
Trunk rebuild worklog pics...beginning


Unless I am not understanding your install... it will look good in the trunk, but like a$$ in the rear deck... your going to have them inverted, magnets up, subs face in the trunk? Not to bad... just gonna look kinda half a$$ from inside if I am seeing your plans correctly... unless your gonna lay glass on the inside too. Oh well... good luck
Thread Starter
Back from Hibernation

Joined: Mar 2004
Posts: 1,100
Originally Posted by DukeDuke
Unless I am not understanding your install... it will look good in the trunk, but like a$$ in the rear deck... your going to have them inverted, magnets up, subs face in the trunk? Not to bad... just gonna look kinda half a$$ from inside if I am seeing your plans correctly... unless your gonna lay glass on the inside too. Oh well... good luck
1. For the thrid time (at least) the magnets facing down, subs firing up into the cabin. Have you done any reading or just looked at pics and posted this comment?
2. Yes Of course I'm glassing the rear deck. Do you think I'd do all this and stop there and leave it looking that way instead of taking a few extra hours and making a new rear deck? Hello? Amyone home? If I wanted, I would be able to get away with simply putting the stock rear deck on over it actually, but no I'm not...I'm glassing it.
3. Please post some custom work you've done before you come on here and tell my my stuff is gonna look like crap when it's chopped up half way done.
Constructive criticism and advice from people that can offer tips cause they actually install are welcome..Jerkoffs hating who after all this still don't really get what I'm doing NOT welcome


Senior Member
Joined: Dec 2005
Posts: 115
Originally Posted by BBOYSTEVIE
Now the dissapointing pic. You can see the lights under where the top amp will be real well, but the others, I think, don't have enough room to really shine. I'll see how much room I have tomorrow....One way or another, it'll still be neat and clean (for me, at least), just not light up as much as I wanted.

Originally Posted by BBOYSTEVIE
Constructive criticism and advice from people that can offer tips cause they actually install are welcome..Jerkoffs hating who after all this still don't really get what I'm doing NOT welcome
 QFMFT.
Looking good, dude. Can't wait to see the progress.

Thread Starter
Back from Hibernation
Joined: Mar 2004
Posts: 1,100
Thanks for the support. I am trying to keep the actual tubes not shown, but get more light. DJfreestyle, you're right. I think I can move em out to the end a little, and maybe cut out some of the carpet overhang to get a lil more light coming out. If only my amps were one inch longer I could put them all the way on the ends. The yellow LED's I've found first off ended up looking orange, and not putting out much light. Actually of all color LED's and cold cathodes, yellow seems to be the least vivarent. Actually, I've heard that white reflects light best? Maybe a lil white paint may be in order. I think today I'm gonna let that be and reinforce the "tub" some.
Thanks again for your support. I woke up, read that, and hadn't even had my coffee yet.
Hey Metal......two things
1. What does QFMFT mean?
2. You gonna offer advice to save me some sanding? Planning to vinyl the part visable in the trunk and maybe (though possibly not cause of time and money) paint the "inside" of the tub. I'm dreading getting that perfect finish.
Thread Starter
Back from Hibernation
Joined: Mar 2004
Posts: 1,100
After the lights not looking as I wanted yesterday, I really wanted to do something different today, and feel like I got something accomplished, so I did the structural build up of the "tub".
Last time I built a sub enclosure, instead of ordering knytex as I was told to, I used a combo of roving from a boat shop, and mat and thin cloth. Well lemme tell you, compared to that, the knytex was a PLEASURE to work with. It does great around corners, builds up real thick real quick, and from an economic point of view, uses resin very efficiently. I thought I'd be able to put on a layer/layer and a half then run out and get more resin (only had just under a gallon), but instead with that less than a gallon, I was able to put on a full 3 to 4 coats of knytex (supposedly 2 is enough).
I would have taken more pics of the in progress, but i have messy gloves on, fiberglass resin hardening, and anyway, a monkey could do this part. Just cut it up into different shapes you'll need ahead of time....
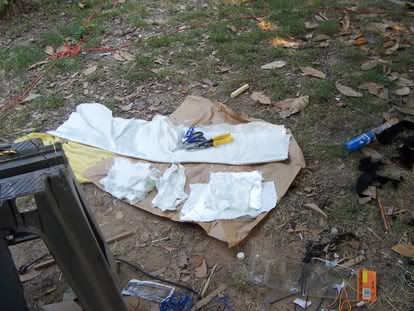
If its the first coat, put a little resin on there to help her stick, then dab the resin on till its all wet. In this pic a few big pieces are on and need just a lil more time on there and a lil more resin brushed on to be done with.
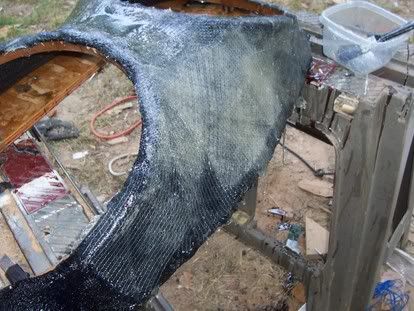
Gosh the knytex made it easy. Didn't form into air bubbles or anything.
Tomorrow I'm gonna get out the grinder (should have done some of this today before glassing) and take off any extra little pieces that aren't needed (extra fleece from the forming, or extra left over around the baffle), make sure the baffle is well glassed on, maybe give a layer to the inside, and do some strength testing (jump on it a lil).
Unbelievable, this knytex stuff. The total buildup took maybe an hour or two and less than a $25 gallon of resin.
Last time I built a sub enclosure, instead of ordering knytex as I was told to, I used a combo of roving from a boat shop, and mat and thin cloth. Well lemme tell you, compared to that, the knytex was a PLEASURE to work with. It does great around corners, builds up real thick real quick, and from an economic point of view, uses resin very efficiently. I thought I'd be able to put on a layer/layer and a half then run out and get more resin (only had just under a gallon), but instead with that less than a gallon, I was able to put on a full 3 to 4 coats of knytex (supposedly 2 is enough).
I would have taken more pics of the in progress, but i have messy gloves on, fiberglass resin hardening, and anyway, a monkey could do this part. Just cut it up into different shapes you'll need ahead of time....
If its the first coat, put a little resin on there to help her stick, then dab the resin on till its all wet. In this pic a few big pieces are on and need just a lil more time on there and a lil more resin brushed on to be done with.
Gosh the knytex made it easy. Didn't form into air bubbles or anything.
Tomorrow I'm gonna get out the grinder (should have done some of this today before glassing) and take off any extra little pieces that aren't needed (extra fleece from the forming, or extra left over around the baffle), make sure the baffle is well glassed on, maybe give a layer to the inside, and do some strength testing (jump on it a lil).
Unbelievable, this knytex stuff. The total buildup took maybe an hour or two and less than a $25 gallon of resin.
Originally Posted by BBOYSTEVIE
1. What does QFMFT mean?
QFMFT = Quoted for mother... well you get it.
again, anxious to see results bboy, make sure you take lots of pics when you're done!

Originally Posted by BBOYSTEVIE
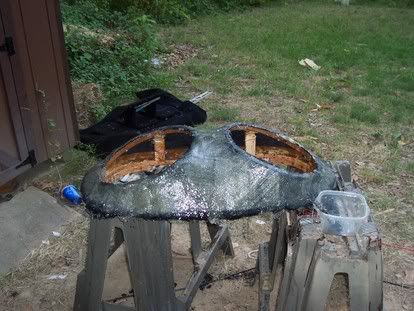
Ok...mold is made for the sub tub. Not going to reinforce it until I get in the speaker wire that I'm going to run "through" it (in the backside that you won't really see). That, I find out, will be Monday or Tuesday cause the one place that had the yellow speaker wire I want is taking it's time....sooooo
turning my attention back to the amp rack...test fit time, and time to figure out how to mount fourth amp in front so it doesn't look too stupid...
Pic of the back of the amp rack...example of how wires will run through it. Only wire shown is from the cold cathodes, just an example...
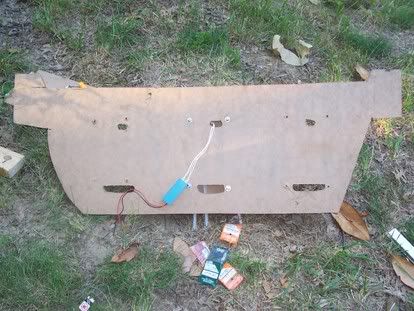 holes on top for RCA's, holes on bottom for power/ground/remote/and speaker wires
Pic of how I'm "raising" the amps a little under an inch to fit the cold cathodes "behind" the amps, and will have the wiring appearing from behind too....Appropriate sized coupling nuts (same size as screw and t-nuts used) allow me to raise the amps with NO wiggle at all. Cathodes will be better mounted, of course....
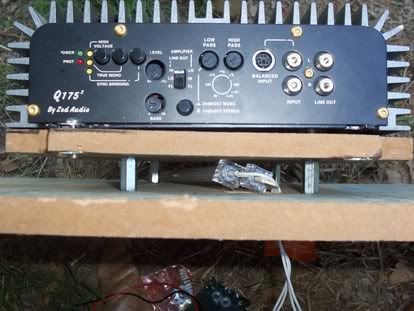
This is a total bite off of Don's idea when he mounted my big 4 channel amp before. He used 2x4's to raise it up off the other amps. I'm doing essentially this, just mounting it at an angle and am going to take measures to mount it so hopefully there's no wiggle. Got a point deducted at SVR because the top amp could move a little, so I'm going to glue it, then I'm gonna screw it,then finally I'm gonna use L brackets to secure it
Pic of 2x4's that will be used to raise 4 channel amp in front of others
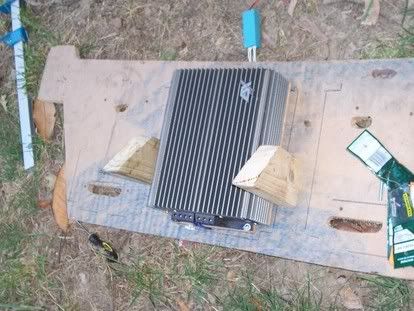
About the angle the 4 channel amp will lay over other amps, with lights behind it of course...
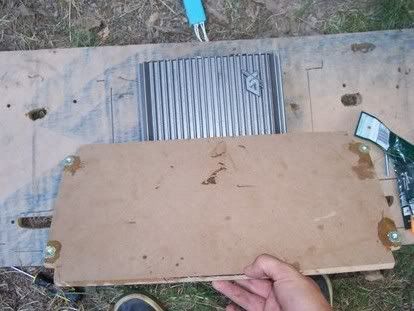
All of this will be carpeted in black, of course, but everythings gotta be in order before that happens....
OK gonna go fasten and glue those 2x4's, make a few holes for the 4 channel wiring, and let it dry overnight....then it should be ready for carpeting and final mounting of the wood that will hold the amps!
turning my attention back to the amp rack...test fit time, and time to figure out how to mount fourth amp in front so it doesn't look too stupid...
Pic of the back of the amp rack...example of how wires will run through it. Only wire shown is from the cold cathodes, just an example...
holes on top for RCA's, holes on bottom for power/ground/remote/and speaker wiresPic of how I'm "raising" the amps a little under an inch to fit the cold cathodes "behind" the amps, and will have the wiring appearing from behind too....Appropriate sized coupling nuts (same size as screw and t-nuts used) allow me to raise the amps with NO wiggle at all. Cathodes will be better mounted, of course....
This is a total bite off of Don's idea when he mounted my big 4 channel amp before. He used 2x4's to raise it up off the other amps. I'm doing essentially this, just mounting it at an angle and am going to take measures to mount it so hopefully there's no wiggle. Got a point deducted at SVR because the top amp could move a little, so I'm going to glue it, then I'm gonna screw it,then finally I'm gonna use L brackets to secure it
Pic of 2x4's that will be used to raise 4 channel amp in front of others
About the angle the 4 channel amp will lay over other amps, with lights behind it of course...
All of this will be carpeted in black, of course, but everythings gotta be in order before that happens....
OK gonna go fasten and glue those 2x4's, make a few holes for the 4 channel wiring, and let it dry overnight....then it should be ready for carpeting and final mounting of the wood that will hold the amps!
Where did you get those post you are using to hold up your amps in the top picture?

Thread Starter
Back from Hibernation
Joined: Mar 2004
Posts: 1,100
Originally Posted by KUBLKMAX
Hey Steve
Where did you get those post you are using to hold up your amps in the top picture?
Where did you get those post you are using to hold up your amps in the top picture?
They're called coupling nuts. I found them at home depot. They have that little section with metal/steel. In that section they have lotsa steel squares, rods, and flat steel. Hanging in that section are the little 99 cent bags of em, so I just got em in the exact size of bolt I was using for a tight fit, and of course long enough to house the cathodes underneath. If you need more funky sizes, do a google for coupling nuts and there's tons of em around. For some reason I think I remember seeing a decent selection at a boating strore recently????
Manny: Thanks. I hope people can get ideas or learn from my mistakes or what bit of knowledge I've picked up from my own mistakes.
Yesterday I took the carpeting off the bottom amps, painted the top's sides black (so the carpet underneath isn't blocking light from getting out), and moved the lights as far outside as I could get them. Definately helped a bit. I have one light not working, but have a replacement that I'll put in today.
Waiting for a freaking check to clear so I can get more resin, then I'll finish the tub, work on a covering, and put it all together. Still getting there, but slowly but surely. I have a buddy coming down next week who has agreed to be my install ***** and help with some work a little, and I'm hoping to get help on vinyling from Mic Wallace if he can squeeze in the time...if not watch out, it would prolly be fugly. Never vinlyed before.

Thread Starter
Back from Hibernation
Joined: Mar 2004
Posts: 1,100
Originally Posted by JOHNSONCL_78
Hay bboy how did you solve the problem of the trunk lid. I have an 03 and want to do the same thing but with 12 in the rear deck how do you keep the trunk up after you cut out the sway bars.
http://forums.maxima.org/showthread.php?t=424338
Or to answer your question simply, gas shocks from a local auto parts store.
Thread Starter
Back from Hibernation
Joined: Mar 2004
Posts: 1,100
K, trying to get somewhere, but this SUCKS!
First off, the little bit of progress made on redoing the lights behind the amp plates
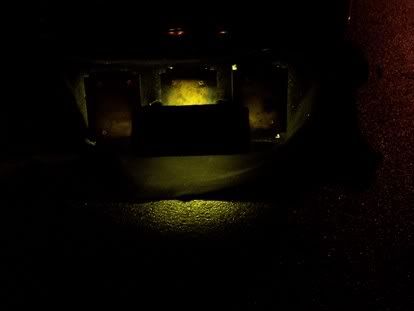
One light is out, and it wasn't actually that dark. whether the picture shows it or not, when I turned on the lights after taking out the carpet and moving lights further outside, I was much happier with it. Just gotta replace one burnt light. No biggie
Now to today..back to the sub tub. First I cut off extra big protrusions on the bottom. Below you can see some of the protrusions left and others still yet to be cut off...I'm sure a better installer could have skipped this whole step
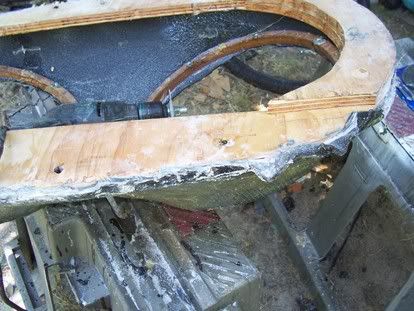
Not shown, i filled large bends on the bottom with duraglass, put a layer of resin/knytex around the "inside" of the tub where the baffle meets glass and where the wood rear deck meets glass....just more reinforcement.
Now to the part that sucks, and this is where I'm going where I haven't really gone before.....Trying to sand this biatch down for vinyling...After big gaps were filled in with duraglass, i smoothed lightweight filler over the whole thing and have started sanding. Dude, my hand hurts real bad, and i'm only on 40 grit sanding still! I have a lotta sanding left, and prolly a few little areas that will need to be refulled and resanded Here's where I am now....
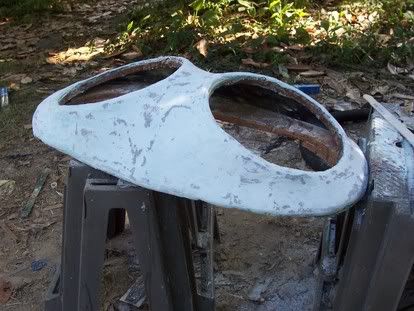
And to think I was actually thinking about sanding and trying to paint the inside of this thing...HELL NO. Anyway, if anybody wwith more experience doing this type of stuff (cough cough Don, Metal Maxima, Kublimax) wants to drop me some hints or pointers here, this would be a great time. My hands hurt.
First off, the little bit of progress made on redoing the lights behind the amp plates
One light is out, and it wasn't actually that dark. whether the picture shows it or not, when I turned on the lights after taking out the carpet and moving lights further outside, I was much happier with it. Just gotta replace one burnt light. No biggie
Now to today..back to the sub tub. First I cut off extra big protrusions on the bottom. Below you can see some of the protrusions left and others still yet to be cut off...I'm sure a better installer could have skipped this whole step
Not shown, i filled large bends on the bottom with duraglass, put a layer of resin/knytex around the "inside" of the tub where the baffle meets glass and where the wood rear deck meets glass....just more reinforcement.
Now to the part that sucks, and this is where I'm going where I haven't really gone before.....Trying to sand this biatch down for vinyling...After big gaps were filled in with duraglass, i smoothed lightweight filler over the whole thing and have started sanding. Dude, my hand hurts real bad, and i'm only on 40 grit sanding still! I have a lotta sanding left, and prolly a few little areas that will need to be refulled and resanded
Here's where I am now....And to think I was actually thinking about sanding and trying to paint the inside of this thing...HELL NO. Anyway, if anybody wwith more experience doing this type of stuff (cough cough Don, Metal Maxima, Kublimax) wants to drop me some hints or pointers here, this would be a great time. My hands hurt.
Thread Starter
Back from Hibernation
Joined: Mar 2004
Posts: 1,100
Yeah I have one that I only had some sanding discs for. Didn't do well on the crevaces at all. What I really need is an air compressonr, but anyways, I think I'm just gonna carpet it to match the rest of my interior Easier, and will match better, but just not as cool...

Originally Posted by BBOYSTEVIE
And to think I was actually thinking about sanding and trying to paint the inside of this thing...HELL NO. Anyway, if anybody wwith more experience doing this type of stuff (cough cough Don, Metal Maxima, Kublimax) wants to drop me some hints or pointers here, this would be a great time. My hands hurt.

 Thanks man, but I'm going with carpet.


Thread
Thread Starter
Forum
Replies
Last Post
REDinLV
7th Generation Maxima (2009-2015)
5
Aug 15, 2024 12:30 AM
James92SE
3rd Generation Maxima (1989-1994)
142
Jan 2, 2024 09:23 AM
BPuff57
Advanced Suspension, Chassis, and Braking
33
Apr 16, 2020 05:15 AM
Pied
4th Generation Maxima (1995-1999)
0
Sep 26, 2015 03:29 PM