
Remove headlight oxidation

Thread Starter

Joined: Dec 2000
Posts: 35,755
From: Lake Orion, MI
Remove headlight oxidation
I tired the Turtle wax kit and it sucked ***.
So I went back to the good ole sanding method but it doesn't last long so I found this:
http://www.autogeekonline.net/forum/...lant-idea.html
Anyone try it? I know the Turtlewax kit came with a sealant, it got washed off by the rain in 2 days
Any other UV sealants you guys have tried?
So I went back to the good ole sanding method but it doesn't last long so I found this:
http://www.autogeekonline.net/forum/...lant-idea.html
Anyone try it? I know the Turtlewax kit came with a sealant, it got washed off by the rain in 2 days
Any other UV sealants you guys have tried?
apparently any sealant should do the trick. i have klasse and tried that as some suggested on autogeek.
once you sand you remove any protectant, although factory protectant only lasts about 5 years anyway.
i got meguires plastiX which worked pretty good and is supposed to protect them. but i think i need to lightly sand to get the rest off.
oh that thread says Plexus protects as well? i love that stuff on my interior plastic. i'll have to apply it more often.

Thread Starter
Joined: Dec 2000
Posts: 35,755
From: Lake Orion, MI
apparently any sealant should do the trick. i have klasse and tried that as some suggested on autogeek.
once you sand you remove any protectant, although factory protectant only lasts about 5 years anyway.
i got meguires plastiX which worked pretty good and is supposed to protect them. but i think i need to lightly sand to get the rest off.
oh that thread says Plexus protects as well? i love that stuff on my interior plastic. i'll have to apply it more often.
once you sand you remove any protectant, although factory protectant only lasts about 5 years anyway.
i got meguires plastiX which worked pretty good and is supposed to protect them. but i think i need to lightly sand to get the rest off.
oh that thread says Plexus protects as well? i love that stuff on my interior plastic. i'll have to apply it more often.


Orange polishing pad with Menzerna's Intensive polish if they're dreadful and then a sealant of some kind or a white pad with Autoglyms Super Resin Polish. I prefer the SRP just cause it's quick and easy and it's an AIO with protection properties. I do it every year because it seems that these plastic headlights just won't stay clear. It's a quick buff so no big deal though.

Senior Member
Joined: Mar 2008
Posts: 731
From: Sacramento
my bro just got a 01 G20 and his headlights were nasty yellow.. i sanded with 1500 then moved to 2500. sanded in circular motions washed dryed then took a cutting wool pad with 3m rubbing compound then a polish pad using 3m finishing material. came out looking brand new!!
any car polish will work the key is to use electric polisher. the 3m finishing material last a long time. i use it when i sand out orange peel and leaves a good protecting layer.
any car polish will work the key is to use electric polisher. the 3m finishing material last a long time. i use it when i sand out orange peel and leaves a good protecting layer.

Newbie - Just Registered
Joined: Jul 2008
Posts: 6
walmart sell a headlight restoration kit for $20.00 it works great,
I got 2 sets of headlights out of it, and it comes with an acrilic coating
to prevent future oxidation.
if its not too bad, some cotton buds and white vinegar.
I got 2 sets of headlights out of it, and it comes with an acrilic coating
to prevent future oxidation.
if its not too bad, some cotton buds and white vinegar.

Just wanted to add my experience here. I tried the Mother's Powerball 4 lights restoration kit. Kragen's had them on sale for $18 and included a 2nd bottle of the plasticx polish. Overall I would not recommend this kit but let me explain way.
My headlights were in okay shape, but both had the hazing/frosting along the edge of the top of the light and one light also had some tar like substance that would not come off with any tar removal cleaners. It seems to me that the hazing is due to particulate matter rubbing the edge of the light. Sanding is the right way to go.
Unfortunately I started with the better condition light. I should have spent a lot more time on the sanding - I spent about 15 minutes total. The instructions say that each of the 4 passes needs to be longer so you would need probably 30 minutes or more depending on the initial damage. The kit comes with tiny (2"x2") pads and they are just too hard to use for long periods of time. I can still see some minor scratching on the one light that I will need to go back over. On the other light I restricted the sanding to only the affected areas. This is not as easy as it sounds but in this case the small pads made that job easier to do. The second light turned out better.
The other aspect that didn't work so well was the use of the powerball attachment for your drill. On a flat surface its easy to control but on curved edges it was very hard to control and tended to spin away. Also because of the curved head you had to use very small amounts of the polish or it would splatter with any kind of speed of the drill.
I just bought the 3M kit for $20 ($3 rebate). The drill attachment is flat so the control should be better although harder in rounded corners. It also comes with sanding disks for the drill so the issue of more sanding time should be much easier. I'm going to wait a week or two before trying it to see if I can fix up the one headlight that needs the attention.
Hope this helps.


an easy $100 for some cheap Ebay stuff. Both of these methonds VVVVVVVVVVVVV have never failed me
for plasic: some sort of orbital (buffer, powerball, etc), rubbing compound, polishing compound, plastx, wax
glass: start off with some 2000grit wet sand paper, then some sort of orbital (buffer, powerball, etc), rubbing compound, polishing compound, plastx, wax
for plasic: some sort of orbital (buffer, powerball, etc), rubbing compound, polishing compound, plastx, wax
glass: start off with some 2000grit wet sand paper, then some sort of orbital (buffer, powerball, etc), rubbing compound, polishing compound, plastx, wax


Senior Member
Joined: Mar 2004
Posts: 497
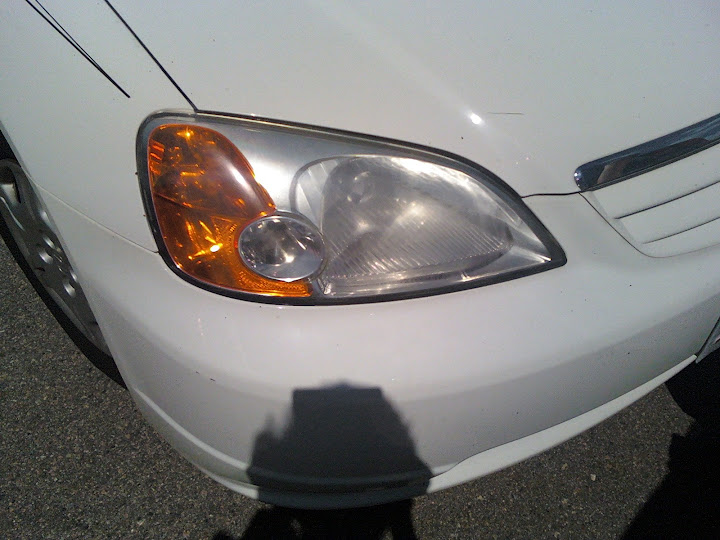
It is NOT my car. I had bought some ebay headlight cleaner. My headlights are quite respectable and that ebay cleaner did not bring the "bling" out on mine. So I thought I would find some beat up lights in my office parking lot and found the coworker's car!
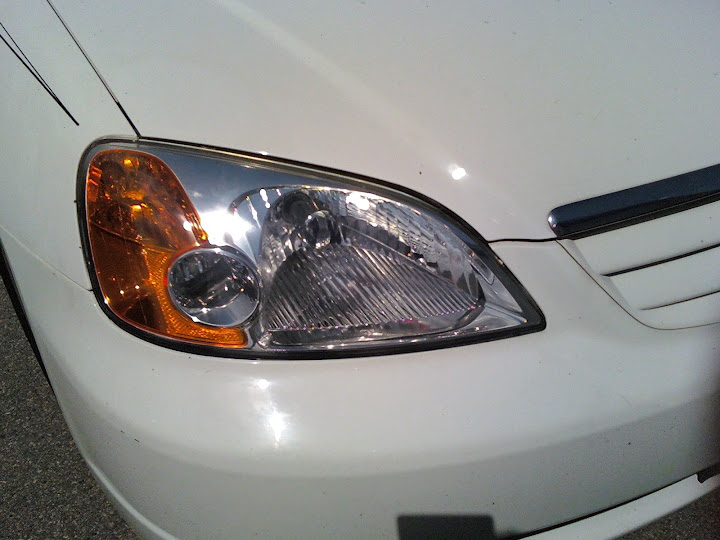
The first headlight I did was with the ebay cleaner which I did by hand. For the other headlight I decided to try Ultimate Compound and cordless drill. Both came out good but the UC/drill was easier and lot cheaper. I paid $7 for tiny vial of ebay cleaner whereas the big UC bottle is under $10 from local Walmart and will last you a long time even after polishing entire car or two.
In general I am sold on UC. It is almost as good as M105 and locally available.
- Vikas


Thread
Thread Starter
Forum
Replies
Last Post
doctorpullit
8th Generation Maxima (2016-)
21
Oct 28, 2019 10:58 PM
trsandrew
7th Generation Maxima (2009-2015)
17
Apr 8, 2016 06:45 PM
Dennis Twohy
1st & 2nd Generation Maxima (1981-1984 and 1985-1988)
0
Oct 1, 2015 06:01 PM