
5spd VLSD Swap **PICS**- Part I
 05-18-2005, 06:49 PM
#1
Armed and Dangerous

Thread Starter
iTrader: (8)
Join Date: Mar 2004
Location: Denver, CO
Posts: 4,416
5spd VLSD Swap **PICS**- Part I
Well, it has begun!! I decided to go a head and install my manual pedals eventhough I am still waiting for my fidanza flywheel to ship. Logically, this was the first thing I would want to do as I can still drive my car to minimize down time.
Also, this was the hardest part in my opinion, so I wanted to get it out of the way. The quarters are close to say the least, and drilling through the fire wall is very time consuming. Not to mention the razor sharp steering wheel support bracket that must be removed in order to get the auto brake pedal/bracket out cut my hands up pretty good.
Now I know that pulling and installing the tranny will be the MOST time consuming, but the actual work involved is not as difficult as installing the pedals (I helped my friend pull the tranny on his 96 twice, and this was more difficult).
First, I removed the seat (only 4 bolts and a couple of connectors), the steering wheel trim, lower dash panel and the metal bracket behind it, the trim around the gauge cluster and pulled the cluster out (but left it connected), and the 4 nuts that support the steering wheel up. I used a jsck stand to support the wheel so that way it would not be just hanging there bottoming out and possibly causing some damge.
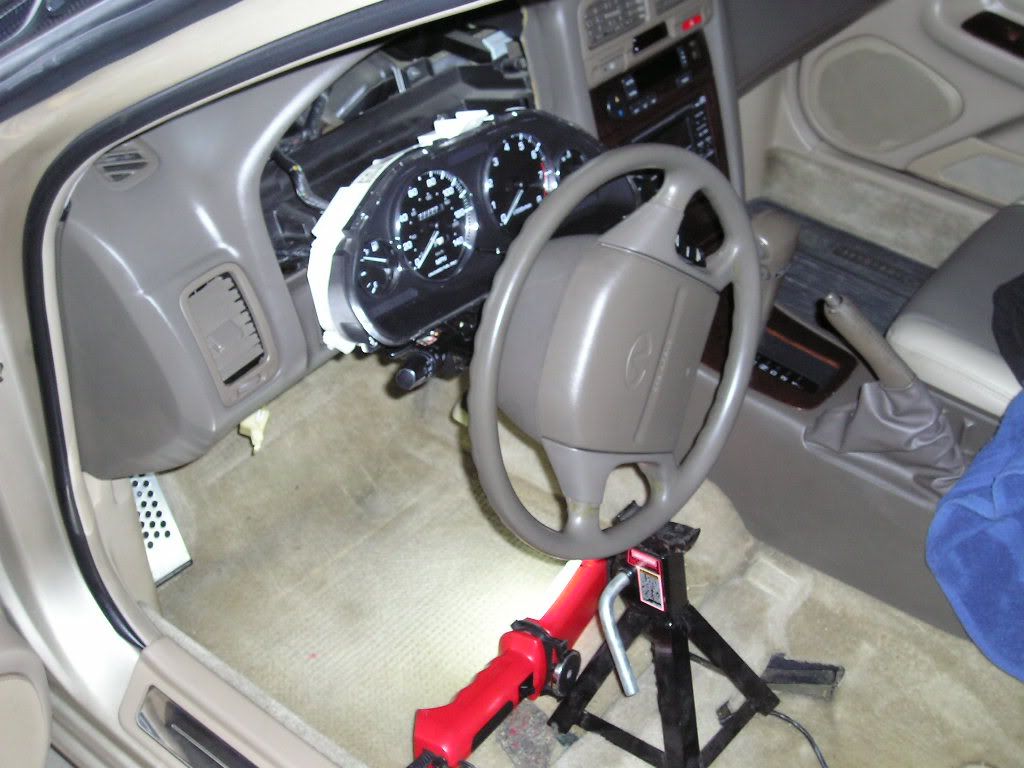
Now with all this stuff out of the way I now had enough room to remove the auto brake pedal/bracket. In order to do this I also had to remove the left steering wheel support bracket which is held in place by 3 nuts, and 2 of them require access through the cluster area which is why I removed it. With that out of the way, the brake pedal was only 4 nuts and a couple of connectors (but the 4 nuts can be a b!tch to get at).

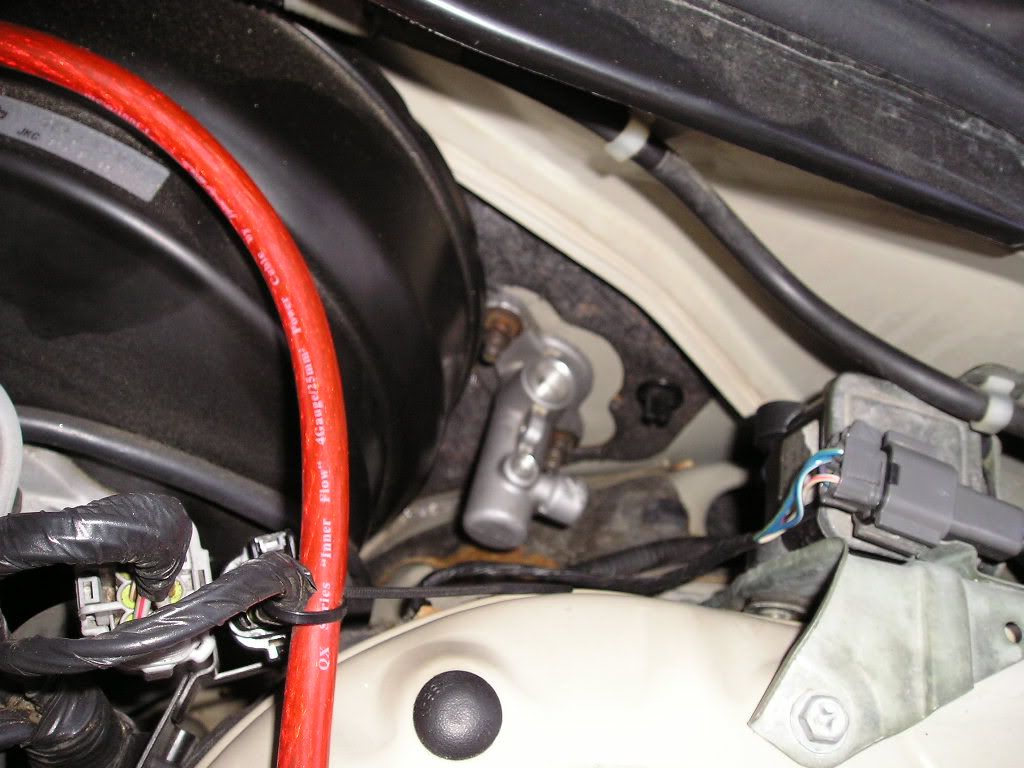
I now had enough room to drill through the fire wall for the clutch master cylinder. I bought a right angle adapter for $35 from home depot (drilling in this tight of an area would have been IMPOSSIBLE with out it and I dont know how the other guys could have done it).
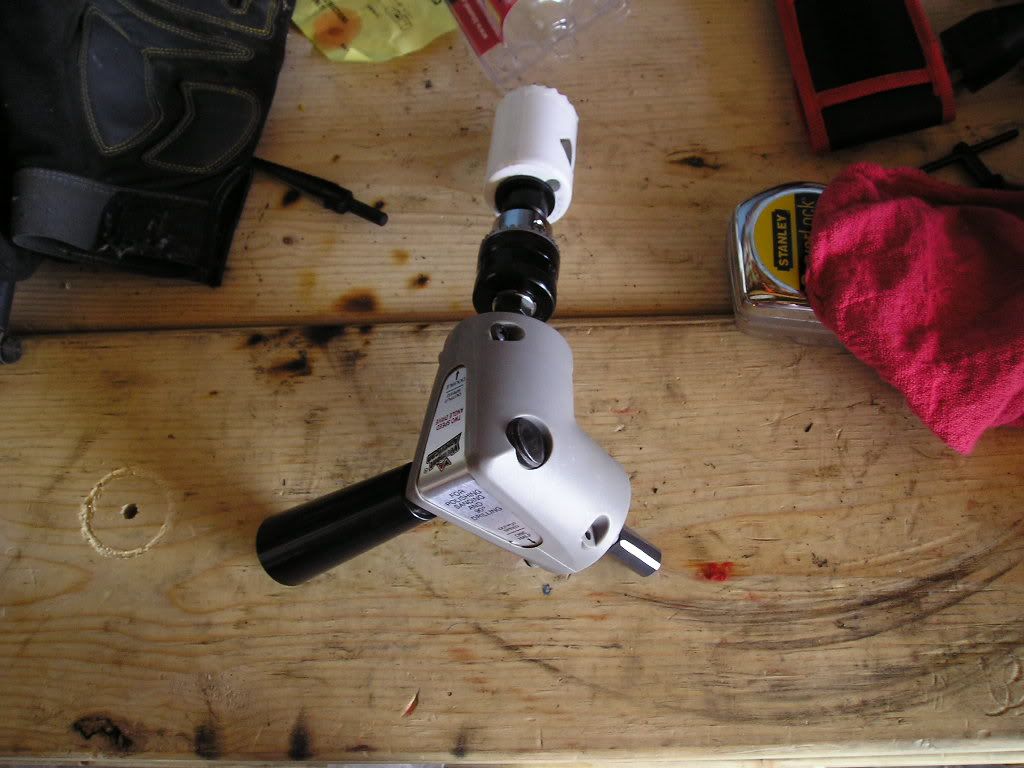
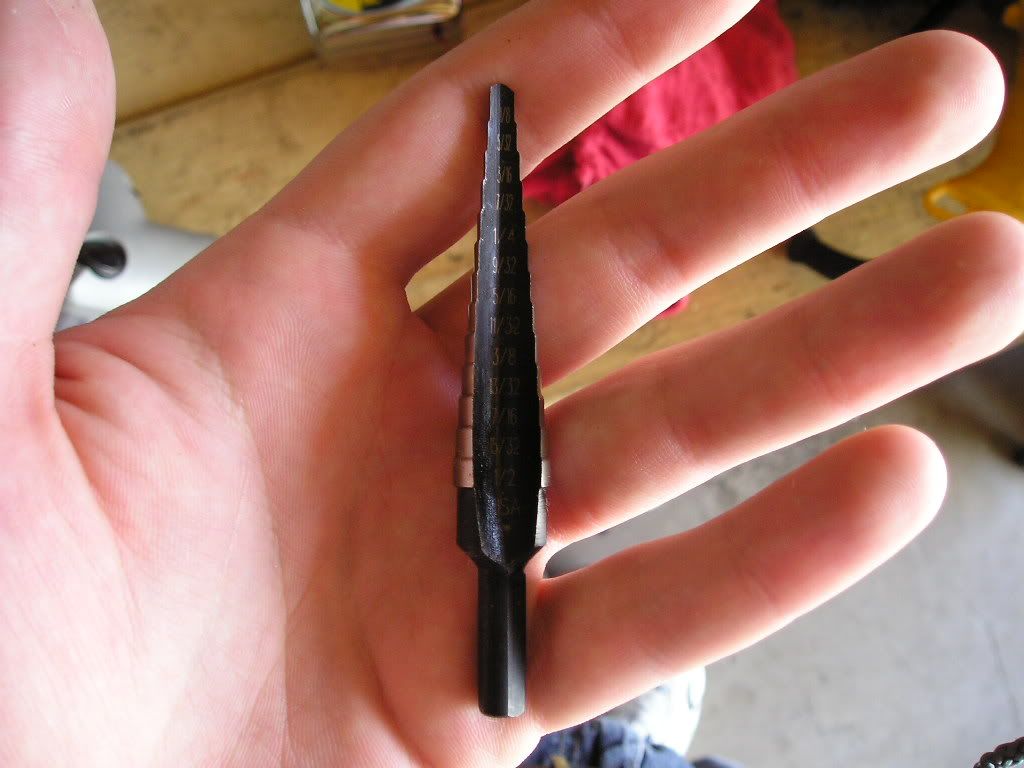
I also bought a STEP bit for $10 from home depot (I dont know why the hal write up called it a 'tree' bit). If you are thinking about just using a 3/8 bit (the size of the two holes for the studs that come from the clutch pedal bracket through the fire wall), forget it!! I tried to do this but the bit is too long, even with the right angle adapter. You need the step bit which gets progressively bigger as you go down the bit.
Also, this was the hardest part in my opinion, so I wanted to get it out of the way. The quarters are close to say the least, and drilling through the fire wall is very time consuming. Not to mention the razor sharp steering wheel support bracket that must be removed in order to get the auto brake pedal/bracket out cut my hands up pretty good.
Now I know that pulling and installing the tranny will be the MOST time consuming, but the actual work involved is not as difficult as installing the pedals (I helped my friend pull the tranny on his 96 twice, and this was more difficult).
First, I removed the seat (only 4 bolts and a couple of connectors), the steering wheel trim, lower dash panel and the metal bracket behind it, the trim around the gauge cluster and pulled the cluster out (but left it connected), and the 4 nuts that support the steering wheel up. I used a jsck stand to support the wheel so that way it would not be just hanging there bottoming out and possibly causing some damge.
Now with all this stuff out of the way I now had enough room to remove the auto brake pedal/bracket. In order to do this I also had to remove the left steering wheel support bracket which is held in place by 3 nuts, and 2 of them require access through the cluster area which is why I removed it. With that out of the way, the brake pedal was only 4 nuts and a couple of connectors (but the 4 nuts can be a b!tch to get at).
I now had enough room to drill through the fire wall for the clutch master cylinder. I bought a right angle adapter for $35 from home depot (drilling in this tight of an area would have been IMPOSSIBLE with out it and I dont know how the other guys could have done it).
I also bought a STEP bit for $10 from home depot (I dont know why the hal write up called it a 'tree' bit). If you are thinking about just using a 3/8 bit (the size of the two holes for the studs that come from the clutch pedal bracket through the fire wall), forget it!! I tried to do this but the bit is too long, even with the right angle adapter. You need the step bit which gets progressively bigger as you go down the bit.
 05-18-2005, 06:49 PM
#2
Armed and Dangerous
Thread Starter
iTrader: (8)
Join Date: Mar 2004
Location: Denver, CO
Posts: 4,416
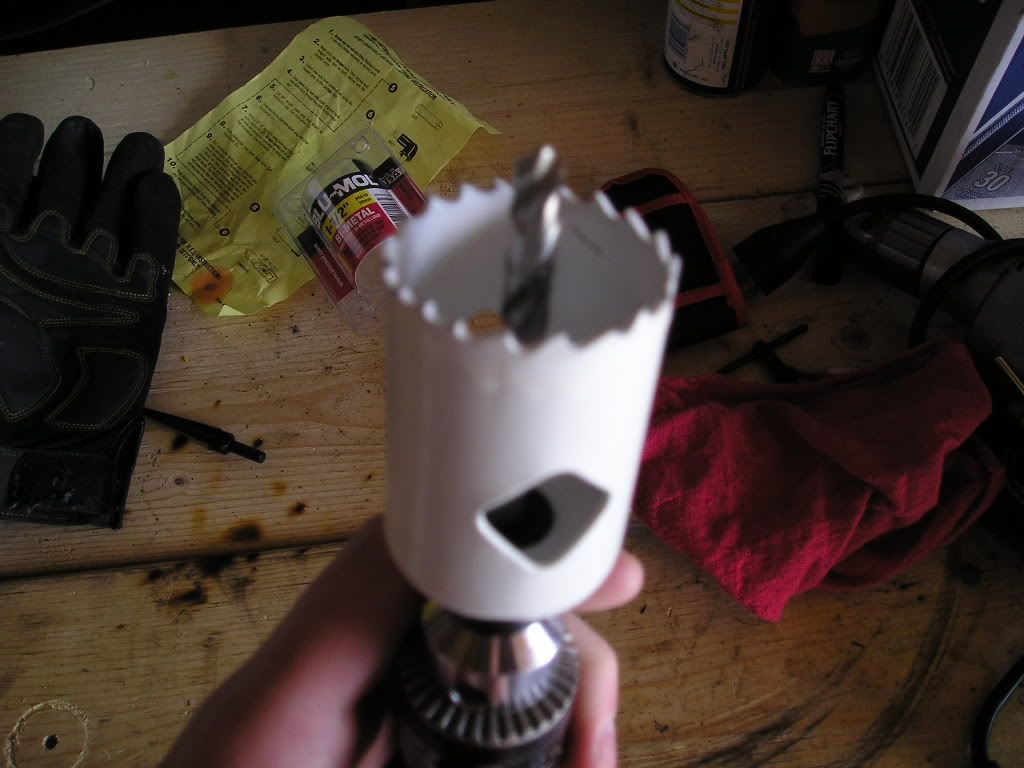
For the hole for the mater cylinder I used a 1-1/2 hole saw bit (once again, I dont know why the hal called a cylinder bit). This is the exact size for the master cylinder.
With all this, I drilled my holes (sorry I for got to take pics), and mounted the cluch pedal and the master cylinder. I know the master looks off center, but the holes lined up perfectly from the inside and the pedal bracket mounted up to the other factory bolt holes (that were previously unused) perfectly as well. This makes me think that the insulation in the engine bay is what is off (for some reason or another). It is moot point regardless.
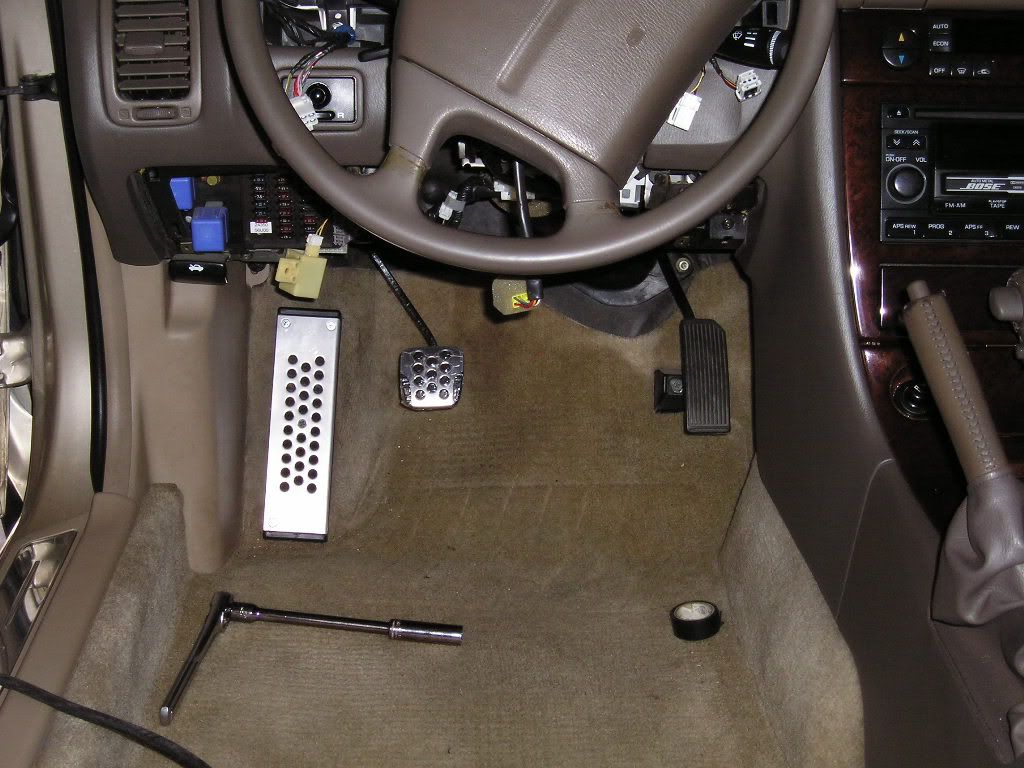
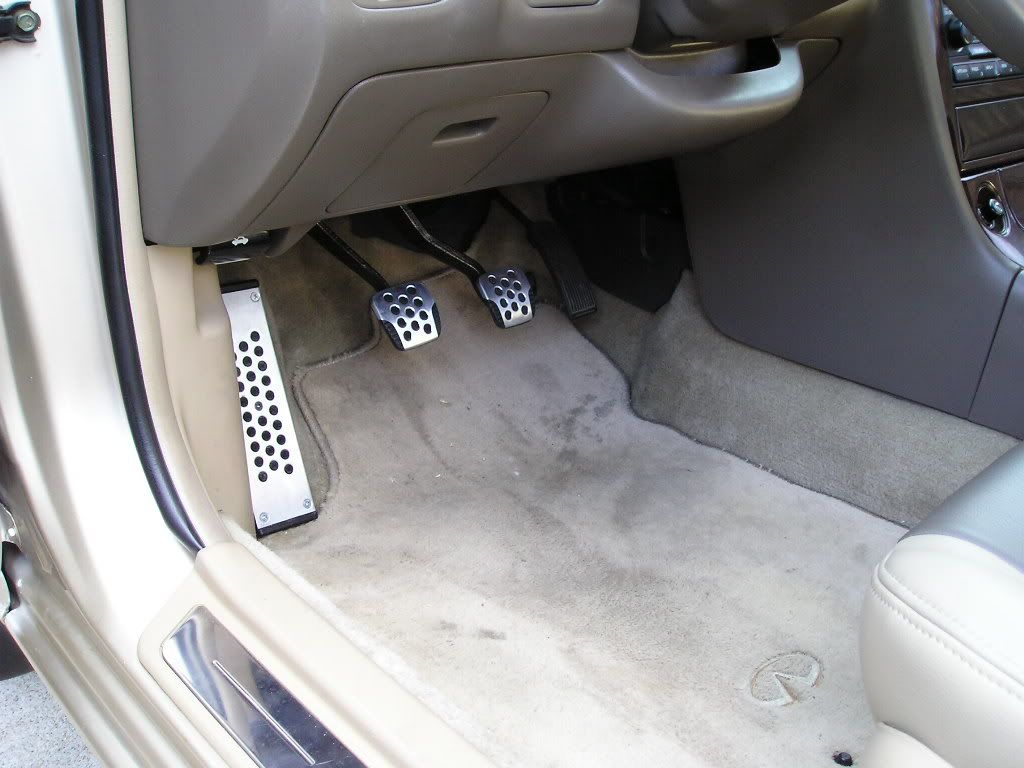
Finally, I put the brake pedal in a long with the left steering wheel support bracket (I dont know why the hal threw his away, with out it your steering wheel is only half way supported), and put everything back together. The clutch pedal is NOT attached to the master cylinder in these pics (I have a new one on order), and this is why the clutch pedal sticks out more than it should.
Leave any comments...
With all this, I drilled my holes (sorry I for got to take pics), and mounted the cluch pedal and the master cylinder. I know the master looks off center, but the holes lined up perfectly from the inside and the pedal bracket mounted up to the other factory bolt holes (that were previously unused) perfectly as well. This makes me think that the insulation in the engine bay is what is off (for some reason or another). It is moot point regardless.
Finally, I put the brake pedal in a long with the left steering wheel support bracket (I dont know why the hal threw his away, with out it your steering wheel is only half way supported), and put everything back together. The clutch pedal is NOT attached to the master cylinder in these pics (I have a new one on order), and this is why the clutch pedal sticks out more than it should.
Leave any comments...
05-18-2005, 07:03 PM
#3

Nice! Looks like you are taking all the steps and doing everything right. How long before you get your flywheel and finish the project? I really wish I could do this but I don't want to invest anymore in my car.....
05-18-2005, 07:07 PM
#4
Armed and Dangerous
Thread Starter
iTrader: (8)
Join Date: Mar 2004
Location: Denver, CO
Posts: 4,416
Originally Posted by Gates
Nice! Looks like you are taking all the steps and doing everything right. How long before you get your flywheel and finish the project? I really wish I could do this but I don't want to invest anymore in my car.....


 05-18-2005, 07:50 PM
#8
Originally Posted by i30ds
The quarters are close to say the least, and drilling through the fire wall is very time consuming. Not to mention the razor sharp steering wheel support bracket that must be removed in order to get the auto brake pedal/bracket out cut my hands up pretty good.
 i can confirm this. the pedals look alot better than when i sent them to you.
I miss that 1996 ECU
 05-18-2005, 07:59 PM
#9
Armed and Dangerous
Thread Starter
iTrader: (8)
Join Date: Mar 2004
Location: Denver, CO
Posts: 4,416
Originally Posted by zack342
i can confirm this. the pedals look alot better than when i sent them to you.I miss that 1996 ECU
Dont worry about that ECU, you will find one soon enough.
05-18-2005, 08:08 PM
#10
looks really good though. i think that will be the hardest part of your install.
you know installing the tranny is cake and the shift rods should now be a problem.i think getting the lines in may be a bit tricky but you be able to get it done.
you know installing the tranny is cake and the shift rods should now be a problem.i think getting the lines in may be a bit tricky but you be able to get it done.
05-18-2005, 08:18 PM
#11
Armed and Dangerous
Thread Starter
iTrader: (8)
Join Date: Mar 2004
Location: Denver, CO
Posts: 4,416
Originally Posted by zack342
looks really good though. i think that will be the hardest part of your install.
you know installing the tranny is cake and the shift rods should now be a problem.i think getting the lines in may be a bit tricky but you be able to get it done.
you know installing the tranny is cake and the shift rods should now be a problem.i think getting the lines in may be a bit tricky but you be able to get it done.
05-18-2005, 09:18 PM
#12
Senior Member

Join Date: Jan 2005
Posts: 1,108
Originally Posted by i30ds
Yeah, I am going to try to install the lines while the tranny is out of the car so I have a little more room to work with. Other than that the tranny and the shift rods will definitely be a piece of cake. I figure that one I get my fly wheel in, I'll put the car up on some jack stands and I should get the whole thing done in under 3 days provided I dont get caught up any where (which will probably happen).
Have you got a pic of where you cut the hole, I know it only goes 1 place but I'd like to see it

I'm doing the swap too, can you prepare for the clutch pedal install and still have the car drivealbe as automatic?
 05-19-2005, 11:24 AM
#16
Armed and Dangerous
Thread Starter
iTrader: (8)
Join Date: Mar 2004
Location: Denver, CO
Posts: 4,416
Originally Posted by killerVQ30DE
Have you got a pic of where you cut the hole, I know it only goes 1 place but I'd like to see it
I'm doing the swap too, can you prepare for the clutch pedal install and still have the car drivealbe as automatic?
I'm doing the swap too, can you prepare for the clutch pedal install and still have the car drivealbe as automatic?
05-19-2005, 11:33 AM
#17
Armed and Dangerous
Thread Starter
iTrader: (8)
Join Date: Mar 2004
Location: Denver, CO
Posts: 4,416
Originally Posted by DAVE Sz
Is this a 5th gen LSD or just a i30t lsd?
http://forums.maxima.org/showthread....t=brand+tranny
I know that the 5th gen AE tranny is supposedly a stronger unit with a better 3rd gear, but I could never get a straight answer from any one on what would be required to make it work in the 4th gen.
05-19-2005, 11:49 AM
#18
Guest
Posts: n/a
I know it's a little late, but for future reference and for anyone else who may not know about them, several powertool manufacturers make what's called a right angle drill. These are designed for close quarters work and would be great for firewall drilling. I have one and love it. Those adapters like the one you got are good, but require two hands, which I guess isn't necessarily a bad thing, but one hand is better so you can support/stabilize your work or yourself.

Great job on the swap!
Great job on the swap!
05-19-2005, 02:24 PM
#20
Spending $1500 on a mediocre LSD is a waste to me. Why not get the 2k1 instead? Same mediocre LSD but stronger. Where was it that you didn't get straight answers? The forums here have several threads about the 5th gen trans being better.
05-19-2005, 02:52 PM
#21
Armed and Dangerous
Thread Starter
iTrader: (8)
Join Date: Mar 2004
Location: Denver, CO
Posts: 4,416
Originally Posted by DAVE Sz
Spending $1500 on a mediocre LSD is a waste to me. Why not get the 2k1 instead? Same mediocre LSD but stronger...
http://forums.maxima.org/showthread.php?t=404826
Originally Posted by DAVE Sz
Where was it that you didn't get straight answers? The forums here have several threads about the 5th gen trans being better.
Originally Posted by i30ds
I know that the 5th gen AE tranny is supposedly a stronger unit with a better 3rd gear, but I could never get a straight answer from any one on what would be required to make it work in the 4th gen.
Threads about fuccers gloating about the thing are not the same as threads about getting it to work in a 4th gen...
 05-19-2005, 06:13 PM
#24
Originally Posted by DAVE Sz
Getting it to work on a 4th gen? It's a straight swap, you just need LSD axles which I would guess you'd need witht eh 4th gen LSD trans as well.
Don't worry Devin i wouldn't pay to much attention to Dave. Work looks awesome so far and i doubt you will have problems with that tranny. I got my 1996 Maxima Ecu today and sending it out to JWT tomorrow and my MEVI is on its way in. I will have some pic for you too.
05-20-2005, 11:53 AM
#25
Armed and Dangerous
Thread Starter
iTrader: (8)
Join Date: Mar 2004
Location: Denver, CO
Posts: 4,416
Originally Posted by zack342
Don't worry Devin i wouldn't pay to much attention to Dave. Work looks awesome so far and i doubt you will have problems with that tranny. I got my 1996 Maxima Ecu today and sending it out to JWT tomorrow and my MEVI is on its way in. I will have some pic for you too.
05-20-2005, 04:44 PM
#26
Originally Posted by i30ds
Awsome! I look forward to seeing them. You sure got that ecu quickly. Did you get the mevi kit from courtesy?
Courtesy is a bit more expensive but i know a place you can get it for $395+ shipping new.
 05-23-2005, 12:54 PM
#29
Armed and Dangerous
Thread Starter
iTrader: (8)
Join Date: Mar 2004
Location: Denver, CO
Posts: 4,416
Originally Posted by zack342
Well i got an ECU from JeffersonM on here and the MEVI I purchased with install components from JAY25.
Courtesy is a bit more expensive but i know a place you can get it for $395+ shipping new.
Courtesy is a bit more expensive but i know a place you can get it for $395+ shipping new.
05-23-2005, 12:56 PM
#30
Armed and Dangerous
Thread Starter
iTrader: (8)
Join Date: Mar 2004
Location: Denver, CO
Posts: 4,416
Originally Posted by vsamoylov
sweet man. keep us updated. i remember how much fun it was for me to take off the auto brake pedal. also did you get a ss clutch line from the gd?
 05-25-2005, 12:54 PM
#32
Armed and Dangerous
Thread Starter
iTrader: (8)
Join Date: Mar 2004
Location: Denver, CO
Posts: 4,416
Originally Posted by Luigi38
Damn dude, I didn't even know you were doing a 5sp swap ( what a headache).
Good job, keep us posted.
Good job, keep us posted.
05-25-2005, 02:24 PM
#33
Senior Member

Join Date: Nov 2003
Posts: 1,860
Oh man... Im soooo envious. I wish I had the funds to do this... Instead, I get to repair 2k worth of damage this summer from a hit and run.  I would much rather sepend the money on a 5-speed swap... or a down payment on the bike Ive been wanting
keep up the good work, post pics along the way.
I would much rather sepend the money on a 5-speed swap... or a down payment on the bike Ive been wanting keep up the good work, post pics along the way.
05-25-2005, 09:09 PM
#34
Senior Member
Join Date: Jan 2005
Posts: 1,108
Any update.. I'm doing the swap next month.. keen to hear about any pitfalls... planning to do it this way
1. swap my foot e-brake for normal hand e-brake
* keep it driveable
2. Install the clutch pedals etc
* keep it driveable
3. drop the auto and install manual transaxle with console bits
* starting shifting
I hope that timeline is practical
1. swap my foot e-brake for normal hand e-brake
* keep it driveable
2. Install the clutch pedals etc
* keep it driveable
3. drop the auto and install manual transaxle with console bits
* starting shifting
I hope that timeline is practical
05-26-2005, 12:13 PM
#35
Armed and Dangerous
Thread Starter
iTrader: (8)
Join Date: Mar 2004
Location: Denver, CO
Posts: 4,416
Originally Posted by killerVQ30DE
Any update.. I'm doing the swap next month.. keen to hear about any pitfalls... planning to do it this way
1. swap my foot e-brake for normal hand e-brake
* keep it driveable
2. Install the clutch pedals etc
* keep it driveable
3. drop the auto and install manual transaxle with console bits
* starting shifting
I hope that timeline is practical
1. swap my foot e-brake for normal hand e-brake
* keep it driveable
2. Install the clutch pedals etc
* keep it driveable
3. drop the auto and install manual transaxle with console bits
* starting shifting
I hope that timeline is practical
 05-26-2005, 12:15 PM
#36
Armed and Dangerous
Thread Starter
iTrader: (8)
Join Date: Mar 2004
Location: Denver, CO
Posts: 4,416
Originally Posted by NewLoveI30
Oh man... Im soooo envious. I wish I had the funds to do this... Instead, I get to repair 2k worth of damage this summer from a hit and run. I would much rather sepend the money on a 5-speed swap... or a down payment on the bike Ive been wanting
keep up the good work, post pics along the way.
I would much rather sepend the money on a 5-speed swap... or a down payment on the bike Ive been wanting keep up the good work, post pics along the way.
BTW is your accident the reason why you dont wanna come to a CO meet?
05-26-2005, 05:23 PM
#37
looks very clean. I'm actually done with bolting on everything and on the process of bleeding the clutch system. but it pi$$es me off, since it creates no pressure what so ever. i've been bleeding the clutch for 5 hours today and nothing. There's no leak found on the hydralic lines. So I'm suspecting master or slave cylinder, since they're were bought used. I actually changed out two used master or slave cylinder, but still no good. I have new master cylinder in hand so i'll try that tomorrow and see how it goes. Good luck with your freaking hydralic system.
05-26-2005, 06:44 PM
#38
Armed and Dangerous
Thread Starter
iTrader: (8)
Join Date: Mar 2004
Location: Denver, CO
Posts: 4,416
Originally Posted by maxima8624
looks very clean. I'm actually done with bolting on everything and on the process of bleeding the clutch system. but it pi$$es me off, since it creates no pressure what so ever. i've been bleeding the clutch for 5 hours today and nothing. There's no leak found on the hydralic lines. So I'm suspecting master or slave cylinder, since they're were bought used. I actually changed out two used master or slave cylinder, but still no good. I have new master cylinder in hand so i'll try that tomorrow and see how it goes. Good luck with your freaking hydralic system.
05-27-2005, 12:08 AM
#39
do yourself a favor and get a speed bleeder or vacuum bleeder if you don't have one.
the old classic method only works with very little air in the system. So right now i'm trying to find a SS cluch line that I can connect directly from master cylinder to slave cylinder to save some bleeding and tighter cluch pedal.
the old classic method only works with very little air in the system. So right now i'm trying to find a SS cluch line that I can connect directly from master cylinder to slave cylinder to save some bleeding and tighter cluch pedal.
05-27-2005, 12:09 PM
#40
Armed and Dangerous
Thread Starter
iTrader: (8)
Join Date: Mar 2004
Location: Denver, CO
Posts: 4,416
Originally Posted by maxima8624
do yourself a favor and get a speed bleeder or vacuum bleeder if you don't have one.
the old classic method only works with very little air in the system. So right now i'm trying to find a SS cluch line that I can connect directly from master cylinder to slave cylinder to save some bleeding and tighter cluch pedal.
the old classic method only works with very little air in the system. So right now i'm trying to find a SS cluch line that I can connect directly from master cylinder to slave cylinder to save some bleeding and tighter cluch pedal.