When you click on links to various merchants on this site and make a purchase, this can result in this site earning a commission. Affiliate programs and affiliations include, but are not limited to, the eBay Partner Network.
I'm doing separate threads because it'd be nuts to have all of my cars in one thread.
Soooo after my G35 coupe was totaled I purchased an 03 Nissan Maxima TE w/ a blown water pump. The vehicle was sold in 2003 in New Jersey, lived a few years there and moved to Atlanta and then finally to Houston around 2009/2010, there is some evidence of rustyness here and there but overall the car made it out pretty well asides from the faded clear coat on the roof it's overall in pretty nice shape. It was in some minor fender bender from what I can tell but it was not reported to car-fax (happens a lot). Anywho I purchased the vehicle modded already for a sweet deal and decided that I was either gonna HR swap it immediately or just throw in a water pump. Decided to do the latter, I don't need every whp I can get out of this car. I promised myself this wasn't that car.
Took it to a shop because I worked 60hrs a week at the time and did not have time for that water pump nonsense and I tricked the poor bastard by not letting him know the 3.5hr labor quote from the book is a trap
I've done some rice-tackular things to it in the last few years while I was deciding the fate of the 200k+ mile drivetrain.
After driving it awhile I decided to stick w/ the 1st gen VQ35 motor.
Here is where it sits right now with the current mod list:
-I dowsed the engine bay w/ dawn, it wasn't THAT slimy...
** This is the original motor.... Not the replacement fyi **
We're in the neighborhood of 217k miles and the motor was just plain old tired.......... I have plans for this motor which you'll see in yet ANOTHER thread coming soon actually.....
-
-CURRENT MOD LIST!!
-Admintuning 4" intake w/ a dyno tune on e85
-OBX V2 Headers w/ a small modifcation
-3" Crush bent catback w/ only a Vibrant Muffler and small vibrant resonator.
-4.1 HLSD 6MT Trans - slightly rebuilt ish.
-VQ35DE Hybrid 1.5gen build w/ New gaskets inside and out (gallery, vct, rear main, front main, etc), revup oil pump, arp rod bolts.
-SSIM intake manifold
-NWP BBTB
-600cc Injectors
-PCV DELETED
-1 Piece SS Clutch line
-NWP Spacers + Block Off Plate
-NWP TQ Link
-Unorthodox Racing UDP
-Ebay 350z Lightweight Flywheel
-Exedy OEM Replacement 350z Clutch + PP
-New OEM TOB (they are surprisingly cheap from certain places....)
-AFR gauge in the change holder
-BC Racing Coilovers (8k front / 6k rear springs - stock - same ones I've had for ages but brand new strut inserts winter 2019 - Front / May 2020 - Rear)
-370z Rays 19" Wheels, staggered setup w/ 20mm spacers for the front wheels.
-Unknown Manufacturer Texalium hood
-OEM All Weather Mats
-Did I mention it's a Titanium Edition w/ all the chrome/bling bling/what nots?
-01 SE Tail lights
-6th gen Maxima Front calipers+drilled/slotted rotors
-Orangey shift **** from ebay, weighted
-TP Aluminum Radiator Brackets
-Custom Battery Tie Down
-Mishimoto Radiator
-Energy Suspension front, rear, passenger side motor mounts.
-Redlion Racing Transmission Mount
-Custom Made battery tie down
-JVC KW-V double din touch screen radio
-Yellow Fog Lights
-Smoked Side Markers with LED replacement bulbs.
-Unknown Brand Front Strut Tower Bar
I have a Stillen lip kit thats collecting dust but I'm waiting to figure out what I am going to do wheel wise I may paint the lip kit to match the wheels, again we're going for rice-tackular...
Also something is up with the brakes on this car, idk what. Need to get around to fixing them.... Planning on a Z32 front brake upgrade.
Ooooh, post pics of doing the gaskets and rod bolts! How bad is the water pump job? From I remember even on a 3.0 it didn't look fun, thankfully never had to do one.
Ooooh, post pics of doing the gaskets and rod bolts! How bad is the water pump job? From I remember even on a 3.0 it didn't look fun, thankfully never had to do one.
Will do when they arrive!
Till then.... Here's a pic of my trans mid-assembly... It's a 4.1 HLSD trans. 03 spec v into an 03 maxima case.
Almost got the replacement motor stripped down today, this is a good stopping point while I wait on my shipment from Lynchburg Nissan (where I order OEM parts for the low, they match Z1 performance's prices).
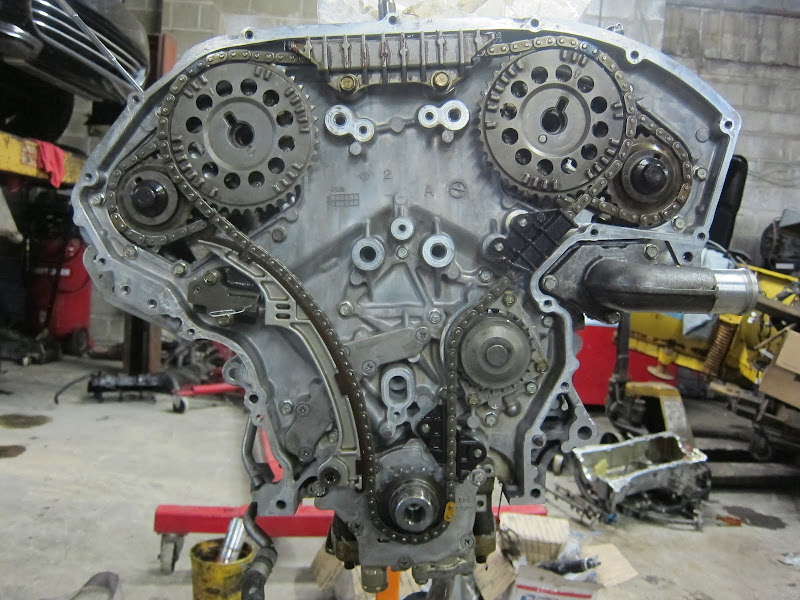
I did round 1 of the dawn treatment of the Timing cover, upper oil pan, and all parts connected to it, going for round 2 today on just the Upper and Timing cover, my parts were delayed a day so I figured why not go for the extra effort. Pics tomm when I'm done cleaning the external parts.
I'm taking the picture to remind me to seafoam the timing case when I assemble the motor back together, unless someone has a safe (and easy) recommendation on cleaning the rear timing cover?
Welp short of me forgetting the VTC solenoid orings for the inner timing cover I got some decent work done.
a picture of everything in the timing case stripped down.
Acl rod bearings, 350z rev up rod bolts, concept z gallery gaskets, rev up oil pump, 350z tensioner and guide (this is a 6th gen motor so the OEM guide and tensioner are hot garbage, I used the 350z setup because it's superior quality to the 6th gen setup. -note: the 5.5 gen reverts to the 350z tensioner setup still. So basically whatever you do, do not order the 6th gen timing equipment, it's hot garbage)
Then I was gonna throw on the timing cover but I forgot the two vtc orings, so I will have to wait till Monday to close the motor up.
But here's a pic anyways, I think this 10 minute cleanup job will suffice just fine in a fwd engine bay, you cant see all of my lack of effort when the motor is installed.
But all I did was take a drill and a metal brush and tried to remove whatever dirt or defects the dawn treatment left. I could have used smaller bits but meh, not a rwd or a show car. Hell I even used a matte clear coat so no one would think I attempted to polish the cover 🤣.
I also repainted the access covers too. Everything is high temp matte clear coated so hopefully it cleans easily.
More pics after I close up the motor.
Last edited by aackshun; May 10, 2020 at 07:40 AM.
Motor closed up today, got tied up running around for small parts so I couldn't get the motor in but I did get the trans attached so tomorrow I can just focus on dropping it in.
pictars and details below.
Motor closed up but I noticed something iffy with the rear vc....
Some jackass broke a bolt trying to install the rear vc gaskets -_____-
$80 helicoil kit to the rescue....
Anywho got all that done took one last spray of degreaser and water before continuing...
Since I'm balling on a budget, I'm using a RWD flywheel.
Small mods are needed to make this a bolt on affair, but for the lightest vq35 flywheel on the market and under $200 new (this one costed me around $185 shipped and weighs 12lbs).... You'd be an idiot to spend JWT/Fidanza/Aasco money if you have a decent array of tools and mechanical knowledge
(Also you can use ARP flywheel bolts with this setup. Will probably do on a future build the oem bolts will suffice).
I own all 3 aforementioned company fwd flywheels and a lot of the parts are interchangeable and they all make the flywheel in multiple pieces so they just take and add pieces to suit each application.
The main difference is the position and clocking of the trigger ring.
The ring is 7.5mm (will measure and edit later) offset towards the driver side. Also the ring is one bolt hole offset (I believe this is done because the 350z has the crank sensor mounted in a different position and Nissan is too lazy to come up with a different program for the ecu, which works to our favor because 350z ecus are a nice plug and gain 20hp mod pending a few small changes).
Why not show pics?
Crank offset difference, adding a new hole - you will need to grind out extra room on the trans side as well to account for the crank sensors new position.
Added a new hole to the flywheel, just like JWT and Fidanza does.
Welp that's it, if I measured everything correctly then the car will start right up. The only mistake I could have made is the alignment of the crank sensor but I believe I got it right. Stay tuned to find out if I did it right lol.
Anywhoz here's a pic of my used 350z exedy clutch setup came with pressure plate too (got it for a steal $91 shipped! See the pics and you'll see why I believe it was a steal!)!
Remember this was actually listed as used! I mean the previous owner probably just broke in the clutch and I guess wrecked the car shortly after 🤣 I'll get plenty of track time with this setup and will have no worries selling the car for the price I want the clutch has a long life ahead of it.
I ran the part #'s and it's the stage 1, not the OEM replacement, which is my favorite exedy to use for 300whp and under applications.
I am at a bit of crossroads with the headers, I am going to chance it and hope my usual exhaust shop has a tiny sawzall to cut them up and work on them already installed in the vehicle.
If not then I'll have to get grimy and pull the obxs off and cut it myself then reinstall and go-to the exhaust shop.
But that's next week's problem. Right now, I just want the car running again to start breaking in that clutch setup. And enjoying a fully functioning Maxima (something I haven't had for quite some time... Pretty much since I parted out my silver i35 2-3 years ago)
Waiting on some parts to arrive but the car runs!!! Needed some extra grinding on the transmission bellhousing but it was easy work with a Tungsten bit and my Dremel 4300.
I'll add some pictures when I get...... 02 Pathfinder Primary o2 sensors (longer than stock maxima ones, works great for headers), new BC strut inserts (my 5th gen BC's are 8 years old - I already replaced the fronts late last year).
Probably update early next week, car has a few issues here and there but it starts up literally on the 2nd crank!!! Like a brand new car again! Haven't had this crispy of a startup in years.
Also I made a mistake above, this is the 350z OEM replacement exedy unit. NOT the stage 1, I will edit my original post but I'm not going back through the thread and changing all subsequent post.
Last edited by aackshun; May 14, 2020 at 05:17 PM.
Probably best to separate both suspension and exhaust post anyways, but as of today I have installed new rear strut inserts for my BC coilovers on this car - I am still waiting on my o2 sensors to arrive (probably wednesday)
The process is simple, does not need a spring compressor just a little assortment of 17 mm sockets, wrenches, hex keys, I used WD40 Dry Silicon lubricant to coat the threads of the coilover body (I've used various things in the past, I am always trying new things).
Here are the old strut bodies removed:
Basically you remove all of the components (keeping them in order so you can re-assemble correctly) and then re-assemble them on the new strut body. Here is a pic of my 4th gen coils I had to transfer my stiffer springs on today:
(My I35 was on BC coils with stiffer springs, I had to take the springs off of the I35 coilovers, take the stock springs off of the 4th gen coilovers, and then do a 3 vehicle coilover swap... My 03 Maxima here was already on Tru-harts which I wanted off of my car. Leaving my 4th gen on stiffer springs and BC coils, and my 5th gen on stock springs and bc coils... when I say springs I mean the coilover springs not like drop springs for regular struts - For reference Stock 5.5 Gen BC coilover springs are 8kg/mm for the fronts and 6kg/mm for the rears, these specs are pretty much stock for every maxima BC makes coilovers for. I have 10k/8k going onto my 4th gen, because race car)
Anywhooooooo
Done with suspension with this car. I may install a new rear end link just because the car has over 200k and it's lowered I heard it may help center the beam re-installing it at a new height (NO, I am not doing the work of installing the adjustable link on this car, that's stuff for my 4th gen).
I am not sure if I mentioned earlier but along with the motor swap I installed new end links (autozone house brand - lifetime warranty doeeee) and Moog front lower control arms.
But I am happy with how it feels with all the new goodies on the vehicle
Only thing left is to finish my exhaust and enjoy the ride (Well... I still have a long list.... but man I am really close to just oil changes only on this car!)
Last edited by aackshun; May 18, 2020 at 03:35 PM.
Well I maybe not..... I used a 6th gen oil pan and there was a stud I didn't saw off completely that was touching the header. So I grinded it down and wrapped the headers.... Coolant gauge stayed lower on another short highway trip and I didn't hear bubbling when I parked the car (which I usually do).
I'm going to do a compression test next and if it comes out even stevens hot and cold then I'm just gonna send it... all with a backup pair of heads on deck ready to go in case smoke actually starts coming out the exhaust 😅.
I'm the meantime I'm going to resume my next few mods.
Modding the headers, adding a velocity stack to the intake and an eBay strut tower bar.
Last edited by aackshun; May 30, 2020 at 05:11 PM.
I had a heater hose let go on my old Altima and was driven until it shut off twice. After the hose was replaced and coolant was filled, it never had a single issue. Since then, I have been under the impression it is impossible to overheat a throttle by wire engine. I figure the ECU is smart enough to know when the temp is way too hot and will shut the engine down. Or maybe I was lucky?
Since I'm balling on a budget, I'm using a RWD flywheel.
Small mods are needed to make this a bolt on affair, but for the lightest vq35 flywheel on the market and under $200 new (this one costed me around $185 shipped and weighs 12lbs).... You'd be an idiot to spend JWT/Fidanza/Aasco money if you have a decent array of tools and mechanical knowledge
(Also you can use ARP flywheel bolts with this setup. Will probably do on a future build the oem bolts will suffice).
I own all 3 aforementioned company fwd flywheels and a lot of the parts are interchangeable and they all make the flywheel in multiple pieces so they just take and add pieces to suit each application.
The main difference is the position and clocking of the trigger ring.
The ring is x-mm (will measure and edit later) offset towards the driver side. Also the ring is one bolt hole offset (I believe this is done because the 350z has the crank sensor mounted in a different position and Nissan is too lazy to come up with a different program for the ecu, which works to our favor because 350z ecus are a nice plug and gain 20hp mod pending a few small changes).
Why not show pics?
Crank offset difference, adding a new hole - you will need to grind out extra room on the trans side as well to account for the crank sensors new position.
Added a new hole to the flywheel, just like JWT and Fidanza does.
Forgive me for asking what is surely a stupid question, but will the 350z flywheel and modded crank sensor location only work with 5.5th gen timing/350z ECU, or is this also an option for people like me with 3.0 timing?
Forgive me for asking what is surely a stupid question, but will the 350z flywheel and modded crank sensor location only work with 5.5th gen timing/350z ECU, or is this also an option for people like me with 3.0 timing?
Same problem with offset.
But cause you're a 3.0 you can only use JWT, AASCO, Fidanza and z1. Not the El cheapo eBay 1 piece because you have to put on a different trigger ring and the eBay 1 piece is ..... 1 piece.
3.0 people do not need to worry about flywheel clocking cos y'all's trigger teeth aren't clocked.
Alright well I'm still too scared to do a compression test, in the mean time I'm off doing other things to avoid doing heads on a VQ😅
Took the ol girl to my usual exhaust shop to have them do my fave exhaust mod, extending the merge, among many other things.
(Car already has a crush bent 3" exhaust fyi, see mod list)
-relocated merge further back with 2.5" crush bent piping on each bank.
-wideband installed after the merge
-vibrant 1794 resonator installed in the OEM resonators location. (details on why later).
-vibrant 2.5 to 3" merge.
-3" flex section after the merge (the vibrant merge kinda ruined the idea of using two 2.5 flexes in the same area as obx's/OEM flex location), if I have any problems in the future I'll know I'll need to redo this piping so I can move the flex pipe further up.
Basically I had them cut where the OBXs merged and went up to 2.5" piping. They got creative from there and made the magic happen.
I had a small resonator put in because I wanted the car to sound aggressive, but it was just too raspy at part throttle and cruising with just the muffler only. I don't mind disturbing the peace when I'm heavy footing around but just backing out of the driveway rasping away is not acceptable for a street vehicle IMO.
Previously I've used the longer vibrant bottle resonator and it mellowed out the exhaust too much and mellow was NOT what I was intending for this vehicle at all.
Overall the Vibrant 1794 does the trick, car is still obnoxious when I want it to be and just putting around it's just annoyingly loud. Also this small resonator helped kill the classic VQ trumpet sound too.
All in all the mods I've done seem to be working, the car is running very lean now, (according to mr. Innovate sensor), and hopefully that's due to the mods and not damage to the heads.
If I have a successful compression test, and tackle my new warm start issue, then I will be adding a few sprinkles here and there before a dyno tune and calling it a day on the power part of this build.
Interesting, do you have any data behind moving the merge back? Does your current merge end where the cat would normally be?
Just Dynos from an 09 6mt swap, 12whp gain across the board, just by moving the merge.
The theory was formed by me watching the local RWD DEs dynoing the same as us FWD guys with OEM exhaust manifolds.
Which scientifically doesn't add up. Those motors (block and heads) are not capable of making more power than us. So if everything is equal then why aren't we dynoing higher?
So I've been doing my best to imitate a RWD DEs setup as much as possible.
eg. Matching exhaust tubing (48-52 inches of 2.5" piping after the 3 cylinders merge on a typical rwd exhaust setup)
I may even do Dyno testing with a RWD manifold because the test we have are with sad old technology.
Ideally yes, when I redo the red and black cars exhaust I will remeasure a rwd setup again but I'm sure it comes out to deleting the secondary cat and merging right before the catback. That's what I initially recall figuring out but I didn't write it down and forgot. I've just been kinda eyeballing it on the cars since.
Nick's edit- I accidentally edited your post instead of replying to it Gotta get used to these new options. Could you repost the pictures?
Last edited by 95maxrider; Jun 9, 2020 at 09:32 AM.
Some videos of the rice tastic exhaust setup I've created.
Exhaust tone has to match the look of the car right?
I've Spent years building mellow sounding systems, I wanted to do something that turned heads and was way out of my comfort zone. Turns out it takes a bit of science to build a loud exhaust that doesn't sound terrible.
Modified OBX headers as previously posted
Vibrant 1794 Resonator
Vibrant 1042 Muffler
3" crush bent piping
Just Dynos from an 09 6mt swap, 12whp gain across the board, just by moving the merge.
The theory was formed by me watching the local RWD DEs dynoing the same as us FWD guys with OEM exhaust manifolds.
Which scientifically doesn't add up. Those motors (block and heads) are not capable of making more power than us. So if everything is equal then why aren't we dynoing higher?
So I've been doing my best to imitate a RWD DEs setup as much as possible.
eg. Matching exhaust tubing (48-52 inches of 2.5" piping after the 3 cylinders merge on a typical rwd exhaust setup)
I may even do Dyno testing with a RWD manifold because the test we have are with sad old technology.
Ideally yes, when I redo the red and black cars exhaust I will remeasure a rwd setup again but I'm sure it comes out to deleting the secondary cat and merging right before the catback. That's what I initially recall figuring out but I didn't write it down and forgot. I've just been kinda eyeballing it on the cars since.
That's really interesting, this is the first I've heard about it. Once I get a 3" catback built and installed, I was wondering what sort of gains I could see if I replaced the curvy end piece (merge?) of my Cattman headers with larger piping. Although, now that I think about it, I'm not sure there's room next to the crossmember...I would love to see some before/after dynos from this process, or your old dyno where you picked up 12 whp.
Once I get a 3" catback built and installed, I was wondering what sort of gains I could see if I replaced the curvy end piece (merge?) of my Cattman headers with larger piping. Although, now that I think about it, I'm not sure there's room next to the crossmember...
That's really interesting, this is the first I've heard about it. Once I get a 3" catback built and installed, I was wondering what sort of gains I could see if I replaced the curvy end piece (merge?) of my Cattman headers with larger piping. Although, now that I think about it, I'm not sure there's room next to the crossmember...I would love to see some before/after dynos from this process, or your old dyno where you picked up 12 whp.
09 maxima 6mt swap, all the regular goodies tuned.
Then relocated the merge, retune comparison.
I can't catch a break. So while running to autozone to rent a compression tester, I heard a faint knocking.
I did my compression test and well this motor did 120psi on all 6 cylinders, 90 first turn, 120 max by 2nd turn, exactly the same on all 6 while warm. I noticed I melted two coil packs too. Typical cyl 5 (hottest running cylinder on the VQ) and cyl 4 (haven't done that before), but that's a moot point now because... After the compression test.......
..... I drained my oil and checked my handy dandy magnetic drain plug and.........
At least now I get to keep working through my hoard of motors.....
I have a few 2nd gen DE's lying around that need various sorts of love.
I have one that snapped a cam and one that shot nothing but white smoke, going to try ol smokey since it clearly needs the heads removed...... And off to building motor #3
Motor #3 plans:
-2nd gen DE Block
-Rev Up Oil Pump
-ARP Rod Bolts
-Rereshed 1st Gen VQ35DE Heads, w/ valve job and freshly decked with Rev-Up cams.
I'm being cheap again but I'm a bit at a loss as to why this motor ate a bearing, unless those rev-up rod bolts just aren't the ones to use. This is the 2nd time I've had a motor fail using these. This time I double checked the tq procedure, mostly because the motor did not turn smoothly on the first time around. Maybe Rev-Up rod bolts can't take being torqued down 2x??????
My spare set of heads are already at the machine shop, waiting to get done, they said they were ok, but a valve job would be a good idea since they weren't holding as much vacuum as they could.
There will be pics as things get done. Going to wait till the heads get done and gaskets/parts come in before I tear down the 2nd gen blocks.
Last edited by aackshun; Jun 10, 2020 at 04:24 PM.
Just Dynos from an 09 6mt swap, 12whp gain across the board, just by moving the merge.
The theory was formed by me watching the local RWD DEs dynoing the same as us FWD guys with OEM exhaust manifolds.
Which scientifically doesn't add up. Those motors (block and heads) are not capable of making more power than us. So if everything is equal then why aren't we dynoing higher?
So I've been doing my best to imitate a RWD DEs setup as much as possible.
eg. Matching exhaust tubing (48-52 inches of 2.5" piping after the 3 cylinders merge on a typical rwd exhaust setup)
I may even do Dyno testing with a RWD manifold because the test we have are with sad old technology.
Ideally yes, when I redo the red and black cars exhaust I will remeasure a rwd setup again but I'm sure it comes out to deleting the secondary cat and merging right before the catback. That's what I initially recall figuring out but I didn't write it down and forgot. I've just been kinda eyeballing it on the cars since.
Nick's edit- I accidentally edited your post instead of replying to it Gotta get used to these new options. Could you repost the pictures?
Originally Posted by aackshun
09 maxima 6mt swap, all the regular goodies tuned.
Then relocated the merge, retune comparison.
Thank you for actually sharing data! Time to add y pipe v4 to my list of things to change on this darn car.
measurements of my ARP rod bolts, for future reference in case the worst happens and I have to take these out and re-use them.
2nd gen DE block from like a Murano or something, its made in Japan so it's made for glory (honestly, i didn't take everything apart and weigh the pistons and rods but it's waaaay better balanced than my 6th gen motor I had previously installed 6k doesn't feel like it's gonna rattle apart)
VQ35DE heads from an 02 Altima (another glorious Japanese hunk of metal), lightly milled, valve job, and hot tanked.
Rev up cams installed with a m12x1.25 50mm socket cap grade 12.9 bolt with a grade 8 washer on the exhaust cams, stock vq35De intake cam bolts (ok I didn't take an install pic, I was busy).
Motor assembled with HR head gaskets (2nd gen blocks have the HR cooling mod already done), HR head bolts, rev up cams, rev up oil pump, gallery gaskets repaired, new orings everywhere.
Drove it home. So far so good... Sorta (has a gear oil leak, exhaust leak and my clutch hydraulic system decided it was time to go). Car is running more lean on light throttle (15s now, grosss) so obviously it is sucking down more air than before but otherwise I will continue looking over and continue to repair everything, on these last 200 miles of clutch break in and hopefully hit the track Friday.
Last edited by aackshun; Jun 27, 2020 at 08:26 PM.