
ECU Removal Pictures and Slide Show


Thread Starter
Senior Member
Joined: Jan 2011
Posts: 3,037
From: Central AR
ECU Removal Pictures and Slide Show
Here's a slide show I pulled together this morning after I removed the ECU from my 99 Maxima. I read some ECU removal instructions and was able to remove the ECU in about 20 minutes or less.
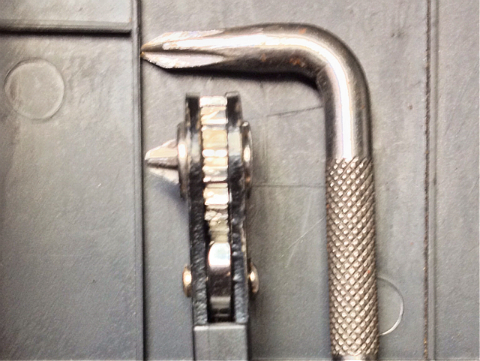
While I purchased a new Offset Ratchet Screwdriver Tool with a #2 Phillips, once I started the job, I quickly realized my existing 8mm Swivel Head Gear Wrench would stay mounted on the ECU bracket bolts and make removal go faster.
Here's a link to a PhotoBucket Slide Show that shows covers the steps I followed during removal.
Set your viewing speed in the lower right hand corner of the slide show screen.
http://s286.photobucket.com/user/Rid...99/ECU_Removal
If the slide show doesn't work out for some users, I posted the slide show IMG images in this message.
Individual Slide Images Below
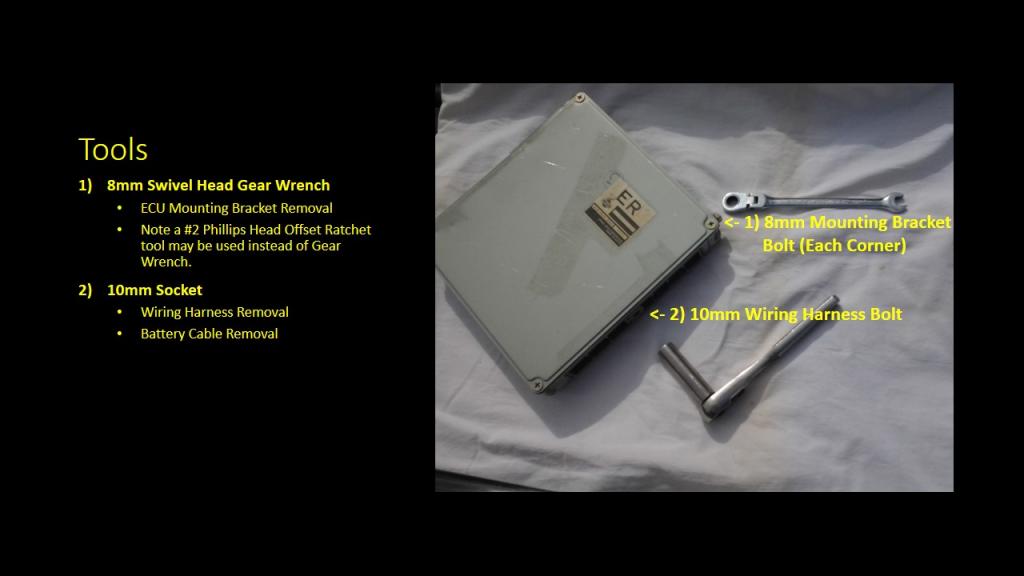
Tools
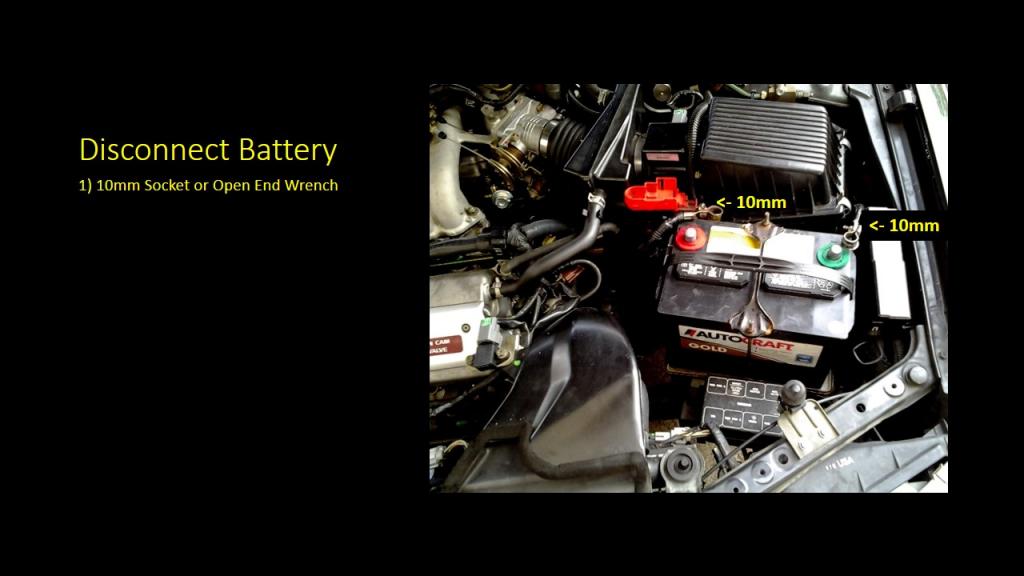
Step 1 - Disconnect Battery
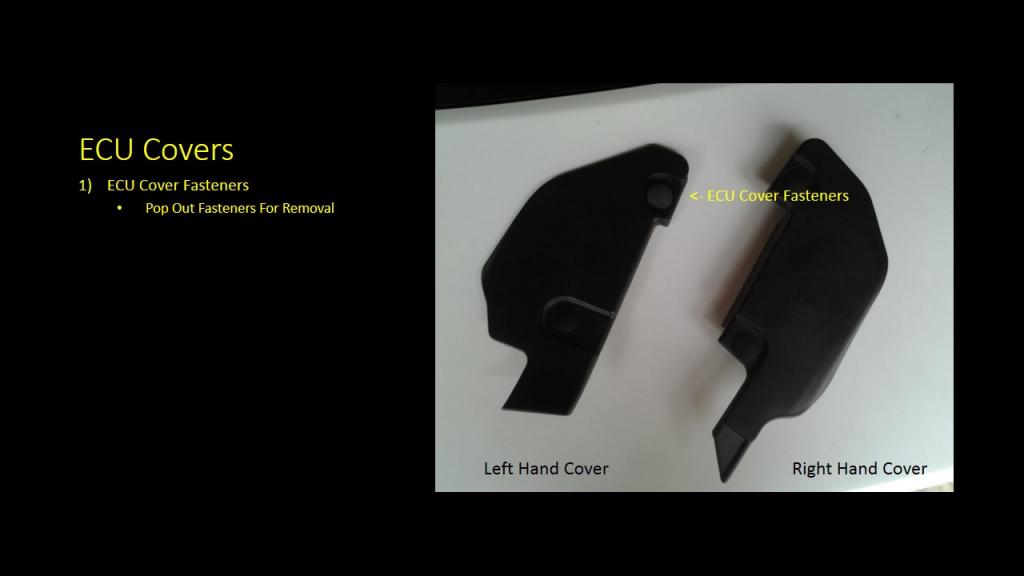
Step 2 - Remove ECU Covers
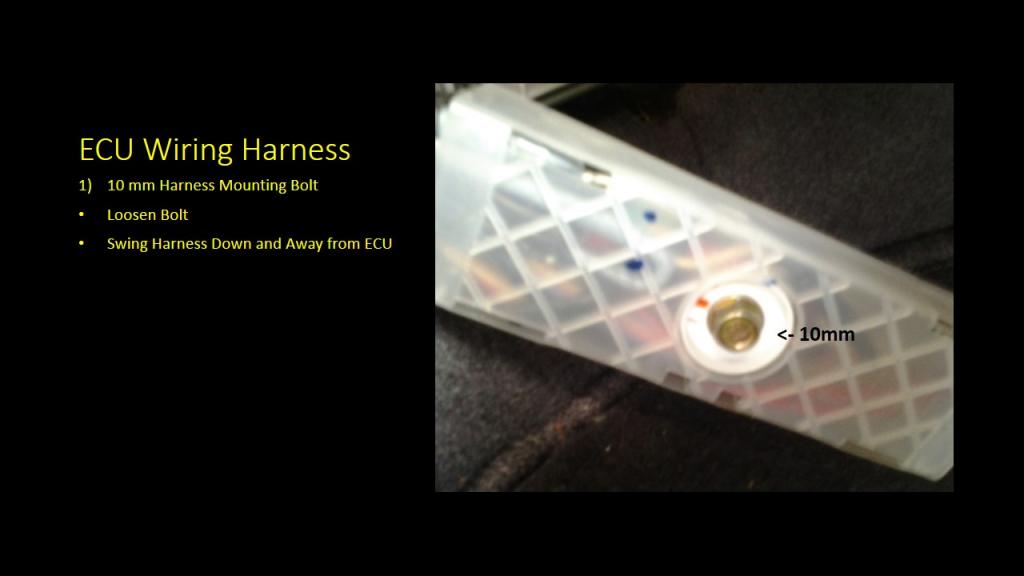
Step 3 - Remove ECU Wiring Harness
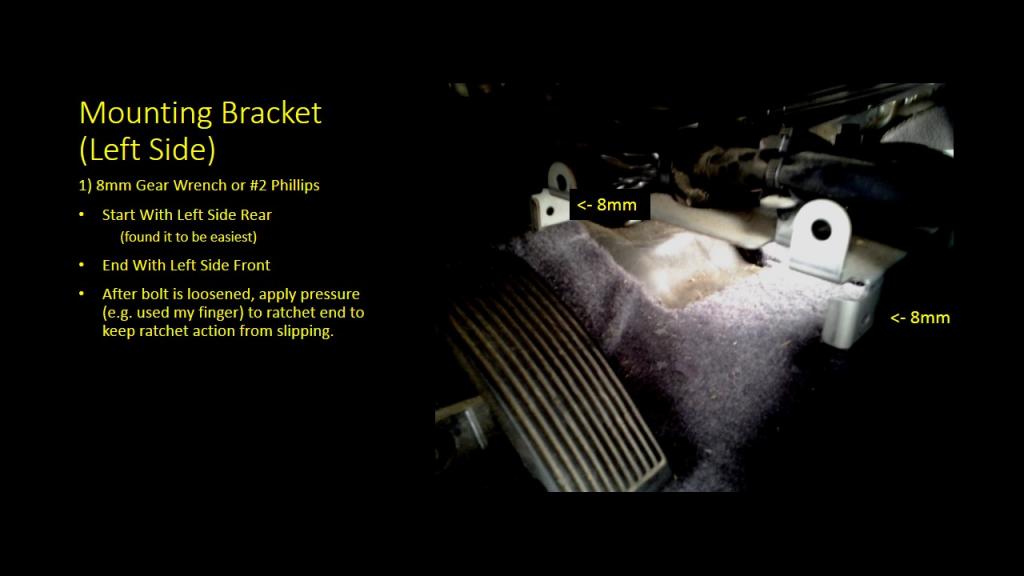
Step 4 - Remove Left Side ECU Mounting Bracket Bolts
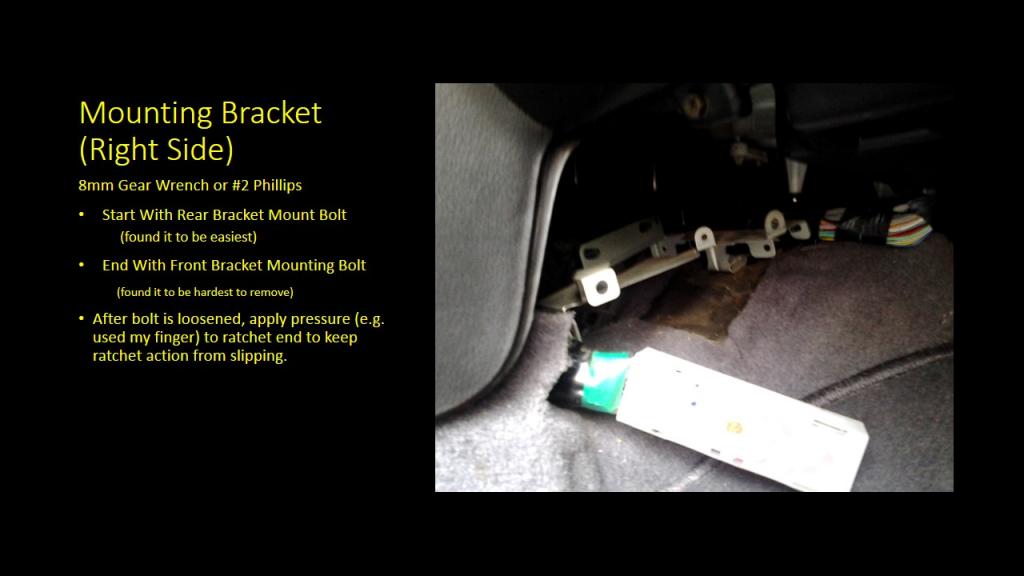
Step 5 - Remove Right Side ECU Mounting Bracket Bolts
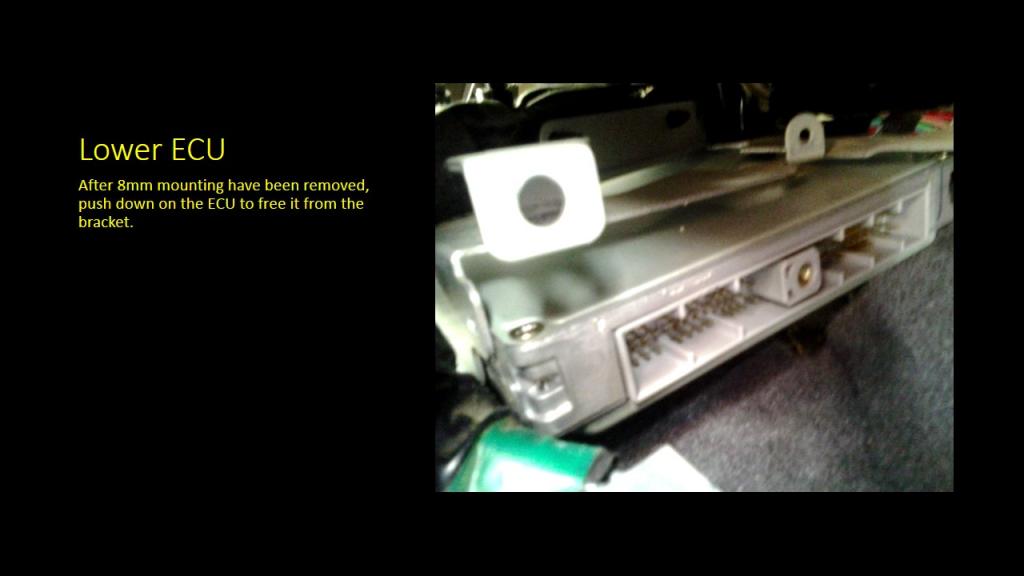
Step 6 - Lower ECU Away From Mounting Bracket
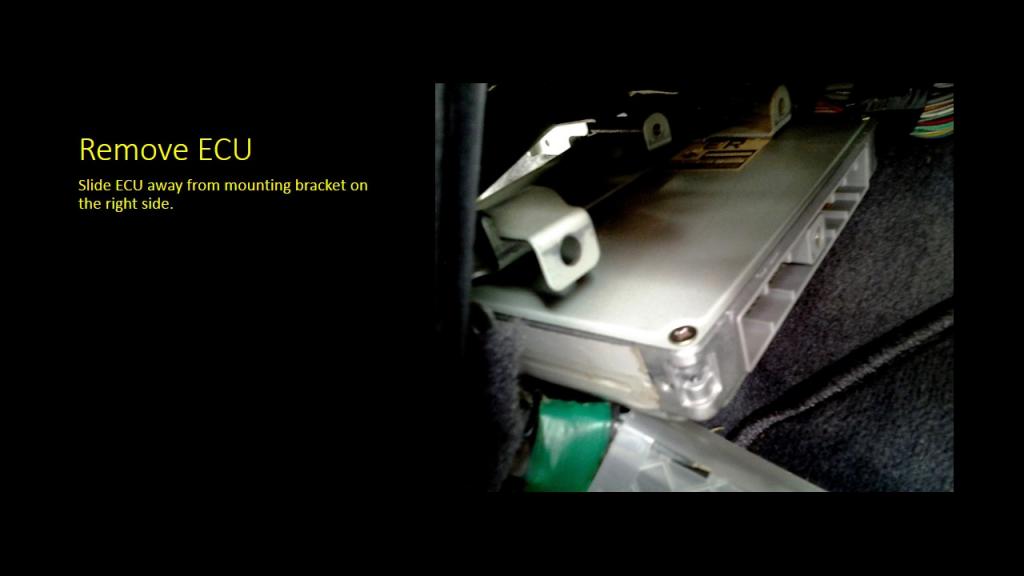
Step 7 - Remove ECU
While I purchased a new Offset Ratchet Screwdriver Tool with a #2 Phillips, once I started the job, I quickly realized my existing 8mm Swivel Head Gear Wrench would stay mounted on the ECU bracket bolts and make removal go faster.
Here's a link to a PhotoBucket Slide Show that shows covers the steps I followed during removal.
Set your viewing speed in the lower right hand corner of the slide show screen.
http://s286.photobucket.com/user/Rid...99/ECU_Removal
If the slide show doesn't work out for some users, I posted the slide show IMG images in this message.
Individual Slide Images Below
Tools
Step 1 - Disconnect Battery
Step 2 - Remove ECU Covers
Step 3 - Remove ECU Wiring Harness
Step 4 - Remove Left Side ECU Mounting Bracket Bolts
Step 5 - Remove Right Side ECU Mounting Bracket Bolts
Step 6 - Lower ECU Away From Mounting Bracket
Step 7 - Remove ECU
Last edited by CS_AR; Feb 23, 2014 at 11:29 AM.


Thread Starter
Senior Member
Joined: Jan 2011
Posts: 3,037
From: Central AR
Hey Chris - It looks like the earlier models used #2 Phillips head screws. I had initially purchased a Offset Ratchet Screwdriver Tool with a #2 Phillips, thinking it would work.
On the 99 model. I was surprised/shocked to find 8mm heads. Over the past year, I've seen it both ways.
On the 99 model. I was surprised/shocked to find 8mm heads. Over the past year, I've seen it both ways.
Last edited by CS_AR; Nov 30, 2014 at 06:53 PM.
Thread Starter
Senior Member
Joined: Jan 2011
Posts: 3,037
From: Central AR
I read where somebody took some small pliers or needle nose vice groups and grabbed the screw by the head to start it turning.
You're not kidding it is PITA to remove the passenger side.
You're not kidding it is PITA to remove the passenger side.
Last edited by CS_AR; Nov 30, 2014 at 06:53 PM.
**** it, I might try that. Or just leave the Nistune ECU off to the side and call it a day.
I'm just not sure if I can let the ECU bounce around like that. No one sits on the passenger side but roads aren't perfect on my daily commute.
I'm just not sure if I can let the ECU bounce around like that. No one sits on the passenger side but roads aren't perfect on my daily commute.
Thread Starter
Senior Member
Joined: Jan 2011
Posts: 3,037
From: Central AR
Here's an old thread on ECU removal.
https://maxima.org/forums/4th-genera...u-removal.html
I pulled a 96 ECU from a salvage yard car that had screws in it like the one in the picture below. Over the past three years, I've pulled/swapped three 99 model ECUs. Somewhere during the 4th gen run, the screws changed from round head to 8mm.

https://maxima.org/forums/4th-genera...u-removal.html
I pulled a 96 ECU from a salvage yard car that had screws in it like the one in the picture below. Over the past three years, I've pulled/swapped three 99 model ECUs. Somewhere during the 4th gen run, the screws changed from round head to 8mm.
I removed the ECU successfully today. For the front passenger side screw, I was able to use a needle nose which loosened it easily.
The rear took me a while. I couldn't get the needle nose on it but was able to trim down the Philips attachment for the Neiko tool to really shorten it up. Here you can see how much shorter it became compared to the offset screwdriver. Made the job a lot easier.
When I put in the Nistune ECU, I only installed the front driver side screw. Don't got time to mess with all four of them bishes again lol
I've got no passenger side and only the front driver side screw in place. It'll be fine. The tight ECU connector/wiring should hold it snugly in place along with that one screw.
Maybe I'll get some bolts that I can use a swivel head gear wrench on
Maybe I'll get some bolts that I can use a swivel head gear wrench on

Like you, I only have one screw securing it in place. With the EU tied to it on the opposite side, it's not going anywhere.

Thread
Thread Starter
Forum
Replies
Last Post
boomerbrian
5th Generation Maxima (2000-2003)
6
Oct 31, 2018 10:25 AM
ballerchris510
3rd Generation Maxima (1989-1994)
9
Sep 10, 2015 09:35 PM