
Akebono 370Z Big Brake Kit: I has it.


Akebono 370Z Big Brake Kit: I has it.
I ordered from Z1motorsports on Tuesday at 4:00pm
When I returned home from work on Wednesday I had a missed delivery notification.
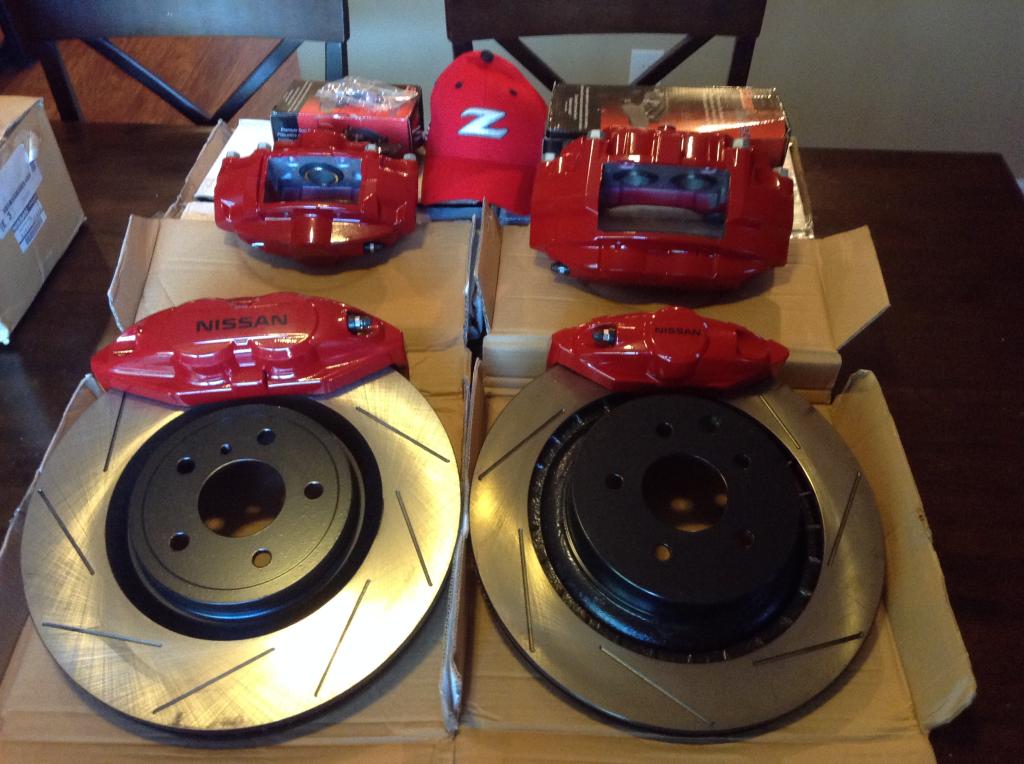
Well, today I finally have them.
I was able to unbox them and snap this picture before I had to go to work.
I'll add installation pictures and instructions to this thread when I get time to install them in the next couple of weeks.
It was just under $1800 shipped for the kit. Shipping was included at $125.
The options were:
slotted rotors
include banjo bolts
Red calipers
Standard Ceramic brake pads
When I returned home from work on Wednesday I had a missed delivery notification.
Well, today I finally have them.
I was able to unbox them and snap this picture before I had to go to work.
I'll add installation pictures and instructions to this thread when I get time to install them in the next couple of weeks.
It was just under $1800 shipped for the kit. Shipping was included at $125.
The options were:
slotted rotors
include banjo bolts
Red calipers
Standard Ceramic brake pads


Senior Member
Joined: Nov 2010
Posts: 4,020
From: Maryland
the BBK from Stillen isn't that great, its 2 piston and is only for the front axle. you can find these Akebono setups used for like a grand usually, they look much better and 4 piston front+2 piston rear > 2 piston front+stock rear


Alright, here it is, what you have all been waiting for........
If you attempt this yourself, you assume that you have some mechanical aptitude, and already know how to bleed your brakes when you are done. Make sure you do not run out your brake fluid reservoir. Keep it topped off. Multiple fills per caliper.
Tools needed:
Jack, and jack stands
Fluid catch tub
small funnel, mine came from the camping section at walmart
1/4" hose, clear, 2 feet in length. Not an absolute, but will help when you bleed brakes.
10, 12, 14, 19 wrenches, and a 21mm if you have it.
12, 14, 19, 21mm sockets.
Flat head screw driver
Impact driver: Not an absolute, but will make your life easier
Rubber mallet
Angle grinder with cut-off wheel.
Paper towels
Gloves, if you like your knuckles.
1L bottle of brake fluid.
Safety glasses, or motorcycle helmet if you prefer.
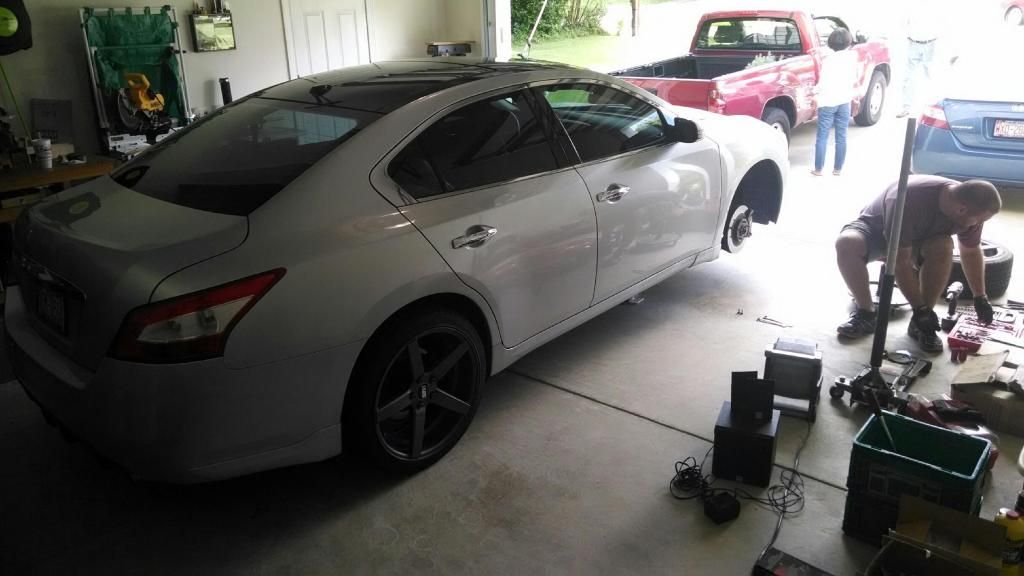
I chose to complete one corner at a time, and bleed after each corner installed.
1. Jack the front of the car up, place jack stands, and remove front wheels.
2. Remove the front caliper bolts. Use the 14mm.
3. remove the front pads.
4. tuck the caliper out of the way, don't leave it hanging.
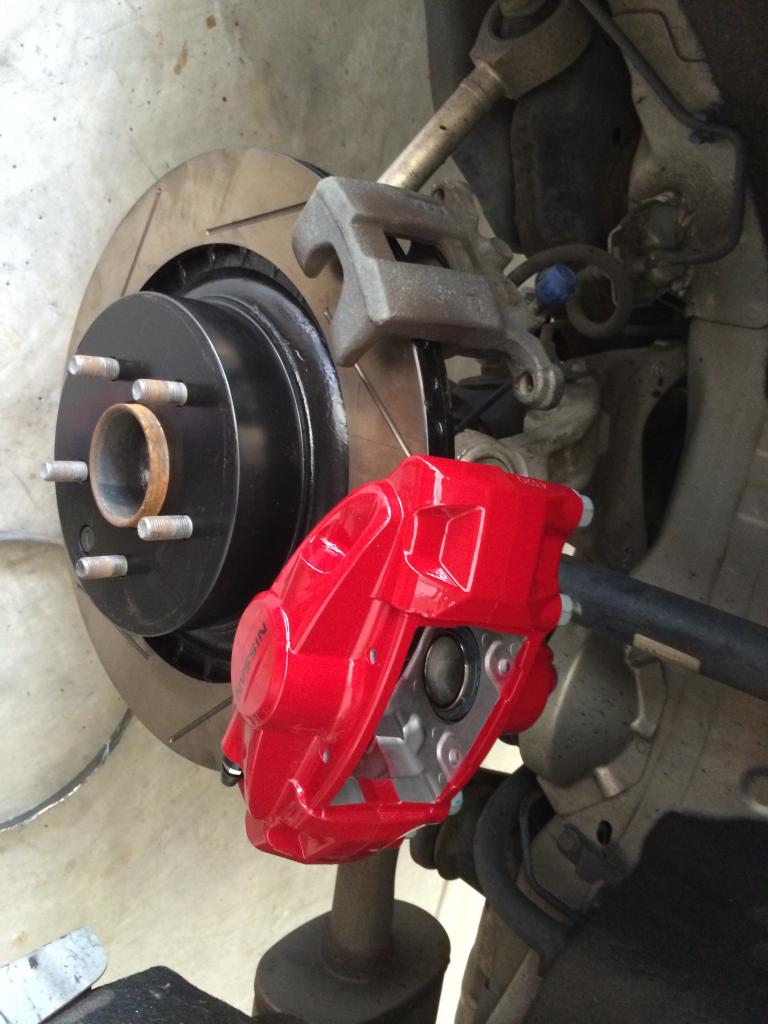
5. remove the carrier with the 21mm. I was not able to make mine move with the wrench and some effort, so I just used the impact gun. Mine were very, very tight after 115kmiles of not being touched.
6. I opted to test fit everything and make sure I wouldn't have problems before I went any farther. Spoke design can influence fit. That is the picture I posted previously with the single lug nut
7. Place the new rotor on the hub, and use one or two lug nuts to hold it in place. Depending on your lug nuts, you may need some washers. You don't have to do this but it makes life easier.
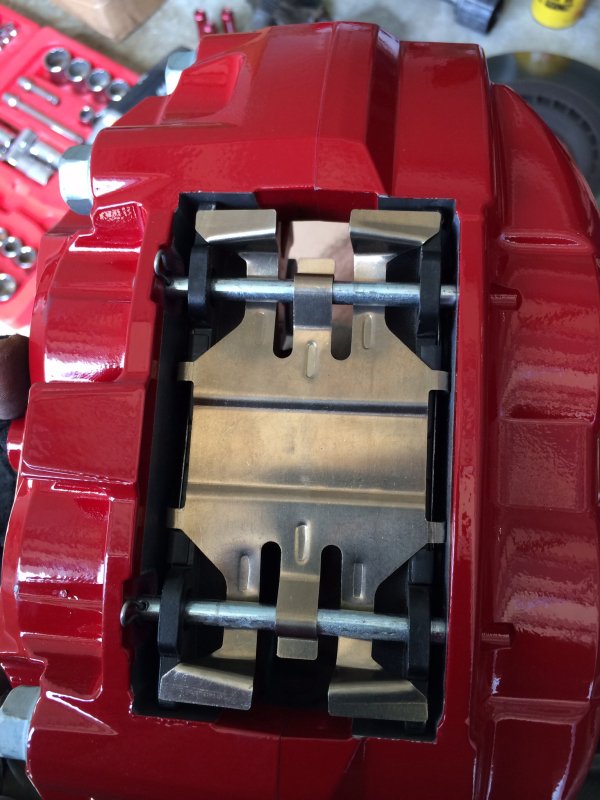
8. Now you need to add brake pads to your new caliper. Squeal tab goes on the inside. Then you add the spring plate, followed by slide pins. Use the cotter pins to hold it together. The flat head screw driver will help you here.
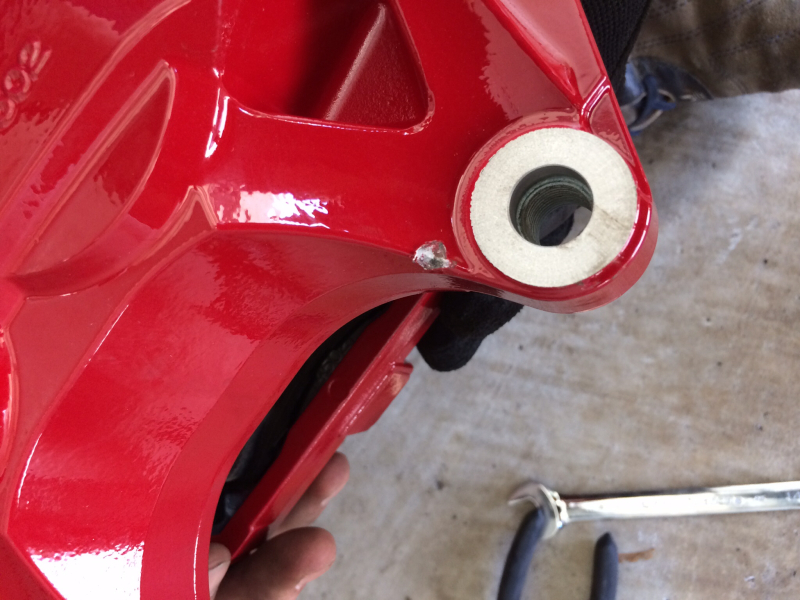
9. Now you want to bolt this to the knuckle. The new brakes are the caliper and carrier. YOU MAY RUN INTO AN ISSUE AT THIS POINT.
ONE OF MY CALIPERS NEEDED A SLIGHT TOUCH WITH A GRINDER. One of the gussets was slightly oversized during molding, and was hitting the knuckle. I had to remove about 1mm of material in a small section where it was hitting. It would not bolt flat otherwise. One of my calipers self corrected when I bolted it down, and was not a problem, the other needed my help. Make sure it is correct. You could also remove the material from the knuckle if you dont want to scratch your paint.
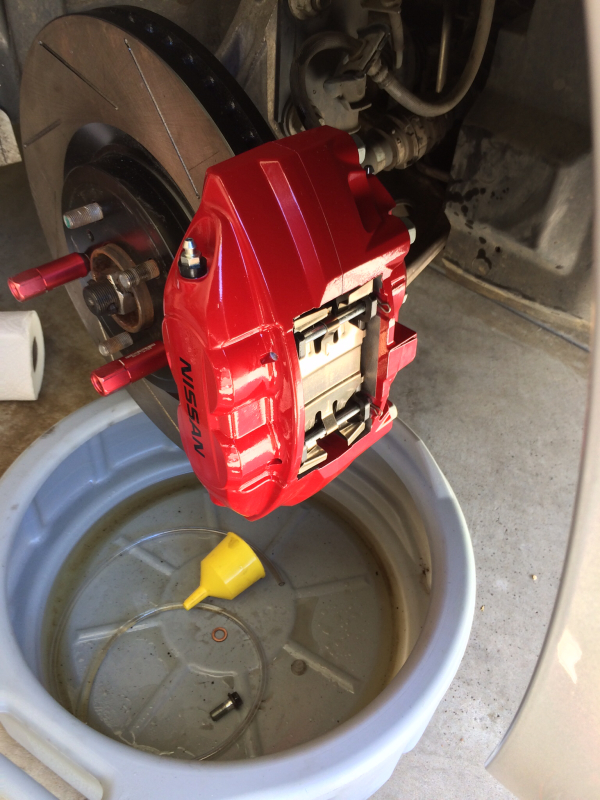
10. Now we get to make more of a mess. Use the 10mm wrench to remove the bleeder screw from the outside, and open the screw on the inside.
Use the small funnel to fill the caliper. Place the catch tub under the brakes. It does not take much, so go slowly. Once full, replace and close the bleeders. Use the paper towels to wipe up spills.
11. Now we need to swap the brake line. Get the new, shorter banjo bolt ready. Use the 12mm to remove the brake line. You will need the 14mm for the new one. Quickly remove old bolt, slide on new bolt, then screw it into the back of the new caliper. Remember, the order is: bolt, crush washer, brake line, crush washer, caliper.
12. Bleed the brakes for that corner. It will take a bit of time and a few repetitions to get fluid in and air out. Watch the fluid level in your reservoir so you don't run it out. Use the plastic tube now. Slide it over the bleeder, then you can guide the fluid to the catch pan, and also see if it is air or fluid being pushed out. I recommend outside, inside, then verify outside when bleeding.
If you attempt this yourself, you assume that you have some mechanical aptitude, and already know how to bleed your brakes when you are done. Make sure you do not run out your brake fluid reservoir. Keep it topped off. Multiple fills per caliper.
Tools needed:
Jack, and jack stands
Fluid catch tub
small funnel, mine came from the camping section at walmart
1/4" hose, clear, 2 feet in length. Not an absolute, but will help when you bleed brakes.
10, 12, 14, 19 wrenches, and a 21mm if you have it.
12, 14, 19, 21mm sockets.
Flat head screw driver
Impact driver: Not an absolute, but will make your life easier
Rubber mallet
Angle grinder with cut-off wheel.
Paper towels
Gloves, if you like your knuckles.
1L bottle of brake fluid.
Safety glasses, or motorcycle helmet if you prefer.
I chose to complete one corner at a time, and bleed after each corner installed.
1. Jack the front of the car up, place jack stands, and remove front wheels.
2. Remove the front caliper bolts. Use the 14mm.
3. remove the front pads.
4. tuck the caliper out of the way, don't leave it hanging.
5. remove the carrier with the 21mm. I was not able to make mine move with the wrench and some effort, so I just used the impact gun. Mine were very, very tight after 115kmiles of not being touched.
6. I opted to test fit everything and make sure I wouldn't have problems before I went any farther. Spoke design can influence fit. That is the picture I posted previously with the single lug nut
7. Place the new rotor on the hub, and use one or two lug nuts to hold it in place. Depending on your lug nuts, you may need some washers. You don't have to do this but it makes life easier.
8. Now you need to add brake pads to your new caliper. Squeal tab goes on the inside. Then you add the spring plate, followed by slide pins. Use the cotter pins to hold it together. The flat head screw driver will help you here.
9. Now you want to bolt this to the knuckle. The new brakes are the caliper and carrier. YOU MAY RUN INTO AN ISSUE AT THIS POINT.
ONE OF MY CALIPERS NEEDED A SLIGHT TOUCH WITH A GRINDER. One of the gussets was slightly oversized during molding, and was hitting the knuckle. I had to remove about 1mm of material in a small section where it was hitting. It would not bolt flat otherwise. One of my calipers self corrected when I bolted it down, and was not a problem, the other needed my help. Make sure it is correct. You could also remove the material from the knuckle if you dont want to scratch your paint.
10. Now we get to make more of a mess. Use the 10mm wrench to remove the bleeder screw from the outside, and open the screw on the inside.
Use the small funnel to fill the caliper. Place the catch tub under the brakes. It does not take much, so go slowly. Once full, replace and close the bleeders. Use the paper towels to wipe up spills.
11. Now we need to swap the brake line. Get the new, shorter banjo bolt ready. Use the 12mm to remove the brake line. You will need the 14mm for the new one. Quickly remove old bolt, slide on new bolt, then screw it into the back of the new caliper. Remember, the order is: bolt, crush washer, brake line, crush washer, caliper.
12. Bleed the brakes for that corner. It will take a bit of time and a few repetitions to get fluid in and air out. Watch the fluid level in your reservoir so you don't run it out. Use the plastic tube now. Slide it over the bleeder, then you can guide the fluid to the catch pan, and also see if it is air or fluid being pushed out. I recommend outside, inside, then verify outside when bleeding.
Last edited by MaximaDrvr; Sep 8, 2014 at 03:20 PM.

13. Complete the same steps on the other side to complete the front swap.
It is fairly simple, and took about 1 hour to complete. If you are inexperienced, plan for 3 hours.
14. Put your front wheels back on, lower the front, raise the rear of the car, and remove the rear wheels.
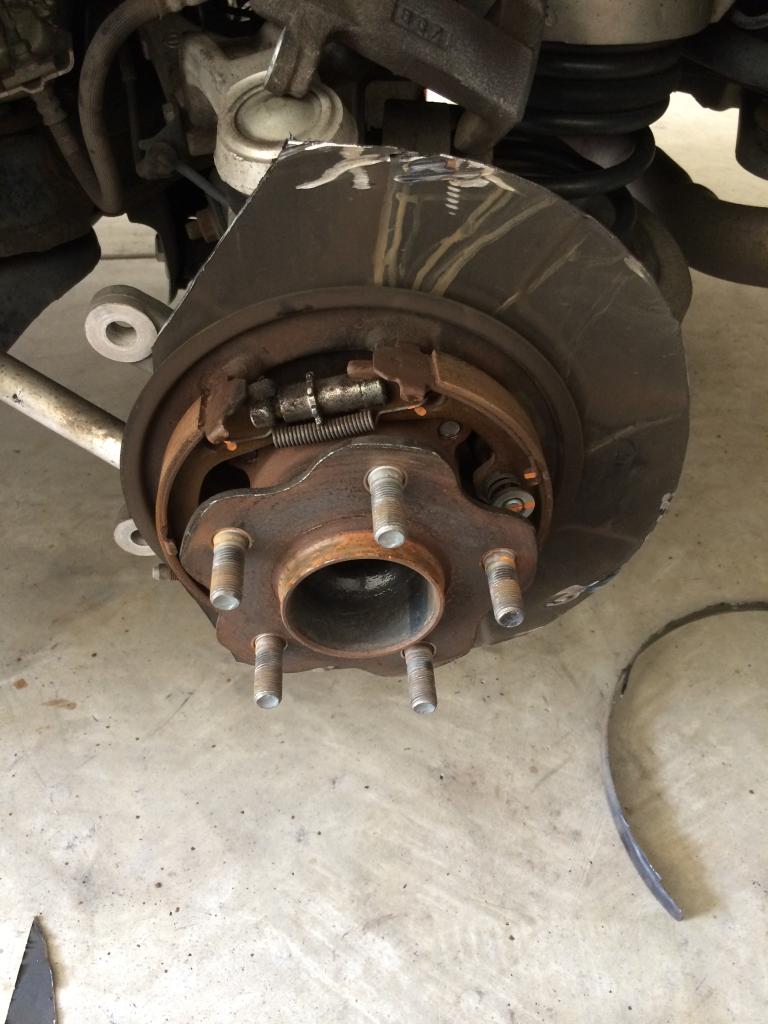
15. Now we will take care of the rear brakes. Remove the rear caliper and pads. Use the 14mm for the caliper bolts. Use the 19mm for the carrier bolts. The bottom bolts both require a wrench, not socket, because of the tight space. Again, tuck the caliper somewhere out of the way.
You may need the hammer or mallet to get the disks off. Tape around the hat, and on the face of the rotor.
16. This is more involved than the fronts because of the dust shield. You will need your cutoff wheel now.
If you optioned for factory dust shields, you will need to do substantially more work, and I won't describe the process of removing the parking brake shoes and hub to R&R the shield. You need to remove the protruding ring of the dust shield as well as make room for the new caliper.
It makes a lot of sparks. Wear safety glasses. I do not recommend wearing safety glasses and a hat, as it can direct sparks behind the glasses if they are not well fitting. If wearing a hat, turn it around.
My friend was with me, and wore his motorcycle helmet while cutting the other side.
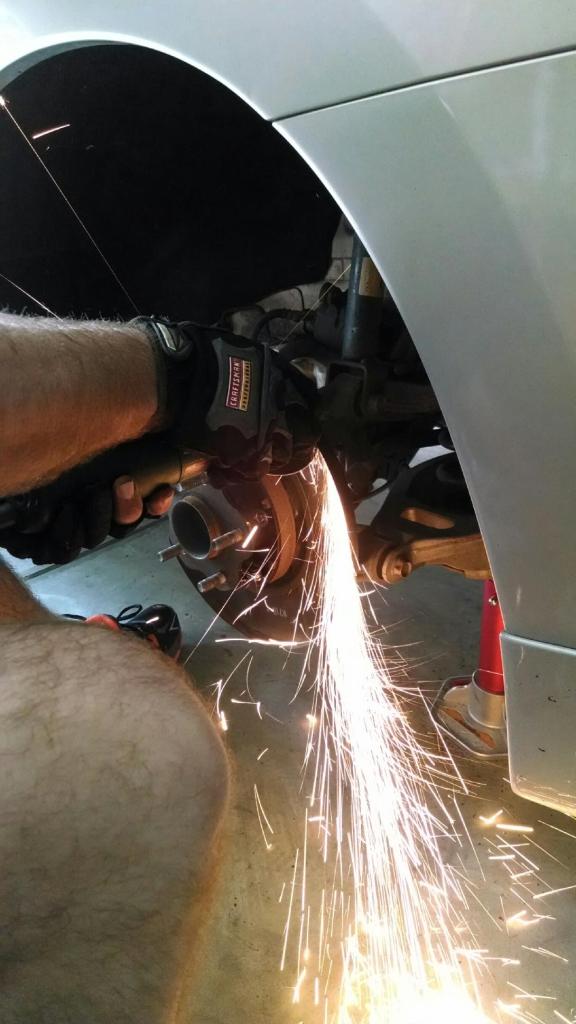
When I showered afterward, there was a substantial amount of metal in my limited amount of hair.
Comparison:
17. Install the pads into the caliper. Again, squeal tab towards the inside. Then place the new rotor on, and bolt on the caliper.
18. Follow the same procedure as the fronts to fill the calipers with fluid, swap the brake line, and bleed.
19. Put the wheels back on, torque everything down, and test the brakes.
Make sure you don't have any weird noises, vibrations, etc.
Bedding, or seating the brakes will vary based on which pads you choose.

It is fairly simple, and took about 1 hour to complete. If you are inexperienced, plan for 3 hours.
14. Put your front wheels back on, lower the front, raise the rear of the car, and remove the rear wheels.
15. Now we will take care of the rear brakes. Remove the rear caliper and pads. Use the 14mm for the caliper bolts. Use the 19mm for the carrier bolts. The bottom bolts both require a wrench, not socket, because of the tight space. Again, tuck the caliper somewhere out of the way.
You may need the hammer or mallet to get the disks off. Tape around the hat, and on the face of the rotor.
16. This is more involved than the fronts because of the dust shield. You will need your cutoff wheel now.
If you optioned for factory dust shields, you will need to do substantially more work, and I won't describe the process of removing the parking brake shoes and hub to R&R the shield. You need to remove the protruding ring of the dust shield as well as make room for the new caliper.
It makes a lot of sparks. Wear safety glasses. I do not recommend wearing safety glasses and a hat, as it can direct sparks behind the glasses if they are not well fitting. If wearing a hat, turn it around.
My friend was with me, and wore his motorcycle helmet while cutting the other side.
When I showered afterward, there was a substantial amount of metal in my limited amount of hair.
Comparison:
17. Install the pads into the caliper. Again, squeal tab towards the inside. Then place the new rotor on, and bolt on the caliper.
18. Follow the same procedure as the fronts to fill the calipers with fluid, swap the brake line, and bleed.
19. Put the wheels back on, torque everything down, and test the brakes.
Make sure you don't have any weird noises, vibrations, etc.
Bedding, or seating the brakes will vary based on which pads you choose.
Impressions:
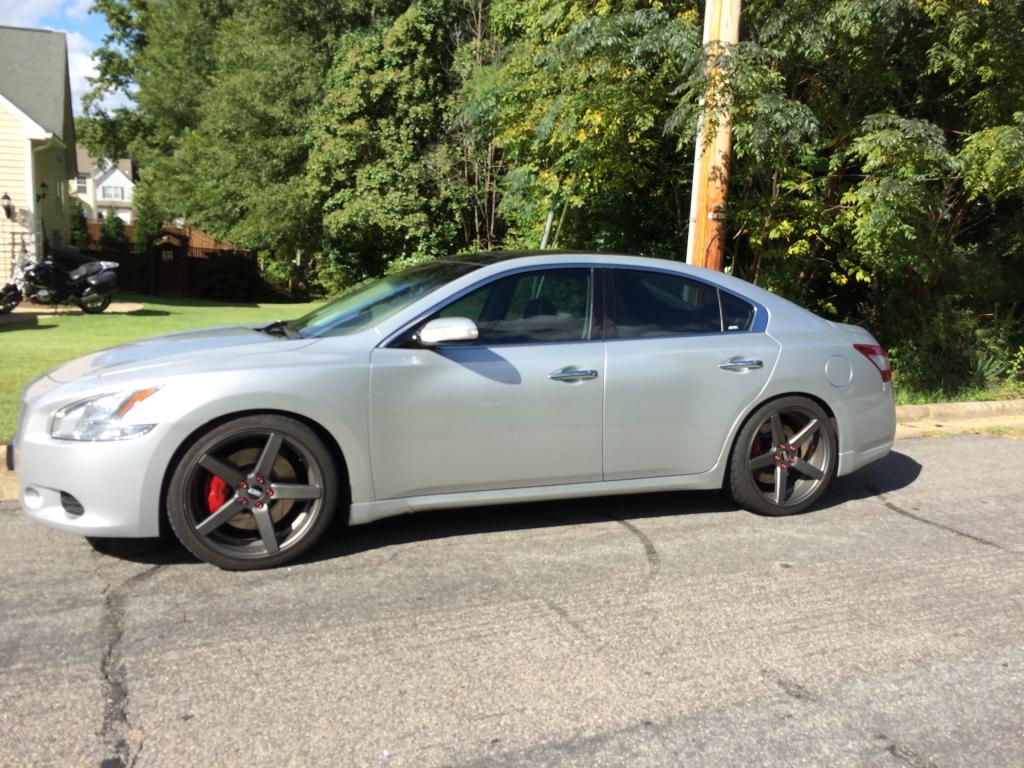
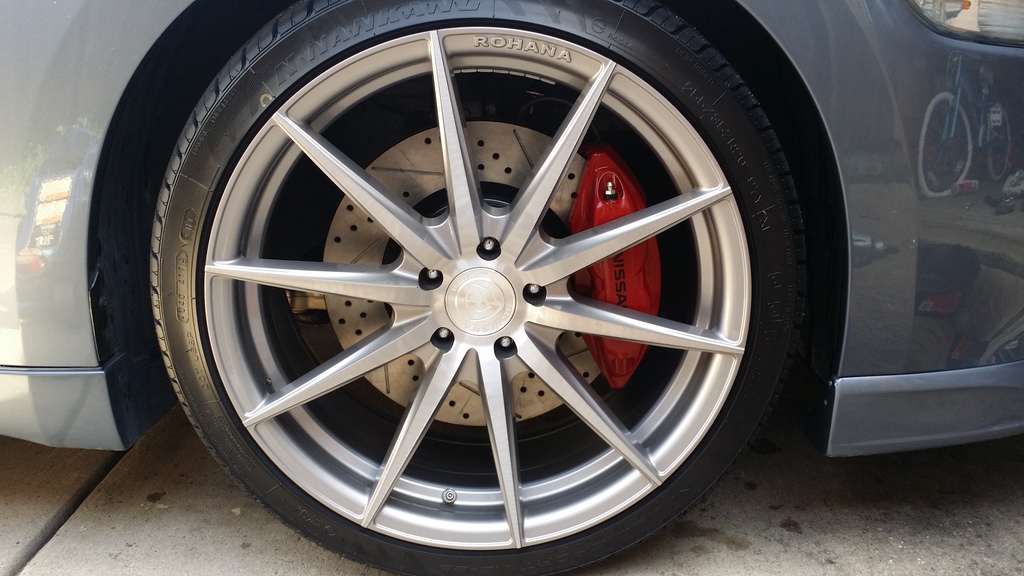
WOW, Wow, wow. The brakes bite earlier than before, with a more solid pedal feel. When you really give the brake pedal some pressure, it will quickly lock your seat belt and try to give passengers whip-lash. There is a slight decrease in acceleration. THESE BRAKES ARE 37 POUNDS HEAVIER THAN THE STOCK OPTION. That is ~12lbs each per front, and ~6lbs each in the rear more weight.
If you can afford it, or if you have had them long enough to need replacement, I HIGHLY recommend the light two-piece rotors. You will only add 2lbs to the front and 1lb to the rear with this $900 option.
On slotted rotors:
The direction does not matter for these disks. They are manufactured with straight veins on the inside, or omnidirectional. It is up to you if you want the veins to go forward or backward.
I have heard repeatedly that spinning opposite of wheel travel can cause more noise, so I opted for spinning with direction of travel.
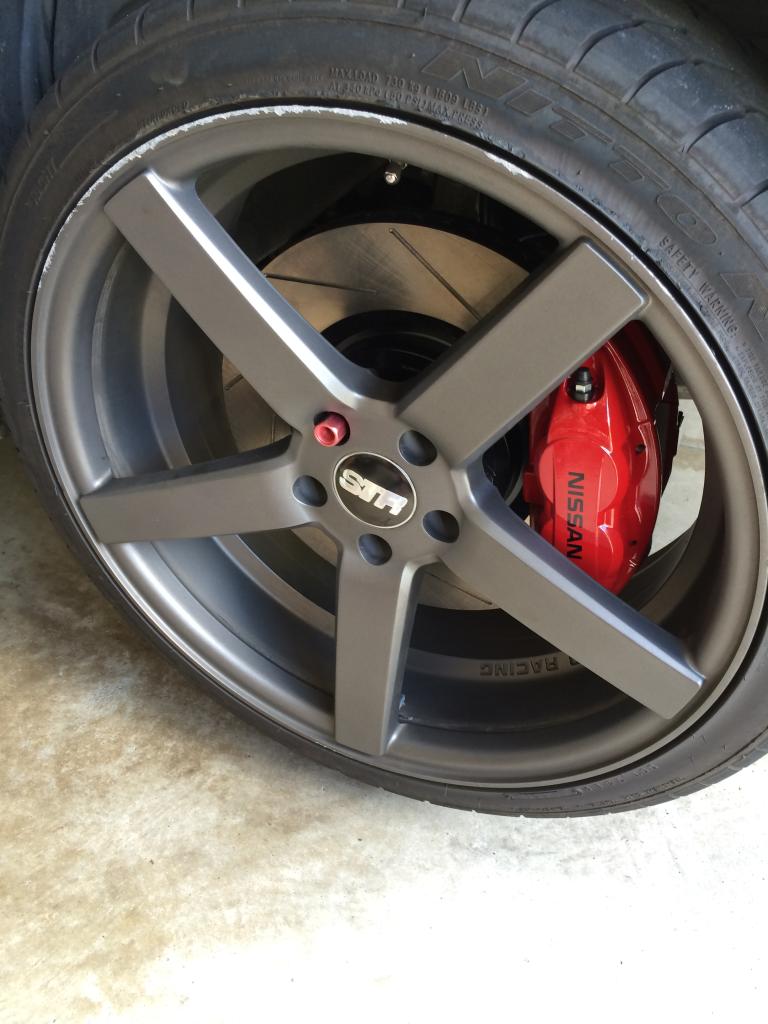
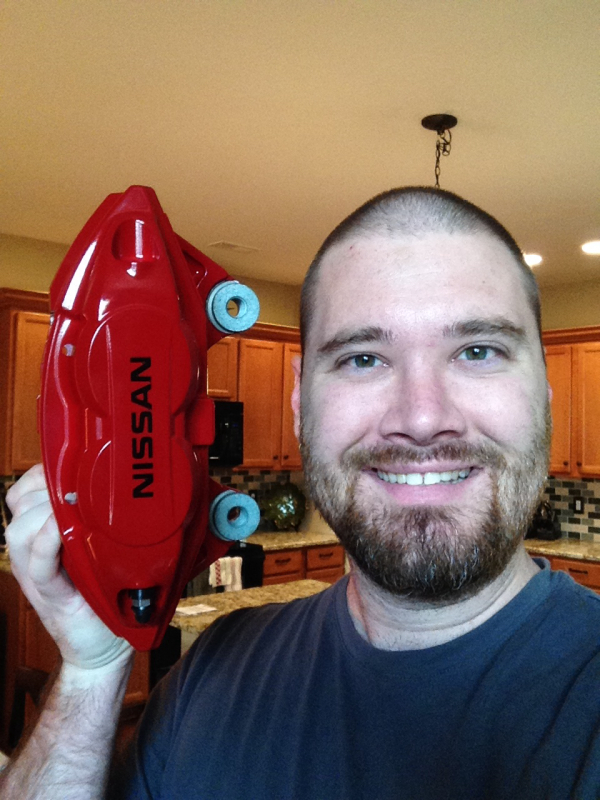
When they are on the car, you really loose the sense of scale. This is what I show people to give them an idea of size:
WOW, Wow, wow. The brakes bite earlier than before, with a more solid pedal feel. When you really give the brake pedal some pressure, it will quickly lock your seat belt and try to give passengers whip-lash. There is a slight decrease in acceleration. THESE BRAKES ARE 37 POUNDS HEAVIER THAN THE STOCK OPTION. That is ~12lbs each per front, and ~6lbs each in the rear more weight.
If you can afford it, or if you have had them long enough to need replacement, I HIGHLY recommend the light two-piece rotors. You will only add 2lbs to the front and 1lb to the rear with this $900 option.
On slotted rotors:
The direction does not matter for these disks. They are manufactured with straight veins on the inside, or omnidirectional. It is up to you if you want the veins to go forward or backward.
I have heard repeatedly that spinning opposite of wheel travel can cause more noise, so I opted for spinning with direction of travel.
When they are on the car, you really loose the sense of scale. This is what I show people to give them an idea of size:

Junior Member
Joined: Nov 2014
Posts: 56
From: Dallas, TX
Thank you for the write-up. This is great. And your setup looks really good!
Are the new rotors the same diameter as the original ones? I'm asking because I'm looking at just ordering the front calipers for now, but am wondering if another set of slotted/cross-drilled rotors for the Maxima would work with these calipers. Or will rotors made for a 370Z with Akebono calipers fit on our Maximas? (sorry for the ignorant questions)
Are the new rotors the same diameter as the original ones? I'm asking because I'm looking at just ordering the front calipers for now, but am wondering if another set of slotted/cross-drilled rotors for the Maxima would work with these calipers. Or will rotors made for a 370Z with Akebono calipers fit on our Maximas? (sorry for the ignorant questions)
Last edited by Voltaire; Jan 5, 2015 at 05:18 PM.
They are larger than stock by about 1". You can use any factory or aftermarket 370Z rotors that go with the larger factory calipers.
All of the 370Z components bolt directly to the maxima, but you need all of the parts to make it work:
- 370Z 14" rotors
- Akebono calipers
- new 'shorter' banjo bolts
All of the 370Z components bolt directly to the maxima, but you need all of the parts to make it work:
- 370Z 14" rotors
- Akebono calipers
- new 'shorter' banjo bolts
Last edited by MaximaDrvr; Apr 26, 2015 at 04:37 PM.

Junior Member
Joined: Nov 2014
Posts: 56
From: Dallas, TX
They are larger than stock by about 1". You can use any factory or aftermarket 370Z rotors that go with the larger factory calipers.
All of the 370Z components bolt directly to the maxima, but you need all of the parts to make it work:
- 370Z 13" rotors
- Akebono calipers
- new 'shorter' banjo bolts
All of the 370Z components bolt directly to the maxima, but you need all of the parts to make it work:
- 370Z 13" rotors
- Akebono calipers
- new 'shorter' banjo bolts
Yes, that was a typo, and I have corrected it. Thanks.
So, I have had them on the car about 8 months now, and I'm still impressed with how well these work.
Bite and pedal feel are still great.
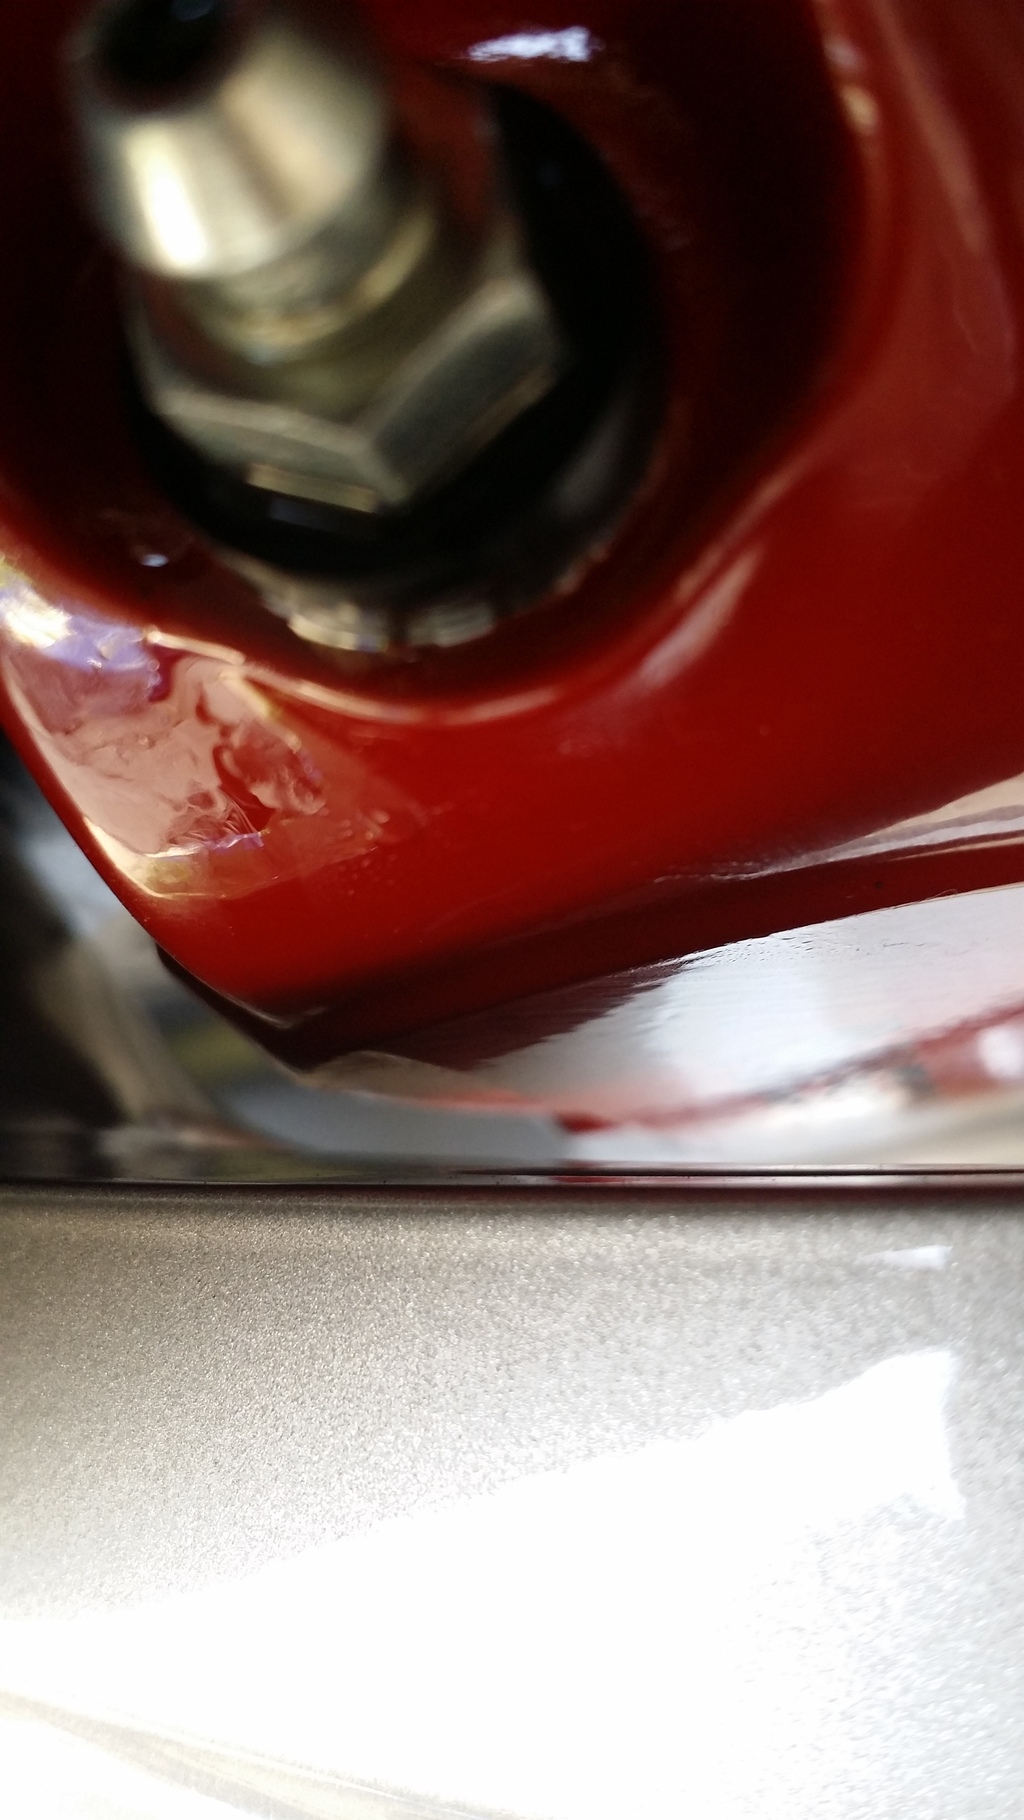
Unfortunately, my rotors are warped slightly (could be pad material buildup) and I have some light vibration.
I'm going to take my grinder with scotchbrite pad and try to clean them up and see if it helps.
If not, then time to upgrade to the two piece rotors!
So, I have had them on the car about 8 months now, and I'm still impressed with how well these work.
Bite and pedal feel are still great.
Unfortunately, my rotors are warped slightly (could be pad material buildup) and I have some light vibration.
I'm going to take my grinder with scotchbrite pad and try to clean them up and see if it helps.
If not, then time to upgrade to the two piece rotors!
Last edited by MaximaDrvr; Apr 26, 2015 at 04:40 PM.
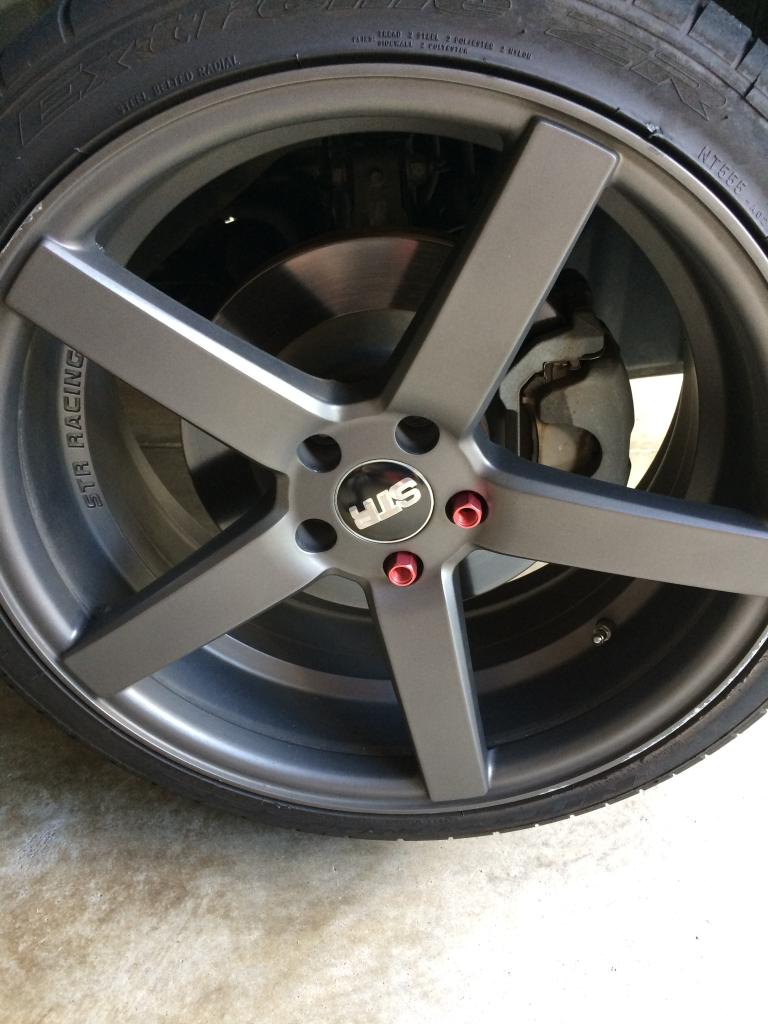
The stock wheels should fit over them, with the use of spacers.
You already have the spacers, so there shouldn't be a problem.
Some 18" wheels won't fit, but almost all 19" wheels will.
That is for diameter, spoke design may interfere which would require spacers to get them off the caliper face.
You already have the spacers, so there shouldn't be a problem.
Some 18" wheels won't fit, but almost all 19" wheels will.
That is for diameter, spoke design may interfere which would require spacers to get them off the caliper face.

Junior Member
Joined: Nov 2014
Posts: 56
From: Dallas, TX
In case anyone's interested, here's a handy template that I found...
https://conceptzperformance.com/imag...nttemplate.pdf
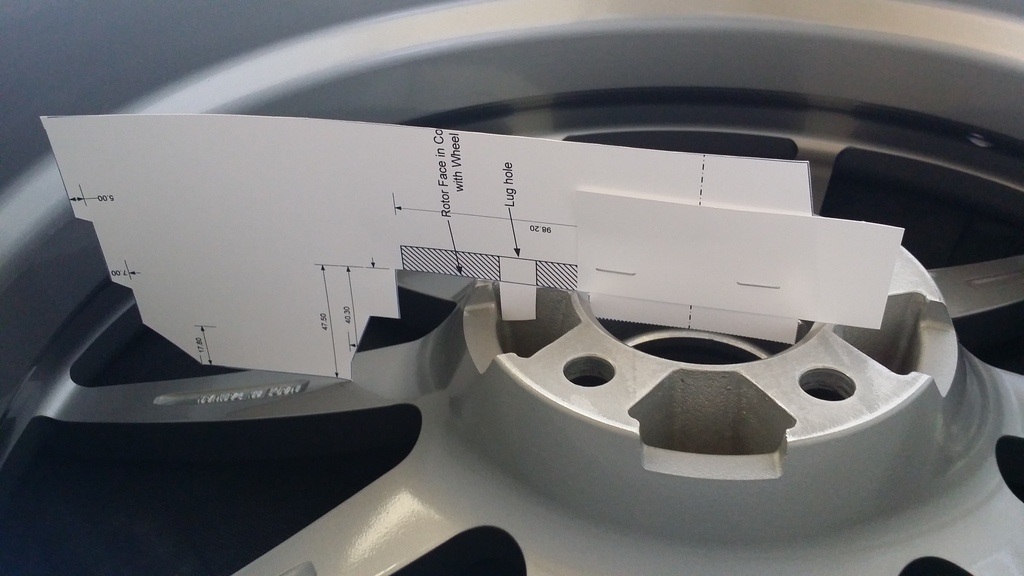
https://conceptzperformance.com/imag...nttemplate.pdf

Junior Member
Joined: Feb 2012
Posts: 96
From: Long Island
In case anyone's interested, here's a handy template that I found...
https://conceptzperformance.com/imag...nttemplate.pdf

https://conceptzperformance.com/imag...nttemplate.pdf


Newbie - Just Registered
Joined: Jul 2015
Posts: 10
From: Sunny Riyadh
I can get all these parts from the wreckers. But will need to wait until my warranty period is finish which is 100k kms or 3 years before I can install them. If I can get them for cheap what is the best way to keep/store them without getting the parts rusting in my parts bin?
You don't need to do anything to the calipers. Spray the rotors with wd40 and put them in a plastic bag till you are ready to use them. Then you will need to clean them off with carb or break cleaner before use.
Newbie - Just Registered
Joined: Jul 2015
Posts: 10
From: Sunny Riyadh

They are larger than stock by about 1". You can use any factory or aftermarket 370Z rotors that go with the larger factory calipers.
All of the 370Z components bolt directly to the maxima, but you need all of the parts to make it work:
- 370Z 14" rotors
- Akebono calipers
- new 'shorter' banjo bolts
All of the 370Z components bolt directly to the maxima, but you need all of the parts to make it work:
- 370Z 14" rotors
- Akebono calipers
- new 'shorter' banjo bolts
They are the banjo bolts from the 370z.
The dealer, or the link where I bought the kit from, have them available.
I do not have a part number off hand.
https://www.z1motorsports.com/brakes...lt-p-8488.html
You need 4 bolts and 4 copper washers.
The dealer, or the link where I bought the kit from, have them available.
I do not have a part number off hand.
https://www.z1motorsports.com/brakes...lt-p-8488.html
You need 4 bolts and 4 copper washers.
Last edited by MaximaDrvr; Dec 20, 2015 at 04:44 AM.


Newbie - Just Registered
Joined: May 2023
Posts: 1
I have a 7 gen Maxima myself I’m looking to get some big brakes done. What is the wheels size diameter in order to clear the caliper I was looking to go 20 x 9 x 15 mm or 20 x 10 x 15 mm any suggestion I do not want to use any spaces but if I do have to don’t want to exceed over 20mm
Last edited by The Wizard; May 25, 2023 at 11:50 AM.

Junior Member
Joined: Jul 2015
Posts: 32
From: Southeastern Wisconsin, East of Madison, small town of Hustisford
Front and rear so 1 per caliper?
They are the banjo bolts from the 370z.
The dealer, or the link where I bought the kit from, have them available.
I do not have a part number off hand.
https://www.z1motorsports.com/brakes...lt-p-8488.html
You need 4 bolts and 4 copper washers.
The dealer, or the link where I bought the kit from, have them available.
I do not have a part number off hand.
https://www.z1motorsports.com/brakes...lt-p-8488.html
You need 4 bolts and 4 copper washers.

Thread
Thread Starter
Forum
Replies
Last Post
asand1
4th Generation Maxima (1995-1999)
31
Dec 15, 2015 04:55 PM
LatinMax
4th Generation Classifieds (1995-1999)
82
May 15, 2014 07:44 AM
MROTH
4th Generation Classifieds (1995-1999)
22
Mar 4, 2013 05:45 PM
TurboA32
4th Generation Classifieds (1995-1999)
7
Nov 26, 2012 05:59 AM