When you click on links to various merchants on this site and make a purchase, this can result in this site earning a commission. Affiliate programs and affiliations include, but are not limited to, the eBay Partner Network.
3RD GEN MAXIMA INTERIOR LIGHTING INFORMATION more than enough information to replace ANY and EVERY bulb
ALL RECOMMENDED LED BULBS ARE DROP IN REPLACEMENTS ie built-in resistors
ALL RECOMMENDED REPLACEMENTS SHOULD DIM APPROPRIATELY ie dimmer switch www.superbrightleds.com for the LED bulbs
Radioshack for the microlamps
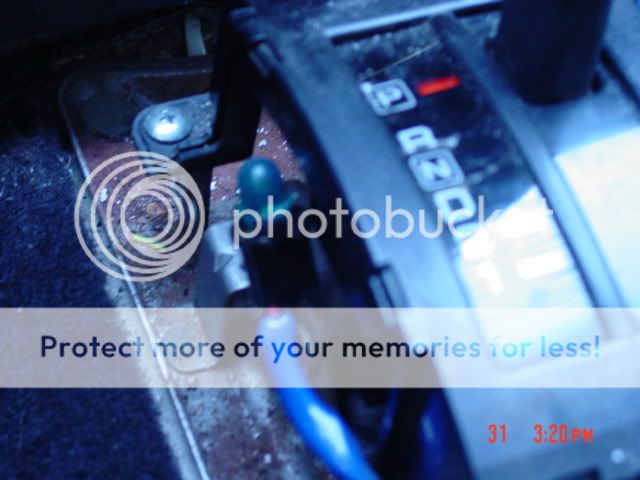
PRND21 ILLUMINATION: SBLreplacement = WLED-x
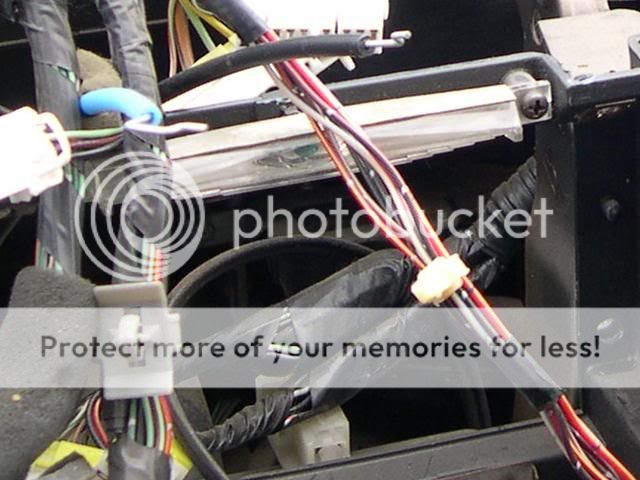
this bulb is located at the end of the harness covered in blue plastic, in a twist lock socket. for easy access to this bulb remove the center console(6 screws). 158/194 bulb, green condom.
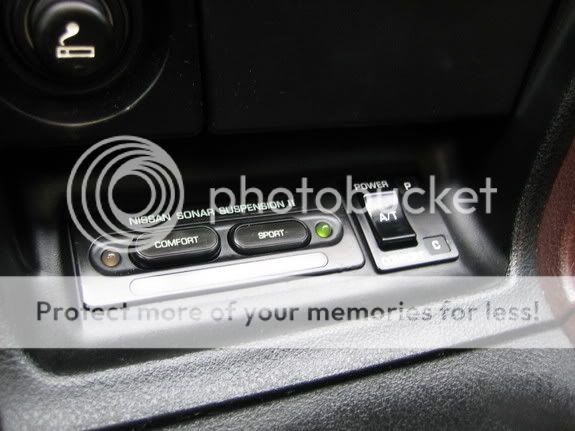
A/T POWERCOMFORT SWITCH: the A/T font on the switch should light up white, the P orange when in POWER, the C green when in COMFORT
SBLreplacement = NEO3(2x) for "P" and "C" VERY EASY TO REPLACE
(microlamp)radioshack part# 272-1092 or 7219 for "A/T" REQUIRES DISASSEMBLY OF SWITCH SONAR SUSPENSION SWITCH: the comfort and sport switches illuminate with the parking lights. SBLr = NEO3(2x)
the left 5MM LED lights up green when in COMFORT, the right 5MM LED green when in SPORT.
also "S" "N" or "F" will display in green on the bottom depending on the setting
CIGARETTE LIGHTER SURROUND:SBLreplacement = ??? this bulb is located inside a black piece of plastic that consists of a female plug for the harness on one end and the bulb socket on the opposite end. the bulb/socket end doubles as a male plug which snaps into the female end(white) of the lighter surround. the black plastic piece that holds the bulb can be removed(to change bulb) without removing the cigarette lighter assembly from the dash trim(unplug from harness, disconnect from surround). if you need to replace the lighter surround(often damaged, see picture); unplug both harnesses from the assembly, with the lighter removed there are two tabs inside of the lighter socket(top and bottom) that hold it to the lighter surround. press the tabs 1 at a time while pushing the back of the socket out of the dash. the surround is removed by pushing the bottom of the surround out of the dash while pulling down on the top(back). 74 bulb, green condom. the 74-x and 74-xHP LED bulbs from superbrightleds will not fit in this housing. also getting this surround to illuminate fully/correctly also proves to be difficult. I have ordered some surface mount component LEDs and will see what I come up with.
ASHTRAY LIGHT:SBLreplacement = 74-x this bulb is mounted on the top of the ashtray bracket, in a twist lock socket. 74 bulb, green condom.
89-91 RADIO LIGHT:: SBLreplacement = 74-x
located underneath the climate control unit behind the radio trim. bulb snaps into a horizontal plastic diffuser that shines light into the stock Bose tape deck. main reason for difference between 89-91 and 92-94 radio trim pieces. unscrew vertical plastic piece from dash to get to bulb. 74 bulb, green condom.
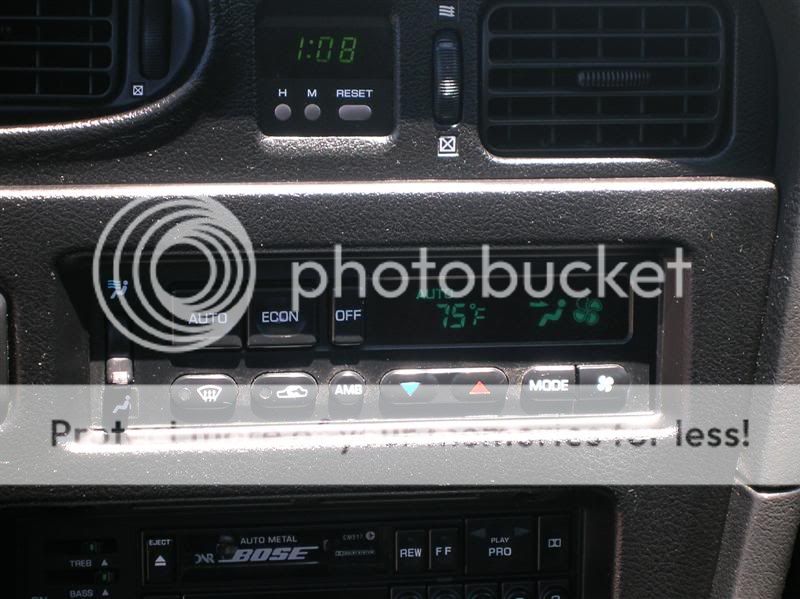
MANUAL CLIMATE CONTROL:4 easily replaced bulbs (microlamp)radioshack part# 272-1092 or 7219 the two bulbs on the left are for the fresh vent switch, the two on the top are for FAN OFF-1-2-3-4 and COLD-HOT illumination. you'll need to bend the leads coming from the bulb around the little rubber base, but just look at how it is before you take the old one out.
AUTOMATIC CLIMATE CONTROL: 6 easily replaced bulbs (microlamp)radioshack part# 272-1092 or 7219
4 behind the face of the unit for button illumination (Can be replaced with NEO3 LED bulbs)
2 for fresh vent switch see MCC (Can be replaced with NEO3 LED bulbs)
CLOCK: is a digital display, prone to failure EASY FIX
if yours is intermittent or dead, see here -> http://web.archive.org/web/200910262...ock/clock.html
the only way to change the color is with use of colored plastic film
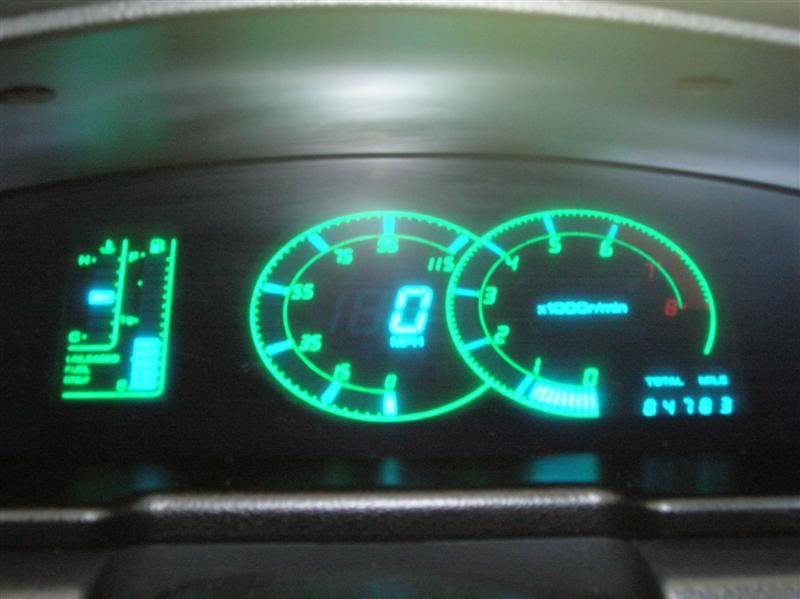
ANALOG DASH: (92-94 SE CLUSTER) 11-14 idiot lights (12:O/D OFF,13:AIRBAG,14:ABS) -> SBLreplacement = T1.5-x
4X illumination(194) -> SBLreplacement = WLED-x LED bulb recommendation needed!
2X signal indicator -> SBLreplacement = NEO4
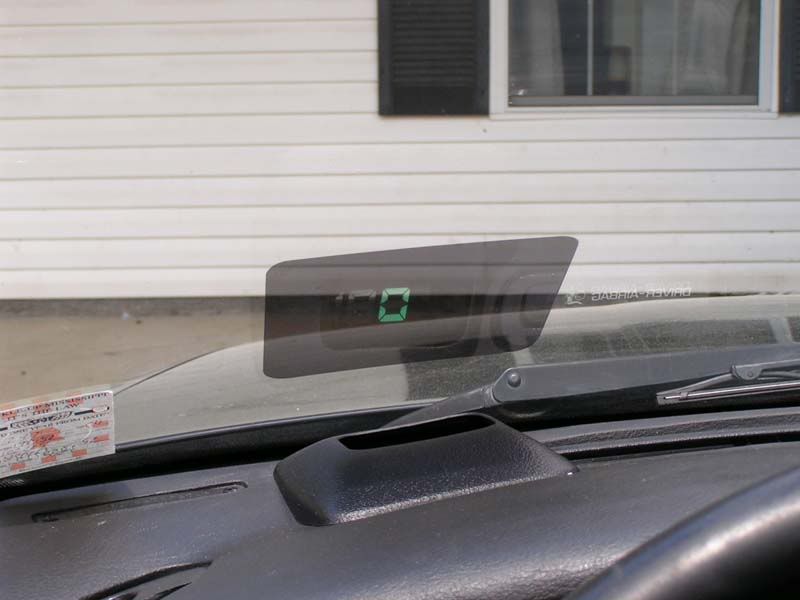
DIGITAL DASH/HEADS UP DISPLAY: (89-90 GXE ONLY OPTION)
12-13 (13:ABS) idiot lights -> SBLreplacement = T1.5-x
3X illumination -> SBLreplacement = T1.5-x (have tried here and they dont fully illuminate, stick to incandescent)
2X signal indicator -> SBLreplacement = NEO4
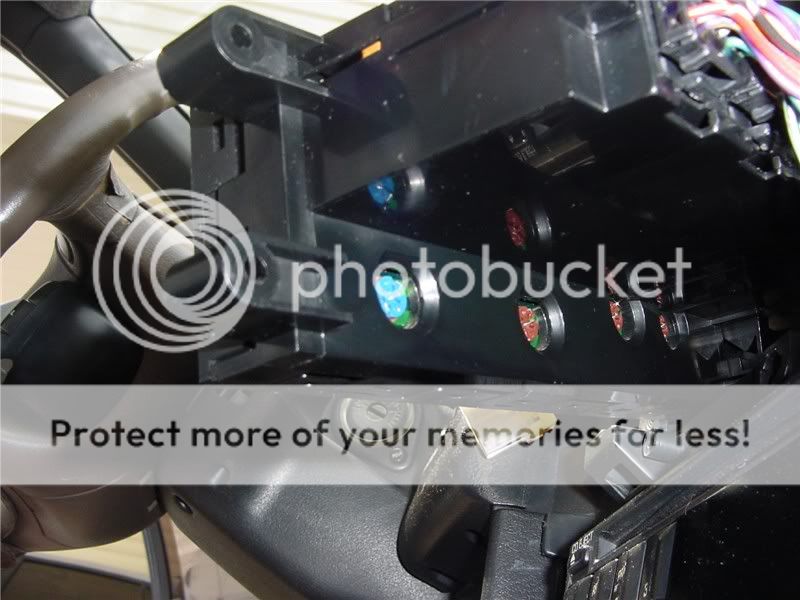
DASH BUTTONS: mirror switch* (1)3mm LED[defrost ON]
cruise switch (2)3mm LED[cruise ON/switch ilum]
fog switch (1)3mm LED[switch ilum]
dimmer switch* (1)3mm LED[switch ilum]
defroster switch (2)3mm LED[defrost ON/switch ilum]
[switch ilum LEDs need 1/4watt 470ohm resistors]
[ON position LEDs need 1/4watt(or smaller) 470ohm resistors] see here for detailed LED install: http://home.comcast.net/~Michael-H/LEDwriteup.htm *mirror defrost ON and dimmer switch ilum can be replaced with SBLr# NEO3
IGNITION SURROUND: SBLreplacement = 74-x
for access to this bulb; remove lower driver dash/fusebox cover (8 screws) and steering column plastic (4 screws). dont try removing the steering column plastic without having the lower dash removed; you will only get pissed. there is a plastic cover piece for the ignition and this surround not shown in the picture, so not as much light is visible. 74 bulb, green condom.
MAP LIGHTS: same for sunroof/non-sunroof 10Watt single contact bayonett bulb
there are bulbs at your local auto parts store that will replace these bulbs, however the original bulb is 10 Watts while the replacements arent usually over 4 Watts, so they will not be as bright. "12V10W" is the only thing written on the original bulb. UPDATE these are BA9 bulbs. I ordered some 360 degree LED bulbs from SBL http://www.superbrightleds.com/morei...-360-degree/8/ and I would definately recommend them. They have other styles but they're mostly forward facing LEDs and thats not what you want in this housing.
DOME LIGHT: festoon DE3175 31MM 10Watt
STEP/COURTESY LIGHT(4): 158/194 3.4Watt (one in each door panel)
SBLreplacement = WLED-x 90 or 120 degree non-polarized
THE MAJORITY OF THIS INFORMATION WAS FOUND FROM SEARCHING.
Thanks to Michael and MrKanda for lots of good pictures and Michael and Craig Brace for the good information.
Last edited by DMad8724; Oct 22, 2012 at 07:26 PM.
not a problem, most of the information came from searching.
any bulb that says to replace with a radioshack microlamp; an LED with resistor can be used if you're looking for color
I am looking to replace my speedometer (gxe) with a SE cluster, and change the bulbs to blue. Would it matter if I get a SE 145mph or 125? I know I would need at least 4 bulbs. pep boys sells 2 blue LEd bulbs for $10. Is there anywhere online that I can get them for less, if so what kind to get?
Thanks for the Interior lighting Info. I had thought about upgrading my interior lighting to LED's and this helps me get there without a lot of experimentation. You really opened my eyes, because I thought the interior lighting on my newly aquired 3rd gen GXE was 70' ish, but your article pointed me to a lot of bulbs that needed replacing. You not only provided good replacement LED info, but also helped a Nubie, who probably would have done major damage learning how to take everything apart and put it back the first time.
Bulb type - I wanna say microlamp that DMad8724 mentions (radioshack part# 272-1092 or 7219)
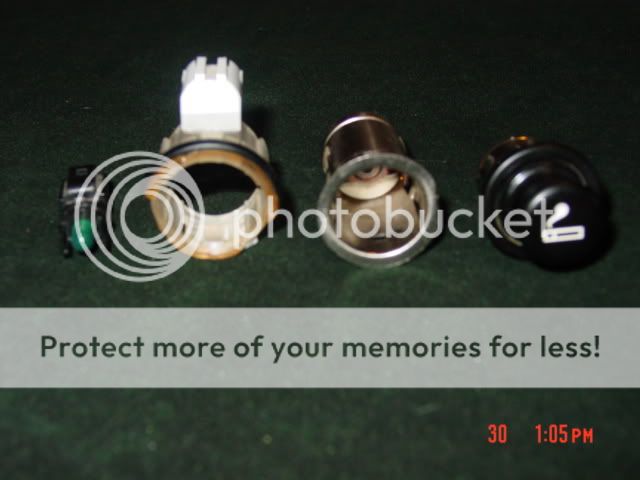
Disassembly : With two small-tipped flathead screwdrivers, insert them into the area pointed in the picture and pry it as shown. The connector piece will start to go up.
Note: The button is spring loaded. When you are prying up the connector piece, the button piece may pop out along with the springs, so be careful not to lose the springs.
Assembly: Start with inserting the button piece and springs into the body first, making sure that the springs are seated properly on both pieces. Then insert the white piece. The white piece has tabs that sits into the button piece as shown.
With the button slightly depressed so that the white piece does not come out of the button piece, re-insert the connector piece.
LED Upgrade:
To upgrade to LED, you can apply the instrument control buttons instructions. One thing to pay attention is that the light bulb is not positioned so that it points directly to the hazard icon. So you may need to bend the LED at an angle to avoid the hotspot effect.
I found the bulb in the hazard switch as well, but it wont shine through the stock hazard button cover. I scraped some of the texture behind mine and tried it with an LED but it does not look good. Did you come up with something else to get it to shine through?
ALSO ive been meaning to go through this thread and edit some things that dont work out
the "idiot" lights in the gauge clusters (whether analog or digital) are not T1.5 bulbs, they are T1.75 bulbs! Sometimes I could get the LED bulbs to stay in the sockets, other times they would fall out, because its the wrong size. However the LED output wasnt up to par anyway, so im going back to incandescent with these.
these are the same bulbs in the digital dash "illumination"
also there is a place called Mcmaster Carr that sells like anything and everything, apparently. I purchased some light bulb covers from them. The same covers as the stock Green condoms on stock bulbs, however I ordered mine in blue. They have sizes for the radioshack microlamps (T1, also have different colors) and these T1.75 bulbs, those could also possibly fit a 194 bulb. they sell 3 other sizes as well, although much larger. Link for that: http://www.mcmaster.com/#light-bulb-covers/=hw5uhj -> scroll to the bottom of the page
NEO4 bulbs for the turn signals (im using green, no color change) work great on both analog and digital clusters, even though the stock bulb sockets have different mounting angles.
I took pictures a while ago of the power comfort switch disassembly, however they were all out of focus...Jibbons?
I found the bulb in the hazard switch as well, but it wont shine through the stock hazard button cover. I scraped some of the texture behind mine and tried it with an LED but it does not look good. Did you come up with something else to get it to shine through
Interesting. I have two hazard switches that I didn't have to do anything and the light goes through them. One is installed with the LED and the second one is the one pictured above. I'm guessing it varies with the year/trim as well? Since you got two different Maximas on you, you can check it out. I don't remember where I got the other switch from.
I can take a couple of more photos later tonight when it's dark enough to show it's working.
Originally Posted by DMad8724
NEO4 bulbs for the turn signals (im using green, no color change) work great on both analog and digital clusters, even though the stock bulb sockets have different mounting angles.
Did replacing them affect the flicker speed of the turn signals? I went through the wiring diagram and I was curious about it.
Originally Posted by DMad8724
I took pictures a while ago of the power comfort switch disassembly, however they were all out of focus...Jbbons?
I did put an LED on the A/T switch, but I didn't take pics of it. Plus I don't wanna go through it again since I broke a tab that holds the Power/Comfort light bulb piece. But I am planning to do a J/Y run some day to get other switches to try them out so I may get another one.
I also took apart a manual climate control. This one is interesting because it uses 5mm x 2mm rectangular LEDs. I may do a writeup on that too.
that is interesting. I only made sure the light (LED) worked on one of my hazard switches, and after that didnt show up I didnt bother with the others. Ill have to crack open another one tomorrow. I had a really bright LED in the one (Like 8000mcd) and it didnt even make the face glow or dimly illuminate or anything. Then once I scratched the back of it it looks like trash when it lights up.
Does only the triangle or yours light up? On the back of the cover could u see where it was transparent?
EDIT: Ill be damned, the switch i LED'd was from my 92, just popped open a hazard from my 1990, held it up to my lamp light and sure enough it shines through. I am positive my 92 switch wasnt like this, otherwise I wouldnt have scraped/ruined it.
LEDs in the turn signal sockets did not affect anything. Blinking still works just as it did, keep in mind I am using LED bulbs not component stuff, not that it should matter. I will say the arrows seem to have more of a "glow" to them, its hard to describe. Looks nice, tho
the "idiot" lights in the gauge clusters (whether analog or digital) are not T1.5 bulbs, they are T1.75 bulbs! Sometimes I could get the LED bulbs to stay in the sockets, other times they would fall out, because its the wrong size. However the LED output wasnt up to par anyway, so im going back to incandescent with these.
I just got em in the mail an hour ago, but for the idiot and turn signal lights, you can use SBL part 24-xHP. For now I got two green for the turn signals.
My turn signal LEDs are definately not bright enough to look like that in a picture. However seems you mentioned it was a High Power LED. After Ive been tinkering around with all this interior lighting there is one thing Ive learned and have to keep in mind at all times.
(Not neccessarily directed at jibbons just wanted to get this out there..)
That the most important thing is to get LEDs that arent very bright. You really dont want SUPER BRIGHT LEDs otherwise youll have an interior full of eye irritating lights!!!
My dash buttons for example. Started with something like an 8000mcd LED: hideous; couldnt look at for more than 2 seconds without still seeing a glare from them when I look away. Also you will catch a glare out of the corner of your eye while driving.
Found some LEDs on ebay from China that were listed at 4000~5000mcd, still too bright.
lots of experimentation later Now Ive got 3000mcd Flat top 3mm LEDs: Even though its a drastic improvement from the 8000mcd leds. It is still too bright.
You can use your dimmer switch with the LEDs you install. With the 3000mcd LEDs installed I can dim it all the way down to where everything is almost blacked out...but the dash buttons barely went down any: so obviously they are way brighter in comparison to a stock incadescent minibulb.
I finally found some 3mm flat tops on ebay (from China) that were listed as 1300 or 1400mcd and this is about the dimmest thing Ive been able to find. Ive yet to install and test them out but im willing to bet they will be as close as Ill get to having a tolerable LED interior. Not a lot of LED places make the dimmest LEDs, everyones about how bright theirs are and thats really not what you want for your interior.
It turns out that the sunroof cont. map lights are BA9 bulbs. They dont usually sell replacements for these at your local stores, however SBL does offer LED replacements for BA9 and BA7 bulbs. I have ordered some of the 360 degree ones and will post their output when they arrive.
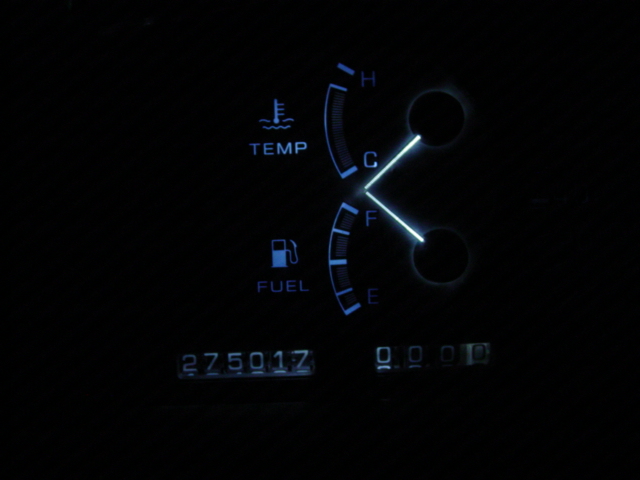
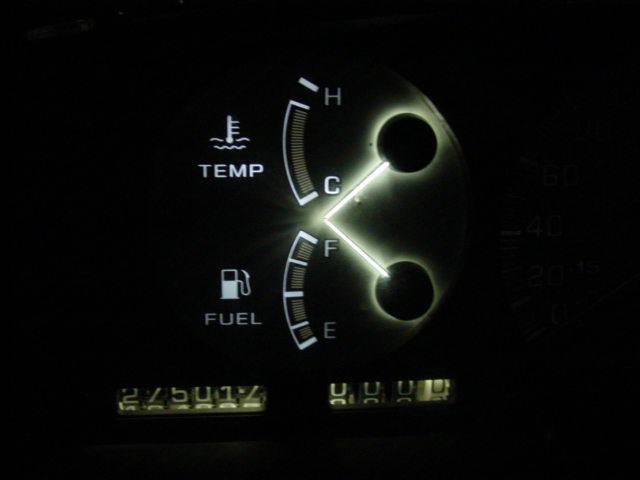
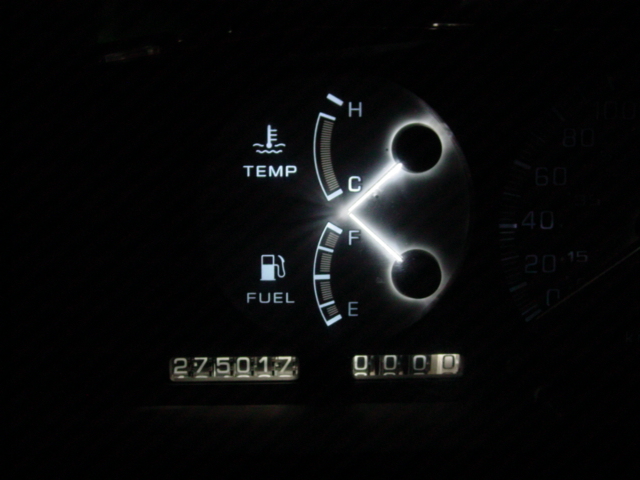
Ive been doing some experimenting with an analog cluster ive got inside. Cant remember if I recommended any certain type of bulbs for this earlier but Im here to do so now..It had been a while since I saw the white face gauges illuminated so I powered it up with stock bulbs inside. it uses clear 194 bulbs with blue covers; you would think that these covers would get rid of the "warm" or yellow from the clear bulbs, but in stock form the SE gauges light up a distinct warm white.
I put in a cool white 194 led bulb, which is what im pretty sure I used years ago when I first put leds in an se cluster, but this time I did not like it, the cool white looks more like a faded purple than anything else. It also seems like the hotspots are easier to find..
also, wanted something brighter than that
there are tons of LED bulbs out there that will replace a 194 bulb, but some of them start getting larger and larger, and Im also sure I dont want to use any high power smds either. Also its easy to find led bulbs in cool white, but the same isnt so for warm white. so I ordered one of these http://www.superbrightleds.com/morei...edge-base/199/
it has 5 leds and is only a tiny bit wider than a 194 bulb (fits in our clusters perfect). I ordered one in warm white, and they also had a 'natural white' so I got one of those too.
the warm white is a great replacement if you're looking to have the same look as stock, only brighter, check out the needles.
although this next picture doesnt show it well, the 'natural white' has pretty much the same effect as the cool white. a dimmer, faded purple. this picture makes it seem almost warm white but its more purple in real life.
in reality, its somewhere between what this picture shows, and the cool white picture above; as far as color.
I got access to the key ring lamp. It was actually very easy, thank you everyone. My problem is I cannot figure out how to remove the actual lamp from the plug without damaging it or the plug.