
MAINTENANCE and MECHANICAL Information- Don't Post Questions Here! (UPDATED)


Senior Member
Joined: Aug 2001
Posts: 1,503
Mods remove if you will, i figure it might be handy 
How to verify if your coil packs work!
Engine worked with: 1996 maxima
Requires: An ohmmeter (cheap purchase at radio shack....)
Conditions: Make sure your engine is cold, or it'll be hot on your hands
you have 6 Ignition coil packs. 3 up front and 3 near your firewall. (when asking for new ones, they are referred to as L and R)
3 are hidden behind the plastic piece on your engine that says NISSAN... simply remove the bolts and remove the plastic piece.
once removed, you should see 3 coil packs. un plug and test them one at a time.
I won't go into how to remove them since it should be fairly obvious Simply remove both bolts (do one coil pack at a time...) and pull the coil pack out. i had one where it was very hard to get out... so you may have to pull hard...
Once out, look at the area where you removed the electrical plug. You should see a "+" on the back end of the electrical plug. There should also be the letter "B"....
the spot where you see the positive symbol, means that's prong number one on the electrical connector.
To test:
Turn on your ohmmeter and place the positive wire on the 1st prong in the electrical plug of the coil pack. The negative wire should be touching the middle prong. Verification of the ohmmeter at this time should say "0" aka infinite... if it's anything else, the pack should be changed. Next test: reverse the wires... positive on the middle prong and negative on the 1st prong.... on a new coil pack, it should give a value of approximately 1.3-1.7 mega ohms. If any of the readings are off, replace the coil pack.
Note: Firewall coil packs are extremely easy to find, simply look in the cracks of the intake header. you'll see 3 similar looking coil packs to the front ones. The exception with these is that they are longer and look a slight bit different. removal is the same process as the front coil packs. Simply pay special attention to not dropping the screws in the intake area... it'll be hard to get out
to test: follow the front coil pack testing method. Look for the Positive symbol, this is your first prong... and go from there.
Good luck...
How to verify if your coil packs work!
Engine worked with: 1996 maxima
Requires: An ohmmeter (cheap purchase at radio shack....)
Conditions: Make sure your engine is cold, or it'll be hot on your hands
you have 6 Ignition coil packs. 3 up front and 3 near your firewall. (when asking for new ones, they are referred to as L and R)
3 are hidden behind the plastic piece on your engine that says NISSAN... simply remove the bolts and remove the plastic piece.
once removed, you should see 3 coil packs. un plug and test them one at a time.
I won't go into how to remove them since it should be fairly obvious
Simply remove both bolts (do one coil pack at a time...) and pull the coil pack out. i had one where it was very hard to get out... so you may have to pull hard...Once out, look at the area where you removed the electrical plug. You should see a "+" on the back end of the electrical plug. There should also be the letter "B"....
the spot where you see the positive symbol, means that's prong number one on the electrical connector.
To test:
Turn on your ohmmeter and place the positive wire on the 1st prong in the electrical plug of the coil pack. The negative wire should be touching the middle prong. Verification of the ohmmeter at this time should say "0" aka infinite... if it's anything else, the pack should be changed. Next test: reverse the wires... positive on the middle prong and negative on the 1st prong.... on a new coil pack, it should give a value of approximately 1.3-1.7 mega ohms. If any of the readings are off, replace the coil pack.
Note: Firewall coil packs are extremely easy to find, simply look in the cracks of the intake header. you'll see 3 similar looking coil packs to the front ones. The exception with these is that they are longer and look a slight bit different. removal is the same process as the front coil packs. Simply pay special attention to not dropping the screws in the intake area... it'll be hard to get out
to test: follow the front coil pack testing method. Look for the Positive symbol, this is your first prong... and go from there.
Good luck...
1 of few unmodded 4G Maxs

Joined: Mar 2002
Posts: 2,827
From: Commerce Twp., MI
Is my '97 or '98 Maxima affected by the Alternator Recall?
from Nissannews.com
1997 and 1998 Nissan Maxima and Infiniti I30/Q45 Alternator Voluntary Safety Recall Campaign [Jul. 3, 02]
Background
Nissan/Infiniti will be conducting a voluntary safety recall campaign on approximately 161,000 1997 and 1998 Nissan Maxima and Infiniti I30/Q45 vehicles. The recall will apply to Nissan Maxima vehicles manufactured from February 13, 1997 to February 27, 1998; Infiniti I30 vehicles manufactured from February 13, 1997 to February 28, 1997 and from August 1, 1997 to February 27, 1998; and Infiniti Q45 vehicles manufactured from February 13, 1997 to April 6, 1997 and August 1, 1997 to February 27, 1998. On some of these vehicles manufactured during these time periods, there is a possibility that the alternator may contain a damaged diode. This could result in an electrical short, which may cause a fire in the alternator that could spread to the engine compartment. No other Nissan/Infiniti vehicles are affected by this campaign; and to date, no injuries have been reported.
At no cost to the customer, Nissan/Infiniti dealers will first inspect, and if necessary, replace the alternator to correct this condition.
NHTSA has been notified and Nissan/Infiniti will begin sending notification letters to consumers in August 2002.
Statement
�On some 1997 and 1998 Nissan Maxima and Infiniti I30/Q45 vehicles, there is a possibility that the alternator may contain a damaged diode. This could result in an electrical short, which could lead to a fire in the alternator that could spread to the engine compartment. No other Nissan/Infiniti vehicles are affected by this campaign; and to date, no injuries have been reported. To correct this potential condition, to prevent an alternator failure, and to ensure customer satisfaction, Nissan/Infiniti will initiate a voluntary safety recall campaign to first inspect, and if necessary, replace the original alternator with a new one. Nissan/Infiniti is committed to a high level of customer service and will be working with its dealers to promptly address this condition.�
You should also check the manufacture date on the driver door jamb
I have a Cali spec, what Ypipe do I need?
95-98 All have the same ypipe. It does not matter if you are Calispec or not.
99 FED spec have the same ypipe as 95-98's.
99 Cali spec have a different ypipe.--It is similar to 00-01 CALI spec ypipes.
99 FED spec have the same ypipe as 95-98's.
99 Cali spec have a different ypipe.--It is similar to 00-01 CALI spec ypipes.
How to use 96 ECU in 97-98 - http://forums.maxima.org/showthread.php?t=260209
Last edited by Kevlo911; Oct 13, 2007 at 06:53 AM.
There are a # of ways which you can tell if your car has a VLSD transmission.
1)Tranny code on the VIN plate.If it list the tranny code pictured Below then you have a VLSD.

2)If your drivers side axle seals looks like the one pictured below. VLSD trannies have a much larger drivers side axle seal than Open differential trannies.

3)You can also follow the check outline in the FSM.

This is what the VLSD drivers side Axle seal looks like.

POSTS FROM OTHER USERS:
It is not really clear in the photograph of the FSM above, but the transmission MUST BE IN NEUTRAL to perform this check.
If the transmission is in gear, the wheels will turn in opposite directions regardless of what type of differential you have..
and all I30T's have the VLSD tranny, both in automatic and manual transmissions.

FSM, pdf format. everybody should have it
Jae
TC is not the same as VLSD. VLSD id mechanical (based on fluid). TC is electronically-controlled.
When buying VLSD axles:
http://forums.maxima.org/7606714-post1.html
1)Tranny code on the VIN plate.If it list the tranny code pictured Below then you have a VLSD.
2)If your drivers side axle seals looks like the one pictured below. VLSD trannies have a much larger drivers side axle seal than Open differential trannies.
3)You can also follow the check outline in the FSM.
This is what the VLSD drivers side Axle seal looks like.
POSTS FROM OTHER USERS:
It is not really clear in the photograph of the FSM above, but the transmission MUST BE IN NEUTRAL to perform this check.
If the transmission is in gear, the wheels will turn in opposite directions regardless of what type of differential you have..
and all I30T's have the VLSD tranny, both in automatic and manual transmissions.

FSM, pdf format. everybody should have it
Jae
Originally Posted by C3nthusiast
I have a 1999 Max with Traction Control. Does that have anything to to with having a VLSD? Someone told me I did.
When buying VLSD axles:
http://forums.maxima.org/7606714-post1.html
Last edited by Kevlo911; Jun 17, 2010 at 03:50 PM.
Power Steering Pump Replacement
Power steering pump R&R:
http://www.vqpower.com/v2/infusions/...article_id=157
http://www.vqpower.com/v2/infusions/...article_id=157
Last edited by Kevlo911; Feb 9, 2008 at 07:27 AM.
How do I do a leak-down test?
Originally Posted by Scruit
Leak Down Test
The leakdown test is another way of measuring the sealing capacity of the cylinder. The basic concpet is to feed shop air into the spark plug hole while the piston is at TDC on the compression stroke, and to see how much pressure it can hold.
If you don't want to spent the $100 on buying a leakdown tester, you can make your own.
http://en.wikipedia.org/wiki/Leak-down_tester
The tester has the following components, in order:

1) Shop air supply, regulated to 100psi
2) Pressure guage to read the pressure that the shop air is supplying
3) Damper valve between the pressure guages to keep the pressures seperate
4) Pressure guage to read the pressure of the cylinder
5) A quick-release to allow the spark plug fitting to be threaded in easily, then connected to the air supply. Without this you will have to turn the whole tester as you screw it in!
6) A threaded fitting to screw into the spark plug hole. This has to be straight, about 9" long for the deep spark plug wells in the maxima.
The parts can all be purchased from hardware store (1/4" NPT brass fittings) for about $20 - except the damper valve. All this is is a tube section inline with the tester between the guages that has a severe restriction. This helps keep the pressures from equalising on the two guages - for the test you want to read the difference in pressures. I made a damper valve by plugging a 1/4" NPT male-to-male fitting with solder then drilling a 1mm hole in it.
Steps to test (allow 1-2 hours):
1) Remove the fuel pump fuse then run the engine till it dies. Remove all coil packs and spark plugs. Open the oil filler, the radiator cap and prop open the throttle.
2) Rotate the first cylinder to TDC on the compression stroke using a wrench to turn the crank pulley clockwise.
3) With the shop air supply regulated to 100psi, and the engine locked in place using the wrench on the crank pulley, apply the shhop air.
4) Read the lower guage, it should read 80-100 psi. (80psi = 80%, therefore 20% loss. 95psi = 5% loss)
5) Listen to where the air is escaping to.
6) Repeat 2-5 on the remaining cylinders.
The loss should be less than 20% - any more than that is bad. More that 40% loss means you are doing something wrong, or your engine is crap. Less than 10% is great. Less than 5% is spectacular. 0% loss on a road engine means you must be doing the test wrong, because no engine can be that good, not even a racing engine.
5-20% loss, with the air escaping through the oil filler, is normal and good.
Any air escaping through the exhaust means you should suspect a poorly sealing exhaust valve. Similarly, air escaping through the throttle body means poorly sealing intake valve. Air coming through the radiator means bad head gasket.
The leakdown test is a good follow-up test to a compression check. It will help you pinpoint problems that exist, but also give you a better idea of the cylinder's condition than a compression check alone. A compression check can give artificially good numbers if you crank too many times, or if you have fluid pooling in the cylinder (leaking oil or fuel). Also you can get artificially high numbers from carbon buildup. If your engine passes a compression check AND a leakdown test then you can rest assured your engine is in good shape.
The leakdown test is another way of measuring the sealing capacity of the cylinder. The basic concpet is to feed shop air into the spark plug hole while the piston is at TDC on the compression stroke, and to see how much pressure it can hold.
If you don't want to spent the $100 on buying a leakdown tester, you can make your own.
http://en.wikipedia.org/wiki/Leak-down_tester
The tester has the following components, in order:
1) Shop air supply, regulated to 100psi
2) Pressure guage to read the pressure that the shop air is supplying
3) Damper valve between the pressure guages to keep the pressures seperate
4) Pressure guage to read the pressure of the cylinder
5) A quick-release to allow the spark plug fitting to be threaded in easily, then connected to the air supply. Without this you will have to turn the whole tester as you screw it in!
6) A threaded fitting to screw into the spark plug hole. This has to be straight, about 9" long for the deep spark plug wells in the maxima.
The parts can all be purchased from hardware store (1/4" NPT brass fittings) for about $20 - except the damper valve. All this is is a tube section inline with the tester between the guages that has a severe restriction. This helps keep the pressures from equalising on the two guages - for the test you want to read the difference in pressures. I made a damper valve by plugging a 1/4" NPT male-to-male fitting with solder then drilling a 1mm hole in it.
Steps to test (allow 1-2 hours):
1) Remove the fuel pump fuse then run the engine till it dies. Remove all coil packs and spark plugs. Open the oil filler, the radiator cap and prop open the throttle.
2) Rotate the first cylinder to TDC on the compression stroke using a wrench to turn the crank pulley clockwise.
3) With the shop air supply regulated to 100psi, and the engine locked in place using the wrench on the crank pulley, apply the shhop air.
4) Read the lower guage, it should read 80-100 psi. (80psi = 80%, therefore 20% loss. 95psi = 5% loss)
5) Listen to where the air is escaping to.
6) Repeat 2-5 on the remaining cylinders.
The loss should be less than 20% - any more than that is bad. More that 40% loss means you are doing something wrong, or your engine is crap. Less than 10% is great. Less than 5% is spectacular. 0% loss on a road engine means you must be doing the test wrong, because no engine can be that good, not even a racing engine.
5-20% loss, with the air escaping through the oil filler, is normal and good.
Any air escaping through the exhaust means you should suspect a poorly sealing exhaust valve. Similarly, air escaping through the throttle body means poorly sealing intake valve. Air coming through the radiator means bad head gasket.
The leakdown test is a good follow-up test to a compression check. It will help you pinpoint problems that exist, but also give you a better idea of the cylinder's condition than a compression check alone. A compression check can give artificially good numbers if you crank too many times, or if you have fluid pooling in the cylinder (leaking oil or fuel). Also you can get artificially high numbers from carbon buildup. If your engine passes a compression check AND a leakdown test then you can rest assured your engine is in good shape.
Supporting Maxima.org Member
Joined: Oct 2000
Posts: 9,159
What does a VB, TC, or tranny cooler do?
VB mod = valve body modification. Basically, tunes the valve body in the tranny to allow faster, quicker shifts. Slipping is elminated and tranny will eventually last longer.
Tranny Cooler = A radiator-like cooler for the transmission fluid. You need to get this if you have your VB recalibrated. The VB will make for faster shifts and your tranny fluid will run hotter. Heat is very bad for a transmission. The tranny cooler will keep the fluid at a lower temp. You can get this even without the VB mod.
TC = Torque Converter. Your auto has this already, but a stronger TC will increase your stall speed and transfer more power from engine to drivetrain. You will be able to get better launches and will lose less power than you would with your stock tranny.
Credit: UMD_MaxSE
Supporting Maxima.org Member
Joined: Oct 2000
Posts: 9,159
Can I convert my automatic to a 5-speed?
Yes.
Warning: This is not a weekend project! This involves time and money and someone who knows what they are doing! If you need a write-up, please donate and/or search.
If you want to use a guide, here it is:
How do I convert my Automatic to a 5-speed?
http://www.dynomagic.com/maxima/5spd_conversion.htm
Will a 2000 and 2001 Manual transmission fit 95-99 maximas? yes but...
In order for this tranny to function you will need to replace both axles. The car will not even move with the 4th gen axles.
Autozone axle part numbers are
Left drivers side 9717 and right side part number is ST1270. Call various autozones as they may say some stup!d **** like we dont make them etc..because they are too lazy to check the computer or dont feel like ordering them. The tranny seals are all the same thing from 95-01
left drivers side 38342-81X00 and 38342-81X01 for right side these are the seal part numbers. DAVEB the parts guy was right the internals are different. You will also need to remove your old speed sensor and install it on the 2K-2k1 tranny. If you dont do this you wont know how fast/miles you have traveled.
Guest
Posts: n/a
Write Up: Noisy AC compressor repair (pulley bearing)
Write Up: Noisy AC compressor repair (pulley bearing)
As promised, here is the detailed write up for the AC compressor pulley bearing repair.
Symptoms: Screech/howl coming from AC compressor as shown in this video: AC compressor noise
Diagnosis: the compressor's pulley bearing is worn out, causing the noise as shown here:
Pulley and clutch free spin
and here:
Pulley bearing spin, off vehicle
NOTE: it is also possible that your clutch disc could be dragging due to improper gap or a broken spring. this can be confirmed by spinning the clutch disc by hand while the pulley remains stationary (as shown in the "..clutch free spin" video above). in my case the clutch disc was fine.... but you should confirm this on your compressor. if your clutch disc is broken you can buy a new one from the AC Compressor Rebuilder referenced at the end of this write-up.
Repair:
A repair shop will tell you the entire compressor needs to be replaced, which also necessitates a full evac & recharge of the entire AC system and replacement of the drier/filter. Nissan dealers will charge >$900 for this job. independent shops may do it for $500-$600.
A better solution is to simply replace the pulley bearing for $30. The compressor itself remains on the vehicle so there is no need to recharge the system and replace the drier, and you save the cost of a new compressor (>$300).
NOTE: bearing replacement is only effective if the system is otherwise in good working condition (compressor has not seized, system has not leaked excessive oil, etc). If the compressor internals have been compromised then the entire compressor should be replaced.
Results: (click to watch)
Before - old bearing spin, off vehicle
After: new bearing spin, off vehicle
and
Before: old bearing, engine running
After: new bearing, engine running
In the "after" video, when the AC is turned on you can hear the "clanking" of the variable swash plate as described in the FSM
NOTE: Bearing Repair vs. New Compressor
Many people seem to think it is better to just put on new compressor. I would advise against this unless the compressor is damaged internally. aside from the extra $400+ for a new compressor, drier/filter & required recharge, there is considerable risk that the recharge may not be done correctly - infant mortality of replacement AC compressors is very high due to improper charging procedures (incorrect amount of oil, wrong oil type, failure to completely recover all old oil & refrigerant, failure to flush debris from the system, etc, etc). it is not a DIY job, and even shops often screw it up. too risky and too expensive when all that's needed is a new bearing.
replacing the bearing will take 1-2 hours for a novice, barring any unforeseen problems. I could do it again in 30 minutes. if you don't want to try it, just buy the bearing and take it to a local mechanic. negotiate a reasonable fee -- 1hr labor or $75. any competent mechanic with a press can do the whole job for that, you'll still save a lot of $$ and not have to worry about the recharge.
Repair Procedure: - this should take 1-2 hours if all goes well
i) Tools needed:
- AC clutch removal tool (free rental from Autozone)
- snap ring pliers (free rental, or $6 to buy)
- 10mm & 14mm sockets
- 12mm wrench
- hammer & round blunt for bearing extraction
- 10 ton press for bearing insertion (or pay a shop $15 to do it)
ii) Parts needed:
- AC Clutch bearing (<$20 from houston bearing online)
NOTE: there are at least 4 different compressors on the 4th gen, and you need to verify the compressor model and/or bearing size before you order the bearing. ...one of these will work.... http://www.houstonbearing.com/Defaul...BEARING*6017@@
EDIT---> the bearing for the '99 calsonic v618 is a standard ball bearing 62mm x 40mm x 24mm (ODxIDxW). it can be purchased from any bearing supply company for <$20. just find one and tell them what you need. here's one that should work...http://www.houstonbearing.com/defaul...de=DAC40620024
- 36"~37" belt (if you wish to bypass compressor while completing the job). EDIT - measure the bypass belt path for your car with string... it seems some 4th gens are set up differently, or some people have UDP pulleys.
iii) Compressor Bypass - you my want to bypass the compressor if you need to drive the car while performing the job (e.g. if you need to take the pulley to a shop to press the new bearing in). Simply buy an appropriate 6-groove belt (NAPA is a good source) and run it around the alternator and you're good to go. Measure the bypass belt path with string to determine your belt size.
iv) Repair Steps
1) Raise vehicle on ramps & remove plastic shroud underneath AC compressor.
2) Loosen idler pulley nut, relieve tension on belt and remove belt.
3) Confirm noisy bearing by spinning pulley as show in video above.
4) The AC clutch and pulley assemblies are as follows:

5) Remove clutch center bolt using the clutch tool as follows

6) Remove clutch assembly by pulling outward with hand pressure - be careful to keep the shim. If clutch disc does not come off with hand pressure, a puller will be required. This may require detaching the compressor body from the engine block (while keeping refrigerant lines connected) and positioning it so as to make room for the puller.
7) Remove pulley snap ring.

8) Remove pulley with hand pressure. Again, a puller may be required.
9) Extract bearing using a hammer, a suitable round iron "blunt", and 2 boards for elevation. This will require a tremendous amount of force. The bearing is held in with "peans" -- little indentations in the pulley housing. you will need to force the bearing past those peans....


(embedded image limit reached, the rest will be links)....
http://img237.imageshack.us/img237/8...ngpush3ce3.jpg
http://img237.imageshack.us/img237/5...ngpush4gr1.jpg
10) Press in new bearing: if you have access to a 10T hydraulic press you can do this in less than 5 minutes. be sure to use a suitable "pusher race" so as not to damage the new bearing. Alternately, take the pulley and bearing to a trusted mechanic and negotiate a reasonable fee. For 10 minutes of work it shouldn't cost more than $15.
here's the new bearing pressed into the pulley (note the remnants of the "peans")...
http://img237.imageshack.us/img237/6...aringines6.jpg
NOTE: I would not use a hammer to force the new bearing in - I believe that would damage it. The force of extraction caused my old bearing to seize.
11) Re-install the pulley and clutch onto the compressor in the same way they were removed.
12) Measure clutch gap to confirm it is within FSM specs.
13) Tighten clutch center bolt, re-install AC belt and tighten to specs.
14) Start engine and test for proper AC clutch engagement.
Alternate Approach: AC Compressor Re-builder...
If you don't want to deal with the hassle of extracting the bearing and pressing it in, you can buy a rebuilt pulley and clutch assembly from an AC re-builder in Florida for $80+shipping w/ exchange. their website is http://www.autoaircompressors.com/
As promised, here is the detailed write up for the AC compressor pulley bearing repair.
Symptoms: Screech/howl coming from AC compressor as shown in this video: AC compressor noise
Diagnosis: the compressor's pulley bearing is worn out, causing the noise as shown here:
Pulley and clutch free spin
and here:
Pulley bearing spin, off vehicle
NOTE: it is also possible that your clutch disc could be dragging due to improper gap or a broken spring. this can be confirmed by spinning the clutch disc by hand while the pulley remains stationary (as shown in the "..clutch free spin" video above). in my case the clutch disc was fine.... but you should confirm this on your compressor. if your clutch disc is broken you can buy a new one from the AC Compressor Rebuilder referenced at the end of this write-up.
Repair:
A repair shop will tell you the entire compressor needs to be replaced, which also necessitates a full evac & recharge of the entire AC system and replacement of the drier/filter. Nissan dealers will charge >$900 for this job. independent shops may do it for $500-$600.
A better solution is to simply replace the pulley bearing for $30. The compressor itself remains on the vehicle so there is no need to recharge the system and replace the drier, and you save the cost of a new compressor (>$300).
NOTE: bearing replacement is only effective if the system is otherwise in good working condition (compressor has not seized, system has not leaked excessive oil, etc). If the compressor internals have been compromised then the entire compressor should be replaced.
Results: (click to watch)
Before - old bearing spin, off vehicle
After: new bearing spin, off vehicle
and
Before: old bearing, engine running
After: new bearing, engine running
In the "after" video, when the AC is turned on you can hear the "clanking" of the variable swash plate as described in the FSM
NOTE: Bearing Repair vs. New Compressor
Many people seem to think it is better to just put on new compressor. I would advise against this unless the compressor is damaged internally. aside from the extra $400+ for a new compressor, drier/filter & required recharge, there is considerable risk that the recharge may not be done correctly - infant mortality of replacement AC compressors is very high due to improper charging procedures (incorrect amount of oil, wrong oil type, failure to completely recover all old oil & refrigerant, failure to flush debris from the system, etc, etc). it is not a DIY job, and even shops often screw it up. too risky and too expensive when all that's needed is a new bearing.
replacing the bearing will take 1-2 hours for a novice, barring any unforeseen problems. I could do it again in 30 minutes. if you don't want to try it, just buy the bearing and take it to a local mechanic. negotiate a reasonable fee -- 1hr labor or $75. any competent mechanic with a press can do the whole job for that, you'll still save a lot of $$ and not have to worry about the recharge.
Repair Procedure: - this should take 1-2 hours if all goes well
i) Tools needed:
- AC clutch removal tool (free rental from Autozone)
- snap ring pliers (free rental, or $6 to buy)
- 10mm & 14mm sockets
- 12mm wrench
- hammer & round blunt for bearing extraction
- 10 ton press for bearing insertion (or pay a shop $15 to do it)
ii) Parts needed:
- AC Clutch bearing (<$20 from houston bearing online)
NOTE: there are at least 4 different compressors on the 4th gen, and you need to verify the compressor model and/or bearing size before you order the bearing. ...one of these will work.... http://www.houstonbearing.com/Defaul...BEARING*6017@@
EDIT---> the bearing for the '99 calsonic v618 is a standard ball bearing 62mm x 40mm x 24mm (ODxIDxW). it can be purchased from any bearing supply company for <$20. just find one and tell them what you need. here's one that should work...http://www.houstonbearing.com/defaul...de=DAC40620024
- 36"~37" belt (if you wish to bypass compressor while completing the job). EDIT - measure the bypass belt path for your car with string... it seems some 4th gens are set up differently, or some people have UDP pulleys.
iii) Compressor Bypass - you my want to bypass the compressor if you need to drive the car while performing the job (e.g. if you need to take the pulley to a shop to press the new bearing in). Simply buy an appropriate 6-groove belt (NAPA is a good source) and run it around the alternator and you're good to go. Measure the bypass belt path with string to determine your belt size.
iv) Repair Steps
1) Raise vehicle on ramps & remove plastic shroud underneath AC compressor.
2) Loosen idler pulley nut, relieve tension on belt and remove belt.
3) Confirm noisy bearing by spinning pulley as show in video above.
4) The AC clutch and pulley assemblies are as follows:
5) Remove clutch center bolt using the clutch tool as follows
6) Remove clutch assembly by pulling outward with hand pressure - be careful to keep the shim. If clutch disc does not come off with hand pressure, a puller will be required. This may require detaching the compressor body from the engine block (while keeping refrigerant lines connected) and positioning it so as to make room for the puller.
7) Remove pulley snap ring.
8) Remove pulley with hand pressure. Again, a puller may be required.
9) Extract bearing using a hammer, a suitable round iron "blunt", and 2 boards for elevation. This will require a tremendous amount of force. The bearing is held in with "peans" -- little indentations in the pulley housing. you will need to force the bearing past those peans....
(embedded image limit reached, the rest will be links)....
http://img237.imageshack.us/img237/8...ngpush3ce3.jpg
http://img237.imageshack.us/img237/5...ngpush4gr1.jpg
10) Press in new bearing: if you have access to a 10T hydraulic press you can do this in less than 5 minutes. be sure to use a suitable "pusher race" so as not to damage the new bearing. Alternately, take the pulley and bearing to a trusted mechanic and negotiate a reasonable fee. For 10 minutes of work it shouldn't cost more than $15.
here's the new bearing pressed into the pulley (note the remnants of the "peans")...
http://img237.imageshack.us/img237/6...aringines6.jpg
NOTE: I would not use a hammer to force the new bearing in - I believe that would damage it. The force of extraction caused my old bearing to seize.
11) Re-install the pulley and clutch onto the compressor in the same way they were removed.
12) Measure clutch gap to confirm it is within FSM specs.
13) Tighten clutch center bolt, re-install AC belt and tighten to specs.
14) Start engine and test for proper AC clutch engagement.
Alternate Approach: AC Compressor Re-builder...
If you don't want to deal with the hassle of extracting the bearing and pressing it in, you can buy a rebuilt pulley and clutch assembly from an AC re-builder in Florida for $80+shipping w/ exchange. their website is http://www.autoaircompressors.com/

Sparkplugs Information
How often should I replace my spark plugs? Unfortunately,there is no single answer to this question. As spark plugs grow older, they lose their sharp edges as material from the center and ground electrodes is slowly eroded away. As the gap between these two points grows, the voltage required to bridge the gap increases proportionately. Even the best ignition systems will be strained to supply enough voltage to completely burn the fuel. It is at this point, when fuel is being left unburned, that the time has come to change spark plugs.
Replacing worn out spark plugs with new ones (with sharp new edges) effectively restores the ignition system's efficiency. Misfires are reduced, power is restored, economy of operation is enhanced and emissions are reduced.
The best guide is the manufacturer's recommendation for your vehicle, as this particular service varies from brand to brand and model to model. In the absence of this information or in conjunction with it, you can rely on the advice of a mechanic who is familiar with your type of vehicle. In the best of all worlds, this would be a mechanic who is also familiar with the vehicle you own. If you find a good mechanic, whether dealer or independent, stick with him. The better he knows your personal vehicle, the better he will be able to diagnose and service it. The end result is very much like a doctor-patient relationship and, in the long run, you will have a healthier vehicle.
How much of a performance improvement can I expect from changing plugs?
A common misconception is that changing spark plugs will result in a large power increase. In most cases, removing even seriously worn out spark plugs will only result in very modest power gains, typically about 1-2% of total engine output. This could be even less for computer-controlled vehicles, primarily because most newer vehicles have more powerful ignition systems and the vehicle's computer can make adjustments so that vehicle operation seems smoother and more seamless.
Many people think that simply supplying more spark to the firing tip can and will combust more fuel. What they don't understand is that most newer cars' engines are so efficient that they are already burning all of the available fuel. Simply adding more spark voltage can't burn more fuel because there is no more fuel to burn.
When a stock or near-stock engine is given a fresh set of spark plugs, peak efficiency is restored. The power gains that come from this restored state of tune are usually minimal. Any company that tells you that their spark plug will provide significant gains in power in a stock or near-stock engine is making blanket statements that may not be supportable.
What is a "fouled" spark plug?
A spark plug is considered fouled when the insulator nose at the firing tip becomes coated with a foreign substance such as fuel, oil or carbon. This coating makes it easier for the voltage to follow along the insulator nose, leach back down into the metal shell and ground out rather than bridging the gap and firing normally.
Many factors can contribute to spark plug fouling. The air/fuel ratio may be too rich as a result of incorrect carburetor adjustment or a poorly performing fuel injection system. Worn piston rings or valve seals may allow too much oil to leak into the combustion chamber, leading to oil fouling. The ignition system may not be performing properly. Prolonged idling or continuous low-speed driving may keep the spark plug from reaching its optimum operating temperature. Using too cold a spark plug can lead to the same problem. Finally, a dirty air cleaner can create a too-rich condition which can lead to fouling.
Fuel, oil and carbon fouling can all be the result of different causes but, once a spark plug is fouled, it will not provide adequate voltage to the firing tip and that cylinder will not fire properly. In many cases, the spark plug cannot be cleaned sufficiently to restore normal operation. Therefore, it is recommended that a plug be replaced once it is fouled.
Does compression ratio affect firing end temperature?
Yes, the by-product of increased compression is the elevation in cylinder temperatures. This is why it is recommended to choose a spark plug suitable for your application. NGK Spark Plugs recommends dropping heat ranges and altering Air/Fuel mixtures and timing as needed. It is very important to dissipate the excess heat from the combustion chamber in order to prevent pre-ignition.
Are special plugs always necessary on a modified engine?
It depends on the modifications. The term "modified" refers to those engines that have received bolt-on improvements that may or may not raise the engine's total compression ratio. These can include turbocharging, supercharging, nitrous oxide injection, the use of smaller-chambered cylinder heads, modified piston configurations, free-flowing cylinder heads, change of induction components and/or the use of different fuel types and octane. These kinds of modifications generally require a change from stock spark plugs.
Modifications that will typically not require specialized plugs (in most cases the factory installed plug will be more than adequate) include adding a free-flowing air filter, headers, mufflers and rear-end gears. Basically, any modification that does not alter the overall compression ratio will not usually necessitate changing plug types or heat ranges. Such minor modifications will not significantly increase the amount of heat in the combustion chamber, hence, a plug change is probably not warranted.
However, when compression is raised, along with the added power comes added heat. Since spark plugs must remove heat and a modified engine makes more heat, the spark plug must remove more heat. A colder heat range spark plug must be selected and plug gaps should be adjusted smaller to ensure proper ignitability in this denser air/fuel mixture.
Typically, for every 75-100 hp you add, you should go one step colder on the spark plug's heat range. A hotter heat range is not usually recommended except when severe oil or fuel fouling is occurring.
Does humidity affect spark plug temperature?
Yes, humidity does affect spark plug temperature. As the humidity increases, the intake air mass decreases. This results in lower combustion pressures and temperatures, causing a decrease in the spark plug's temperature.
Does ignition timing affect a spark plug's temperature?
Yes, ignition timing directly affects the firing end temperature of the spark plug. Advancing the ignition timing prolongs the time to compress the burning gases. The pre-ignition temperature also elevates gradually, since the pressure and temperature of the combustible mixture is low before ignition. Advancing your timing elevates firing end temperatures.
What is pre-ignition?
Pre-ignition is defined as the ignition of the air/fuel mixture before desired ignition timing.
What is detonation?
Detonation is a spark plugs worst enemy. It can break insulators and ground electrodes. Spark plug temperatures can reach in excess of 3000 �F.
Detonation, in simple terms, is a violent uncontrolled burn of the air/fuel mixture, which occurs when excessive heat and cylinder pressure causes the air/fuel mixture to spontaneously ignite.
Can I use platinum plugs with nitrous injection?
No, it is not suggested to use platinum plugs with nitrous oxide injection.
There have been instances where the platinum tip has lost its bond to either the center or ground electrode when they were used in a motor with nitrous.
Thus far the tech's say they have had no problems using Iridium plugs with nitrous.
Can I use Iridium plugs with nitrous injection or a blown alcohol motor?
A-. Yes, and Yes.
We double checked with the tech�s on this one, they say, while they have been watching for problems, thus far, there has been no reports of any problems in using iridium plugs with a nitrous system.
There should not be any problems using Iridium with a blown alcohol motor
I have slightly modified my motor, do I need a colder spark plug?
Possibly(more info below)
What is the torque setting for my plugs?
Plug torque settings
It is essential to tighten a spark plug to the specified turning angle or torque setting. This is for a number of reasons, over tightening can cause;
1) Damage to the threads in the cylinder head (especially aluminum heads).
2) Damage the threads of the spark plug.
3) Damage the internal seal of a spark plug allowing combustion chamber blow-by.
Under tightening of the spark plug can cause plug overheating and possibly pre-ignition. This is because one of the primary purposes of the spark plug is to remove heat from the combustion chamber, it does so by transferring that heat to the engine head. If the plug is not properly tighten it will not have sufficient contact with the head to transfer that heat. Proper tightening procedure is described below.
**Torque 14-22 ft-lb**(as per FSM)
Should I gap my Iridium Plugs?
The manufacturers say NO.
This is because most people do not know how to properly gap a spark plug, and the center electrodes on the ultra-fine iridium can easily snap if mishandled. There is no warranty for snapped center electrodes. The manufacturers say an iridium spark plug will run so much better than a traditional plug, even if it is not gapped for that motor, that they would prefer you just leave it rather than risk snapping the center electrode.
Personally, we at sparkplugs.com, gap our iridium plugs for our own vehicles (we�re rebels). If you insist on gapping your iridium plug, please refer to Proper Gapping for instruction.
How long will my iridium spark plugs last?
A traditional iridium plug such as a Denso IK20 or NGK ZFR6FIX-11 both have iridium center electrodes, however the ground electrodes are the traditional nickel construction. The ground electrode will wear out first. The manufacturers are saying 40,000 to 60,000miles on iridium plugs. But they have to temper their projections as driving conditions and motor modifications differ. Typically we have found you can expect 60,000 to 80,000 miles on an unaltered motor. (the wife�s mini-van has had the Denso's for 76,000 miles, I examined 2 of the plugs, they had some minor spooning on the ground electrode, I put them back in and will likely change them in another 5,000 miles)
Both Denso iridium racing plug and some NGK Iridium racing plugs have iridium center and a platinum ground electrodes. If installed to a regular engine they would likely last longer than most people keep their car (barring any motor problems that can cause premature plug death). But, these usually come in heat ranges too cold for an unaltered motor and are usually used in racing applications where all bets are off.
For the traditional automotive market, the longest lasting plugs are the NGK "IFR" series and the Denso "SK" series. These have Iridium center and platinum tipped ground electrodes, however these are extremely limited in application as they only manufactured these in a couple of heat range configurations.
Can old spark plugs be cleaned?
Yes, you can clean spark plugs, but in most cases its not worth it.
We do not recommend it for a number of reasons. In short, you will not get the same performance from a cleaned plug as a new plug. This is because electricity likes sharp edges to discharge from, a used plug will already have wear, and cleaning may contribute to that wear even more. (depending on the cleaning method used) If you want to try it, the below cleaning procedure was supplied to us by an old motor head. Good luck!
If the firing end is wet, make sure you clean the spark plug with a quick drying cleaner. (Examples: contact cleaner or brake cleaner).
Sand blast the spark plug using low air pressure and use a dry compound.
Completely blow all the sand from the spark plug.
Using a wire brush clean the threads and re-gap.
NOTE: Insufficient cleaning of the spark plug may lead to spark plug failure in a very short period of time. Clean the spark plug thoroughly to avoid problems later. Remember, if a spark plug is fouling it's usually a result of engine side factors or incorrect heat range selection.
Do I need to Gap my plugs?
Maybe, but likely not. Many plugs are pre-gapped for their most popular applications, however, the gap can be altered if the plug is dropped or mishandled in packing/shipping. Therefore even if the plugs are supposedly preset for your motor, it is always wise to check the gap on each plug prior to installing.It is not recommended you adjust the gap on multi-ground plugs.
What is proper spark plug gap for my motor?
.039-.043(as stated in the fsm)
What is the maximum I can open or close the gap?
Manufacturers don't recommend adjusting the spark plug gap < or > .008". The reason for this is the ground electrode and center electrode won't line up properly, hindering spark plug performance.
Proper gapping
In most cases the factory set gap should conform to your vehicle specifications. However if it is necessary to widen the gap, do so with a tool that only pulls back on the ground electrode without touching the center electrode or the porcelain. To close the gap on a plug, gently tap the plug, electrode first on a hard surface.
Heat range
The term spark plug heat range refers to the speed with which the plug can transfer heat from the combustion chamber to the engine head. Whether the plug is to be installed in a boat, lawnmower or racecar, it has been found the optimum combustion chamber temperature for gasoline engines is between 500�C�850�C. When it is within that range it is cool enough to avoid pre-ignition and plug tip overheating (which can cause engine damage), while still hot enough to burn off combustion deposits which cause fouling.
The spark plug can help maintain the optimum combustion chamber temperature. The primary method used to do this is by altering the internal length of the core nose, in addition, the alloy compositions in the electrodes can be changed. This means you may not be able to visually tell a difference between heat ranges. When a spark plug is referred to as a �cold plug�, it is one that transfers heat rapidly from the firing tip into the engine head, which keeps the firing tip cooler. A �hot plug� has a much slower rate of heat transfer, which keeps the firing tip hotter.
An unaltered engine will run within the optimum operating range straight from the manufacturer, but if you make modifications such as a turbo, supercharger, increase compression, timing changes, use of alternate racing fuels, or sustained use of nitrous oxide, these can alter the plug tip temperature and may necessitate a colder plug. A rule of thumb is, one heat range colder per modification or one heat range colder for every 75�100hp you increase. In identical spark plug types, the difference from one full heat range to the next is the ability to remove 70�C to 100�C from the combustion chamber.
The heat range numbers used by spark plug manufacturers are not universal, by that we mean, a 10 heat range in Champion is not the same as a 10 heat range in NGK nor the same in Autolite. Some manufacturers numbering systems are opposite the other, for domestic manufacturers (Champion, Autolite, Splitfire), the higher the number, the hotter the plug. For Japanese manufacturers (NGK, Denso), the higher the number, the colder the plug.
Do not make spark plug changes at the same time as another engine modification such as injection, carburetion or timing changes as in the event of poor results, it can lead to misleading and inaccurate conclusions (an exception would be when the alternate plugs came as part of a single precalibrated upgrade kit). When making spark plug heat range changes, it is better to err on the side of too cold a plug. The worst thing that can happen from too cold a plug is a fouled spark plug, too hot a spark plug can cause severe engine damage
much of the info taken from http://www.sparkplugs.com and http://www.ngksparkplugs.com
The following information was added by sky jumper:
NGK plugs (according to their official product line):
V-Power Copper -- BKR5E-11 -- $1.89 ea
G-Power Platinum -- BKR5EGP -- $2.99 ea
OE Laser Platinum -- PFR5G-11 -- $9.99 ea
OE Laser Iridium -- IFR5E11 -- $9.99 ea
Iridium IX -- BKR5EIX-11 -- $6.99 ea
I believe the Iridium IX, like the G-Power, do not have the platinum tipped ground electrode or the laser welded center electrode, hence they are cheaper than the two OE laser products.
http://www.ngksparkplugs.com/part_fi...engineid=30512
http://www.ngksparkplugs.com/product...x.asp?mode=nml
These are the most popular platinum and iridium plugs
Denso Iridium Ik16 $11.99
0.4mm Iridium Center Electrode, Tapered Cut
U-Groove Ground, Resistor, .044" Gap
Ngk Iridium Ifr5e-11 $11.71
Resistor, Projected Tip, Extremely Long Life
Plug, Iridium Center Electrode With Platinum
Tipped Ground Electrode, .044"Gap
Ngk Platinum Oem Pfr5g-11 $11.71
Resistor, Projected Tip, Extreme Long Life Double
Platinum, Fine Point Platinum On Center
Electrode, Platinum Tip Laser Welded On Ground
Electrode, .044"Gap
Champion Iridium 9201 $8.11
Resistor, Projected Tip, Extremely Long Life
Plug, Iridium Center Electrode With Platinum
Tipped V-Trimmed Ground Electrode, .040"Gap
Ngk Iridium Ix Bkr5eix-11 $6.95
Resistor, Projected Tip, Fine Wire (0.6mm)
Iridium Center Electrode, Tapered Cut Ground
Electrode, .044" Gap
Denso Double Platinum Pk16pr-L11 $6.82
Projected Tip, Resistor, Double Platinum,
.044"Gap
Champion Double Platinum Rc12pyp $5.47
Double Platinum, Resistor Plug, Projected Tip
Autolite Double Platinum App3924 $5.30
Gasket Seat, Resistor, Power Tip, Copper Core,
Double Platinum
Iridium
Iridium is a precious metal that is 6 times harder and 8 times stronger than platinum, it has a 1,200=F higher melting point than platinum and conducts electricity better. This makes it possible to create the finest wire center electrode ever. Prior till now, spark plug manufacturers have favored platinum for their long life or performance spark plugs due to its high melting point, also the technology did not exist to machine and bond iridium on a spark plug electrode (at least in a cost effective manner). Champion spark plugs have produced iridium industrial and aviation spark plugs since the 1960's, but they still sell for over a hundred dollars per plug. Just now is the technology cost effective to use iridium in a spark plug for automotive applications. The strength, hardness and high melting point of iridium make it very well suited for a fine wire plug. The primary iridium plug manufacturers at this time are Denso with a 0.4mm center electrode, while Champion and NGK have 0.7mm center electrodes. These are the best performance plugs on the market for traditional automotive use and many racing applications. Autolite has introduced an iridium-enhanced plug (the iridium content is too low to call it an iridium plug) we do not consider this in the same class as Denso, NGK or Champion.
SIDENOTE: Thus far the tech's we have spoken with report no problems using iridium plugs with Nitrous.
Platinum
PLATINUM'S USE IN SPARK PLUG CONSTRUCTION
Nearly all spark plug manufacturers use platinum in one form or another on their long life or performance spark plugs. This is because of platinum�s high melting point which makes it useful in two ways. On long life spark plugs a thin wafer of platinum is bonded at the firing point to the center electrode (and possibly ground electrode) solely so they don�t wear as fast as a traditional plug. On a fine wire performance plug, the very tip of the center electrode is made of platinum so that the fine wire tip will last longer. Do not be fooled, all platinum plugs are not created equal, Platinum is a very expensive precious metal, a $2 platinum spark plug will not have much platinum in it, and therefore will not last as long as a $12 platinum spark plug. Some platinum plugs have only the center electrode tipped with platinum, while others have both the center and ground electrodes platinum tipped. (it is not suggested that platinum plugs be used on vehicles with nitrous injection, there have been no problems reported using iridium plugs with nitrous).
Resistor
At the moment the spark jumps the gap it causes a high frequency burst of energy, this is known as RFI (radio frequency interference). This is why resistor spark plugs were introduces in the mid 1960's. Placing a resistor within the spark plug suppresses the RFI. Without resistor plugs in your car you can experience static on your radio as well as interfere with other sensitive electronic equipment. Some later model vehicles as well as newer Powersport engines must use resistor plugs for a proper "talkback" to the electronic ignition. Outboard marine Capacitive Discharge Ignition (CDI) such as used on some Johnson and Evinrude marine engines require a special inductive type resistor (such as a Champion Q-type or NGK Z-type). Use of non-inductive resistor type plugs on these motors can cause misfire and poor performance.
For automotive CDI high output ignition systems systems (such as Mallory, MSD, Crane and Accel), refer to Resistor plugs for race engines for information relative to modified motors.
When should I use a resistor spark plug?
"R" or resistor spark plugs use a 5k ohm ceramic resistor in the spark plug to suppress ignition noise generated during sparking.
NGK strongly recommends using resistor spark plugs in any vehicle that uses on-board computer systems to monitor or control engine performance. This is because resistor spark plugs reduce electromagnetic interference with on-board electronics.
They are also recommended on any vehicle that has other on-board electronic systems such as engine-management computers, two-way radios, GPS systems, depth finders or whenever recommended by the manufacturer.
In fact, using a non-resistor plug in certain applications can actually cause the engine to suffer undesirable side effects such as an erratic idle, high-rpm misfire, engine run-on, power drop off at certain rpm levels and abnormal combustion.
Prices are according to this website http://www.sparkplugs.com so may it be lower or higher depending where you buy them i wrote it so you guys have an idea of the cost between each one.
Consider these steps an add-on to MOTORVATE'S write-up that are missing.
First off, ensure you have
- large breaker bar
- metal file
- general purpose grease
- Condom (dry, non lubricated)
Add-ons:
a) When you try to remove the fans, you'll need to disconnect the radiator hose on the right side of the radiator. It'll make removing the fans 99.9% easier.
b) Take the condom and put it over the radiator where the hose was connected. It'll actually collect the dripping radiator fluid.
c) When you remove the bolt from the top of the radiator, don't even try a wrench, use a breaker bar. These bolts are in tight if they've never been off before.
d) Drop the condenser BEFORE you attempt to get at the rear bolt. Chances are, you'll need the breaker bar to that those four bolts off as well.
e) When you attempt to remove the rear bolt, use the breaker bar again - do not attempt to use a wrench.
f) Before you put the replacement alternator in, grab a fine metal file and file away at where the lower bolt contacts the inside of the car bracket. The re-furbed alternators will have that cheap silver pant and trying to fit it back on the bracket on the engine is near impossible. By filing it smooth for a few minutes, it'll fit back into the lower bolt bracket as smooth as butter making aligning it to put in the lower bolt easy peazy. Trust me.
g) Before putting the two alternator and the four compressor bolts back in, grease them up good. I think Nissan was scared to use grease/lub on ANY of their bolts for some reason. As a result, taking off bolts that have never been touched since assembly require a breaker bar for removal.
h) It's a great opportunity to replace your drive belt. Make sure you spend AT LEAST $20 on this belt, preferably a gatorback from Goodyear or an OEM. Cheaping out on belts is BAD news.
A warning to anyone with an UDP
This is the result of a 2 year old Motostrom UDP. The bolts holding the timing ring on the back came out over time and caused a catastrophic failure. I would think that anyone running a TRUE 3.5 with TRUE 3.5 timing would be safe as there is no timing ring that is bolted to the pulley.
Just a word of advice, ditch your aftermarket pulley and deal with losing the 1.5 horse power you gained.
Metal shavings in the timing case and oil pan FTL!

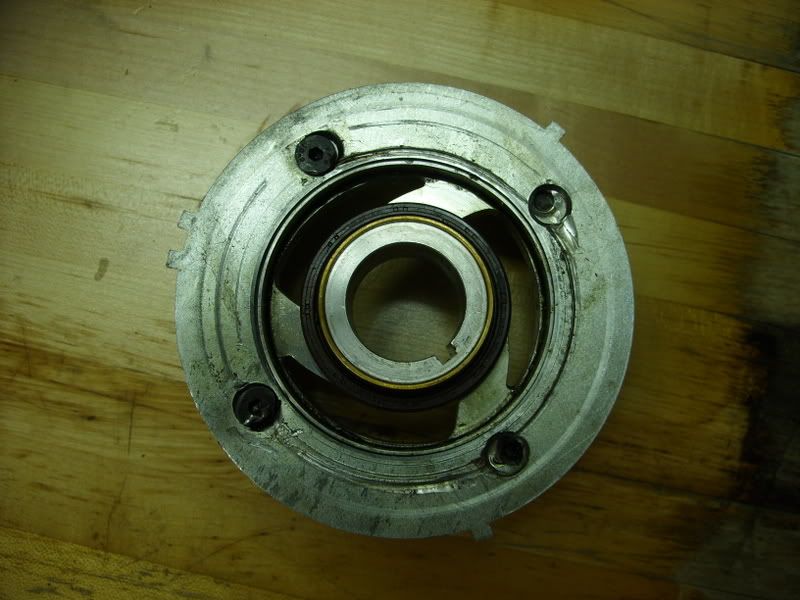
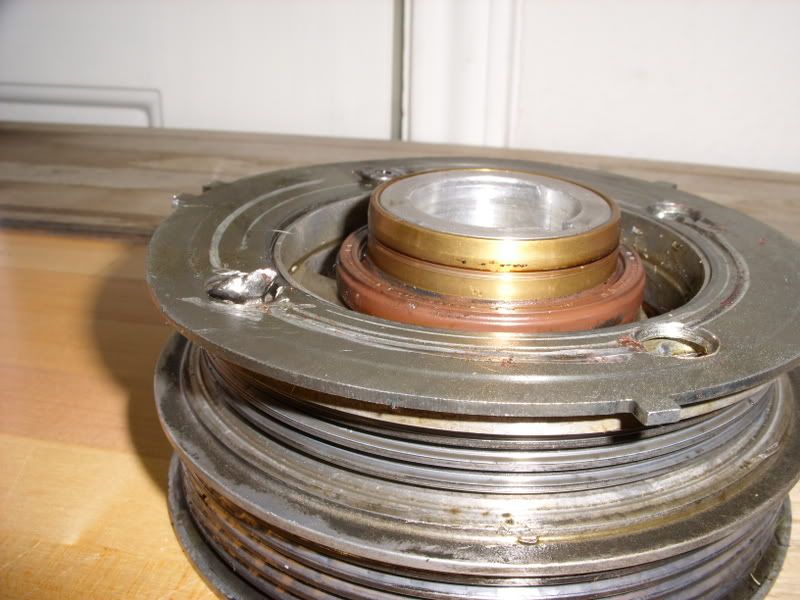

Just a word of advice, ditch your aftermarket pulley and deal with losing the 1.5 horse power you gained.
Metal shavings in the timing case and oil pan FTL!
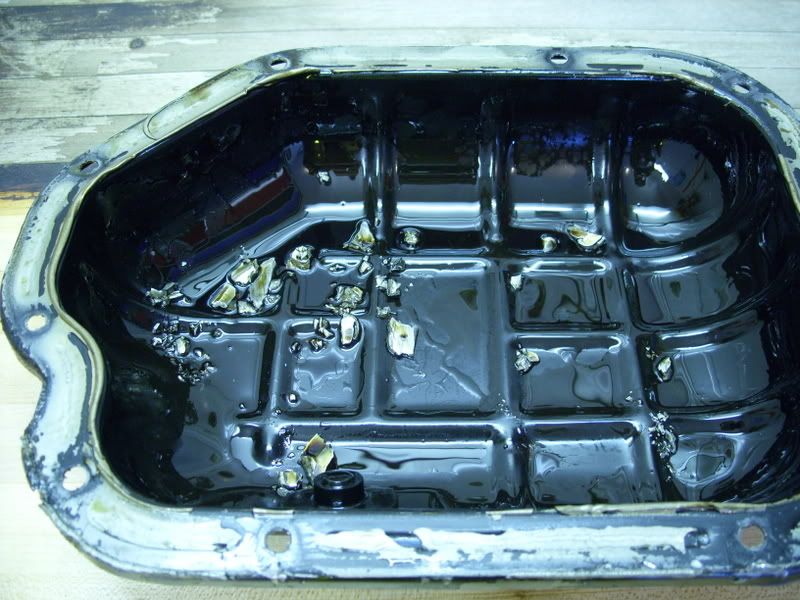
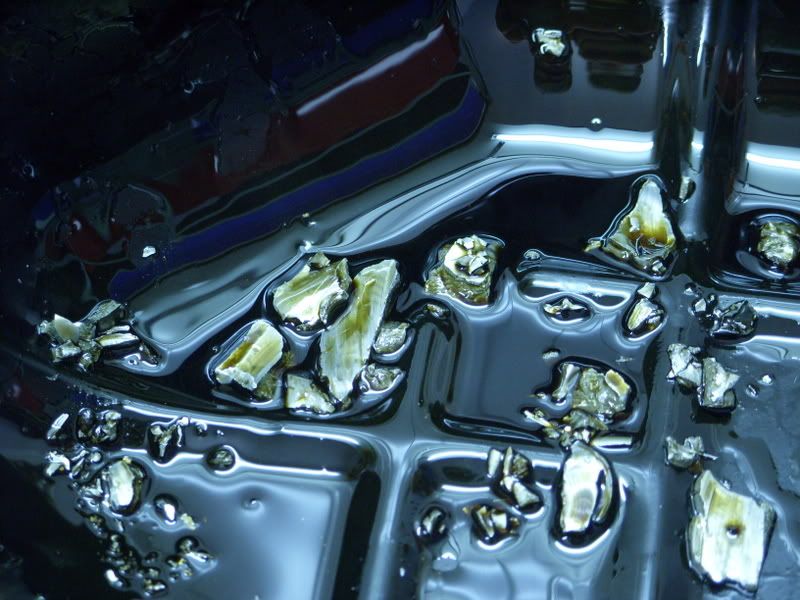

Manual Transmission FAQ
This Q/A applies to manual transmissions only.
What gear oil should I use? How much?
Ideally you should use a 75w-90 weight gear oil rated to GL-4 specifications only. The transmission is designed to shift with GL-4 oil, so using GL-5 or GL-4/GL-5 oil can reduce shifting performance. GL-4 Synthetics like Redline MT-90 or Amsoil MTG are best. You will need 4.5 qts to completely fill the tranny.
To drain the old oil, start by loosening the refill plug first - read 2 paragraphs down. Use the small bolt with 12mm head to drain the tranny. It is located near the rear of the tranny case, facing the center of the car, about 4" forward of the rubber accordian boot at the back of the tranny.
If you choose to drain by removing the gear position sensor (big black plastic thing on the driver's side), be *very* careful not to crack it. Start by rotating it in the bore before very carefully prying it out around the perimeter. Oil will gush out, so be ready with a large, deep catch pan. The oil also stinks.
Refill plug is the big plug directly under the battery. Loosen this plug with a 1/2" square socket wrench and fill to the bottom of this opening with the car level. A funnel on a flexible tube works well for the filling. Make sure the oil is at least room temperature so that it pours faster. Be smart and remove the fill plug BEFORE removing the drain plug.
My axle seal is leaking.
You can replace the seal, but be warned that another reason for leakage at the axle seal is differential carrier bearing wear. The differential is located in the transmission right between the axles, and each axle is fitted into the differential. If the bearings wear out, the differential will become loose inside the transmission and the looseness will cause oil to leak through the seals, even if the seals are new.
Perform this test to check for diff carrier bearing wear:
- under the car, hold the big axle stub at the inner end of the axle. Lift this up and down, looking for any motion of the differential inside the transmission. If your bearings are good, there will be no motion except a *very* slight play between the axle and differential.
- or with the axle pulled, insert a clean, sturdy bar or rod and pry the differential in different directions. If you can make the differential move inside the tranny at all, the bearings are shot.
Why does my tranny grind when I shift?
First check that the oil is properly filled and has been replaced in the last 60k/5 years. For many, using a good gear oil will make enough difference.
Also do not force the tranny into gear or try to shift faster than necessary and be sure the clutch pedal is all the way down until it's in gear. In most cases, taking an extra fraction of a second to complete the shift makes a big difference.
If the grind occurs in more than one gear, be sure your clutch is fully disengaging and operating properly.
If that is good, then you probably have wear on the synchros and gear shifter teeth. Be warned that while changing the synchros will help with the shifting, most rebuilders will not replace the shifter rings and gears due to cost. To completely solve the problem, new gears, shifter rings, and synchros are usually required. This can make rebuilding a tranny more costly in some cases than buying a new(er) unit.
What is a tranny rebuild?
At a minimum, a manual transmission rebuild involves replacing all bearings and seals in the transmission. The transmission is fully disassembled, cleaned, and reassembled with new parts as required. Synchros, gears, slider rings, and shafts are other common parts that get replaced. The spacer shims are adjusted if required.
Note that replacing the hard parts can get very expensive. I suggest agreeing with your rebuilder to agree upon a cost at which they will call for your approval to exceed. If a gear pair or shaft needs replacement the costs can add up quickly.
If you have your tranny rebuilt, be sure to require that the rebuilder *measure* the endplay of the shafts, particularly the differential. If a different spacer shim size is required, it can take a while to get the proper shim sizes from Nissan so plan accordingly. These shims are critical for the rebuilt bearings last longer than the original. Cheap/lazy shops will re-use the shims without measuring to save time and labor.
How do I know if my tranny needs rebuilt?
Rough shifting, worn bearings (often discovered by the axle seal oil leak), noisy bearings. If you have any doubt take it to a tranny rebuilder and have them test or inspect the car.
When you drain your tranny oil, inspect it for fine metal flakes. Spread a little bit on your fingertip and hold it under a bright light. Silver metal flakes indicate substantially worn bearings and need for a rebuild. Gold metal flakes suggest synchro damage.
If you have your transmission removed from the car, or a used transmission ready to be installed, I highly recommend paying a tranny shop an hour of labor to open and inspect it before installing. This is the best way to assess the condition of your tranny, and if there is work to be done, provides the most accurate and lowest cost estimates.
I hear a bearing noise. Is it my clutch throwout bearing or a tranny bearing?
Bearing noise is typically a growling, rolling, or whining noise coming from the engine bay on the drivers side.
Tranny input shaft bearings tend to make noise when the clutch is out and the tranny is in neutral. Throwout bearings tend to make noise when the clutch is engaging or disengaging, but not when the tranny is in neutral. The other tranny bearings usually don't make any sound. The throwout bearing is not inside the tranny, so it doesn't require a rebuild to replace it, but it still requires removing the tranny.
What is VLSD and how much better is it?
VLSD stands for Viscous Limited Slip Differential. The other type is an open differential. Open differentials will freely allow the two front wheels to rotate at different speeds, in fact if the front wheels are off the ground, rotating one wheel will cause the opposite wheel to rotate in the opposite direction.
VLSD keeps both wheels spinning in the same direction and provides some resistance when they are rotating at different speeds.
The big difference in driving is that if one wheel loses traction, an open differential will spin that wheel. In a VLSD, it will not spin a wheel until both wheels are closer to the threshold of sliding, thus providing more grip and better control. This is useful both on dry pavement and in slick conditions. The VLSD was standard equipped on many Canadian models for it's winter weather benefits.
Can I install a 6 speed?
Yes, but it requires modification to the shifter. The 4th gen manual transmission is shifted using a lever, and the 6 speeds found in the later Maximas are shifted by cable. While it is not impossibly complicated, it is not a direct bolt-in.
How to REBUILD 5speed transmission
http://forums.maxima.org/showthread....00#post6215300
Last edited by dgeesaman; May 9, 2008 at 04:13 AM.

Newbie - Just Registered
Joined: Aug 2006
Posts: 8
From: Ypsilanti, MI
CEL: P0440 and/or P1448 DTC's
The P0440 is a generic EVAP system leak. The P1448 is a manufacturer specific code for the charcoal canister vent valve stuck open. The charcoal canister is located behind the left rear tire. It's a largish black box with a few hoses running to it.
First, check all of these hoses to make sure none or torn or otherwise damaged. If they check out, disconnect these hoses and the electrical connection with a pair of pliers. Then, remove the three screws that hold the box to the car, then push the rear bracket out of the way to remove it. With the box out, take off the two screws that hold the purge valve to the box. It takes a bit of force to remove the valve even with the screws out. Be firm, but don't break it.
Next, take some brake cleaner and spray through one of the holes so it flows out the other. Hose it for a good 10 seconds or so, then spray some silicone spray through it to lubricate it. Install the valve back on the box, put the box back in the car and reconnect the hoses and wire connector.
With the car back together, clear the codes on the ECU and you should be good. If this doesn't work, double check all the lines in that area and if all else fails, you might need a new canister vent valve. You should be able to test the valve by applying 12 volts to the two terminals. A replacement valve runs about $120 from a dealer, so do your best to fix your old one first.

I started a book on http://en.wikibooks.org for 4th generation Maxima's. Feel free to added anything to it or fix any mistakes, its a free public resource, run by wikipedia. Here is the link
http://en.wikibooks.org/wiki/Automob..._Generation%29
http://en.wikibooks.org/wiki/Automob..._Generation%29

Water Pump Replacement.
REMOVAL
Drain coolant from drain plugs on radiator and both sides of cylinder block.
Remove water pump drain plug.
Remove right side engine mounting, mounting bracket and nuts.
Remove drive belts and idler pulley bracket.
Remove chain tensioner cover and water pump cover
While pushing timing chain tensioner sleeve, apply a stopper pin so it does not return.
Then remove the chain tensioner assembly.
Remove the 3 water pump fixing bolts. Secure a gap between water pump gear and timing chain, by turning crankshaft pulley 20�backwards.
Fasten two M8 bolts to two M8 threaded holes (out of 3) water pump fixing bolt holes
Tighten M8 bolts by turning half turn alternately until they reach timing chain rear case.
In order to prevent damages to water pump or timing chain rear case, do not tighten one bolt continuously. Always turn each bolt half turn each time.
Lift up water pump and remove it.
CAUTION:
When lifting up on the water pump, do not allow the water pump gear to hit timing chain.
When removing the water pump assembly, be careful not to get coolant on drive belt.
NOTE: The water pump cannot be disassembled and should be replaced as a unit.
INSTALLATION:
Apply engine oil and coolant to the O-rings.
Before installing water pump, remove all traces of liquid gasket from mating surface of water pump cover and chain tensioner cover using a scraper. Also, remove traces of liquid gasket from mating surface of front cover.
NOTE: Do not allow cylinder block to nip O-rings when installing water pump.
Apply a continuous bead of liquid gasket to mating surface of chain tensioner cover and water pump cover.
Return the crankshaft pulley to its original position by turning it 20�forward.
Install timing chain tensioner, then remove the stopper pin.
NOTE: After installing the tensioner, race the engine at about 3,000 RPM under no-load to purge air from the high-pressure chamber. The engine may produce a rattling noise. This indicates that air still remains in the chamber and is not a matter of concern.
Install drain plug on cylinder block.
Reinstall any parts removed in reverse order of removal.
NOTE: After installing water pump, connect hose and clamp securely, then check for leaks using radiator cap tester.


EVAP Control Cleaning System Procedure
How to rebuild your master cylinder and front brake calipers:
http://forums.maxima.org/showthread....ghlight=master
http://forums.maxima.org/showthread....hlight=rebuild
http://forums.maxima.org/showthread....ghlight=master
http://forums.maxima.org/showthread....hlight=rebuild

Last edited by phenryiv1; Oct 21, 2008 at 05:28 AM.
Rebuilding a 4th generation 5-speed manual transmission (link includes pictures and discussion)
http://forums.maxima.org/4th-generat...te-up-pix.html
Credit: JtzMax
http://forums.maxima.org/4th-generat...te-up-pix.html
Credit: JtzMax
Last edited by phenryiv1; Feb 22, 2009 at 06:18 AM.

Can I convert my automatic to a 5-speed?
Yes.
Warning: This is not a weekend project! This involves time and money and someone who knows what they are doing! If you need a write-up, please donate and/or search.
If you want to use a guide, here it is:
How do I convert my Automatic to a 5-speed?
http://www.dynomagic.com/maxima/5spd_conversion.htm
Will a 2000 and 2001 Manual transmission fit 95-99 maximas? yes but...
In order for this tranny to function you will need to replace both axles. The car will not even move with the 4th gen axles.
Autozone axle part numbers are
Left drivers side 9717 and right side part number is ST1270. Call various autozones as they may say some stup!d **** like we dont make them etc..because they are too lazy to check the computer or dont feel like ordering them. The tranny seals are all the same thing from 95-01
left drivers side 38342-81X00 and 38342-81X01 for right side these are the seal part numbers. DAVEB the parts guy was right the internals are different. You will also need to remove your old speed sensor and install it on the 2K-2k1 tranny. If you dont do this you wont know how fast/miles you have traveled.
Yes.
Warning: This is not a weekend project! This involves time and money and someone who knows what they are doing! If you need a write-up, please donate and/or search.
If you want to use a guide, here it is:
How do I convert my Automatic to a 5-speed?
http://www.dynomagic.com/maxima/5spd_conversion.htm
Will a 2000 and 2001 Manual transmission fit 95-99 maximas? yes but...
In order for this tranny to function you will need to replace both axles. The car will not even move with the 4th gen axles.
Autozone axle part numbers are
Left drivers side 9717 and right side part number is ST1270. Call various autozones as they may say some stup!d **** like we dont make them etc..because they are too lazy to check the computer or dont feel like ordering them. The tranny seals are all the same thing from 95-01
left drivers side 38342-81X00 and 38342-81X01 for right side these are the seal part numbers. DAVEB the parts guy was right the internals are different. You will also need to remove your old speed sensor and install it on the 2K-2k1 tranny. If you dont do this you wont know how fast/miles you have traveled.
also incorrect. nothing needs to be changed over when switching to a 5th gen transmission.
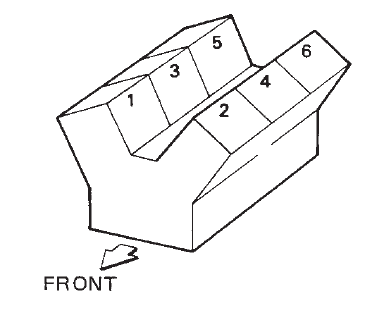
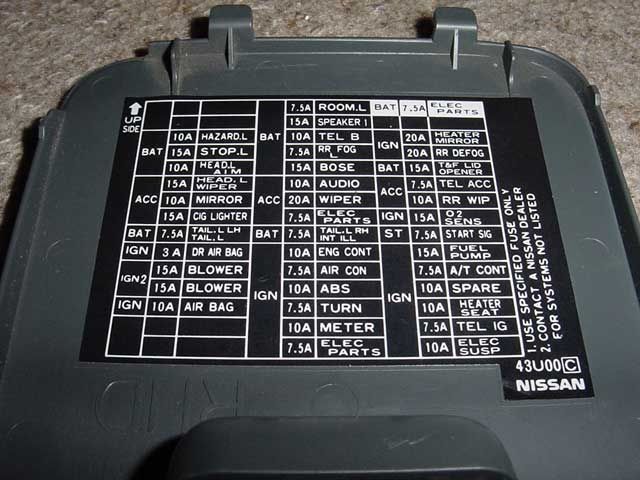

Before you replace a failing coil, CHECK THIS OUT:
http://forums.maxima.org/4th-generat...hins-fail.html
http://forums.maxima.org/4th-generat...hins-fail.html

Newbie - Just Registered
Joined: Feb 2017
Posts: 1
99 Maxima muffler/catalytic Bad?
Hey guys, i'm not completely sure if im posting in the correct thread or what. This place is a little hard to tell.. lol no offense.. anyway..
I just purchased a 1999 Maxima Se with only 58,xxx miles on her 2 days ago.(Guy that was selling it listed as a GXE but Vin is SE) This car is in excellent shape other then a few paint blemishes, and a rust spot in the right rear wheel well.. there really isnt anything wrong with her(SO FAR). Besides needing a little tlc.
However, when i test drove the car i noticed when i turned her over that there was a nice little roar from the exhaust, upon further inspection it looks like some one might have put an exhaust tip on the muffler but i cant quite tell.. when i drive the car there is no noise coming from the muffler however it makes a horrible "farting" noise at about 2000rpm then goes away either below or over the 2000rpm mark....and every time i go up a hill its a constant crackling/farting sound coming from the muffler regardless of rpm..
also took her on the highway where the speed limit is now 75. i got her up to 70 and noticed a horrid sulfur smell which i know is usually the catalytic converter. but i was just wondering if it could be that stupid muffler tip throwing things out of wack or if i should have my mechanic take a look at the C.V.
also any tips on what i should check on this car would be great, since shes old and came with NO PAPERWORK.. i'm kind of at a loss when it comes to maintenance before i purchased her.. although i doubt there was much considering shes got less then 60k on her.. again i am very sorry if i posted this in the wrong spot and understand if you delete or anything. but please point me in the direction of someone that can help a New Owner as this in my first Nissan.
I just purchased a 1999 Maxima Se with only 58,xxx miles on her
2 days ago.(Guy that was selling it listed as a GXE but Vin is SE) This car is in excellent shape other then a few paint blemishes, and a rust spot in the right rear wheel well.. there really isnt anything wrong with her(SO FAR). Besides needing a little tlc.However, when i test drove the car i noticed when i turned her over that there was a nice little roar from the exhaust, upon further inspection it looks like some one might have put an exhaust tip on the muffler but i cant quite tell.. when i drive the car there is no noise coming from the muffler however it makes a horrible "farting" noise at about 2000rpm then goes away either below or over the 2000rpm mark....and every time i go up a hill its a constant crackling/farting sound coming from the muffler regardless of rpm..
also took her on the highway where the speed limit is now 75. i got her up to 70 and noticed a horrid sulfur smell which i know is usually the catalytic converter. but i was just wondering if it could be that stupid muffler tip throwing things out of wack or if i should have my mechanic take a look at the C.V.
also any tips on what i should check on this car would be great, since shes old and came with NO PAPERWORK.. i'm kind of at a loss when it comes to maintenance before i purchased her.. although i doubt there was much considering shes got less then 60k on her.. again i am very sorry if i posted this in the wrong spot and understand if you delete or anything. but please point me in the direction of someone that can help a New Owner as this in my first Nissan.

Junior Member
Joined: Jun 2014
Posts: 50
From: Dallas, TX
Hey guys, i'm not completely sure if im posting in the correct thread or what. This place is a little hard to tell.. lol no offense.. anyway..
I just purchased a 1999 Maxima Se with only 58,xxx miles on her 2 days ago.(Guy that was selling it listed as a GXE but Vin is SE) This car is in excellent shape other then a few paint blemishes, and a rust spot in the right rear wheel well.. there really isnt anything wrong with her(SO FAR). Besides needing a little tlc.
However, when i test drove the car i noticed when i turned her over that there was a nice little roar from the exhaust, upon further inspection it looks like some one might have put an exhaust tip on the muffler but i cant quite tell.. when i drive the car there is no noise coming from the muffler however it makes a horrible "farting" noise at about 2000rpm then goes away either below or over the 2000rpm mark....and every time i go up a hill its a constant crackling/farting sound coming from the muffler regardless of rpm..
also took her on the highway where the speed limit is now 75. i got her up to 70 and noticed a horrid sulfur smell which i know is usually the catalytic converter. but i was just wondering if it could be that stupid muffler tip throwing things out of wack or if i should have my mechanic take a look at the C.V.
also any tips on what i should check on this car would be great, since shes old and came with NO PAPERWORK.. i'm kind of at a loss when it comes to maintenance before i purchased her.. although i doubt there was much considering shes got less then 60k on her.. again i am very sorry if i posted this in the wrong spot and understand if you delete or anything. but please point me in the direction of someone that can help a New Owner as this in my first Nissan.
I just purchased a 1999 Maxima Se with only 58,xxx miles on her
2 days ago.(Guy that was selling it listed as a GXE but Vin is SE) This car is in excellent shape other then a few paint blemishes, and a rust spot in the right rear wheel well.. there really isnt anything wrong with her(SO FAR). Besides needing a little tlc.However, when i test drove the car i noticed when i turned her over that there was a nice little roar from the exhaust, upon further inspection it looks like some one might have put an exhaust tip on the muffler but i cant quite tell.. when i drive the car there is no noise coming from the muffler however it makes a horrible "farting" noise at about 2000rpm then goes away either below or over the 2000rpm mark....and every time i go up a hill its a constant crackling/farting sound coming from the muffler regardless of rpm..
also took her on the highway where the speed limit is now 75. i got her up to 70 and noticed a horrid sulfur smell which i know is usually the catalytic converter. but i was just wondering if it could be that stupid muffler tip throwing things out of wack or if i should have my mechanic take a look at the C.V.
also any tips on what i should check on this car would be great, since shes old and came with NO PAPERWORK.. i'm kind of at a loss when it comes to maintenance before i purchased her.. although i doubt there was much considering shes got less then 60k on her.. again i am very sorry if i posted this in the wrong spot and understand if you delete or anything. but please point me in the direction of someone that can help a New Owner as this in my first Nissan.

Thread
Thread Starter
Forum
Replies
Last Post
max_speed97
5th Generation Classifieds (2000-2003)
2
Aug 26, 2015 07:46 PM
ViciousVQ30
4th Generation Classifieds (1995-1999)
0
Aug 5, 2015 05:40 PM