
CAI question...


CAI question...
I am going to install my PR style CAI, and had a question regarding the intake temperature sensor. In the stock intake it was mounted to the box in which the filter was in. Because I am keeping the stock resonator that is between the TB and MAF, there is no place to mount the ITS, so my question is... where can I mount it? I thought maybe in the intake tubing, but am not sure.

how much, if at all, does that sensor affect performance? cuz mine is just dangling, so im assuming what it does is.....read intake temperatures...and mine is reading engine bay temps??
 . . . .
Alright, thanks guys... upon doing more research I have solved my problem. I already knew that it does not affect anything other than tripping the CEL, I just didn't want that to happen. I'm going to fabricate a hole somewhere in the intake so that I can securely mount the IATC. /thread

Senior Member
Joined: Nov 2005
Posts: 369
From: Auckland, New Zealand
Advance apologies for a possible hijack. 
I've been toying with the idea of modifying my radiator mounts to lower it down may be 4 inches (100mm) to accommodate cold air intake piping to sit behind the front grille beside the front left headlight.
Hidden unlike a hood scoop and with better air flow than the PRCAI-style intake in the wheel well.
Anyone done this?
Originally Posted by PHAT6
Advance apologies for a possible hijack.
I've been toying with the idea of modifying my radiator mounts to lower it down may be 4 inches (100mm) to accommodate cold air intake piping to sit behind the front grille beside the front left headlight.
Hidden unlike a hood scoop and with better air flow than the PRCAI-style intake in the wheel well.
Anyone done this?
http://forums.maxima.org/showthread....=cai+fog+light

Originally Posted by Neo Raven456
Like others have said, I just made a hole and fabricated a mount.
Originally Posted by lilaclucymaxima
Looks good. Yeah, I'm going to drill a hole in the stock resonator between the TB and the MAF sensor. That way it's a nice flat surface. I'll take pics when I'm done.
Originally Posted by PHAT6
It does look lucy but does it go through the wheel well like the PR intakes or have you modified it to sit behind the front grille...?
Originally Posted by lilaclucymaxima
I am going to install my PR style CAI, and had a question regarding the intake temperature sensor. In the stock intake it was mounted to the box in which the filter was in. Because I am keeping the stock resonator that is between the TB and MAF, there is no place to mount the ITS, so my question is... where can I mount it? I thought maybe in the intake tubing, but am not sure.
Originally Posted by Neo Raven456
Like others have said, I just made a hole and fabricated a mount.
I just shoved it in one of the couplers holding the pipe to the maf, it sits in the proper direction to get air temp, and i didnt have to modify anything...takes like 2 seconds....just put it infront of the pipe, and push the coupler over the wire so it the wire gets sandwitched between the pipe and the coupler...then just tug on the wire a bit so the sensor is snug up against the pipe on the inside...that way its not just hanging in there...
Originally Posted by Themajesticking
only problem I see with this is that the actual sensor is not really located inside the tube. I did pretty much the same thing when i installed my PRCAI but once I got rid of the midpipe and put the stock one back on I noticed that it really didn't matter. I also noticed a dramatic increase in overall power and feel just by putting the stock midpipe back on. Anyways....good luck
But thank you for the insightful post, I might throw on the stock midpipe and see how it feels
Originally Posted by XeroX
I just shoved it in one of the couplers holding the pipe to the maf, it sits in the proper direction to get air temp, and i didnt have to modify anything...takes like 2 seconds....just put it infront of the pipe, and push the coupler over the wire so it the wire gets sandwitched between the pipe and the coupler...then just tug on the wire a bit so the sensor is snug up against the pipe on the inside...that way its not just hanging in there...
Originally Posted by Neo Raven456
Actually, the actual sensor is inside the tube:
But thank you for the insightful post, I might throw on the stock midpipe and see how it feels
But thank you for the insightful post, I might throw on the stock midpipe and see how it feels
Originally Posted by Neo Raven456
That's kind of defeating the purpose. Part of the reason the CAI creates the top-end power it does is due to the long straight tubing and smoothness of the airflow. I'm no expert, but from what I understand that's how it works, aside from the cooler air. Shoving the sensor and having the whole bracket and all sit in the, while still flush against the pipe is a bit obstructive and a bit unprofessional. Just my .02
Originally Posted by PHAT6
It does look lucy but does it go through the wheel well like the PR intakes or have you modified it to sit behind the front grille...?
Originally Posted by Neo Raven456
That's kind of defeating the purpose. Part of the reason the CAI creates the top-end power it does is due to the long straight tubing and smoothness of the airflow. I'm no expert, but from what I understand that's how it works, aside from the cooler air. Shoving the sensor and having the whole bracket and all sit in the, while still flush against the pipe is a bit obstructive and a bit unprofessional. Just my .02
Originally Posted by Neo Raven456
Actually, the actual sensor is inside the tube:
But thank you for the insightful post, I might throw on the stock midpipe and see how it feels
But thank you for the insightful post, I might throw on the stock midpipe and see how it feels

Originally Posted by XeroX
Personally i would have dont this on a section of the pipe before the maf...this way if there was a small air leak, it wouldnt be that big of a deal...but just make sure you seal it up reallly good..
Originally Posted by Neo Raven456
You mean place the sensor in the Long pipe that drops into the fender? That picture is with the sensor mounted into the mid-pipe, I just happened to have it all connected when I took the pic so you can see the MAF
I pretty much just got my CAI for the sound honestly...

Originally Posted by XeroX
yes, basically in any section before the MAF, The stock placement of the sensor is before the MAF anyways...probly for the same reason i mentioned before (easy location for an air leak) either that or in case the sensor were to fall apart or something the screen on the maf would prevent it from going into the motor....but that is HIGHLY unlikely....probly does not matter, im just throwing in ideas incase anyone wants to do the same thing...There is always room for improvement on things like this hehe, and i would do this to my PR CAI if i ever wanted to spend that much time on my intake, props for the install, im just too lazy to spend that much time on something like this
I pretty much just got my CAI for the sound honestly...
I pretty much just got my CAI for the sound honestly...
Not to bring this thing back from the dead, just posting the pictures I promised... along with a writeup, in case anybody else wants to do this in the future.
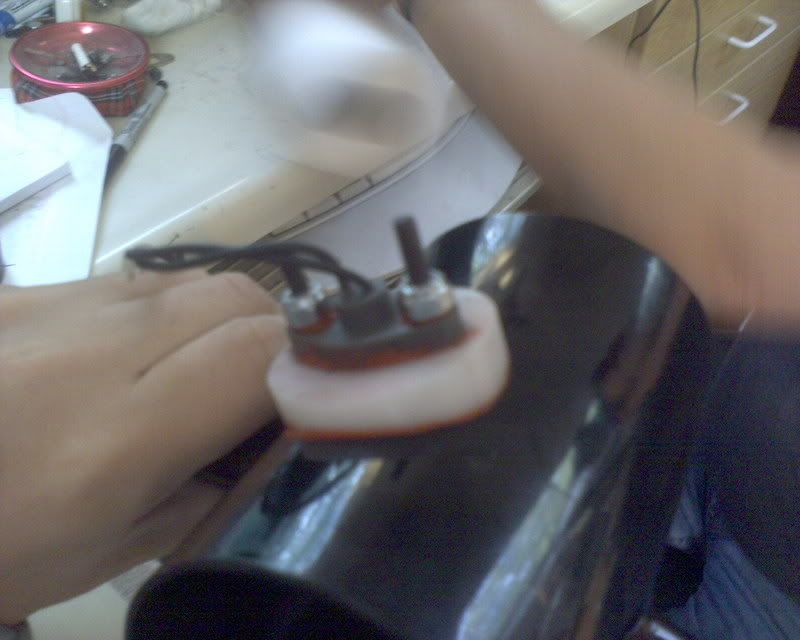
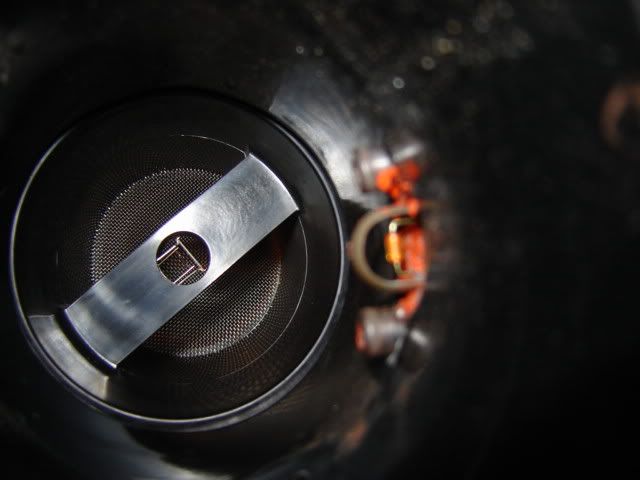
First, take the stock resonator out. Next step is to use the bronze bracket that the sensor screws into as a template and mark the holes. The larger hole in the center, which is where the sensor goes through is 7/16", and the two holes for the bolts are 1/4"... these are the measurements so it sits flushed with the flat surface. Next step is to drill the holes. Most important part... clean up ALL OF THE PLASTIC SHAVINGS you may leave behind, as I'm sure nobody wants that going into your engine. And re-install. That's pretty much it, not very hard. Here are the pics...

Made the template using the bronze bracket.

Drilled the holes.

This is a picture of the inside of it when finished.

Ready to put back in the car.

The finished product and a peak of my dirty a$$ engine bay.
Last edited by lilaclucymaxima; Mar 10, 2008 at 07:38 PM.

Thread
Thread Starter
Forum
Replies
Last Post
Maxima_Joe
4th Generation Classifieds (1995-1999)
16
Nov 25, 2015 08:19 AM
A32goldylocks
4th Generation Maxima (1995-1999)
8
Sep 16, 2015 01:33 PM
lowpost99
1st & 2nd Generation Maxima (1981-1984 and 1985-1988)
22
Sep 2, 2015 04:38 PM

