
Egr Sensor Replacement Help!!!!


Thread Starter
Senior Member
Joined: May 2007
Posts: 172
Egr Sensor Replacement Help!!!!
Hi,
I am throwing a code and have narrowed down the problem to the sensor.
This issue now is its removal. I was able to get a working one off of a dead engine, not a big deal. On the dead engine it was easy. I just cut it out, on mine I do not care to be as cut-happy.
the rubber hoses dont seem to want to budge, and the sensor is held on via a 10mm nut located... ready... UNDERNEATH THE DAMN THING!!!! I have big hands, and (get this) they are not made out of pure cartilage, therefore I have not figured out how to remove that nut. HELP QUICK PLEASE!!!!
Thank you.
(I'll try to get pictures of all of this later)
Edit:
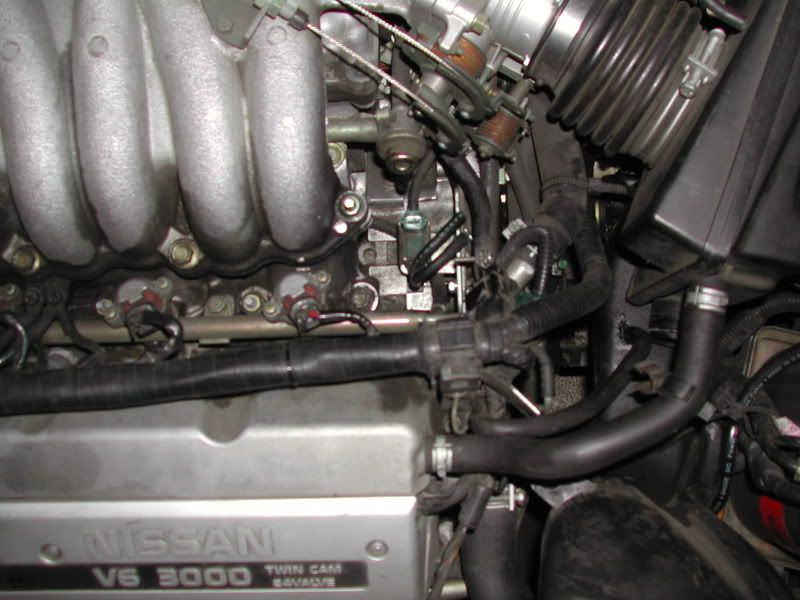
Here it is
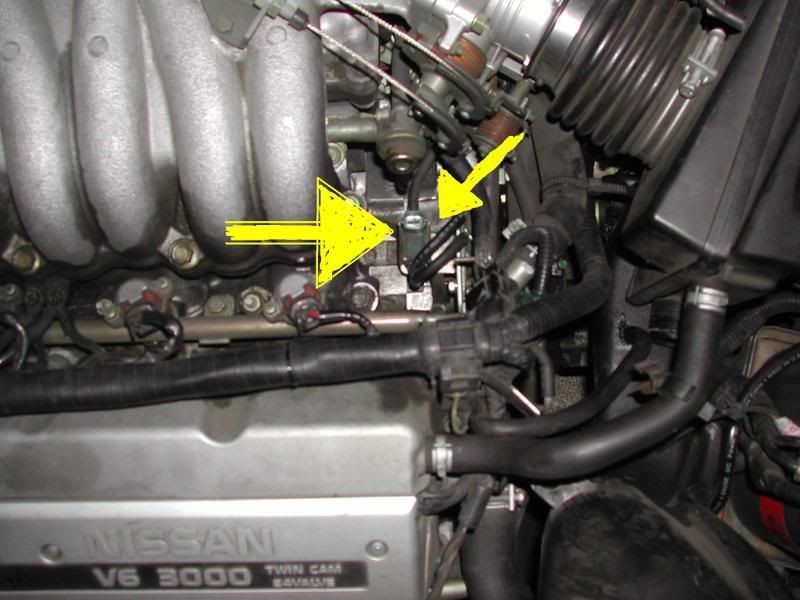
With Arrows pointing to it
I am throwing a code and have narrowed down the problem to the sensor.
This issue now is its removal. I was able to get a working one off of a dead engine, not a big deal. On the dead engine it was easy. I just cut it out, on mine I do not care to be as cut-happy.
the rubber hoses dont seem to want to budge, and the sensor is held on via a 10mm nut located... ready... UNDERNEATH THE DAMN THING!!!! I have big hands, and (get this) they are not made out of pure cartilage, therefore I have not figured out how to remove that nut. HELP QUICK PLEASE!!!!
Thank you.
(I'll try to get pictures of all of this later)
Edit:
Here it is
With Arrows pointing to it

Thread Starter
Senior Member
Joined: May 2007
Posts: 172
I'll try to take a picture of it tonight, but it is a sensor that sits to the right of the engine (when your facing the engine) but to the left of the intake. (I know that leaves a lot of space, but till I can get a picture of it, thats the best I can do.
I think that he's doing the EGR solenoid valve
To remove it, i used a small (about 4 - 5 inches) 10mm open end wrench. i felt around under the valve, and slipped the closed end of the wrench on the bolt. Once i had it on, i placed a spark plug socket extension down there, so that it was perpendicular to the open end wrench. remember, since you're working from above the bolt, you'll need to push clockwise to loosen it, and pull counter clockwise to tighten it.
once I had the extension in place, i held the wrench onto the bolt with one hand, and used my other hand to push / pry at the wrench with the spark plug extension. This broke the bolt free pretty easily. once it broke, i was able to loosen it the rest of the way with the wrench alone (takes a while, b/c due to the limited working space, you have to push, remove, reattach to the bolt, and repeat this process a bunch of times before you can loosen the bolt by hand.)
As for the hoses, try to grab them with a pair of pliers and twist, this will break them off of the metal tubing and allow you to pull them out.

Sensor Removal
Hi There:
I just removed this part on Maxihari's vehicle when I was replacing his KS. You don't have to be a contortionist to remove this sensor, but removing the mounting plate it is attached to will make it easier.
First off, leave the rubber hoses attached to the senor or you will run the risk of breaking the plastic tips off inside the hose. Next, remove the gas line closest to the FPR and move it to the side. Becareful not to cut into the gas line with your plyers. Be patient and it will work free with a little twisting. Then, there are two (2) 10mm bolts holding the mouinting bracket in place. The easier one to the see is behind the sensor. The other one is a little harder to see and it is located underneath the thick wiring harness, closer to the front of the engine.
Once you remove the bolts, carefully fish the mounting bracket from it's location through the solid lines (in other words, twist the entire bracket and sensor towards you) just enough to expose the 10mm bolt underneath. At this point, it may be helpful to have a friend hold the bracket in place, while you remove the sensor. Then, carefully twist the vacuum hoses one at a time until they come free. Installation is the exact opposite. Just remember to make sure the gas line is on tight and there are no leaks.
Hope this helps you!!
Good luck,
Ted, Chicago
Thread Starter
Senior Member
Joined: May 2007
Posts: 172
Ted,
Thanks for the help, I see the first screw, that ones "easy" is the second one closer or further from the front bumper? also those hose attached to the sensor are really freaking on there... any hint to pulling them off without tearing? them?
Lastly is it necessary to take out the gas line, or just a bit helpful. I try to avoid the chance of spilling gas in my enginebay as much as possible.
Thanks
Hi Again:
The second bolt is really hard to see -- it's closer to the 1 inch wire harness cluster (towards to the front valve cover). Pull the harness aside (you may have to clip the zip tie holding it) and you will see the bolt. It will be helpful to use a ratching box end 10 mm wrench.
As far as the gas line goes, by removing the line, you free up more space to pull the sensor bracket towards the drivers fender and sort of flip the bottom up, revealing the bolt underneath. You won't lose that much gas, but definitely have a rag to absorb any overspill.
The sensor hoses can be a bear sometimes, so use a pair of needlenose pliers and take one hose at a time. Once you remove the sensor from the bracket, you can hold the sensor in your hand and get to the hoses much easier. If worse comes to worse, simply clip the plastic tips off the sensor and then use a sharp pair of needlenose pliers to remove the tips from inside the hoses. Just be careful not to damage the hoses or you wil get all kinds of codes down the road.
Let me know how it goes.
Ted
Thread Starter
Senior Member
Joined: May 2007
Posts: 172
I have to tell you, its really tempting to cut the darn hoses and just buy new ones.. wonder what the size is.. (couldn't hurt to have extras anyway right?) Thanks again for the help, I'll probably give this a try again tonight. I'll keep you posted
cutting them is definitely an option. the hoses are just some standard 5/32" vacuum hoses. if you think that the pliers method may be risky, you can just buy a couple of feet of that hose (always good to have too much rather than too little), slice the old ones off with a razor (make an incision from the bottom to top, then just peel the entire hose off so that you won't have to remove the remainder that's stuck on the valve) and reattach. if you want to be absolutely certain that they give you the right size, you can cut one hose off and bring it to the store with you to have it matched up. if the new hose gives you any trouble to attach (it shouldn't, it should slide right on), you can put a smear of clean engine oil around the rim of the connection point on the valve before installing the hose.


Thread
Thread Starter
Forum
Replies
Last Post
lowpost99
1st & 2nd Generation Maxima (1981-1984 and 1985-1988)
22
Sep 2, 2015 04:38 PM
doobadoo
4th Generation Maxima (1995-1999)
2
Aug 15, 2015 06:43 PM