
Hello all,
I have a 1995 Nissan Maxima. I am gearing up to do my first major gasket change. I recently brought my car to a mechanic to check out my oil leaks. The predominant leak is from the rear valve cover. The second leak looks like it is coming from what I think he said the Oil sender switch? All I know is the part is located right above the oil pan.
After a few hours worth of research I found a step by step guide to change the gasket on YouTube. It seems relatively easy to change, but the video guide recommends to slice, if I remember correctly, 3 hoses because they are quite difficult to get off by hand. The guide also did not specify the part name of the hoses and the person was not exactly sure what the inside or outside diameter measurements are.
So, my questions to you guys are: Is slicing the hoses to get them off easier really necessary? If so, what is the hose part name and possibly get get the diameter measurements if a part name is not necessary?

Senior Member
Quote:
I have a 1995 Nissan Maxima. I am gearing up to do my first major gasket change. I recently brought my car to a mechanic to check out my oil leaks. The predominant leak is from the rear valve cover. The second leak looks like it is coming from what I think he said the Oil sender switch? All I know is the part is located right above the oil pan.
After a few hours worth of research I found a step by step guide to change the gasket on YouTube. It seems relatively easy to change, but the video guide recommends to slice, if I remember correctly, 3 hoses because they are quite difficult to get off by hand. The guide also did not specify the part name of the hoses and the person was not exactly sure what the inside or outside diameter measurements are.
So, my questions to you guys are: Is slicing the hoses to get them off easier really necessary? If so, what is the hose part name and possibly get get the diameter measurements if a part name is not necessary?
The only hose necessary to cut would be a small "C" shaped coolant line behind the intake manifold. You'll know what I'm talking about when you get there. It CAN be taken off, but its an extreme PITA. you can go to the dealer if you want a perfect replacement part, or go to your local auto parts store and pick up some coolant lineOriginally Posted by d0773d
Hello all,I have a 1995 Nissan Maxima. I am gearing up to do my first major gasket change. I recently brought my car to a mechanic to check out my oil leaks. The predominant leak is from the rear valve cover. The second leak looks like it is coming from what I think he said the Oil sender switch? All I know is the part is located right above the oil pan.
After a few hours worth of research I found a step by step guide to change the gasket on YouTube. It seems relatively easy to change, but the video guide recommends to slice, if I remember correctly, 3 hoses because they are quite difficult to get off by hand. The guide also did not specify the part name of the hoses and the person was not exactly sure what the inside or outside diameter measurements are.
So, my questions to you guys are: Is slicing the hoses to get them off easier really necessary? If so, what is the hose part name and possibly get get the diameter measurements if a part name is not necessary?

Junior Member
The hardest part of this job is the 4- 12mm bolts behind holding the intake manifold with brackets. I didn't bother putting it back. No real need to.. ALL of the hoses, I have replaced. Saves me future headaches of taking everything off again..

Quote:
+1Originally Posted by Climaxx
The only hose necessary to cut would be a small "C" shaped coolant line behind the intake manifold. You'll know what I'm talking about when you get there. It CAN be taken off, but its an extreme PITA. you can go to the dealer if you want a perfect replacement part, or go to your local auto parts store and pick up some coolant line
Order the hose ahead of time (part #1405NB in the link below) and cut that sucker when you get to it...It'll save you so much time, swearing and knuckle busting....
http://www.courtesyparts.com/maxima-...1808_1812.html
If you ever think you'll be taking the manifold off again, you can bypass that nightmare connection at the back of the manifold and install a double edged barbed fitting, like the one NWP provides with his manifold spacers...
Quote:
+1 as well. I only installed one of these two bolts (the one closest to the passenger side)Originally Posted by Jmax808
The hardest part of this job is the 4- 12mm bolts behind holding the intake manifold with brackets. I didn't bother putting it back. No real need to.. ALL of the hoses, I have replaced. Saves me future headaches of taking everything off again..
Quote:
Order the hose ahead of time (part #1405NB in the link below) and cut that sucker when you get to it...It'll save you so much time, swearing and knuckle busting....
http://www.courtesyparts.com/maxima-...1808_1812.html
If you ever think you'll be taking the manifold off again, you can bypass that nightmare connection at the back of the manifold and install a double edged barbed fitting, like the one NWP provides with his manifold spacers...
+1 as well. I only installed one of these two bolts (the one closest to the passenger side)
Originally Posted by The Wizard
+1Order the hose ahead of time (part #1405NB in the link below) and cut that sucker when you get to it...It'll save you so much time, swearing and knuckle busting....
http://www.courtesyparts.com/maxima-...1808_1812.html
If you ever think you'll be taking the manifold off again, you can bypass that nightmare connection at the back of the manifold and install a double edged barbed fitting, like the one NWP provides with his manifold spacers...
+1 as well. I only installed one of these two bolts (the one closest to the passenger side)
I have another question: The video also explained to use Gasket maker for the corners of the Rear Valve Cover. Is the maker for all corners or only two of the corners?

Junior Member
I believe it was only 3 when I did mine. you will be able to tell when you get the valve cover off. make sure you let it dry a little before you put the cover back on too. Also, about the hoses, I didnt have to cut anything at all. Just make sure you have a pan under where you are working though. One of the hoses, which is the most difficult to get off, will have some coolant in it that will spill out when you loosen it. Biggest PTA on this job was making sure to replace all the little bolts and not mixing them up. Be sure to organize them as you remove them. Last, I would run some snake oil or stop leak in your oil when you are done so that the new gasket will expand properly and fill the gaps, then do an oil change with fresh oil maybe 2 or 3 days later depending upon how much driving you do.

Senior Member
Quote:
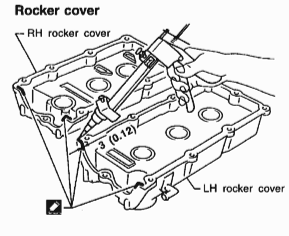
You only need to apply grey RTV sealant in these 4 cornersOriginally Posted by d0773d
I have another question: The video also explained to use Gasket maker for the corners of the Rear Valve Cover. Is the maker for all corners or only two of the corners?
To keep the gasket in the valve cover I also applied a very thin line of sealant in the groove of the valve cover where the gasket sits. I didn't do this when I first flipped over the valve cover during installation so the gasket fell out

Senior Member
Quote:
I have a 1995 Nissan Maxima. I am gearing up to do my first major gasket change. I recently brought my car to a mechanic to check out my oil leaks. The predominant leak is from the rear valve cover. The second leak looks like it is coming from what I think he said the Oil sender switch? All I know is the part is located right above the oil pan....
The diaphragm on that oil pressure switch will fail over time. That threaded switch comes with no washer nor O-ring. You only need to apply plumbers tape or thread sealant to keep it from leaking. With the diaphragm being worn on my switch I replaced it with a new one I got on ebay for less than $10.Originally Posted by d0773d
Hello all,I have a 1995 Nissan Maxima. I am gearing up to do my first major gasket change. I recently brought my car to a mechanic to check out my oil leaks. The predominant leak is from the rear valve cover. The second leak looks like it is coming from what I think he said the Oil sender switch? All I know is the part is located right above the oil pan....
Here's the PN for that switch: 25240-8996E
I replaced it 2 years ago using plumbers tape and it has held fine.

Junior Member
working on this myself right now. I was able to disconnect that PITA hose behind the manifold by rotating the manifold counter clockwise and then slipping in behind. I also didn't disconnect from the manifold, but from the small tube just behind it. rear valve cover gasket is done though, have to wait til morning to finish the job

Newbie - Just Registered
I'm trying to follow the youtube video in the beginning of this thread to replace the valve cover gaskets. If I end up cutting all of the hoses that are cut in the video, could someone help me make sure I'm ordering the right replacement hoses?
This is what I have:
14056N
14056NA
14056NB
Here is a link to the diagram:
http://www.courtesyparts.com/maxima-...1808_1812.html
This is what I have:
14056N
14056NA
14056NB
Here is a link to the diagram:
http://www.courtesyparts.com/maxima-...1808_1812.html

Senior Member
i dunno what every bodies talkin about honestly. none of those hoses are that hard to get off that you need to cut them. and those bolts are easy as hell to get back on. nothing about this is hard. get an extra pair of hands to help and its even easier. just did all of this on my boys and it was mad easy although it wasnt the first time ive done it.
Junior Member
Quote:
This is what I have:
14056N
14056NA
14056NB
Here is a link to the diagram:
http://www.courtesyparts.com/maxima-...1808_1812.html
Originally Posted by acanion
I'm trying to follow the youtube video in the beginning of this thread to replace the valve cover gaskets. If I end up cutting all of the hoses that are cut in the video, could someone help me make sure I'm ordering the right replacement hoses?This is what I have:
14056N
14056NA
14056NB
Here is a link to the diagram:
http://www.courtesyparts.com/maxima-...1808_1812.html
dont cut the hoses unless you intend to replace them. it's not really necessary. I've found that if you spray a little wd-40 at the hose connection, once you can gget the hose to break it's bond and rotate a bit, it pops right off with just a little pry from a flat screwdriver. I followed these instructions, from the how-to, which are fantastic!! Thank you ATTappman!!
http://forums.maxima.org/4th-generat...im-w-pics.html