When you click on links to various merchants on this site and make a purchase, this can result in this site earning a commission. Affiliate programs and affiliations include, but are not limited to, the eBay Partner Network.
Horn blowing intermitently when turning the steering wheel - Resolved
1998 Nissan Maxima SE with cruise. (might be 1999, was mfg 12/98)
Trying to see what is wrong. Out if the blue my horn went off going down the road when I turned the corner.
I turned the wheel straight and it stopped a minute. then turning a little to the right or left it would beep and stop going straight,
then would stay on when going straight.
no rhyme or reason.....when it goes off and stays on i can hit the wheel and it will stop or pull on the ceter pad of the wheel.
It's like having a bad contact. I have no horn now I took the fuse out and the radio still works but don't think the cruise does didn't check that.
Have you messed with the steering lately? If not maybe you should look into removing the airbag on the steering wheel, but make sure you disconnect the battery first and wait a few minutes.... look at the contact points where if you push down on it it activates it......maybe its too tight where the spring is.....you should see two round allen head looking bolts loosen them a little imo.....hopefully it ain't a clock spring issue. Good luck.
Have you messed with the steering lately? If not maybe you should look into removing the airbag on the steering wheel, but make sure you disconnect the battery first and wait a few minutes.... look at the contact points where if you push down on it it activates it......maybe its too tight where the spring is.....you should see two round allen head looking bolts loosen them a little imo.....hopefully it ain't a clock spring issue. Good luck.
It's the contact bars, those paltic insulators and the posts up to the air bag pad are dry rotted and totally desinagrating.
doubt I'll find repalcements pieces....best bet is probably the wrecking yard.
You won't find anything useful in the junkyards. I tried that and the plastic that looked intact crumbled in my hands. BUT, you can use rubber o-rings to replace the plastic if that is the source of your problem.
The like new fix for broken and rotted white contact bar pieces
The old stuff from the junk yark (if you can even find it) is just that "OLD" and it will break if it's not broken when you get it!
Look at the pictures of the solution, and read below and pay attention to comments on the photos.
Note: You need four 3/8" rubber groments
4 white nylon sleeve is from the harware speciaty drawers at Home Depot (maybe have at Ace).
1/2 o.d. x 3/8 i.d. ..need to cut them down to 1/4 long. Are to keep spring away from the bolt.
4 3/4" x # 8 x 32 brass machine bolts and nuts ( the photo shows #6 but 8 is better)
after in place (thread the plate, guess could drill out oversize and use red locktight)
grind them down to just a tiny bit under 7/16" showing after the nut is on.
4 each of orange/ white and green thread protectors ( Ace hardawre Hillman specialty drawer)
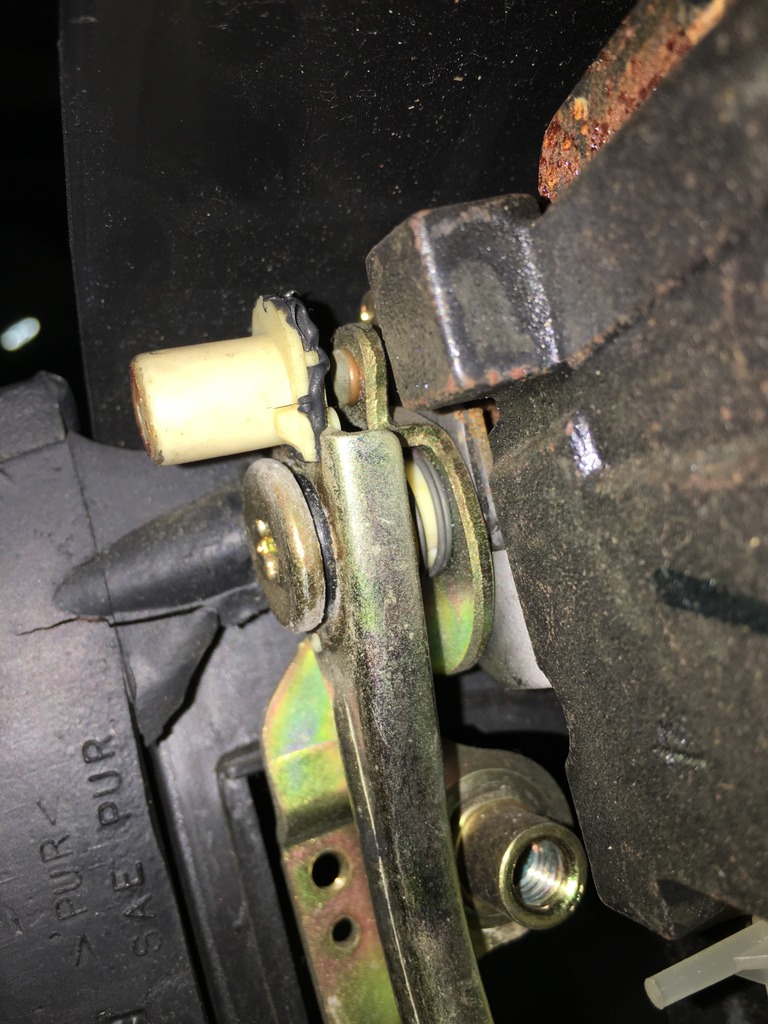
Drill the old contacts out with 1/8" drill and tap, insert brass machine bolts and nuts, grind head down till flat
about the same thickness as the old contacts.
Put it all together.....works just like new and will not break apart like the old ones did
1/8" drill
8 x 32 tap three sizes of thread protectors (orange/white/green). #8 NOT #6 bolts. grind that head flat to 1/16" thick before
the rubber parts are installed. leave out the washer a little grease ( not really needed ) push thread protectors on tight till bottom out. don't forget the 3/8" rubber groments.
the white sleeve needs to be 1/4" long to allow enough travel and will keep the spring
on the rubber gromment. works perfect if you follow this "all"
!
drill out the old contacts and replace with brass machine screws, I tapped the holes and also put a lock nut on. grind the head almost flat like the old contact.
use threat protectos to ge matched height. need rubber crommet for insulation and a sleeve inside.
I took everythig apart and buffes all down on bench grinder with brass wheel on it. Il post more pix... not good at that
think might have usesd #8 not #6 three sizes of thread protectors from Ace. Have to mess with bolt length, didnt use washer,, thing bolt was cut just under 1/2" ling from plate? mess with ti till length matches 1/8" drill old out 8x32 tap grind head down almost flat like original contact didnt use the washer use a bushing cut to 1/4" long fits inside spring from hardware drawers at Home Depot. The bushing is 3/8" form Ace hardware and the 3 sizes of thread protectors for Ace.
Good for you employing creativity with always available materials that's a hell of a lot more reliable. Thank you!
Somebody with a 3D printer needs to scan one of these and sell a kit of 4 new. I'd buy them for WHEN it will happen. Not "IF". Because it will. Especially with ~230K miles.
Good for you employing creativity with always available materials that's a hell of a lot more reliable. Thank you!
Somebody with a 3D printer needs to scan one of these and sell a kit of 4 new. I'd buy them for WHEN it will happen. Not "IF". Because it will. Especially with ~230K miles.
Ill take mine apart and see what some good parts look like (hopefully).
On the surface it looks to be pretty feasible.
Lol we'll see about pricing once I actually have made the CAD model, test fitment, material usage, print time, etc etc.
Looking through the photos in the thread I completely understand the failure now. See below for my good parts.
Now my question, are you wanting both sides?
The top half is the bolt insulator and airbag standoff, the bottom half is the spring bucket.
Id assume both haves since youre likely on borrowed time if one already crumbled.
Mine haven't presented any problems...... YET! LOL
But when one goes, the others ain't long for this world! Same exposure to heat and cold over 22+ years
So if you are capable of making both kinds, I'd take a set of 4 (2 of each).
If you can offer a set of 4, hopefully they won't need to be stupid priced, but instead worth it rather than using the solution above.

 06-27-2021, 10:16 AM