Drop-in LED instrument cluster lighting for 5.5 owners. Finally found one that works!


 05-15-2011, 02:10 PM
#322
I did mention that a while back in this thread. New Incandecent bulbs will be like a night/day change if your bulbs are old, dim and colour faded.
Based on those pictures though, that verifies my suspicions about the output from these Drop ins, thanks very much RR5.
For those wondering, I was suspicious about how bright it seemed these LED's were, but after seeing the comparison to new Incandecents, I know exactly how bright they are, because my testing comparison here used brand new OEM bulbs:
New OEM bulb in the Tach:

Custom LED insert job:

In either case, the LED route is better if you can't get OEM quality bulbs for a decent price. They will stay that brightness and colour for much longer. The OEM bulbs will 'wear out' again after a few months to a year.
Sorry for the mis-matched pics I haven't got time to size them the same right now, I'll come back and fix it later.
Based on those pictures though, that verifies my suspicions about the output from these Drop ins, thanks very much RR5.
For those wondering, I was suspicious about how bright it seemed these LED's were, but after seeing the comparison to new Incandecents, I know exactly how bright they are, because my testing comparison here used brand new OEM bulbs:
New OEM bulb in the Tach:
Custom LED insert job:
In either case, the LED route is better if you can't get OEM quality bulbs for a decent price. They will stay that brightness and colour for much longer. The OEM bulbs will 'wear out' again after a few months to a year.
Sorry for the mis-matched pics I haven't got time to size them the same right now, I'll come back and fix it later.
05-15-2011, 02:21 PM
#323
Senior Member

Join Date: Dec 2005
Location: Leicester, Ma
Posts: 1,124
They are # 74 bulbs right. I just looked and looks like at Autozone you can get all 4 for 10 bucks
http://www.autozone.com/autozone/acc...entifier=16841
http://www.autozone.com/autozone/acc...entifier=16841
05-15-2011, 03:13 PM
#324
Member
Thread Starter

Join Date: Mar 2011
Location: SoCal
Posts: 242
If the Autozone #74 bulbs really are that much better, I wonder why a dim cluster has been an issue for so long. Wouldn't someone have noticed "hey, this is a massive improvement!" long ago?
However, the OEM ones might be different somehow...but at $50 for the four that's rough. I don't doubt RR5 one bit (and he's posted some very useful info) but if someone else tries this and could corroborate that'd be awesome. At the end of the day, all people want is a legible cluster
However, the OEM ones might be different somehow...but at $50 for the four that's rough. I don't doubt RR5 one bit (and he's posted some very useful info) but if someone else tries this and could corroborate that'd be awesome. At the end of the day, all people want is a legible cluster
05-15-2011, 03:14 PM
#325
If the Autozone #74 bulbs really are that much better, I wonder why a dim cluster has been an issue for so long. Wouldn't someone have noticed "hey, this is a massive improvement!" long ago?
However, the OEM ones might be different somehow...but at $50 for the four that's rough. I don't doubt RR5 one bit (and he's posted some very useful info) but if someone else tries this and could verify that'd be awesome. At the end of the day, all people want is a legible cluster
However, the OEM ones might be different somehow...but at $50 for the four that's rough. I don't doubt RR5 one bit (and he's posted some very useful info) but if someone else tries this and could verify that'd be awesome. At the end of the day, all people want is a legible cluster
05-15-2011, 03:32 PM
#326
Member
Thread Starter
Join Date: Mar 2011
Location: SoCal
Posts: 242
That said, I feel like I'm playing with other people's money. I don't expect anyone to go out and drop coin for our testing purposes BUT if someone new happens to try either set, pics/review would be appreciated.
05-15-2011, 03:57 PM
#327
Yes it would have to be RR5 if we are going to get an accurate depiction. Unless someone else wants to go get OEM bulbs AND aftermarket bulbs.
I will have a pretty decent collaboration of most of these, but not on the same gauges unfortunately, so I can't post what the aftermarket bulbs look like specifically in comparison on 5.5 gauges.
I can post what they look like on SE gauges when my HP3's get here. Rochester was nice enough to order extra and send me a few so I can see them in person.
05-15-2011, 03:59 PM
#328
I hear that. I'm tempted to get all three (new incandescents, cool-white LCD and warm-white LCD), play with it and see which ones I want to keep.
But then I drive my Max at night, and that cool-white cluster makes me go "Ah-h-h-h..."
I'm already driving around for the next week before checking my clock face to make sure the plastic sheet isn't melted. And this so I don't have to clip the clock back in and risk breaking things again by prying it out. The things we do for silly little mods.
 05-15-2011, 04:27 PM
#331
Moreover, leave it for now if you're happy with the change, and in the future, when it gets 'old', then tinker with it again.
Yeah of course I am, I live in Canada, things take forever!

Anyways, this is a perfect example of what I've been through time and time again, you can spend so much money on stuff ($5-$10 here, then again, then $15 here), when you could have just spent the coin and get it done properly the first time.
It's something we have all done, some of us have learned that sometimes, it's better to just pay a little more upfront so you can save money later.
In either case, the HP3's Seedy has gratiously found for everyone are a wicked replacement/upgrade from worn out stock bulbs. There's no 'losing' with these, they will be brighter than old stock bulbs, for the money, you'll be happy.
If you want more, then.... well you know what you must do.
05-15-2011, 04:41 PM
#332
Saw these: http://www.carparts.com/details/Niss...lightingge1611
Which match the 3 Watt bulbs listed on courtseyparts.com. Body Electrical > 248 instrument meter and gauge.
Edit: pickup these OEM bulbs and holders from courtseyparts because I did not want to wait for shipping and went to the stealer.
Which match the 3 Watt bulbs listed on courtseyparts.com. Body Electrical > 248 instrument meter and gauge.
Edit: pickup these OEM bulbs and holders from courtseyparts because I did not want to wait for shipping and went to the stealer.
Last edited by RR5; 05-15-2011 at 04:45 PM.
05-15-2011, 05:02 PM
#334
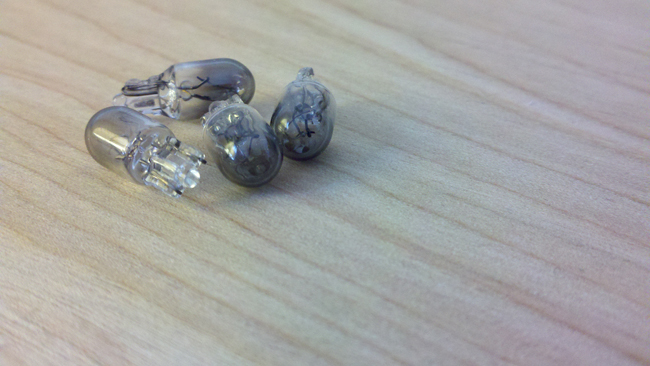
My 9 year old incandescent bulbs didn't look like this... their caps were all dark and shiny. Someone posted a picture a few pages back of their old bulbs.
These are clean:

Here it is... it was Bred. These are what my old bulbs looked like. Kind of darker, actually:
These are clean:
Here it is... it was Bred. These are what my old bulbs looked like. Kind of darker, actually:
05-15-2011, 05:05 PM
#335
Senior Member
Join Date: Dec 2005
Location: Leicester, Ma
Posts: 1,124
I guess both really. Considering the ~$40 difference it'd be nice to see if the Autozone bulbs are inferior or equal to OEM bulbs. At the same time, having a second person try OEM bulbs to confirm they are really bright would be nice too.
That said, I feel like I'm playing with other people's money. I don't expect anyone to go out and drop coin for our testing purposes BUT if someone new happens to try either set, pics/review would be appreciated.
That said, I feel like I'm playing with other people's money. I don't expect anyone to go out and drop coin for our testing purposes BUT if someone new happens to try either set, pics/review would be appreciated.
Im just throwing **** at the wall as someone else stated they went to get the oem bulbs. The autozone ones are sylvania so they arent some generic no name brand that will die in a week. Only reason that the dealer 74s are that much, as everyone knows, is the dealer always ups their price on stuff that can be had cheaper from a parts store.
Get a tie rod from the dealer or a moog part from Autozone. Moog=better +cheaper than the stock. Only reason why stating Autozone or whoever you go to for parts
If im gonna spend the money im gonna try the tunermax option and make my own. Already LEDed the map, puddle, HVAC, dome lights with custom lighting so this will be another little project to do. Plus aty 100 ct of lefs for less that what SBL seels the 4 bulbs for i can screw up a ton till i get the right lighting.
 05-15-2011, 06:46 PM
#336
Member
Thread Starter
Join Date: Mar 2011
Location: SoCal
Posts: 242
Im just throwing **** at the wall as someone else stated they went to get the oem bulbs. The autozone ones are sylvania so they arent some generic no name brand that will die in a week. Only reason that the dealer 74s are that much, as everyone knows, is the dealer always ups their price on stuff that can be had cheaper from a parts store.
So when we see pics like RR5 with the OEM bulbs that look pretty damn good, it makes me wonder WHY they look so good. If it's just age, why are we just finding this out now? So what I'm trying to find out is which of these are true:
1) There's a big difference in OEM vs Sylvania/Autozone bulbs or
2) RR5s pics are misleading or not representative of real world or
3) Past people who tried this in search were all wrong.
I hope that makes sense. Either way I'm still super happy with my $15 LED mod
 05-15-2011, 08:30 PM
#339
Member
Thread Starter
Join Date: Mar 2011
Location: SoCal
Posts: 242
I'm just hoping someone tries the other new bulbs you linked to (GE) or some Sylvanias so we can see what those do. On paper they might look to be the same but real world is often a surprise
 05-15-2011, 09:12 PM
#341

Go to 12v car bulbs, then twist-lock section. They are the NeoWedge series. On the window that pulls up, the standard Neo's are 2 lumen, the NeoHP are 6 lumen. Either will work, I have the 6 lumen ones and they are great. You will need 3 bulbs of the 4mm size.
 05-16-2011, 05:39 AM
#342
Even if I install incandescents back behind the gauges, I'll have no regrets. This little experiment was fun, and I learned how to remove my cluster. It's all good, however it ends up for me.
05-16-2011, 06:49 AM
#343
Senior Member

Join Date: Apr 2004
Location: Atlanta
Posts: 1,861
I'm going to remove the LEDs from the A/C because of the hot spots and just change the LCD to blue to match the clock and HU.
05-16-2011, 07:33 PM
#344
I'm also interested in this. As much as I like the cool-white LED's, I find the low-light situation kind of annoying not being able to read my gauges well.
Even if I install incandescents back behind the gauges, I'll have no regrets. This little experiment was fun, and I learned how to remove my cluster. It's all good, however it ends up for me.
Even if I install incandescents back behind the gauges, I'll have no regrets. This little experiment was fun, and I learned how to remove my cluster. It's all good, however it ends up for me.
If that's the case, I don't see how incandecent/LED would make any difference.... Maybe I"m missing something here, are you sure it's the LED's causing your issue, or are you just noticing your issue since you installed LED's ?
05-17-2011, 05:31 AM
#346
I can't help it.
 05-17-2011, 06:08 AM
#347
Senior Member
Join Date: Dec 2005
Location: Leicester, Ma
Posts: 1,124
posted this on http://forums.maxima.org/5th-generat...ml#post8050513 but not all would go there so put here as well to see
Ok so this is what i was thinking on doing.
This is our cluster apart.
http://i37.tinypic.com/qs8ox5.jpg
What i was thinking with the clear acrylic that disperses the light is to drill holes and attach the leds inside each hole to illuminate the dash fully. Below in the dash the red spots are where i would put each led.

Not sure if i would be able to get behind the needles to illuminate them but i think having an led behind each numbered line and spaced evenly on the gas and temp gauge would evenly disperse the light. I would run flat top leds so they disperse the light even more and reduce hot spotting.
Once i find the leds i want i will run my calculations on how many leds in a series and what resistor to run on each circuit. I would them all off to a common - and + where knight shows they are on the plugs on the cluster.
So essentially right now im thinking it would be 30 leds total unless i want to try/ figure something different and then would have 10 resistors. 3 leds and a resistor in each circuit. Each of the 3 resistors would be daisy chained then a resistor. Each one would have a + and - wire so essentially 10 - wires and 10 + wires. I would connect the neg wires to the common ground that knight shows and the + wires as well to the + spot. So this is my plan. Know to order leds and figure the resitors needed and order those
Ok so this is what i was thinking on doing.
This is our cluster apart.
http://i37.tinypic.com/qs8ox5.jpg
What i was thinking with the clear acrylic that disperses the light is to drill holes and attach the leds inside each hole to illuminate the dash fully. Below in the dash the red spots are where i would put each led.
Not sure if i would be able to get behind the needles to illuminate them but i think having an led behind each numbered line and spaced evenly on the gas and temp gauge would evenly disperse the light. I would run flat top leds so they disperse the light even more and reduce hot spotting.
Once i find the leds i want i will run my calculations on how many leds in a series and what resistor to run on each circuit. I would them all off to a common - and + where knight shows they are on the plugs on the cluster.
So essentially right now im thinking it would be 30 leds total unless i want to try/ figure something different and then would have 10 resistors. 3 leds and a resistor in each circuit. Each of the 3 resistors would be daisy chained then a resistor. Each one would have a + and - wire so essentially 10 - wires and 10 + wires. I would connect the neg wires to the common ground that knight shows and the + wires as well to the + spot. So this is my plan. Know to order leds and figure the resitors needed and order those
Last edited by NmexMAX; 05-17-2011 at 10:36 AM.
05-17-2011, 06:55 AM
#348

posted this on http://forums.maxima.org/5th-generat...ml#post8050513 but not all would go there so put here as well to see...
05-17-2011, 09:57 AM
#349
Senior Member
Join Date: Dec 2005
Location: Leicester, Ma
Posts: 1,124
ok so im curious if anyone has done this. I saw metalmaximas scardomain site on calibrating the speedo and cluster befroe taking the needles off. Now he did this on an 01 and i tried on my 03 and i cant get it to work. Only thing i can do is get the trip a and b odometers to 0000.0 not the whole thing zero out. Anyone try this on an 03
Edit k so i figured it out if any ever needs it for an 03
Edit
k so i figured it out if any ever needs it for an 03HOW TO ALTERNATE DIAGNOSIS MODE
NFEL0151S02
1. Turn ignition switch to ON and change odo/trip meter to “TRIP”. --- zero out the trip odo
2. Turn ignition switch to OFF.
3. Turn ignition switch to ON when pushing odo/trip meter switch.
4. Release odo/trip meter switch 1 second after ignition switch is
turned ON.
5. Push odo/trip meter switch more than three times within 7 =--------- pushed mine 4 times in in 7 secs and it enters the diag mode and you can press and release as many times as you want to get the readings
seconds.
Last edited by jeff5347; 05-17-2011 at 10:48 AM.
 05-17-2011, 05:41 PM
#352
I'm saying that the bluish light coming through the gauges in low-light (dusk) makes it hard to read the numbers on the gauges. This describes most of my driving in predominately overcast Upstate NY.
It's because the LED light is blue-ish in low-light. It's perceived as more white when dark out. And of course, when it's dark, you don't see the gauge face anyway, and the fuly-illuminated LED gauges are gorgeous.
I can't help it.
It's because the LED light is blue-ish in low-light. It's perceived as more white when dark out. And of course, when it's dark, you don't see the gauge face anyway, and the fuly-illuminated LED gauges are gorgeous.
I can't help it.
posted this on http://forums.maxima.org/5th-generat...ml#post8050513 but not all would go there so put here as well to see
And as I said in that thread, I'll get back to you on it, I do have some tips and ideas for you. Knight_yyz will probably chime in there also, he has done his 5.5 cluster in a manner similar.
05-17-2011, 06:24 PM
#353
05-17-2011, 06:35 PM
#354
To clarify, I agree with John on the point that at dusk and dawn, the TE silver gauges are impossible to read with oem bulbs. The "titanium" colour has the illusory effect of changing from silver to black at night, but at dawn and dusk it turns grey, just like the numbers on the cluster.
The OEM bulbs are a whopping 3W at 12V and I'll bet they start to die pretty quickly when the voltage varies. During charging of the battery, WOT, etc... Thus the blackened look on the inside of the bulb. I have about 30 of those little suckers, and even the 1.2 watt versions in the signals turn black over time.
The OEM bulbs are a whopping 3W at 12V and I'll bet they start to die pretty quickly when the voltage varies. During charging of the battery, WOT, etc... Thus the blackened look on the inside of the bulb. I have about 30 of those little suckers, and even the 1.2 watt versions in the signals turn black over time.
05-17-2011, 06:36 PM
#355
ok so im curious if anyone has done this. I saw metalmaximas scardomain site on calibrating the speedo and cluster befroe taking the needles off. Now he did this on an 01 and i tried on my 03 and i cant get it to work. Only thing i can do is get the trip a and b odometers to 0000.0 not the whole thing zero out. Anyone try this on an 03
Editk so i figured it out if any ever needs it for an 03
Edit
k so i figured it out if any ever needs it for an 03HOW TO ALTERNATE DIAGNOSIS MODE
NFEL0151S02
1. Turn ignition switch to ON and change odo/trip meter to “TRIP”. --- zero out the trip odo
2. Turn ignition switch to OFF.
3. Turn ignition switch to ON when pushing odo/trip meter switch.
4. Release odo/trip meter switch 1 second after ignition switch is
turned ON.
5. Push odo/trip meter switch more than three times within 7 =--------- pushed mine 4 times in in 7 secs and it enters the diag mode and you can press and release as many times as you want to get the readings
seconds.
2. Turn ignition switch to OFF.
3. Turn ignition switch to ON when pushing odo/trip meter switch.
4. Release odo/trip meter switch 1 second after ignition switch is
turned ON.
5. Push odo/trip meter switch more than three times within 7 =--------- pushed mine 4 times in in 7 secs and it enters the diag mode and you can press and release as many times as you want to get the readings
seconds.
2. Turn ignition switch to OFF.
3. Turn ignition switch to ON when pushing odo/trip meter switch.
4. Release odo/trip meter switch 1 second after ignition switch is
turned ON.
5. Push odo/trip meter switch more than three times within 7
seconds.
6. All odo/trip meter segments should be turned on. NOTE:
If some segments are not turned on, unified meter control unit assembly should be replaced.
At this point, the unified control meter is turned to diagnosis mode.
7. Push odo/trip meter switch. Indication of each meter/gauge should be as shown left during pushing odo/trip meter switch if it is no malfunctioning.
NOTE: It takes about a few seconds for indication of fuel gauge and water temperature gauge to become stable.
I have done this countless times on my 03 and it works every time
I don't rmember the exact numbers, but... The gas gauge goes to 50% full tank, the temp gauge goes to 50%, the speedo goes to the same number every time, and the tach goes to a number, always the same every time. You need to mark down on a piece of paper where the needles move so that when you are ready to put the gauge back together you redo the calibration mode and then place the needles at their proper positions. Then test it a few times by pushing and releasing the plunger
Last edited by knight_yyz; 05-17-2011 at 06:41 PM.
05-18-2011, 07:25 PM
#356
It's Comparison Time!
Big thanks to Rochester for being my middle man for getting some of the HP3's to test out. I can finally see it in person!
Here's my impression, WOW. SeedyRom, you are the man.
I was incredibly impressed with how bright these are, the pictures everyone posted are not far off.
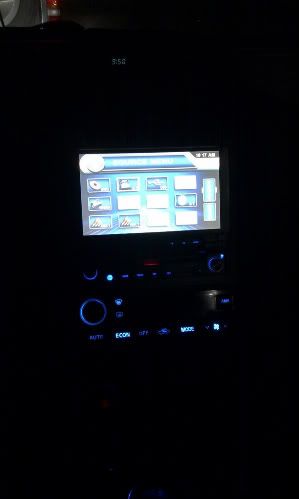
Here is a direct comparison on a 5.5 style cluster with 5th gen SE Gauge face:
HP3 LED (Drop-Ins):

My most basic Brighten job, rough fitment, no aiming:

I tried to get the exact same angle of picture. The lighting, camera and everything else is the exact same.
Again, smaller and side to side, first is the HP3, second my basic brighten:


Impressive little drop ins SeedyRom, you've found a winner. In person, the difference is fairly noticable in brightness, the biggest factor is the needle illumination, they glow with my brighten job, but look just brighter than stock with the HP3. Overall, I was not expecting them to be this bright, you should all jump in an thank SeedyRom again You owe him one!
EDIT: Shoot I forgot to get a stock bulb picture, sorry guys I'll try and update this tomorrow with one
Here's my impression, WOW. SeedyRom, you are the man.
I was incredibly impressed with how bright these are, the pictures everyone posted are not far off.
Here is a direct comparison on a 5.5 style cluster with 5th gen SE Gauge face:
HP3 LED (Drop-Ins):
My most basic Brighten job, rough fitment, no aiming:
I tried to get the exact same angle of picture. The lighting, camera and everything else is the exact same.
Again, smaller and side to side, first is the HP3, second my basic brighten:
Impressive little drop ins SeedyRom, you've found a winner. In person, the difference is fairly noticable in brightness, the biggest factor is the needle illumination, they glow with my brighten job, but look just brighter than stock with the HP3. Overall, I was not expecting them to be this bright, you should all jump in an thank SeedyRom again
You owe him one!EDIT: Shoot I forgot to get a stock bulb picture, sorry guys I'll try and update this tomorrow with one
Last edited by TunerMaxima3000; 05-18-2011 at 07:27 PM.
 05-19-2011, 10:48 AM
#360

Forgive the ignorance. I've been following this thread since it initiated, even bought the warm white bulbs (but can't install until I get car back from rear qtr rust repair). I can not figure out what you are referring to when you talk about the "brighten job" per SeedyROM. What exactly is that? I can't find anything on it...