
How many hours to replace 4 struts/springs?
 07-24-2011 | 08:32 AM
#1

How many hours to replace 4 struts/springs?
Hello,
I received my Eibach springs, GR2 struts, strut mounts and strut boots.
I never replaced springs or struts before, and I did lot of reading on how to replace them myself. I feel pretty confident I can do this myself, and I am planning on doing the job next week end in order to save a few hundred $.
- How many hours will it take +/- for all four corners? I have air tools to speed up the compression process.
- Also, on the housecor's HOW TO on replacing struts/springs http://www.shiftice.com/strut_install.html he says in step 11 for the rear that it may be necessary to re-compress the springs to make sure it lines up correctly. Is there a trick to avoid having to re-compress the rear spring?
- Does anyone have any tips or advice to make sure everything goes smoothly?
Thanks,
07-24-2011 | 08:50 AM
#2

Should take 3-4 hours. The first one took me 1.5 hours and the other 3 about 2 hours.
For the rears remember where the bottom bolt hole is in relation to the mount. Position the new shock the same and it should line up.
For the rears remember where the bottom bolt hole is in relation to the mount. Position the new shock the same and it should line up.
 07-24-2011 | 09:13 AM
#4
I have to respectfully disagree. 1/4 ratchet with long extension will work quickly and effectively. Your method is a waste of time and energy.
07-24-2011 | 09:21 AM
#5
But what if, when I release the spring before putting it back on the car, the top two studs aren't lined up with the 2 holes? Will I have to re-compress the spring and line it up, the release the spring?
07-24-2011 | 11:05 AM
#6

Junior Member
Joined: May 2011
Posts: 64
From: Toronto
If you have air-tools but it's your first time, I am guessing it would take you 3-4 hours total MAX. The spring compressing is the most time-consuming step in the whole procedure. Not hard.
07-24-2011 | 11:07 AM
#7
Junior Member
Joined: May 2011
Posts: 64
From: Toronto
You can still turn the top plate with the studs if you don't fully tighten the middle bolt. Tighten it after you match the holes.
07-24-2011 | 11:15 AM
#8
07-24-2011 | 11:53 AM
#10
4 hours sounds about right if you're putting along and double checking as you go to ensure you're doing everything properly.
Make sure you lubricate all the adjoining parts, bearing, etc.
I used a high quality wheelbearing/chassis lube on most parts, and di-electric grease on all exposed parts.
07-24-2011 | 12:02 PM
#11

did my fronts in an hour and rears were a pita because i dropped one of the bolts where the strut bolts up and then had a little problem matching the holes on the passenger rear so that took about an hour and a half for the rears...funny thing is all data quotes 1.5 each side for fronts and 1.0 each for the rears imo it should be the other way around.
07-24-2011 | 02:11 PM
#12
Yeah the rears are much easier as long as you don't try to remove the upper plates. Just use the universal and an extension as mentioned, and the rears can be done way faster than the front.
07-24-2011 | 02:18 PM
#13
This is true. The right tools make it super easy. The last time I did all 4 struts/springs on a maxima, it took about 2 hours. That's with an air compressor and includes cutting a couple coils off all 4 corners.
07-24-2011 | 10:43 PM
#15

The far bolt is a PITA for sure. Took myself about 6 hours total, and thats for a first time suspension installer as well as having to run down to sears after getting the fronts done to get a swivel socket for the rears.

 07-27-2011 | 02:50 PM
#19
Taking care to form your sentences correctly not only helps with the coherence of your thoughts, it also adds credibility to your words. I'm not sure what point you're trying to make here. I used a 1/4" ratchet with an extension and a standard socket. Deep socket wasn't necessary.
07-27-2011 | 03:10 PM
#20

Junior Member
Joined: Feb 2011
Posts: 96
Taking care to form your sentences correctly not only helps with the coherence of your thoughts, it also adds credibility to your words. I'm not sure what point you're trying to make here. I used a 1/4" ratchet with an extension and a standard socket. Deep socket wasn't necessary.
 07-27-2011 | 03:21 PM
#22
Gotcha. Don't you hate technology sometimes? I guess it's relative to the brand of tools you are using. My standard socket was deep enough. Good point, though. Some may not be able to grab the nut without the deep socket.
07-27-2011 | 03:35 PM
#23
07-27-2011 | 03:38 PM
#24
Junior Member
Joined: Feb 2011
Posts: 96
07-27-2011 | 06:39 PM
#26
I used deep a socket on the rears as well. Do not need to remove any other parts. Once your in there, you'll figure out the best tools to use. Having an abundance of different sockets, extensions, swivels, etc. is a huge help. I did not, however, use a swivel for the rear nuts. 3/8" ratchet and a combination of deep socket, reg. socket and short & long extensions did the trick. I was even able to use my 3/8" torque wrench in there with the above mentioned tools.
08-04-2011 | 05:45 AM
#27
OK so last night after work I decided to get this thing done. I wanted to do all 4 corners, but only had time to do the front. I�ll do the back tonight. It took me about 3 hours (that�s including gathering tools and cleaning everything when I was done).
Everything was pretty smooth. The most time consuming part was [compressing the old spring � removing the old spring from the strut - decompressing the old spring � compressing the new spring � installing the new spring on the strut � decompressing the new spring] X 2, with a wrench� I had an impact gun, but the socket was not long enough, so I had to do everything with a wrench� what a PITA
I just had 3 problems:
1) While compressing the 1st spring, one of the spring compressors slid so instead of having both compressors at 12 o�clock and 6 o�clock, they ended up at 12 and 3� so I had to start over.
2) The moog strut boot and bump stop I bought at advance auto parts did not fit in the strut tower upper plate... I�m pretty pissed about that, they cost me $54 � The old bump stops were still in good shape so I was able to re-use them, and put the new sleeve around the old bump stop.
3) While installing the new assembly on the driver side, I couldn�t push up the lower control arm back into position to be able to put the two bolts in the holes. The problem was that the axle came out of its slot. When I understood that about 10 minutes later, I just rotated the wheel, was able to push the axle back in, and the holes at the bottom of the strut lined up very easily.
The old struts were shot. I was able to compress the rod very easily. On one of them, the rod didn�t even come back up, and the other one took forever.
Just with the front done, the difference is amazing! No more clunking noises, the front end grip is so much better during hard cornering, body roll was greatly reduced, and no more nose diving while braking
There is a bump on the road to my house where I always had to slow down <15mph otherwise the front would bottom out. I took it this morning at 40mph, and it felt like a brand new car, well at least the front end�
I can�t wait to do the rear tonight.
Everything was pretty smooth. The most time consuming part was [compressing the old spring � removing the old spring from the strut - decompressing the old spring � compressing the new spring � installing the new spring on the strut � decompressing the new spring] X 2, with a wrench� I had an impact gun, but the socket was not long enough, so I had to do everything with a wrench� what a PITA
I just had 3 problems:
1) While compressing the 1st spring, one of the spring compressors slid so instead of having both compressors at 12 o�clock and 6 o�clock, they ended up at 12 and 3� so I had to start over.
2) The moog strut boot and bump stop I bought at advance auto parts did not fit in the strut tower upper plate... I�m pretty pissed about that, they cost me $54
� The old bump stops were still in good shape so I was able to re-use them, and put the new sleeve around the old bump stop.3) While installing the new assembly on the driver side, I couldn�t push up the lower control arm back into position to be able to put the two bolts in the holes. The problem was that the axle came out of its slot. When I understood that about 10 minutes later, I just rotated the wheel, was able to push the axle back in, and the holes at the bottom of the strut lined up very easily.
The old struts were shot. I was able to compress the rod very easily. On one of them, the rod didn�t even come back up, and the other one took forever.
Just with the front done, the difference is amazing! No more clunking noises, the front end grip is so much better during hard cornering, body roll was greatly reduced, and no more nose diving while braking
There is a bump on the road to my house where I always had to slow down <15mph otherwise the front would bottom out. I took it this morning at 40mph, and it felt like a brand new car, well at least the front end�
I can�t wait to do the rear tonight.
08-04-2011 | 05:49 AM
#28
2) The moog strut boot and bump stop I bought at advance auto parts did not fit in the strut tower upper plate... I�m pretty pissed about that, they cost me $54 � The old bump stops were still in good shape so I was able to re-use them, and put the new sleeve around the old bump stop.
� The old bump stops were still in good shape so I was able to re-use them, and put the new sleeve around the old bump stop.Glad it all worked out
08-04-2011 | 06:59 PM
#34

To be honest when installing lowering springs I don't compress them, they are usually shorter so I'm just able to push them down with the top hat and mount and just put the middle nut on that way for the rears I can keep removing the nut and shifting the mount easily till its in the right spot. And whoever is about to say this is a "special" case I did this method on both my maxima and my jetta on all 4 corners of each car and it worked and cut out all that time spent for compressing the new springs.
08-04-2011 | 10:14 PM
#35


 08-05-2011 | 05:29 AM
#37
Job done, here are some pictures...
BEFORE, with the SUV looks...
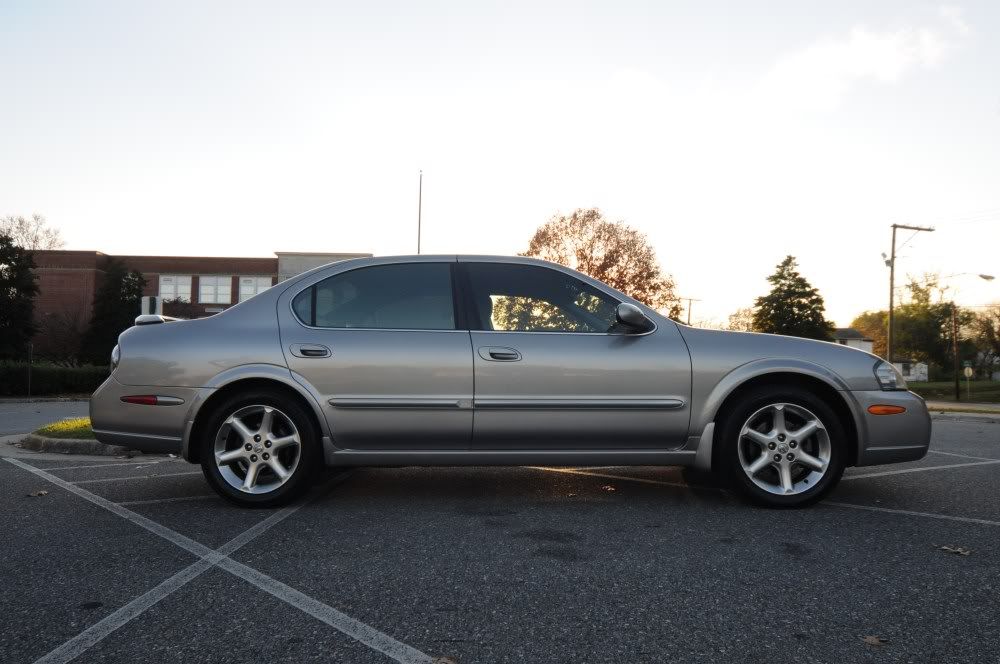
AFTER:
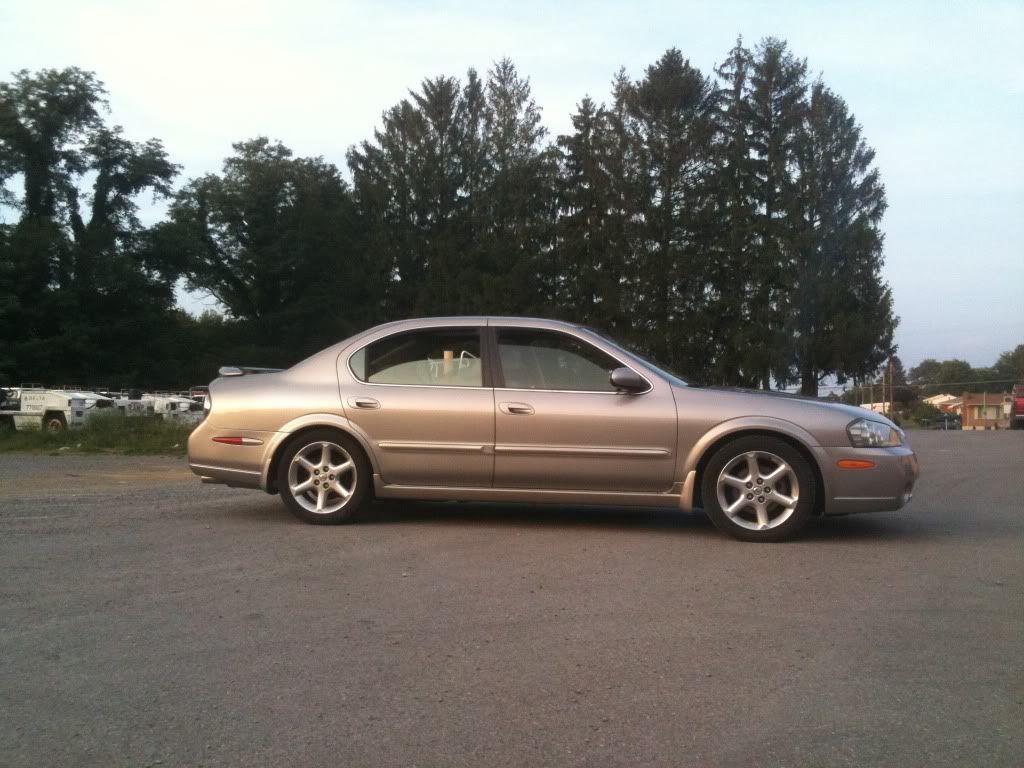

The rear was much easier than the front. It took me about 2 hours. Most of that time was spent trying to loosen the 2 bolts holding the bottom of the struts. It took A LOT of PB Blaster to get them out.
I like the looks, and love the handling.
BEFORE, with the SUV looks...
AFTER:
The rear was much easier than the front. It took me about 2 hours. Most of that time was spent trying to loosen the 2 bolts holding the bottom of the struts. It took A LOT of PB Blaster to get them out.
I like the looks, and love the handling.
08-05-2011 | 06:34 AM
#38
To be honest when installing lowering springs I don't compress them, they are usually shorter so I'm just able to push them down with the top hat and mount and just put the middle nut on that way for the rears I can keep removing the nut and shifting the mount easily till its in the right spot. And whoever is about to say this is a "special" case I did this method on both my maxima and my jetta on all 4 corners of each car and it worked and cut out all that time spent for compressing the new springs.
Oh - for the rears - the two mounting posts should be parallel with the mounting hole at the bottom of the strut. No need for trial and error
Same here too - I can get in there with a 3/8" socket and a 7" extension juust fine.
08-05-2011 | 06:35 AM
#39
Job done, here are some pictures...
The rear was much easier than the front. It took me about 2 hours. Most of that time was spent trying to loosen the 2 bolts holding the bottom of the struts. It took A LOT of PB Blaster to get them out.
I like the looks, and love the handling.
The rear was much easier than the front. It took me about 2 hours. Most of that time was spent trying to loosen the 2 bolts holding the bottom of the struts. It took A LOT of PB Blaster to get them out.
I like the looks, and love the handling.
(I use air but the compressor and tools are a bigger investment than just the cordless gun)
08-05-2011 | 06:49 AM
#40
^^ I was doing this at the shop, where I work. The problem is that I was using a cheap Sears impact gun trying to remove that lower bolt.
After about 30/40 minutes spraying the $hit out of the bolt, and trying to loosen it with with the cheap impact gun, and with a breaker bar, I used a shop impact gun that obviously has a lot more punch, because the bolt came right off... The job would have taken me only 1hr 15 minutes if I used the good impact gun to begin with... oh well, u live and u learn...
After about 30/40 minutes spraying the $hit out of the bolt, and trying to loosen it with with the cheap impact gun, and with a breaker bar, I used a shop impact gun that obviously has a lot more punch, because the bolt came right off... The job would have taken me only 1hr 15 minutes if I used the good impact gun to begin with... oh well, u live and u learn...