
00 Max issues (P0505)


Thread Starter
Junior Member
Joined: Oct 2011
Posts: 34
From: Rhode Island
00 Max issues (P0505) - ECU & IACV Help
Hello guys,
1st, I did my research on the P0505 code and found alot about the ECU/IACV. So the reason I am here asking for help is becuase of how my problem started in the first place.
I've had this 00 max gle A/T that I bought a while back from someone who had it parked for ages. I did some repair work to it to get it up and running like new. Needless to say I've been hella broke lately to even register the car so again its been sitting for a while. I'd occasionally drive it around to keep the juices flowing.
The last time I turned it on, the batt was 100000% dead. Took me 5~10mins of jump charging to even turn the car on. AT which point the car started going bonkers. The alarm went off on my without me having done anything. IT almost did not want to listen to the key fob. Eventually I got the alarm to stay shut and access to the car without it going off on me.
I cranked it a few times, no good. it would make alot of clicking sounds. After charging the batt, it turned on. Ok no problem. or so I thought.
After leaving it running for a good 15~20 mins to get the batt charged up I decided to take it for a stroll. During this drive I noticed the engine light came up. GREAT! Since the car was sitting forever I always keep the code scanner on me at all times. I checked the code P0505. As I kept driving the car, I noticed the gas pedal was not really responding to my actions as I kept seeing the RPM needle moving up by itself without any gas. It was going higher up to the 5000k range. Even after pressing the brakes, the rpm would not drop.
I threw the car in N to force the car to slow down and I noticed the needle then jumping up and down between 2~3k rpm.. at this point my first thought was the MAF sensor must be shot. AS this is the symptom of a messed up MAF sensor.
My question is : I never had these problems prior to this. IS there a chance that the dead battery caused the ECU to reset itself thus causing all the problems??
Also, does the P0505 code ALWAYS pertain to the IACV or can this really be the work of a messed up MAF sensor instead??
I will try to get to work on the car this weekend by first cleaning the MAF and seeing what happens then.. Lastly when this is performed, do I have to do the ECU reset and Idle Relearn procedures??
Thanks for the heads up!
Last edited by HotRod11686; Oct 20, 2012 at 07:49 AM.

Thread Starter
Junior Member
Joined: Oct 2011
Posts: 34
From: Rhode Island
I will be taking out the ECU and looking for that STA509A if its burnt.
Thanks for the assist.
Thread Starter
Junior Member
Joined: Oct 2011
Posts: 34
From: Rhode Island
Holy hell, I am having the most difficult time getting to the damn ECU . There is almost no room for hardly any tools to fit in.
Can someone help me out with the right way to do this as I am stumped at the moment and utterly frustrated! Need to know if there are any specific tools I can use, and also how many bolts hold the harness to the car all together? I noticed 2 10mm bolts on the front but towards the rear there is a mess of wire looms to even see anything back there!
Would REALLLY appreciate the help guys.
Thanks again!

Member
Joined: Aug 2006
Posts: 152
Holy hell, I am having the most difficult time getting to the damn ECU . There is almost no room for hardly any tools to fit in.
Can someone help me out with the right way to do this as I am stumped at the moment and utterly frustrated! Need to know if there are any specific tools I can use, and also how many bolts hold the harness to the car all together? I noticed 2 10mm bolts on the front but towards the rear there is a mess of wire looms to even see anything back there!
Would REALLLY appreciate the help guys.
Thanks again!
Can someone help me out with the right way to do this as I am stumped at the moment and utterly frustrated! Need to know if there are any specific tools I can use, and also how many bolts hold the harness to the car all together? I noticed 2 10mm bolts on the front but towards the rear there is a mess of wire looms to even see anything back there!
Would REALLLY appreciate the help guys.
Thanks again!

Thread Starter
Junior Member
Joined: Oct 2011
Posts: 34
From: Rhode Island
Thanks for the advice!!

Junior Member
Joined: Jan 2004
Posts: 49
From: alpharetta ga
make sure they are lil bolts and not screws like mine. Seems that some people have little bolts holding the ecu in and some have screws. the screws are a real *****. good luck. I just went thru the ecu/ iacv drama and finally got the car to idle somewhat right and pass emissions.
Member
Joined: Aug 2006
Posts: 152
You just reminded me of that. My car had the bolts, the one I was trying to get at the local pick n pull had screws. Boy was that a pain in the ***, I ripped the inside of the car to get the ECU, only to find out it was not the right one for my car.
Thread Starter
Junior Member
Joined: Oct 2011
Posts: 34
From: Rhode Island
I have yet to get to taking out this infernal ecu, its really quite the annoying challenge...
Thread Starter
Junior Member
Joined: Oct 2011
Posts: 34
From: Rhode Island
I have yet to get to taking out this infernal ecu, its really quite the annoying challenge...

Member
Joined: Oct 2009
Posts: 187
From: FloriDUH
Are you referring to the screws / bolts that hold the ECU to the bracket in the car or the bolts/ screws that are on the ECU itself to remove the housing to expose the board??
I have yet to get to taking out this infernal ecu, its really quite the annoying challenge...
I have yet to get to taking out this infernal ecu, its really quite the annoying challenge...
Thread Starter
Junior Member
Joined: Oct 2011
Posts: 34
From: Rhode Island
Yeah I know.. fml.
 , the only way I can think of removing it more efficiently at this point is by removing the entire bracket w/ the ecu attached to it since the those small screws are impossible to remove, I'll have to invest in a 90 degree screwdriver and see how that goes..
Last edited by HotRod11686; Oct 8, 2012 at 04:06 PM.
Member
Joined: Oct 2009
Posts: 187
From: FloriDUH
AH those 4 *****. I unfortunately have 4 small screws / not bolts.
Yeah I know.. fml. , the only way I can think of removing it more efficiently at this point is by removing the entire bracket w/ the ecu attached to it since the those small screws are impossible to remove, I'll have to invest in a 90 degree screwdriver and see how that goes..
Yeah I know.. fml.
, the only way I can think of removing it more efficiently at this point is by removing the entire bracket w/ the ecu attached to it since the those small screws are impossible to remove, I'll have to invest in a 90 degree screwdriver and see how that goes..")
Thread Starter
Junior Member
Joined: Oct 2011
Posts: 34
From: Rhode Island
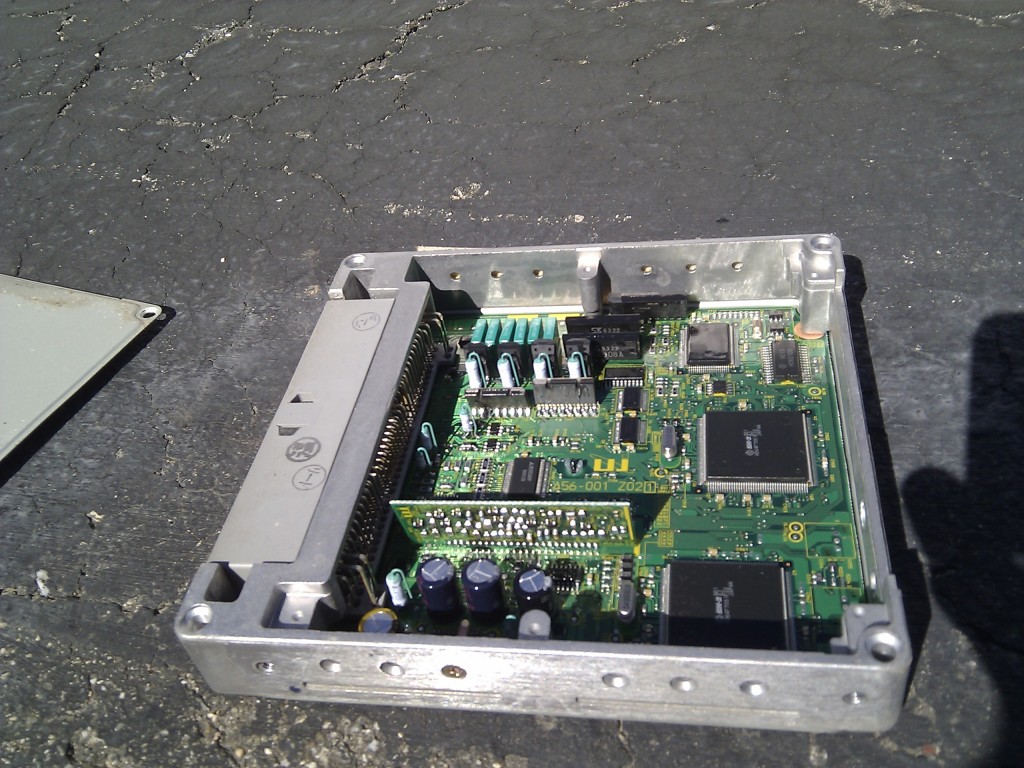
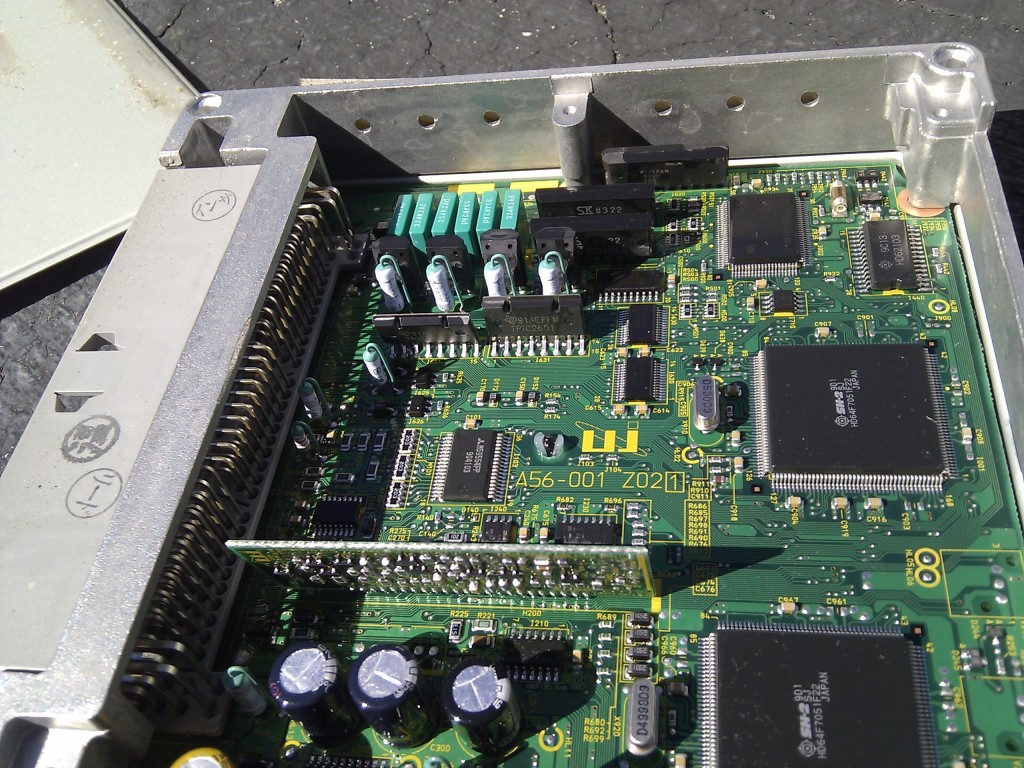
After 5 cuts on my hands later. Success . I removed the entire bracket. Opened up the housing to the ecu and believe it or not.
Note: Did not look like anyone ever touched the ecu in my car as the loom holders were 100% untouched.
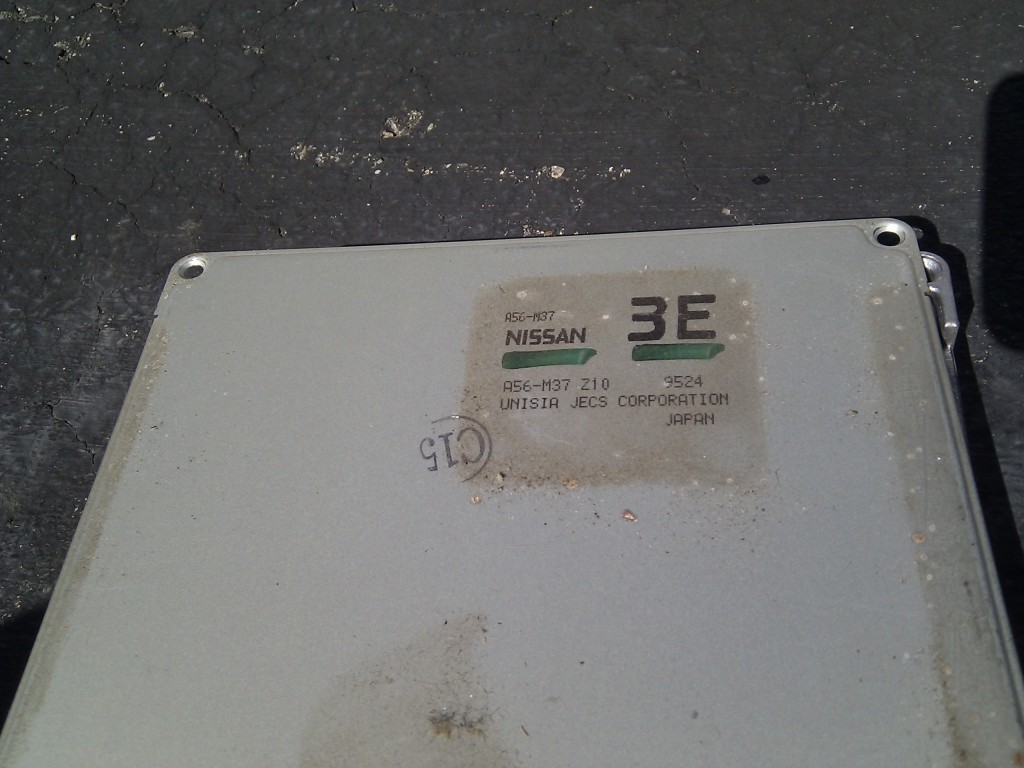
NO DAMAGE! the board looked perfect, i took a bunch of pics below is the info from the ecu.
Front Cover:
NISSAN 3E
A56-M37 Z10 9524
UNISIA JECS CORPORATION
JAPAN
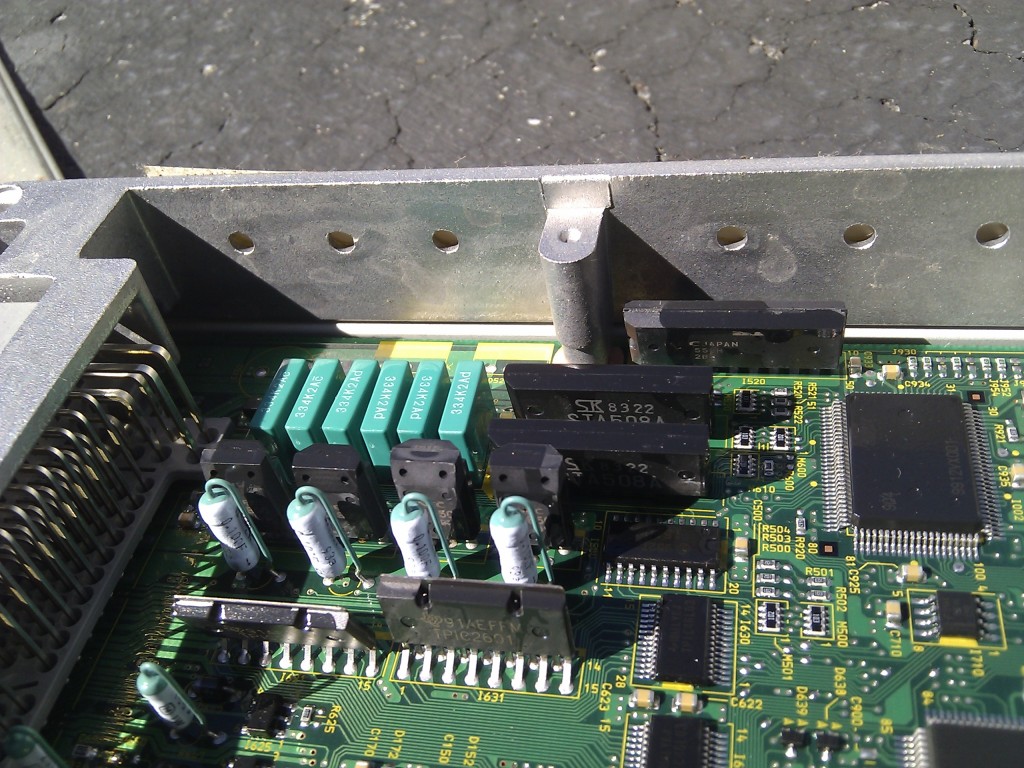
Printed on the board:
A56-001 Z02[1]
The chip: STA508A (i thought it was supposed to be a 509A chip??)
Ok so my next obvious course of action is to replace the IACV and seeing how that goes. Question: I am seeing on NissanPartsZone that the 99 and 00 models have the same identical IACV. Can someone confirm this for me ? Part Number listed is : 781-2Y012 on the site. This will help me buy the correct part

Any other suggestions while I am doing this fix? Should I clean out the MAF while im at it?? Or do any other maintenance as I get to this piece?
Thanks for all the help guys

-- edit:
Last edited by HotRod11686; Oct 13, 2012 at 11:39 AM.
You could do a coolant bypass to prevent the possibility of the IACV from ever malfunctioning and frying the ECU. I chose not to do it because I live in east coast canada and with the cold mornings here I don't want to have hard starts due to a cold IACV.
Thread Starter
Junior Member
Joined: Oct 2011
Posts: 34
From: Rhode Island
Ok I ordered the part on ebay $68 shipped 
In regards to the new IACV installation, now knowing the ECU is perfectly fine. After I install the IACV, would I have to do the idle air relearn procedure or would the ecu still have that in its memory so that I can just replace and go??
Thanks a bunch guys for the assistance!
In regards to the new IACV installation, now knowing the ECU is perfectly fine. After I install the IACV, would I have to do the idle air relearn procedure or would the ecu still have that in its memory so that I can just replace and go??
Thanks a bunch guys for the assistance!
Member
Joined: Oct 2009
Posts: 187
From: FloriDUH
Printed on the board:
A56-001 Z02[1]
The chip: STA508A (i thought it was supposed to be a 509A chip??)
Ok so my next obvious course of action is to replace the IACV and seeing how that goes. Question: I am seeing on NissanPartsZone that the 99 and 00 models have the same identical IACV. Can someone confirm this for me ? Part Number listed is : 781-2Y012 on the site. This will help me buy the correct part
Any other suggestions while I am doing this fix? Should I clean out the MAF while im at it?? Or do any other maintenance as I get to this piece?
-----------------
Ok I ordered the part on ebay $68 shipped
In regards to the new IACV installation, now knowing the ECU is perfectly fine. After I install the IACV, would I have to do the idle air relearn procedure or would the ecu still have that in its memory so that I can just replace and go??
Thanks a bunch guys for the assistance!
BTW, kind of surprised you didn't have any damage in the ECU as that's almost always the case when the IACV fails. I would measure coil resistance on the IACV you remove just to make sure it's bad, I found 3 of the 4 paths measured correctly at 22 ohms but the other was shorted, so I was sure my IACV had failed. I like to verify a bad part so I know I changed the right thing! (I wonder if dealers ever do this..
 )!
)! As far as other things to do once you get it open, I'd clean the throttle body and input manifold, mine were fairly dirty, and since you'll have to remove the MAF might as well clean it too.
Thread Starter
Junior Member
Joined: Oct 2011
Posts: 34
From: Rhode Island
I guess there are some differences in parts from 00 to 01 because my 01 uses the STA509A mosfet and my ECU part number is A56-Q80-ZA1. Also, the IACV for my year is 23781-2Y011, just a digit different than yours, but if you have any doubts just check the part number on the IACV you remove and make sure it matches whatever you install. After you do the replace you're supposed to do idle air relearn, however I found idle was already right at target at turn on, so I don't think I had to do it though I did just to be sure.
BTW, kind of surprised you didn't have any damage in the ECU as that's almost always the case when the IACV fails. I would measure coil resistance on the IACV you remove just to make sure it's bad, I found 3 of the 4 paths measured correctly at 22 ohms but the other was shorted, so I was sure my IACV had failed. I like to verify a bad part so I know I changed the right thing! (I wonder if dealers ever do this..)!
As far as other things to do once you get it open, I'd clean the throttle body and input manifold, mine were fairly dirty, and since you'll have to remove the MAF might as well clean it too.
BTW, kind of surprised you didn't have any damage in the ECU as that's almost always the case when the IACV fails. I would measure coil resistance on the IACV you remove just to make sure it's bad, I found 3 of the 4 paths measured correctly at 22 ohms but the other was shorted, so I was sure my IACV had failed. I like to verify a bad part so I know I changed the right thing! (I wonder if dealers ever do this..
)! As far as other things to do once you get it open, I'd clean the throttle body and input manifold, mine were fairly dirty, and since you'll have to remove the MAF might as well clean it too.
Thanks for the reply
In answer to your concern regarding the ECU. I have a code scanner I always keep on hand and the car was driven only for like 5 minutes after the CEL popped up. I've since then left the car parked and off the entire time. I guess people have been driving with the CEL on and I am assuming that is the cause for the ECU Damage, I guess it is not an instant break. I spoke to my local mechanic who told me he had seen that code on a few max's he's serviced and did do an ECU check on them but found that that there was no damaged ECU's for all the one's he has had to fix the IACV for.
I bought the part on Ebay and it looks identical to the one pictured online for my car.
This is taken from NissanPartsZone
23781U
IACV-AAC VALVE
Replaced by: **781-2Y012
Part Number: **781-2Y011
Production Date: 1999.04-2000.06
Model: VQ30DE
I am assuming that the original part was the 2Y011, which then was replaced by the 2Y012 part. They seem to be interchangeable according to the site.
Tomorrow morning I will be tackling this job. I hope all goes well.

Newbie - Just Registered
Joined: Apr 2009
Posts: 15
From: Brooklyn,NY
Hey if u have not found the problem yet I can help cause I was going thee the same exact thing a few weeks ago, that p0505 is only for the IAC and by the time u see that code ur ECU CHIP for that control is already burnt out. But the key to fixing it is to change both things at once. If u just change the IAC u will still have the same issue. So after u change both things "DO THE IDLE RELEARN" right away or u will burn the ECU CHIP again. Trust me I know.... If u go to the dealer for that ECU they will charge u like $700 and about $300 for the IAC. I bought the IAC with the gasket on ebay for like $60. The ECU I found a company in Cali that's fixes then and gives u a life time warranty on the repairs for $200. Like I said I just did both within the last two weeks and everything is fine.... Hope this was helpful to u... Post how it turns out
Thread Starter
Junior Member
Joined: Oct 2011
Posts: 34
From: Rhode Island
I just wanted a second opinion on the ECU I am posting the pics up.
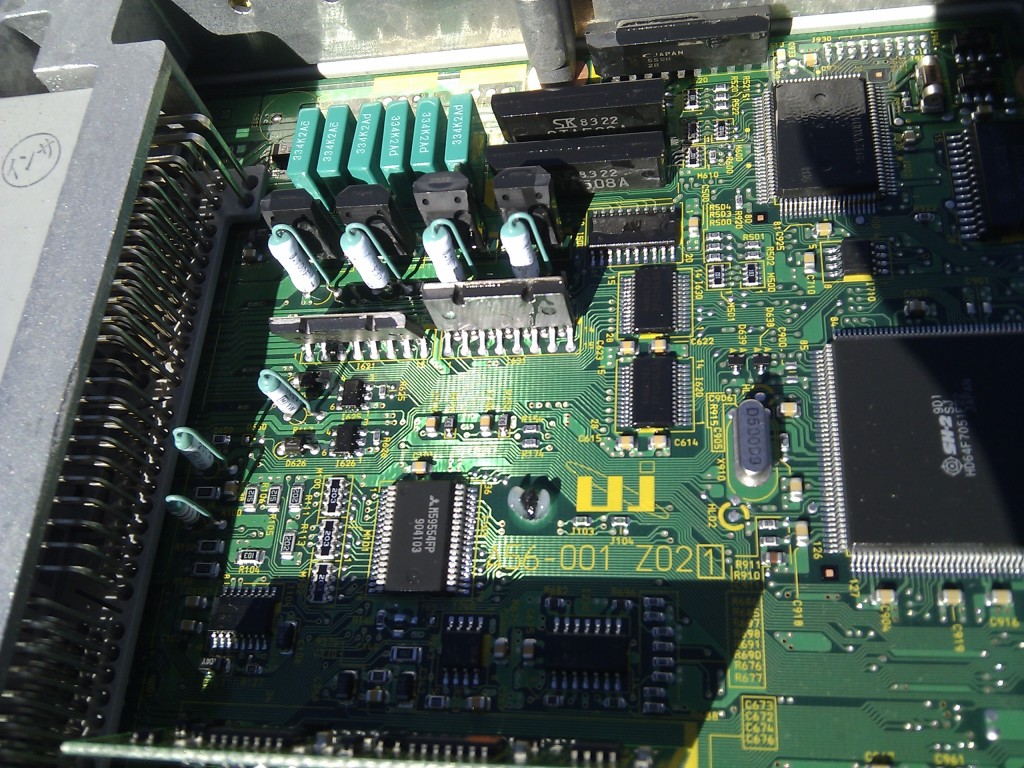
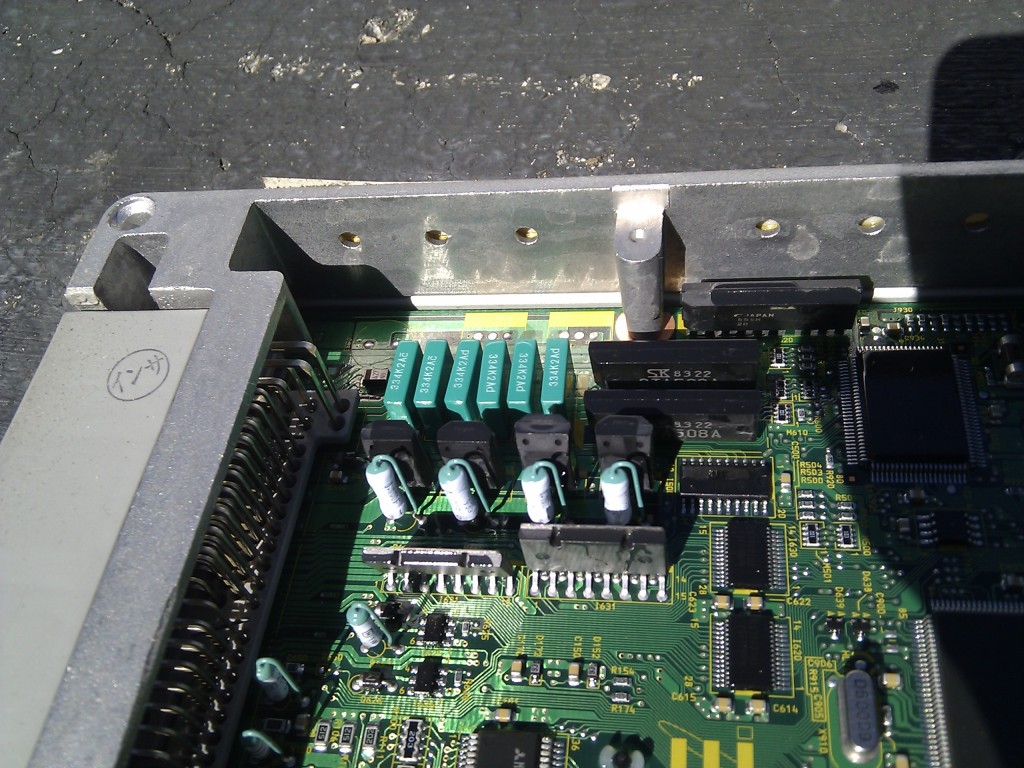
To me it looks perfectly fine but then again I know you guys are the experts
To me it looks perfectly fine but then again I know you guys are the experts
Last edited by HotRod11686; Oct 20, 2012 at 07:43 AM.
Thread Starter
Junior Member
Joined: Oct 2011
Posts: 34
From: Rhode Island
Update:
I got to removing the IACV and throttle body, jeez those 2 spring loaded hoses to the IACV are a real ***** to remove. But they were not as bad as the 5 screws which on this car are caked to death. I will be buying some coca cola and letting them sit in it to remove all the buildup and will be applying some anti seize on them for future work.
Ok so here is the story in pictures.
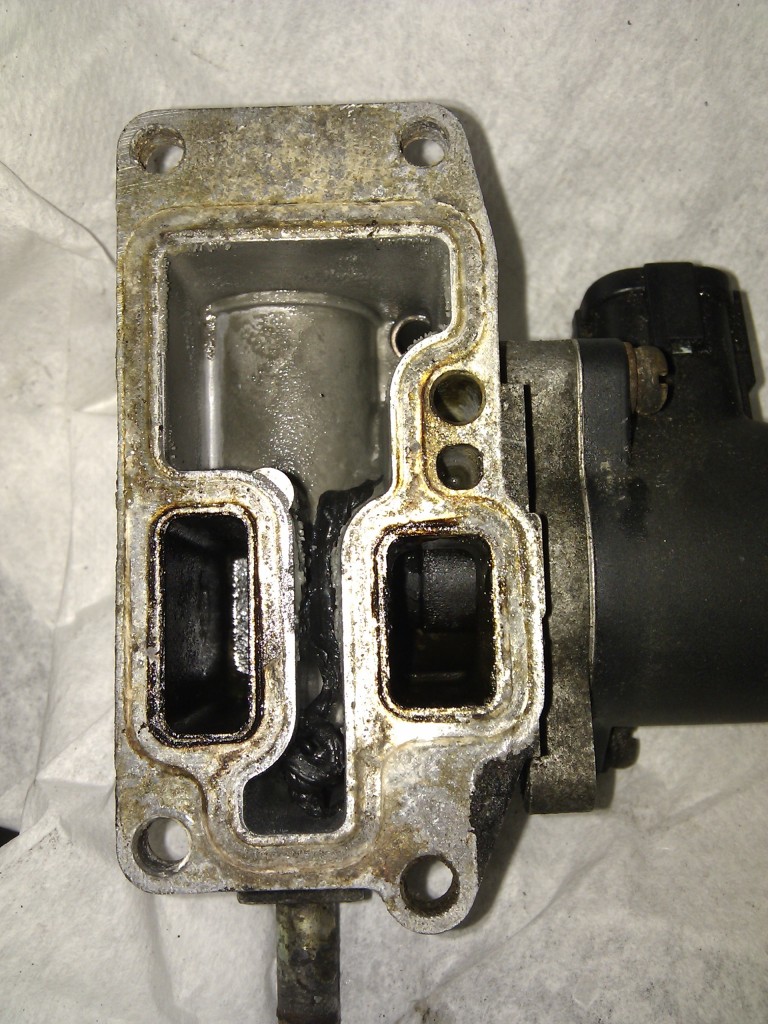

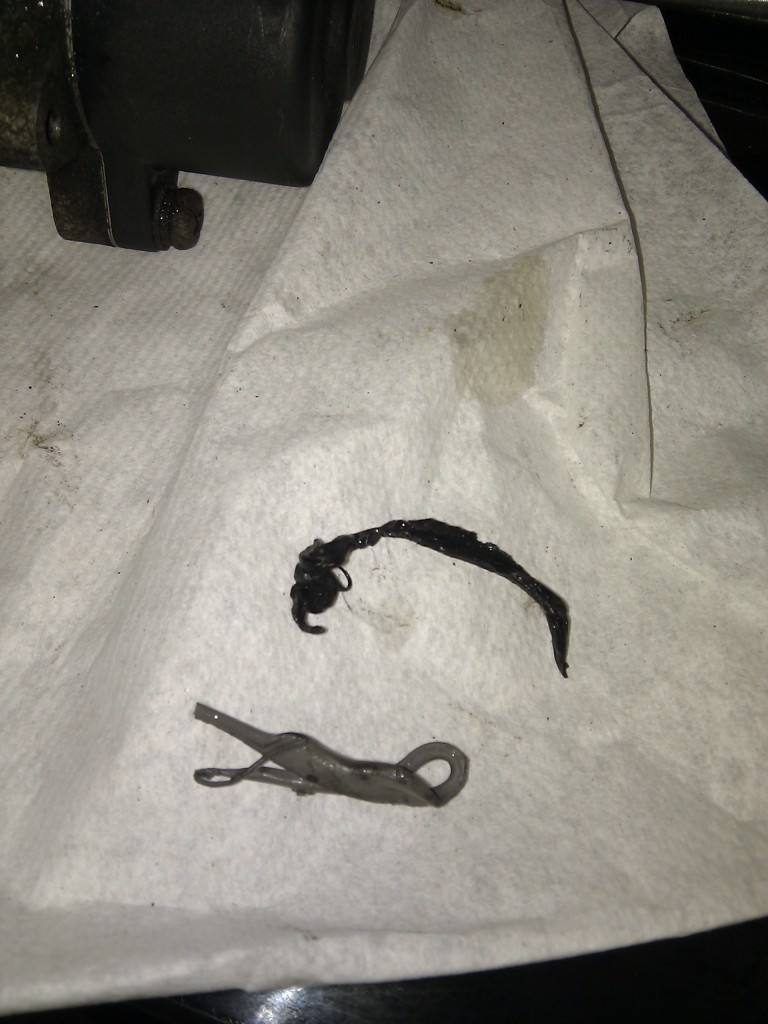
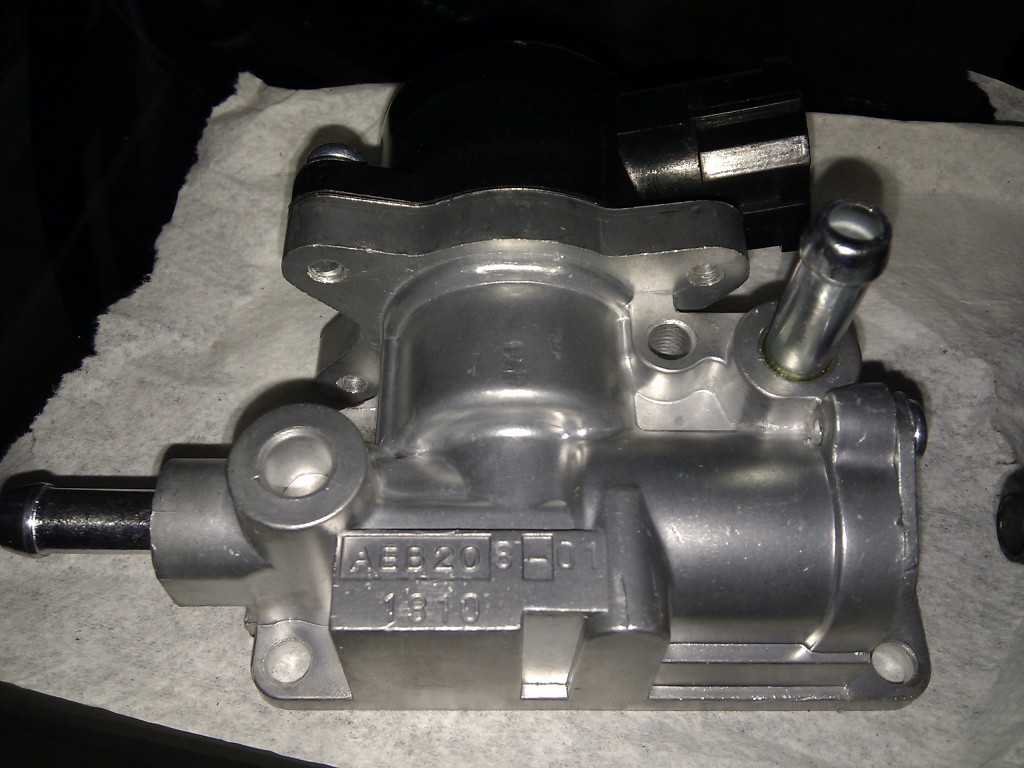
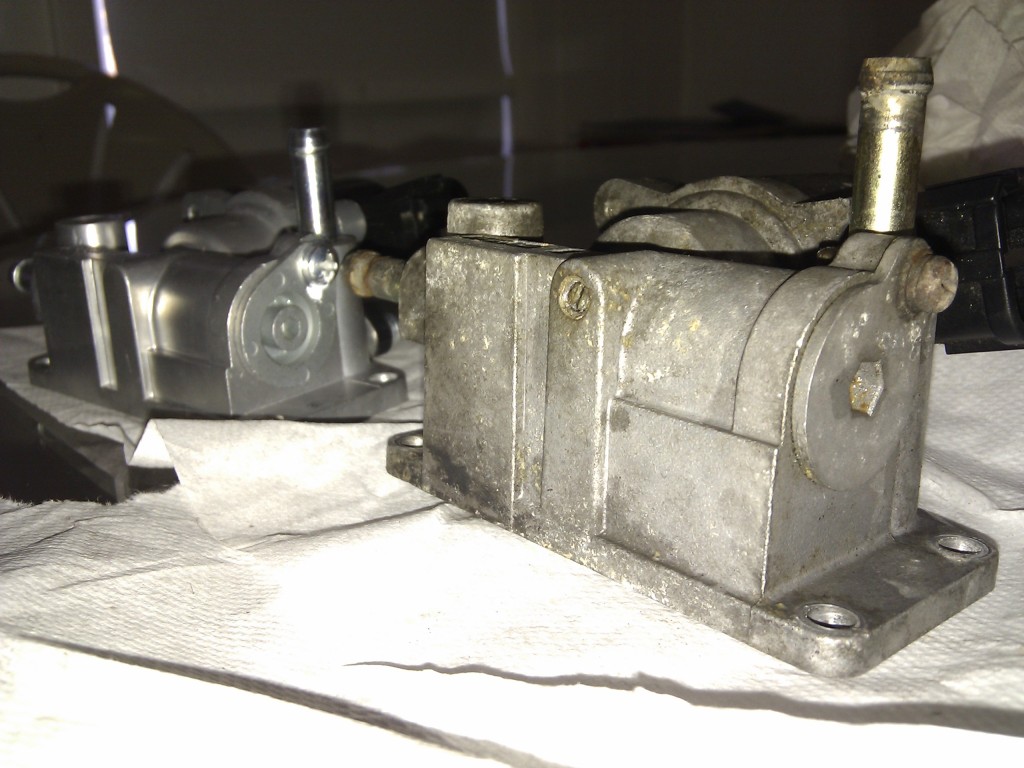
If you notice the old one had 2 pieces of rubber stuck inside near the outlet duct. Anyone think thats the reason why it was acting up??
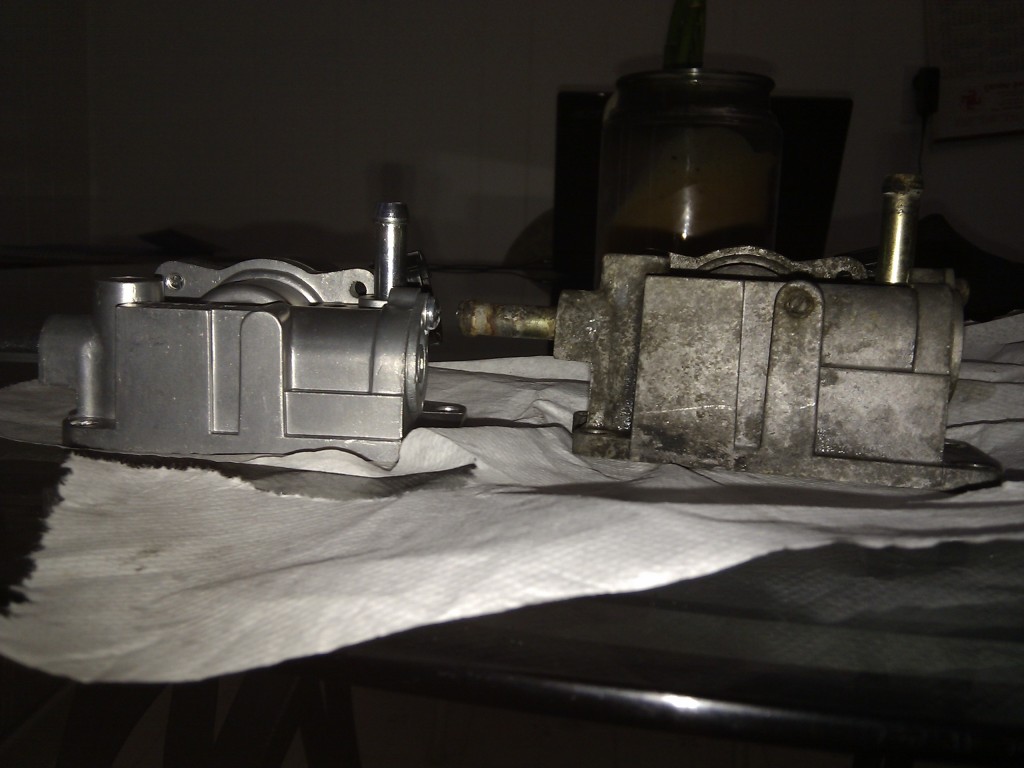
Also after analyzing both parts, the newer one is smaller than the older one
New part id : AEB20-01
1820
Old Part id: AEB20-02
9525
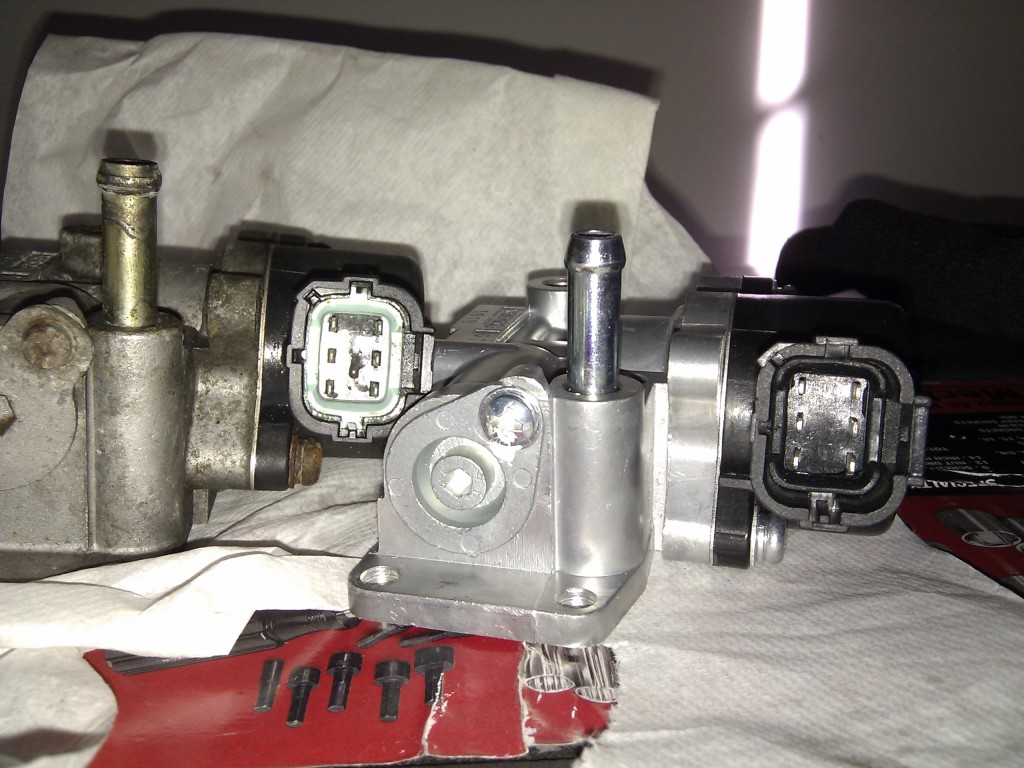
The plug on the new one is black vs the old one which is green. Any thoughts? Did I purchase the wrong one?? Both parts are identical in screw mounts / gasket. etc.
I'll hold off on the replace until I hear back from you guys. Realllly Appreciate the help!
I got to removing the IACV and throttle body, jeez those 2 spring loaded hoses to the IACV are a real ***** to remove. But they were not as bad as the 5 screws which on this car are caked to death. I will be buying some coca cola and letting them sit in it to remove all the buildup and will be applying some anti seize on them for future work.
Ok so here is the story in pictures.
If you notice the old one had 2 pieces of rubber stuck inside near the outlet duct. Anyone think thats the reason why it was acting up??
Also after analyzing both parts, the newer one is smaller than the older one
New part id : AEB20-01
1820
Old Part id: AEB20-02
9525
The plug on the new one is black vs the old one which is green. Any thoughts? Did I purchase the wrong one?? Both parts are identical in screw mounts / gasket. etc.
I'll hold off on the replace until I hear back from you guys. Realllly Appreciate the help!
Member
Joined: Oct 2009
Posts: 187
From: FloriDUH
As far as I can tell from your pics your ECU looks ok. On mine a good size chunk of the plastic package had blown off. I'd say if the plastic package is completely intact with no signs of cracks or swelling from heat, and you don't see any burned traces or burn marks on the leads, it may still be ok. I think you are right about driving on it, if you don't drive on it after the code pops you might avoid blowing the chip.
Member
Joined: Oct 2009
Posts: 187
From: FloriDUH
Update:
I got to removing the IACV and throttle body, jeez those 2 spring loaded hoses to the IACV are a real ***** to remove. But they were not as bad as the 5 screws which on this car are caked to death. I will be buying some coca cola and letting them sit in it to remove all the buildup and will be applying some anti seize on them for future work.
Ok so here is the story in pictures.
If you notice the old one had 2 pieces of rubber stuck inside near the outlet duct. Anyone think thats the reason why it was acting up??
Also after analyzing both parts, the newer one is smaller than the older one
New part id : AEB20-01
1820
Old Part id: AEB20-02
9525
The plug on the new one is black vs the old one which is green. Any thoughts? Did I purchase the wrong one?? Both parts are identical in screw mounts / gasket. etc.
I'll hold off on the replace until I hear back from you guys. Realllly Appreciate the help!
I see you are right about the IACV part number being changed, guess I put the old style part back in mine, but what the heck the original lasted 11 years so can't complain!
So did you measure resistance on the old IACV to verify failure? I would also measure resistance on the new part just to make sure it's 22 ohms, that'll give you more confidence it's the right part. As far as the plug color difference, that seems odd, I'd think Nissan wouldn't change that, unless the part you got is an aftermarket Nissan clone, then they might not care. Send a link to the part you got off eBay and I'll take a look at it.
As far as plastic, is that what the dark stuff in the narrow part of the coolant channel is, if so, that doesn't look good. Kind of wonder how it got there thru those narrow coolant I/O. I assume the gasket you removed was still intact so it wasn't a piece of that. Anyway, given this failure is supposed to be due to coolant getting into the windings of the IACV, I suppose that might be indicative of the typical failure. But to be sure I'd measure resistance, make sure the IACV is bad.
Last edited by Pilm; Oct 20, 2012 at 12:40 PM.
Thread Starter
Junior Member
Joined: Oct 2011
Posts: 34
From: Rhode Island
Had the same trouble with the 2 hoses, PIA to get off and PIA go get back on. I used PB Blaster on the screws and they came off after only a bit of struggle. I have to say your IACV is dirty as he!! on the inside, probably the same on your TB and manifold input, hope they come clean.
I see you are right about the IACV part number being changed, guess I put the old style part back in mine, but what the heck the original lasted 11 years so can't complain!
So did you measure resistance on the old IACV to verify failure? I would also measure resistance on the new part just to make sure it's 22 ohms, that'll give you more confidence it's the right part. As far as the plug color difference, that seems odd, I'd think Nissan wouldn't change that, unless the part you got is an aftermarket Nissan clone, then they might not care. Send a link to the part you got off eBay and I'll take a look at it.
As far as plastic, is that what the dark stuff in the narrow part of the coolant channel is, if so, that doesn't look good. Kind of wonder how it got there thru those narrow coolant I/O. I assume the gasket you removed was still intact so it wasn't a piece of that. Anyway, given this failure is supposed to be due to coolant getting into the windings of the IACV, I suppose that might be indicative of the typical failure. But to be sure I'd measure resistance, make sure the IACV is bad.
Thanks for the quick reply. Yeah tell me about it, the TB is dirty as hell too, this car was parked for a year so tons of rust and gunk built up and also neglected yet the engine purrs and starts without a problem. It needs TLC which I am giving it.
Here is the link to the part I bought. Reference numbers did match the ones on the parts site
http://www.ebay.com/itm/251168465731...S:3160&vxp=mtr
Don't laugh at this but I have no idea how to measure the resistance on the IACV, care to elaborate?? I would need a tester which I don't have. Plug color, I figured it be different due to the fact that is not the Hitachi one which is green, it is an aftermarket one, hence the price tag
.... That plastic, is actually rubber. Looks like a piece of gasket there were two of them one black and one grey. How the hell it came into the housing? I have no clue and yes it is bad, lol. The IACV gasket was 100% intact and no tears were noticeable....
I will be buying MAF cleaner and TB cleaner tomorrow and taking care of those two things while everything is apart.
What do you think should I do for my next step in regards to the IACV? Again thanks for all the help !
Member
Joined: Oct 2009
Posts: 187
From: FloriDUH
Don't laugh at this but I have no idea how to measure the resistance on the IACV, care to elaborate?? I would need a tester which I don't have. Plug color, I figured it be different due to the fact that is not the Hitachi one which is green, it is an aftermarket one, hence the price tag ....
....Here's the service manual instructions for the test, you just probe pins 2-1, 2-3, 5-4 and 5-6, each one should be 22 ohms.
http://s1076.photobucket.com/albums/w458/Pilm99/?action=view�t=iacv_res.jpg

Thread Starter
Junior Member
Joined: Oct 2011
Posts: 34
From: Rhode Island
For resistance test you'll need a multimeter, something like this is only $11 and would work fine: http://www.amazon.com/Equus-3300-Han...=automotive&ie
Here's the service manual instructions for the test, you just probe pins 2-1, 2-3, 5-4 and 5-6, each one should be 22 ohms.
http://s1076.photobucket.com/albums/w458/Pilm99/?action=view�t=iacv_res.jpg
Here's the service manual instructions for the test, you just probe pins 2-1, 2-3, 5-4 and 5-6, each one should be 22 ohms.
http://s1076.photobucket.com/albums/w458/Pilm99/?action=view�t=iacv_res.jpg
Old part
Pins 2-1 = 22.4
Pins 2-3 = 22.4
Pins 5-4 = 18.2
Pins 5-6 = 8.1
-----------------
Conclusion - 100% broken for sure.
New Part
Pins 2-1 = 21.8
Pins 2-3 = 21.8
Pins 5-4 = 21.8
Pins 5-6 = 21.7
----------------
Safe to say the new part is 100% in working order.
Thread Starter
Junior Member
Joined: Oct 2011
Posts: 34
From: Rhode Island
Update:
After spending the last 4 hours of my life on this fix. (POS Spring loaded clips) I was finally able to finish the job. Spent atleast 45 minutes cleaning out the TB and boy it was a dump. Killed 1 shop towel on it.
Went ahead and replaced the IACV + Gasket. Used CLR on the screws because they were horrendous. Thanks to that they came out looking almost new still rusty but thats fine . applied a good amount of anti-seize paste on them.
Ok so after everything was completed , the airbox , everything. I turn the car on and viola. The rpm was a tad bit high at first b/c it was cold so I let the car run for a bit then it started coming down. Note: I did not perform the Idle Air Relearn ...
I went back to the engine bay to see if everything was good and what do you know.. Those infernal clips that mount to the IACV seemed not to be holding and anti-freeze started leaking out of it. Frustrated as hell I thought to myself, no way I am going to dismantle all this ish again.. SO I head to lowes and bought an 11" 45degree plier thank god the length was perfect and I was able to get it perfectly positioned to move it around.. After trying this for 10 minuntes I at last was able to place it at the ideal spot, no leak.
Below are my results
Idle Speed in Park
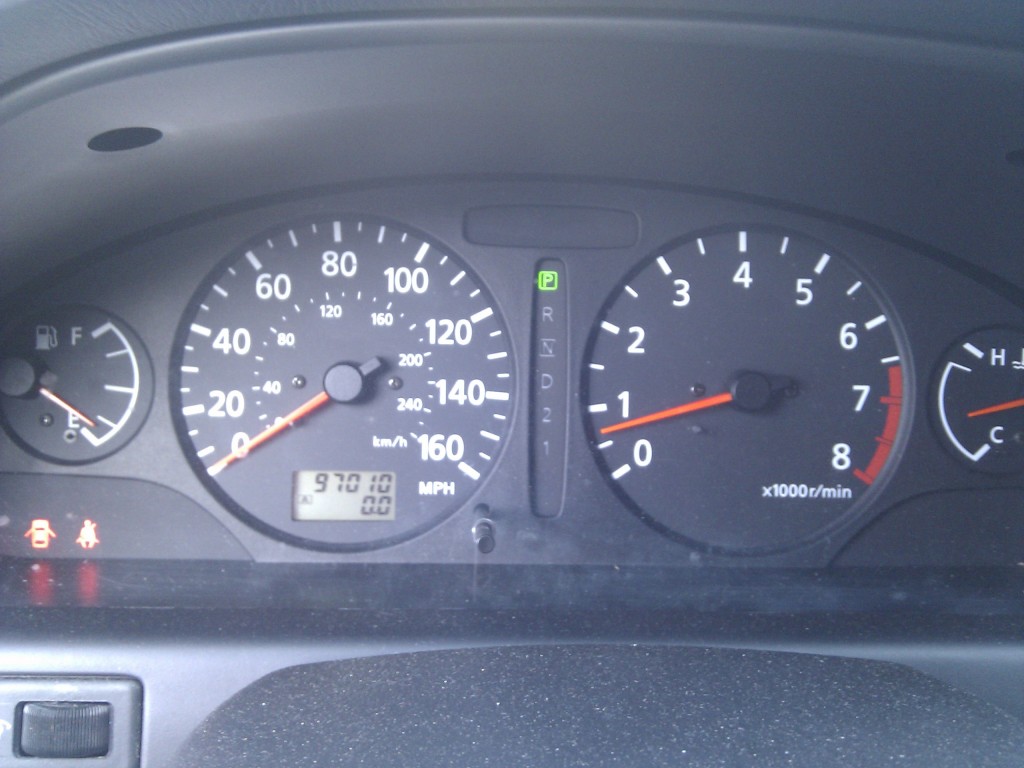
Idle Speed while in Drive
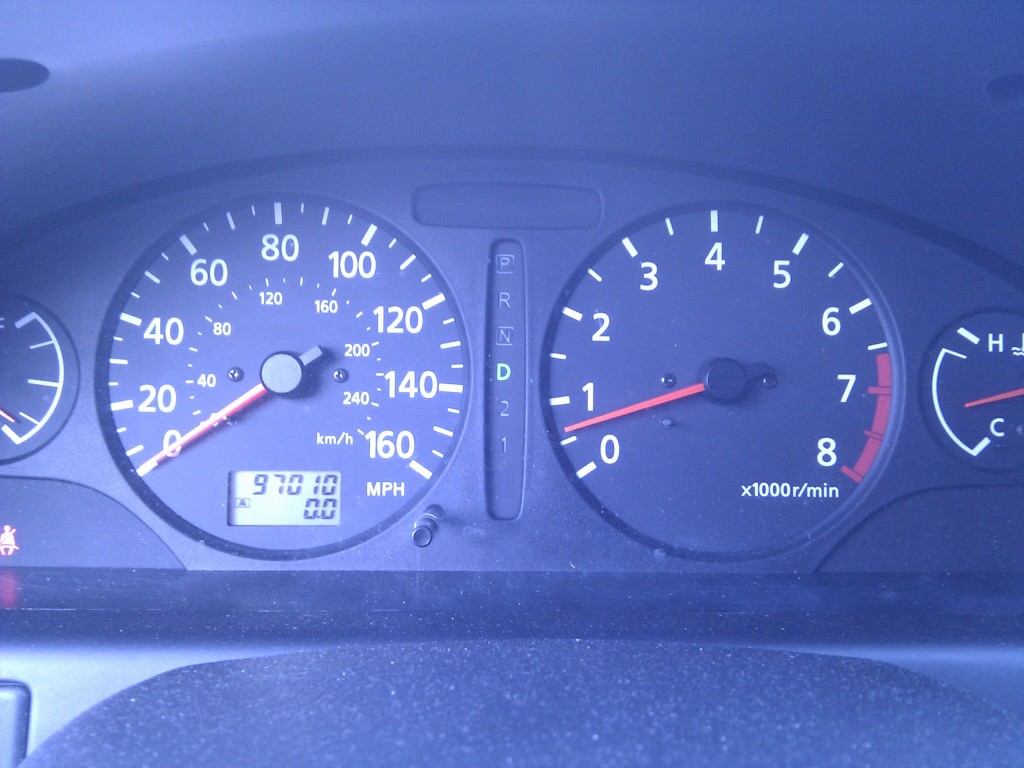
Thank you very much Pilm for the help, made a big difference knowing for sure what was the issue!
After spending the last 4 hours of my life on this fix. (POS Spring loaded clips) I was finally able to finish the job. Spent atleast 45 minutes cleaning out the TB and boy it was a dump. Killed 1 shop towel on it.
Went ahead and replaced the IACV + Gasket. Used CLR on the screws because they were horrendous. Thanks to that they came out looking almost new still rusty but thats fine . applied a good amount of anti-seize paste on them.
Ok so after everything was completed , the airbox , everything. I turn the car on and viola. The rpm was a tad bit high at first b/c it was cold so I let the car run for a bit then it started coming down. Note: I did not perform the Idle Air Relearn ...
I went back to the engine bay to see if everything was good and what do you know.. Those infernal clips that mount to the IACV seemed not to be holding and anti-freeze started leaking out of it. Frustrated as hell I thought to myself, no way I am going to dismantle all this ish again.. SO I head to lowes and bought an 11" 45degree plier thank god the length was perfect and I was able to get it perfectly positioned to move it around.. After trying this for 10 minuntes I at last was able to place it at the ideal spot, no leak.
Below are my results
Idle Speed in Park
Idle Speed while in Drive
Thank you very much Pilm for the help, made a big difference knowing for sure what was the issue!
Last edited by HotRod11686; Oct 21, 2012 at 02:35 PM.
Member
Joined: Oct 2009
Posts: 187
From: FloriDUH
Ok so I got lucky my dad had a multimeter.
Old part
Pins 2-1 = 22.4
Pins 2-3 = 22.4
Pins 5-4 = 18.2
Pins 5-6 = 8.1
-----------------
Conclusion - 100% broken for sure.
New Part
Pins 2-1 = 21.8
Pins 2-3 = 21.8
Pins 5-4 = 21.8
Pins 5-6 = 21.7
----------------
Safe to say the new part is 100% in working order.
Old part
Pins 2-1 = 22.4
Pins 2-3 = 22.4
Pins 5-4 = 18.2
Pins 5-6 = 8.1
-----------------
Conclusion - 100% broken for sure.
New Part
Pins 2-1 = 21.8
Pins 2-3 = 21.8
Pins 5-4 = 21.8
Pins 5-6 = 21.7
----------------
Safe to say the new part is 100% in working order.

Thread
Thread Starter
Forum
Replies
Last Post
MaxLife17
8th Generation Maxima (2016-)
43
Jun 27, 2019 01:37 PM
Maxima30
5th Generation Maxima (2000-2003)
2
Sep 7, 2015 06:13 PM