Altima SE-R front sway bar INSTALLED!!
 07-27-2006, 12:05 AM
#1
Supporting Maxima.org Member

Thread Starter
iTrader: (1)
Join Date: Nov 2004
Location: Upland CA
Posts: 7,353
Altima SE-R front sway bar INSTALLED!!
Well, after all the trials and tribulations of installing a part never installed before, I'm finally finished. I took the car for a test drive. Clearly, the car does not lean at all. VERY flat handling, and very nice tracking through a turn. I like the tighter feel in a corner, yet no adverse effects on the straight. Thats the beauty of stiffer sway bars. For $91 and 2-4 hours of time, I say money well spent.
The bar weighs 1 1/2 pounds more than the OEM bar and is 2mm thicker. This may not seem like much, but its significantly stiffer when going through a turn.
Here is the installation instructions:
Tools needed - Air tools are very very very helpful. I got some 1/2" drive hardened metric sockets and an 18" pipe to fit on my 1/2" drive ratchet as a breaker bar. I believe the sockets I used were 12mm, 14mm, 17mm and 19mm.
1. Loosen lug nuts and jack car up. IMPORTANT!!!---> Position jack stands behind the brackets that hold subframe. If you put jack stands in front under subframe, you will NOT be able to lower subframe.
2. Remove wheels.
3. Remove sway bar endlink using 17mm wrench.

4. Remove y-pipe. This opens up the middle area.
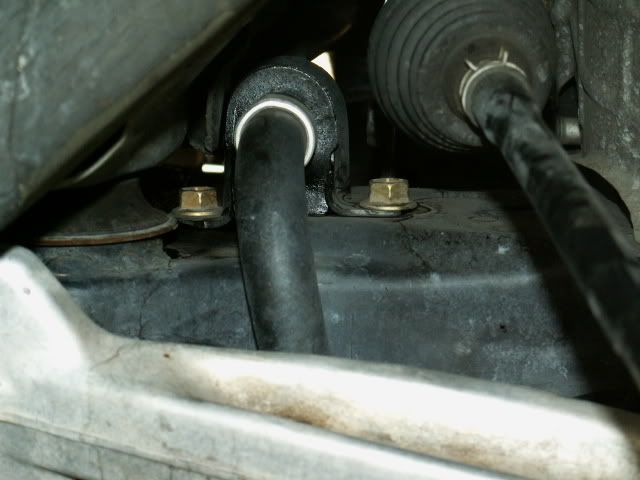
5. Remove the REAR bolt from each sway bar support bushing, but only LOOSEN FRONT bolt of each bushing. Remove these from the wheel well and from underneath in the middle where y-pipe was. Sway bar should be loose now.
6. Now the fun part. Use a floor jack and a small piece of wood and support the engine under the oil pan. Just make sure its supported. DO NOT raise the car at all with this jack or you will bend the oil pan.
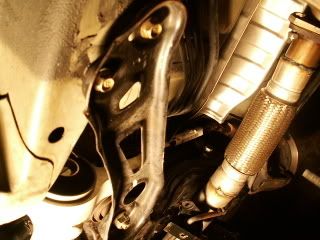
7. Remove the rear sub frame support brackets. The two rear bolts on each bracket are 12mm amd the large front one is 19mm.
The bar weighs 1 1/2 pounds more than the OEM bar and is 2mm thicker. This may not seem like much, but its significantly stiffer when going through a turn.
Here is the installation instructions:
Tools needed - Air tools are very very very helpful. I got some 1/2" drive hardened metric sockets and an 18" pipe to fit on my 1/2" drive ratchet as a breaker bar. I believe the sockets I used were 12mm, 14mm, 17mm and 19mm.
1. Loosen lug nuts and jack car up. IMPORTANT!!!---> Position jack stands behind the brackets that hold subframe. If you put jack stands in front under subframe, you will NOT be able to lower subframe.
2. Remove wheels.
3. Remove sway bar endlink using 17mm wrench.
4. Remove y-pipe. This opens up the middle area.
5. Remove the REAR bolt from each sway bar support bushing, but only LOOSEN FRONT bolt of each bushing. Remove these from the wheel well and from underneath in the middle where y-pipe was. Sway bar should be loose now.
6. Now the fun part. Use a floor jack and a small piece of wood and support the engine under the oil pan. Just make sure its supported. DO NOT raise the car at all with this jack or you will bend the oil pan.
7. Remove the rear sub frame support brackets. The two rear bolts on each bracket are 12mm amd the large front one is 19mm.
 07-27-2006, 12:42 AM
#2
Supporting Maxima.org Member
Thread Starter
iTrader: (1)
Join Date: Nov 2004
Location: Upland CA
Posts: 7,353
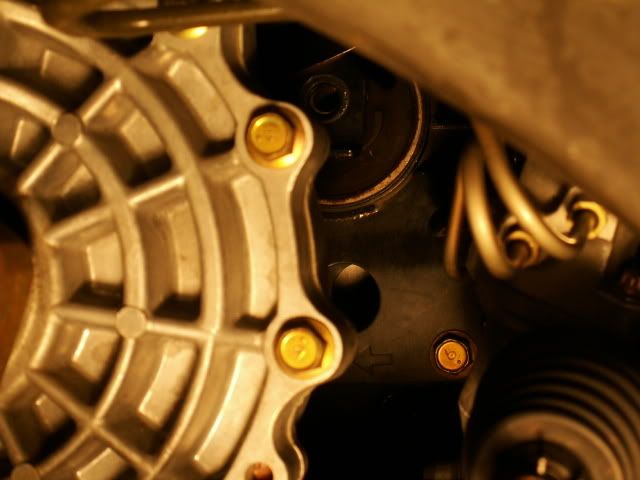
8. Remove the looooong 17mm bolt from the rear motor mount. its located in the center of the subframe and its fairly high up. I used my 18" pipe on a ratchet and it broke loose easily. Here is a shot of the mount without the bolt. Its in the top center of pic behind the tranny.
9. Now you have to pry the subframe down so it drops below the big bolt on each side. I got it down and then put in a small floor jack and pried it untill the subframe cleared to two rear bolts hanging down.
10. I removed the sway bar from the side rather than out the back. Either way is fine. Take ur time. A helper is good here to help snake that curly bar outta there.
11. I marked the old bar on the top passenger side and then took the new bar and put it next to it and marked it as well. That way, there is no confusion as to which way the bar goes in.
12. Snake the new bar in.
13. Now you have to jack up the subframe. Mine was a little off and I loosened the front subframe bolts and pried it until it lined up. This part is tough. Two people are almost mandatory.
BEFORE YOU GO ON TO THE NEXT STEP . . .MAKE SURE THE STEERING SPLINE DID NOT PULL OUT OF THE RECEPTACLE. IF IT DID AND YOU IGNORE IT YOU WILL DO THIS OVER, LIKE I DID. HERE IS A PAINFUL PICTURE:

LOOK UNDER THE DASH AT THE BASE OF THE STEERING COLUMN ON THE FLOOR, AND THE SPLINE SHOULD NOT LOOK LIKE THE PIC. IF IT DOES, GET IT BACK IN THE RECEPTACLE.
14. Now bolt it all back together. Subframe bolts, sway bar bushings, motor mount bolt (looooong one), y-pipe, and then end links. Sway bar support bushings are marked "L" and "R". Left is drivers side and R is passenger side. The slit in the bushing is at the front. Make sure you lube the bushing inside and out. I used anti sieze compound.
15. Put wheels back on, let er down, and fire it up.
16. FOR SAFETY SAKE . ... take it easy for a bit to make sure nothing is loose. Then slowly take corners. See how flat it is through the turn??? Tracking is great.
Great mod for $90. This bar should have come on the car.
9. Now you have to pry the subframe down so it drops below the big bolt on each side. I got it down and then put in a small floor jack and pried it untill the subframe cleared to two rear bolts hanging down.
10. I removed the sway bar from the side rather than out the back. Either way is fine. Take ur time. A helper is good here to help snake that curly bar outta there.
11. I marked the old bar on the top passenger side and then took the new bar and put it next to it and marked it as well. That way, there is no confusion as to which way the bar goes in.
12. Snake the new bar in.
13. Now you have to jack up the subframe. Mine was a little off and I loosened the front subframe bolts and pried it until it lined up. This part is tough. Two people are almost mandatory.
BEFORE YOU GO ON TO THE NEXT STEP . . .MAKE SURE THE STEERING SPLINE DID NOT PULL OUT OF THE RECEPTACLE. IF IT DID AND YOU IGNORE IT YOU WILL DO THIS OVER, LIKE I DID. HERE IS A PAINFUL PICTURE:
LOOK UNDER THE DASH AT THE BASE OF THE STEERING COLUMN ON THE FLOOR, AND THE SPLINE SHOULD NOT LOOK LIKE THE PIC. IF IT DOES, GET IT BACK IN THE RECEPTACLE.
14. Now bolt it all back together. Subframe bolts, sway bar bushings, motor mount bolt (looooong one), y-pipe, and then end links. Sway bar support bushings are marked "L" and "R". Left is drivers side and R is passenger side. The slit in the bushing is at the front. Make sure you lube the bushing inside and out. I used anti sieze compound.
15. Put wheels back on, let er down, and fire it up.
16. FOR SAFETY SAKE . ... take it easy for a bit to make sure nothing is loose. Then slowly take corners. See how flat it is through the turn??? Tracking is great.
Great mod for $90. This bar should have come on the car.

Thread
Thread Starter
Forum
Replies
Last Post
kingw323
4th Generation Maxima (1995-1999)
20
10-21-2015 08:36 AM