
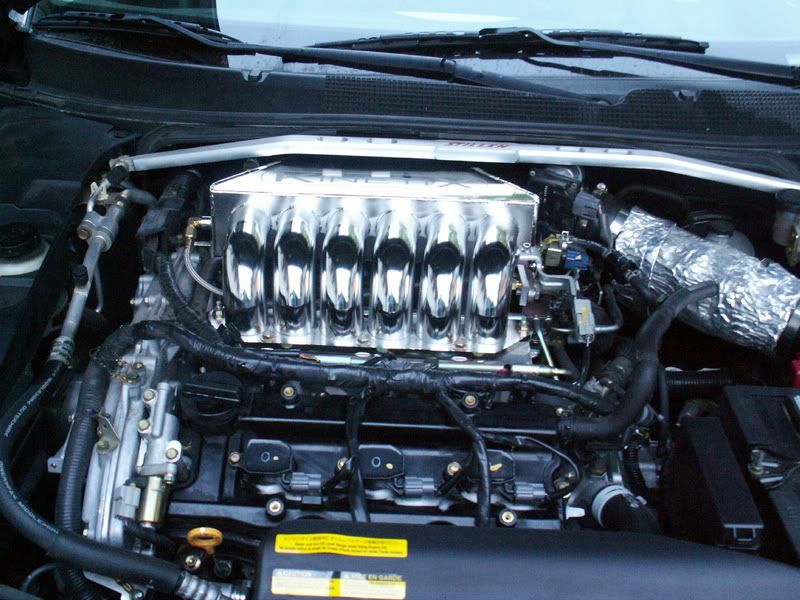
Kinetix intake installed!!!


Joined: May 2005
Posts: 10,197
From: Displaced New Yorker in Southern, MD
Originally Posted by DeusExMaxima
Thank you for the nice comments!!It looks great in person. I tried to put the cover on but it wont fit. It needs trimming. Im up for suggestions on the engine cover as well as ways to spruce up the engine compartment.
The gains are supposed to be 14 hp. The engine feels much more responsive and the power is MUCH stronger up top. The raised redline sure helps. The idle problems went away after i disconnected the battery for 30 min. It seems to run much better. I ought to tune it with a safc, but I lack knowledge in this area. Need to do some homework first.
The intake fit right in with no mods at all. Extremly easy install. Removing the intake was tough as the rear bolts by the firewall are hard to get to. Ill draft another post specifying install procedures that will become a sticky.
I am guessing my horsepower is at 310 at the crank - cattman catback, y-pipe, UDP, reflashed ECU, plus intake and intake manifold.
I understand that the intake was redesigned to make it much more effective. The car has a much improved sound. Ill get clips this weekend probably. When headers go on, the sound will be even more intoxicating than it is now.
Any suggestions on fixing up the engine bay would be appreciated.


these things go for 845 shipped on Kinetix website.
at least get a dyno before the headers to show what 800 dollars worth got ya. you prob wouldn't know anyways if you didn't do a before run.
looks good and all, but this thread is worthless.
at least get a dyno before the headers to show what 800 dollars worth got ya. you prob wouldn't know anyways if you didn't do a before run.
looks good and all, but this thread is worthless.
 +1 +1
+1 +1

Thread Starter
Joined: Nov 2004
Posts: 7,353
From: Upland CA
The procedure for removing the OEM intake and replacing it with teh Kinetix was fairly straightforward. With basic handtools, I did the job at a casual pace in under 2 hours.
Tools needed:
allen wrench (supplied with manifold)
10mm, 12mm, and 14mm wrenches and sockets
flat blade screw driver
1. Disconnect battery and remove engine cover with allen wrench
2. Remove attachments on manifold, including this cannister shown here:

3. Remove air intake
4. Remove throttle body with 4 allen bolts.
Now is the time to clean the throttle body.

In this picture, the disconnected hose is a vacuum hose. But the hose below, that is still connected, with the black fitting is a COOLANT hose. Be careful when remove this hose as coolant leaks out. You can also see the EGR hose which has black braided material, which is right below the two vaccum hoses near the left center of the picture.
5. The bolts at the back of the manifold are now accessible . .. barely. They are hard to get to, and you have to have a good touch. I believe they are 12mm, and there are two of them.
6. Once all hoses and front brackets are removed, and the rear middle bracket is disconnected, the EGR tubing must come off. Its very stiff and hard to take off.
7. Now is the time to undo the manifold nuts and bolts. Do it in a cross pattern and start it a 1/4 turn at a time until they are loose so you dont warp anything. There is one more bracket to remove, but its easier to remove it when the manifold is raised a bit.
8. The bracket on the passenger rear side of the manifold is very hard to remove because of the lack of space and the angle. Its a 10mm bolt head. Here is a pic of the green connectors that attach to it:

Tools needed:
allen wrench (supplied with manifold)
10mm, 12mm, and 14mm wrenches and sockets
flat blade screw driver
1. Disconnect battery and remove engine cover with allen wrench
2. Remove attachments on manifold, including this cannister shown here:
3. Remove air intake
4. Remove throttle body with 4 allen bolts.
Now is the time to clean the throttle body.
In this picture, the disconnected hose is a vacuum hose. But the hose below, that is still connected, with the black fitting is a COOLANT hose. Be careful when remove this hose as coolant leaks out. You can also see the EGR hose which has black braided material, which is right below the two vaccum hoses near the left center of the picture.
5. The bolts at the back of the manifold are now accessible . .. barely. They are hard to get to, and you have to have a good touch. I believe they are 12mm, and there are two of them.
6. Once all hoses and front brackets are removed, and the rear middle bracket is disconnected, the EGR tubing must come off. Its very stiff and hard to take off.
7. Now is the time to undo the manifold nuts and bolts. Do it in a cross pattern and start it a 1/4 turn at a time until they are loose so you dont warp anything. There is one more bracket to remove, but its easier to remove it when the manifold is raised a bit.
8. The bracket on the passenger rear side of the manifold is very hard to remove because of the lack of space and the angle. Its a 10mm bolt head. Here is a pic of the green connectors that attach to it:
Thread Starter
Joined: Nov 2004
Posts: 7,353
From: Upland CA
The manifold should come clear from the car.
Installation:
1. Unscrew the plug from passenger side of manifold. Screw in the fitting from the EGR hose; only the fitting, NOT the hose yet. Make sure its positioned in line where the hose will eventually connect.
2. Lay the hose across, behind the lower manifold. Connect the braided EGR hose to the OEM stiff pipe. I reused the gasket but you should get a new one.
3. Install manifold. Tighten in cross pattern so nothing warps.
4. Connect the EGR braided hose to the fitting in the manifold.
5. The coolant hoses need to be joined together. Identify the coolant hoses (green fluid dripping out) and join them together with this fitting:

After its connected, it should look like this:

6. Connect hoses, the throttle body and air intake. This should be fairly obvious if you're careful when you disconnected things.
7. This is the end result:

Installation:
1. Unscrew the plug from passenger side of manifold. Screw in the fitting from the EGR hose; only the fitting, NOT the hose yet. Make sure its positioned in line where the hose will eventually connect.
2. Lay the hose across, behind the lower manifold. Connect the braided EGR hose to the OEM stiff pipe. I reused the gasket but you should get a new one.
3. Install manifold. Tighten in cross pattern so nothing warps.
4. Connect the EGR braided hose to the fitting in the manifold.
5. The coolant hoses need to be joined together. Identify the coolant hoses (green fluid dripping out) and join them together with this fitting:
After its connected, it should look like this:
6. Connect hoses, the throttle body and air intake. This should be fairly obvious if you're careful when you disconnected things.
7. This is the end result:
Thread Starter
Joined: Nov 2004
Posts: 7,353
From: Upland CA
Originally Posted by clayman88
Wow...looks cool, but doesn't seem to justify the price. Cool mod though.


Originally Posted by Look-at-my-MAX
i never understood why you have foil wrapped around your intake....
Keep the heat away from the piping.
Deus are you going to dyno it soon????
Thread Starter
Joined: Nov 2004
Posts: 7,353
From: Upland CA
Well the theory was to keep keep away from the intake air. Its not foil but insulation. I notice that the intake manifold gets hot. I was going to see about having insulation placed between the bottom part of the intake, and the rear exhaust manifold.

Hey Deus, since there's so much going on with spacer development on the 3.5 to lower underhood temps, how's this manifold effect temps? I would think it runs cooler but would be interested in your thoughts.
Thread Starter
Joined: Nov 2004
Posts: 7,353
From: Upland CA
Originally Posted by Nietzsche
Hey Deus, since there's so much going on with spacer development on the 3.5 to lower underhood temps, how's this manifold effect temps? I would think it runs cooler but would be interested in your thoughts.
How much room for improvement is in the intake manifold(the one below your kinetix). At first I thought it replaced that as well. I know the stock collector could use some tweaking but wouldn't there be better improvements from doing it all the way down to the head? Doesn't seem like that much more work after everything they've gone through.
Thread Starter
Joined: Nov 2004
Posts: 7,353
From: Upland CA
Well, the Altima forum has a post that it gains 14 hp and i dont doubt it. i also love the throttle response and the deeper richer engine sound. It has quite a growl to it.


Please, you spend 700 on a cattback for 10. The problem with the dyno graph is that the 14 peak hp gain was very narrow IMO. It doesn't make power across the board. Very peaky so it's much harder to gauge it's viability. The test car was untuned though so I'd like to see a tuned car before and after for some real differences.
Originally Posted by Nietzsche
Please, you spend 700 on a cattback for 10. The problem with the dyno graph is that the 14 peak hp gain was very narrow IMO. It doesn't make power across the board. Very peaky so it's much harder to gauge it's viability. The test car was untuned though so I'd like to see a tuned car before and after for some real differences.

That thing looks mean DEUSK!! Keep up the modding.
Kamski
Originally Posted by DeusExMaxima
Before:

After:
After:
LOL that is such a HUGE difference. It makes the stock version look like a toy. (it also makes the insulation stand out like a sore thumb). The small hood vents for cooling is a great idea. Maybe you should go with some sort of checkered flag theme for the cover.
Is it worth $800....IMO absolutely!! Looks good and it adds power? People are contemplating $500 + for tailights to look good. So again IMHO it's well worth it.
+1 on the dyno and maybe even a 1/4mile time

Thread Starter
Joined: Nov 2004
Posts: 7,353
From: Upland CA
Originally Posted by Apollos2
LOL that is such a HUGE difference. It makes the stock version look like a toy. (it also makes the insulation stand out like a sore thumb). The small hood vents for cooling is a great idea. Maybe you should go with some sort of checkered flag theme for the cover.
Is it worth $800....IMO absolutely!! Looks good and it adds power? People are contemplating $500 + for tailights to look good. So again IMHO it's well worth it.
+1 on the dyno and maybe even a 1/4mile time
Is it worth $800....IMO absolutely!! Looks good and it adds power? People are contemplating $500 + for tailights to look good. So again IMHO it's well worth it.
+1 on the dyno and maybe even a 1/4mile time
People are ready to drop $500 on tail lights, $2-$3000 on 20" rims (that slow the car down), LED lights, and other visual mods, and yet question question this mod which makes HP, and sounds great too.


Originally Posted by DeusExMaxima
Thanks Kamski. Apollo, I agree with everything you said. Imsulation needs to go. Checkered flag scheme with maybe a thin red line somewhere would be a great idea I think.
People are ready to drop $500 on tail lights, $2-$3000 on 20" rims (that slow the car down), LED lights, and other visual mods, and yet question question this mod which makes HP, and sounds great too.
People are ready to drop $500 on tail lights, $2-$3000 on 20" rims (that slow the car down), LED lights, and other visual mods, and yet question question this mod which makes HP, and sounds great too.


aka The Doom Ship

Joined: May 2004
Posts: 1,788
From: DFW, TX
I think the issue here is whether this mod is purely cosmetic or does it provide a performance gain. If it's cosmetic alone then nobody would have a problem with that. But it's when you make claims that it provides a performance increase is when people begin to question.
Questioning is always good.
I wouldn't knock anyone for getting it though cause it does look good.
Looks like it would provide a higher volume of air with a SC or turbo.
Questioning is always good.
I wouldn't knock anyone for getting it though cause it does look good.
Looks like it would provide a higher volume of air with a SC or turbo.


Supporting Maxima.org Member
Joined: Jan 2003
Posts: 281
Originally Posted by Nietzsche
Please, you spend 700 on a cattback for 10.
The problem with the dyno graph is that the 14 peak hp gain was very narrow IMO. It doesn't make power across the board. Very peaky so it's much harder to gauge it's viability. The test car was untuned though so I'd like to see a tuned car before and after for some real differences.

Joined: May 2005
Posts: 10,197
From: Displaced New Yorker in Southern, MD
Originally Posted by DeusExMaxima
Tin foil removed from intake:
This picture was taken Yesterday...
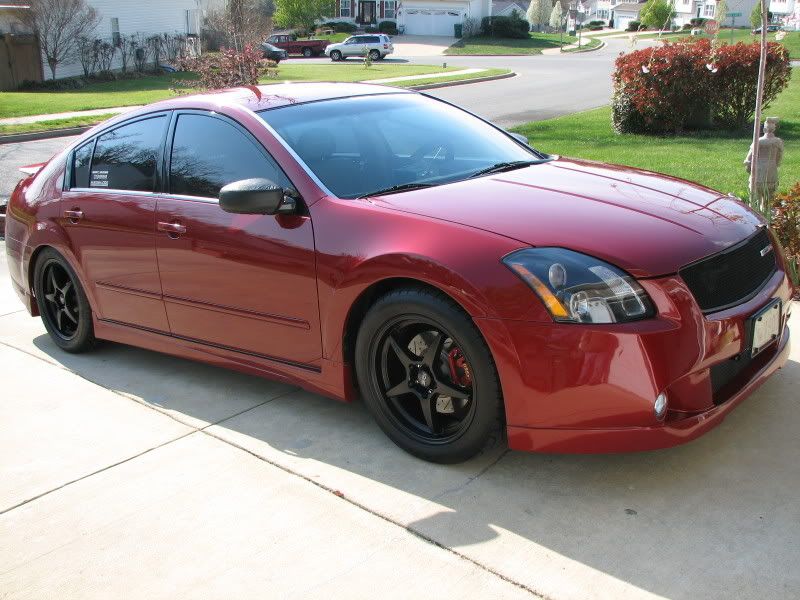
My Wife truck & the neighborhood today...


