
Halo Group Buy The Install


Senior Member
Joined: Sep 2004
Posts: 405
From: Miami, FL
Well, you should have gotten 4 halos total. 2 smaller for the top and 2 larger for the bottom.
Each halo has 2 bare white wires coming off them.
You will have also gotten 2 inverters with 2 plugs on each and 2 bare wires (+ and ground)
There are 4 empty black "quick disconnect" plugs you will be attaching to the bare white wires on the each halo.
Hopefully yours came with some epoxy glue, if not go to the hardware store and get some crystal clear 2 part epoxy in the double syringe.
You will need to get some 18 gauge wire. And lengthen each white wire coming off the halos. Splice into the middle of the white wire, you'll want to reuse the end of each white wire to attach to the plugs provided.
I added about 18" to each white wire since I was mounting the inverter outside the headlights.
On the end of each white wire you will see the special metal end, its not just braided wire strands. On one side it will have a little extra piece of metal in the middle this is to line up with the empty notch on the bare plugs provided.
DO NOT ATTEMPT TO SEE HOW THIS GOES TOGETHER UNTIL YOU ARE DONE AND READY TO MOUNT THE PLUGS. If you snap them in, you will not be able to pull the plug apart from the wire. Then you will need a bigass hole in the back of the headlight housing to get those wires out.
There are 3 slots in each of the plugs but only 2 wires. You'll connect the wires to the outside slots and leave the middle open. You'll notice thats how the other plugs are wired from the inverter.
If you have more questions let me know. I don't think I left any thing out though.
Good Luck!
....wow, I'm speechless. Without a doubt, this was way more than I imagined you would hit me off with, but it is GREATLY appreciated. Thank you. I did get the kit with the epoxy glue as well as a ton of their business cards and brochures, lol. Once I have these installed I will "vouch" for their product by passing out their advertisements. Rich (Richard) was without a doubt very useful. Never got to speak to Justin, but never needed to when I had Rich helping me out from the moment I told him about that issue the installer had told me (not to mention refusing to take my order and telling me to hold off on ordering them). I finally have every part I need in order to do my exterior mods. Let the fun begin.

Ive used my heat gun at 750degrees on the cover to apply eyelids.
Those covers are strong, they are made to withstand rocks and other flying debris.
Do it Do it Do it Do it Do it

I'm not sure what the sealant is called. But, my suggestion is to purchase a heat gun that you would use to melt the existing sealant and mold the gooey sealant around the housing to get a better seal without any lapses in the sealant.
If you try the wrong kind of sealant it may cause more humidity to form inside while it is drying.
Btw, you will be very happy with these halos.
They are bright as hell during the day, still very noticeable in direct sunlight.
If you try the wrong kind of sealant it may cause more humidity to form inside while it is drying.
Btw, you will be very happy with these halos.
They are bright as hell during the day, still very noticeable in direct sunlight.


Member
Joined: Sep 2007
Posts: 72
From: Portland, Me
newb question
hello all. I have a noobie question for ya. I am extremely interested in making the halos happen in my car. I was wondering if it would be possible to get a heated steering wheel switch and turn that into my halo switch (part # 251937y000). simply because i want to have control but i dont want anything to look like i bought the switch at radio shack (no offense). Also i am slightly inclined to do it myself would it be too much for me to handle? (painting, clearing the orange, and doing the halos). any help is appreciated
hello all. I have a noobie question for ya. I am extremely interested in making the halos happen in my car. I was wondering if it would be possible to get a heated steering wheel switch and turn that into my halo switch (part # 251937y000). simply because i want to have control but i dont want anything to look like i bought the switch at radio shack (no offense). Also i am slightly inclined to do it myself would it be too much for me to handle? (painting, clearing the orange, and doing the halos). any help is appreciated
If anyone does need extra sealant to reseal the headlights, I have found that it is a hot melt butyl tape or rope. The only problem is that I have yet to find a supplier of the product. I am going to check at a local glass shop and see if they have the sealant or if they can direct me to a supplier.


Senior Member
Joined: Feb 2007
Posts: 634
From: Pittsburgh, PA
After an entire day of install. That's from 9 this morning till 9 tonight, they are in. Still haven't wired the switch, it took so freakin long to do. You get better as you go along but there are so many parts, just taking the damn thing apart was hard for this newbie.
Pics in the next couple of days.
Joshua
Pics in the next couple of days.
Joshua
I just got my halo's today and will be putting them in this weekend along with the switchbacks. I have already painted the headlights and tinted the sidemarkers prior to this so I hope it doesn't take as long to complete the project. Will post pictures as soon as I can.


Senior Member
Joined: Feb 2007
Posts: 634
From: Pittsburgh, PA
So for anyone who put a switch in the cabin, how the hell did you go through the firewall? Did you put the car up on jacks? Go through the drivers side? I realized at this point how much harder it is...I can't even get under the car to do it, nor do I want to drill into the engine somehow...help!
Joshua
Joshua
It wasn't fun.
Temporarily, I followed the driverside fender at the top, and ran 2 18gauge wires out a crack to near the driverside door hinge. Then there's a large rubber grommet for the speaker wire and door lock, and windows and ran them into the inside.
Temporarily, I followed the driverside fender at the top, and ran 2 18gauge wires out a crack to near the driverside door hinge. Then there's a large rubber grommet for the speaker wire and door lock, and windows and ran them into the inside.
So for anyone who put a switch in the cabin, how the hell did you go through the firewall? Did you put the car up on jacks? Go through the drivers side? I realized at this point how much harder it is...I can't even get under the car to do it, nor do I want to drill into the engine somehow...help!
Joshua
Joshua
Senior Member
Joined: Feb 2007
Posts: 634
From: Pittsburgh, PA
I removed the inner fender well and ran my wiring along the existing wiring harness that leads into the cabin, when you get to the cabin firewall you will see a large rubber grommett and I poked a hole with a sharp punch and then pushed my wires through the hole with the punch. Grommett will seal tight around the wires and that was it. Worked good for me anyway.
Drove with them on today for the first time, they are awesome.
Joshua
I removed the inner fender well and ran my wiring along the existing wiring harness that leads into the cabin, when you get to the cabin firewall you will see a large rubber grommett and I poked a hole with a sharp punch and then pushed my wires through the hole with the punch. Grommett will seal tight around the wires and that was it. Worked good for me anyway.
About how many bolts are there for the fender?
What exactly is the inner fender well and how did you take it off? I'm guessing its the black plastic on the inside that goes around where the tire is? Is there screws to take it off? Did you have to twist the wheel?
Drove with them on today for the first time, they are awesome.
Joshua
Drove with them on today for the first time, they are awesome.
Joshua
Last edited by wildman04; Mar 15, 2008 at 08:18 PM.
I replied right before your post. Just remove the inner fender and you will see where the factory wiring is ran. I didn' get to work on my halo's today(busy trying to get all led's switched inside) but I am hoping to get the halos in tomorrow. Cant wait.
I was installing my halo's today and completed the first headlight. Took pictures to post when I was finished with the install. I went outside to install the one headlight and looked down and the lower halo was broke in half. I went back in and looked on my camera at the pictures I had previously took and the halo was not broke. What could have happened. I am very sick now.
This is right before I walked out with headlight.
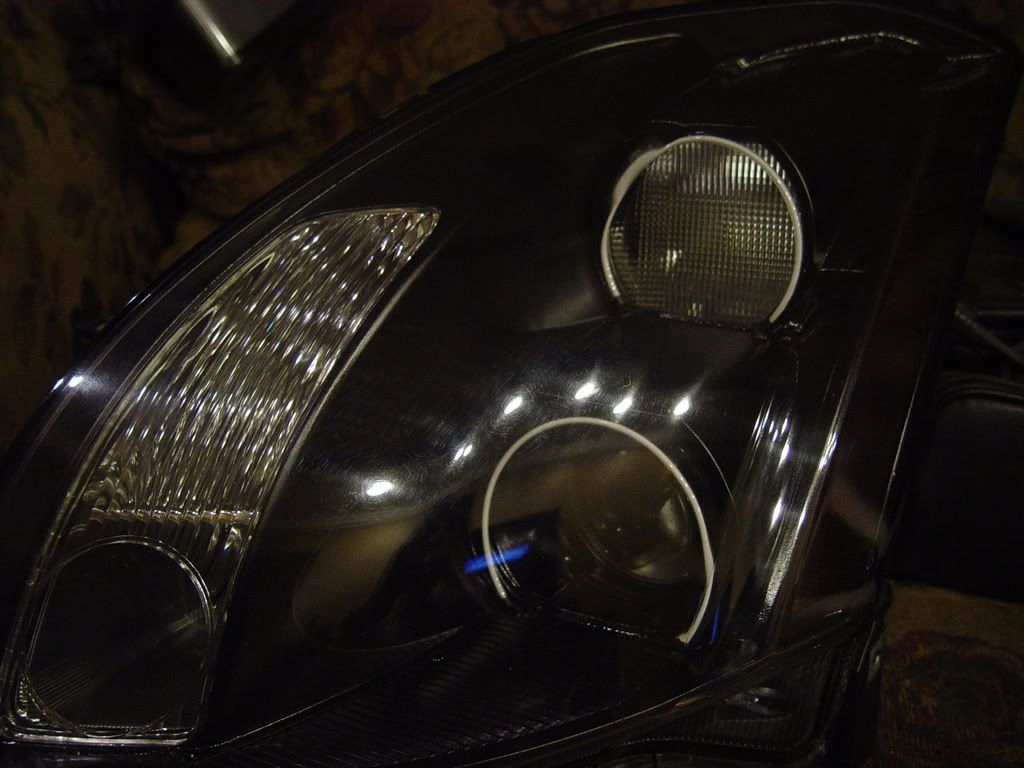
This is what I saw after I went out.
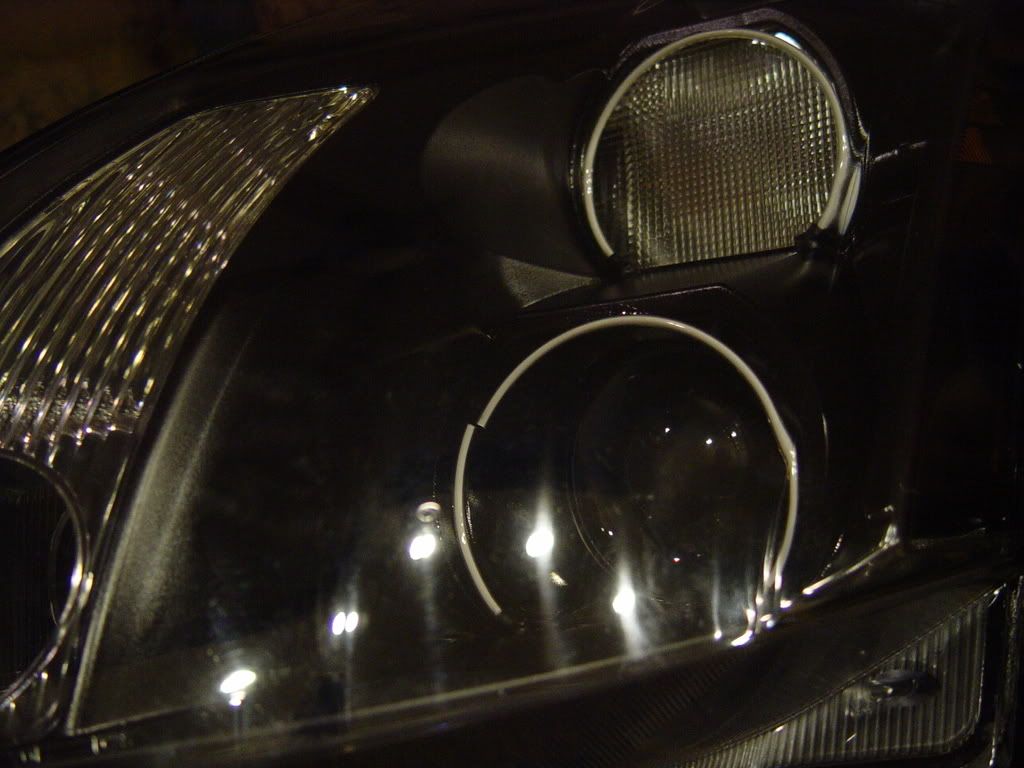
This is right before I walked out with headlight.
This is what I saw after I went out.
Last edited by wildman04; Mar 16, 2008 at 08:10 PM.
I was installing my halo's today and completed the first headlight. Took pictures to post when I was finished with the install. I went outside to install the one headlight and looked down and the lower halo was broke in half. I went back in and looked on my camera at the pictures I had previously took and the halo was not broke. What could have happened. I am very sick now.
This is right befor I walked out with headlight.

This is what I saw after I went out.

This is right befor I walked out with headlight.
This is what I saw after I went out.
That top pick looks like its alot wider than mine at the bottom.
No. I placed the loose bulb up against the light housing and lightly scratched a location to drill the holes and did not pull them wider or push them together at the bottom. It looked great after it was all complete as the first picture shows and I just walked outside, plugged the light into the harness and was screwing the bolts in by hand when I looke down and saw it broken.

Follow this link for the group buy price $119
http://automotivelightstore.com/inde...ROD&ProdID=162
http://automotivelightstore.com/inde...ROD&ProdID=162

Senior Member
Joined: Nov 2004
Posts: 213
From: Torrance, ca
From looking at those pics, it looks like the holes you drilled for the halo where a bit too far apart. Causing outward stress on the halo. Those halos are fragile.
One question, did you insert the boots of the halo inside the mounting holes or just the wires?
One question, did you insert the boots of the halo inside the mounting holes or just the wires?
Last edited by too_Da_MAX; Mar 17, 2008 at 05:39 PM.
I inserted the boots into the mounting holes, but they fit into the holes loosely and then I epoxied the boot and the top edge of the halo to the light housing. I had everything drilled just perfect to match the way the halos came out of the package. I painted the remainder of the boot so it would blend with the light housing and I think that is why it looks wider than some other ones.

