
Guide to installing splash guards and mud flaps


Thread Starter
Member
Joined: Jul 2009
Posts: 105
Guide to installing splash guards and mud flaps
Well, I finally took some time to add my splash guards and some aftermarket mud flaps. First you need to get some generic car mud flaps. The ones I bought where from autozone made by highland park for $9 a pair. I ordered my splash guards from mynissanparts.com for about $120. It comes with all the screws and snap pins you will need but no directions. I started with the rear section first. You will need to remove the rear wheels (This will make you job a lot easier, since no room for a screw driver between wheel and fender). First, you will need to drill pilot holes through the two punched indends as shown in the red cirles in the pic below. After you have made your pilot holes, you will need to place the clips (provided with splash guards) on the fender body over the holes where you will put in the screws, so they have something to tighten against:
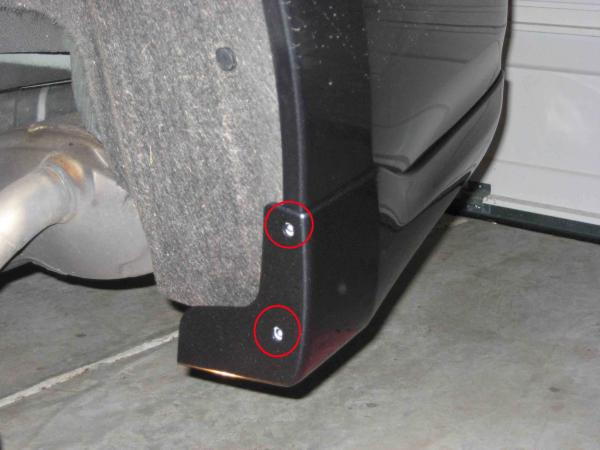
Next, you will need to prep the area, whip down with alcohol and get the rear splash gaurd ready as shown below (the rears have two holes in the fender well versus 1 hole for the fronts)

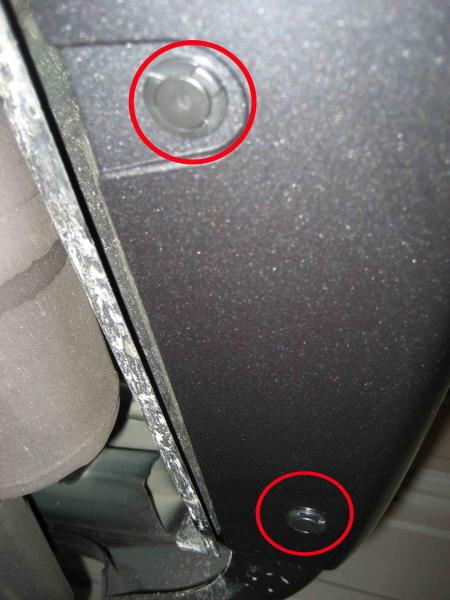
Next, you will need to remove the plastic cover over the adhesive tape on the inside of the splash gaurd and place into position (remember, you need a clean, dry surface before attaching). Be sure to line up the two snap pins on the bottom (there are pre-drilled holes on the bottom valance). Put the snap pins into the holes and push until they lock into place as shown below:
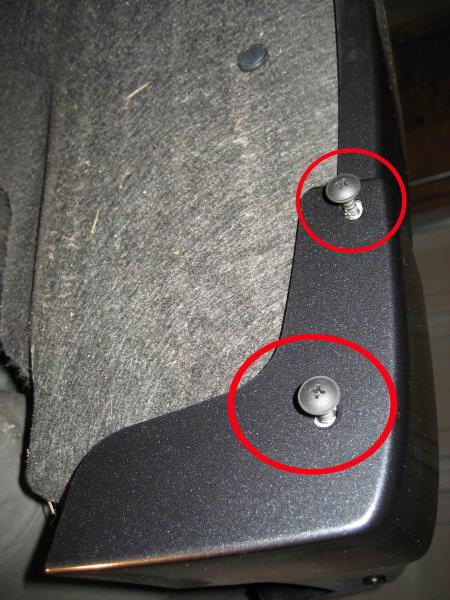
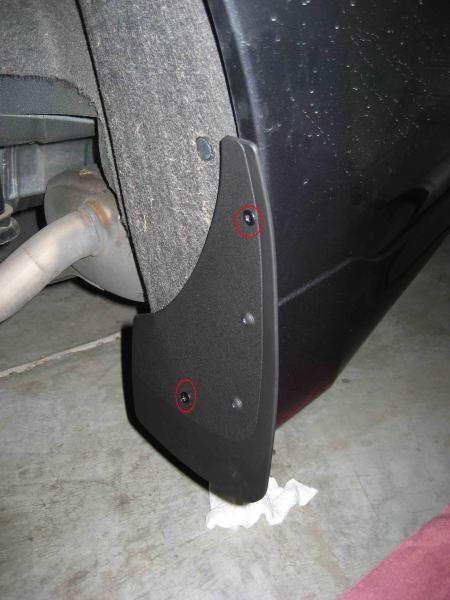
Next, you will need to take your mup flap (I decided to use the whole mud flap instead of cutting it down like some other people on this forum) and place into desired location. Make a mark on the mud flap where the two screw holes line up in the splash gaurd. Drill out those two holes and place into position and tighten down with the two screw as shown in the first pic below. I then added two addition self-tapping metal screws into the top of the mud flap and bottom as shown in the second pic below:
Next, I moved onto the installation of the front splash guards. Remember that the fronts are smaller and only have 1 hole on the fender well side as shown below. Also, for some reason from this point on I could not get pics to load into this page directly, so I will have to add links to each photo from my profile album.
http://forums.maxima.org/picture.php...ictureid=11447
First, you will need to rotate the tire out of the way. Next you will need to remove the two screw on the fender body. The top one (as indicated by the arrow in next pic) will be used to attach the mud flap and the bottom screw will be used to attach the splash guard and mud flap:
http://forums.maxima.org/picture.php...ictureid=11453
Next, remove the plastic cover on the adhesive tape on the inside of the splash guard and place splash guard on the car in the correct location (remember to clean the surface first). Insert the two snap pins into the bottom of the splash guard and push into place until they lock (there are pre-drilled holes on the bottom of the valance for this). Next, place the mud flap in desired location and drill the holes for the two screw sites. Place mud flap on, and screw down. Then use two self-tapping metal screw and tighten down the top and bottom of the mud flap as shown in the next figure:
http://forums.maxima.org/picture.php...ictureid=11454
And then repeat on the other side, It took me about 2 hours to complete. I know other people have used only half or part of the mud flap and attached to the very bottom of the splash guard but I feel like this looks more like a factory installed part. I have asked several people and I had to show them exactly what part I added. My wife could not even tell that I added them! It sticks down below the car about 2-3 inches and to the side of the car a max of about 1/2 inch. Here are some finshed pics:
Rear before I put tire back on:
http://forums.maxima.org/picture.php...ictureid=11452
Front splash guard and mud flap from front view:
http://forums.maxima.org/picture.php...ictureid=11455
Rear splash guard + mud flap from behind:
http://forums.maxima.org/picture.php...ictureid=11458
Front splash guard and mud flap from the rear:
http://forums.maxima.org/picture.php...ictureid=11456
Next, you will need to prep the area, whip down with alcohol and get the rear splash gaurd ready as shown below (the rears have two holes in the fender well versus 1 hole for the fronts)
Next, you will need to remove the plastic cover over the adhesive tape on the inside of the splash gaurd and place into position (remember, you need a clean, dry surface before attaching). Be sure to line up the two snap pins on the bottom (there are pre-drilled holes on the bottom valance). Put the snap pins into the holes and push until they lock into place as shown below:
Next, you will need to take your mup flap (I decided to use the whole mud flap instead of cutting it down like some other people on this forum) and place into desired location. Make a mark on the mud flap where the two screw holes line up in the splash gaurd. Drill out those two holes and place into position and tighten down with the two screw as shown in the first pic below. I then added two addition self-tapping metal screws into the top of the mud flap and bottom as shown in the second pic below:
Next, I moved onto the installation of the front splash guards. Remember that the fronts are smaller and only have 1 hole on the fender well side as shown below. Also, for some reason from this point on I could not get pics to load into this page directly, so I will have to add links to each photo from my profile album.
http://forums.maxima.org/picture.php...ictureid=11447
First, you will need to rotate the tire out of the way. Next you will need to remove the two screw on the fender body. The top one (as indicated by the arrow in next pic) will be used to attach the mud flap and the bottom screw will be used to attach the splash guard and mud flap:
http://forums.maxima.org/picture.php...ictureid=11453
Next, remove the plastic cover on the adhesive tape on the inside of the splash guard and place splash guard on the car in the correct location (remember to clean the surface first). Insert the two snap pins into the bottom of the splash guard and push into place until they lock (there are pre-drilled holes on the bottom of the valance for this). Next, place the mud flap in desired location and drill the holes for the two screw sites. Place mud flap on, and screw down. Then use two self-tapping metal screw and tighten down the top and bottom of the mud flap as shown in the next figure:
http://forums.maxima.org/picture.php...ictureid=11454
And then repeat on the other side, It took me about 2 hours to complete. I know other people have used only half or part of the mud flap and attached to the very bottom of the splash guard but I feel like this looks more like a factory installed part. I have asked several people and I had to show them exactly what part I added. My wife could not even tell that I added them! It sticks down below the car about 2-3 inches and to the side of the car a max of about 1/2 inch. Here are some finshed pics:
Rear before I put tire back on:
http://forums.maxima.org/picture.php...ictureid=11452
Front splash guard and mud flap from front view:
http://forums.maxima.org/picture.php...ictureid=11455
Rear splash guard + mud flap from behind:
http://forums.maxima.org/picture.php...ictureid=11458
Front splash guard and mud flap from the rear:
http://forums.maxima.org/picture.php...ictureid=11456
Last edited by bmanbmv; Oct 19, 2009 at 04:59 AM.

Senior Member
Joined: Sep 2008
Posts: 1,192
From: CT
Well, I finally took some time to add my splash guards and some aftermarket mud flaps. First you need to get some generic car mud flaps. The ones I bought where from autozone made by highland park for $9 a pair. I started with the rear section first. You will need to remove the rear wheels (This will make you job a lot easier). First, remove the two screws as shown in the red cirles in the pic below:

Senior Member
Joined: Jun 2003
Posts: 8,143
From: a meadow south of Atlanta
Very nicely done. Those flaps look remarkably similar to the ones I put on my car last winter. The only difference I see is that I used SUV-size (15" X 9") Highland flaps on the rear, so they would be as wide as the tires when viewed from a vehicle traveling behind me, hence I had to trim the top portion somewhat.
Of course another difference is the excellent photography nmanbnv furnished with his writeup. I made the mistake of taking my Maxima out into the bright sun, thinking that would show the flaps better, and maybe distinguish them from the black molding I have around my wheel wells. But it didn't. As rmanbnv shows, interior photos with carefully placed light works infinitely better. And rmanbnv gives excellent step-by-step instructions. He is correct that removing the rear tires helps. I did not remove the rear tires, but bought new hex-head bolts that I screwed in from the side with a small box wrench; pain in the ****.
It may be that rmanbnv's writeup might be moved to a sticky of some sort, as I suspect folks will be adding these splash guards and flaps as long as the 7th gen is in production. I also suspect we will not see a better writeup of this process.
Excellent presentation, rmanbnv.


Member
Joined: Jan 2010
Posts: 234
More instructions
I just completed this modification on my black 2010 Maxima S, already equipped with the nonfunctional factory slash guards. A few notes from the experience:
The flaps that most resemble the OP's are Highland 15x9 "plain black splash guards," (hereafter "flaps" to avoid confusion) part 10070 at Autozone and $10 for a set of two. They're made of a plastic that looks and feels like a matte trash barrel, or even a bit stiffer, and they come with 3 screws for each side.
A more appealing alternative would be about an inch wider. The Maxima has tires 245mm wide, or about 9.5 inches. The best look from the rear is a flap slightly wider than the tire. I had to mount the the 15x9 flaps more inward than I would have liked to stop them from looking undersized.
To mount the flaps without removing the rear tire, you'll need a very thin ratchet and a Philips screw bit. I had one laying about as part of a $10 tool kit. Similar ones are available on EBay for about $7. Using this was annoying, but not nearly as much as jacking the car up would have been. But then, I didn't have to install the factory splash guards.
The two screws that hold on the rear splash guard are the same length. For the front splash guard, the top screw is shorter. The flaps seem very well-secured with just the two screws. You can use more screws if you want, but I don't think they're necessary.
Here's what I did, and what you'll need:
- Thin ratchet with Philips bit
- Measuring tape
- Something sharp, or a pencil
- Drill with a small bit, say 1/8"
1) Turn the steering wheel hard over in one direction. Go to the exposed side and remove the two screws holding on the factory splash guards.
2) Position the flap approximately where you think you want it. Measure from the bottom of the flap to the bottom of the existing splash guard to see how many inches you want the flaps to extend. I ended up around 4". (EDIT: 2.5" for the front, 3.5" for the rear.) Also note how far the flap overhangs horizontally (if at all) from the body trim across from the lowest screw hole.
3) Put the flap down and measure the vertical distance from the bottom of the existing guard to the lowest screw hole, and then the horizontal distance from the side of the car to the same hole. Use this measurement and the offsets from part 2 to plot the lower screw hole on the flap.
4) Drill a hole through the flap on your mark. Thread the long screw through the hole and mount the flap. Step back and verify that the positioning you liked in part 2 looks right. At the upper screw hole this time, note the horizontal offset from the edge of the flap to the body.
5) Remove the flap and measure the vertical distance from the lower screw hole to the upper. Use that, and the measurement in part 4, to mark the upper screw location on the flap. Drill the hole.
6) Mount the flap and verify you measured properly. Then take it off, lay it on top of the other flap, and drill through the two holes you created. Now you've got the flap for the other side.
7) Mount the flap, turn the wheel, and then mount the other flap. You're done with the front!
The rear screw holes are closer than those in the front, so you can't use the front flaps as a template. Repeat the steps above. You may have to mount the rear flaps an inch or so lower than the front to balance the slope of the car.
I'll post pictures when I get my camera back from Canon. They're barely noticeable on my car. Between packing my tools and driving into the garage, I nearly forgot they were there.
Last edited by alexdi; Mar 3, 2011 at 02:32 AM.
Senior Member
Joined: Jun 2003
Posts: 8,143
From: a meadow south of Atlanta
Alexdi - Nice post! I let my flaps drop only 3 inches below the bottom of the OEM splash guards because of the minimal ground clearance of the 7th gen Maxima, and the proliferation of miserably high speed bumps around where I live (my Maxima actually drags its undercarriage on half of them) . I didn't want the front mud flaps crunching onto the speed bumps when the car dropped after the front tires cleared the bumps. Let us know if your 4 inch drop works OK.
I used the same Highland flaps as you, but got mine at Pep Boys. I overdid things by replacing the splash guard screws with slightly longer ones which I painted black. The splash guard OEM screws would have worked fine, as you proved.
You are absolutely correct that these discreet black flaps are virtually unnoticable. The best thing about them is not having to continually clean the sides of the car.

Senior Member
Joined: Nov 2009
Posts: 738
From: New Jersey
This is great guys! I'm glad you were able to do something about this. I would love to do this, but I unfortunately had a spinal fusion done last year so there is no way in hell I can jack the car up and take the tires off and put them back on to do this. Those days are over for me.
It looks like the guy who did the installation instructions and pictures has the slate or precision gray exterior color and those flaps you added are hardly noticeable so great job! I have the super black exterior so these flaps would blend in even more!
I wrote Nissan a letter a few months back complaining about the OEM guards not protecting the sides of the car and hopefully in a year or two they'll give us better splash guards that go down a little bit farther in the wheel well that actually protects the side of the car so we don't have to go out and do this to a 37-38k dollar car, absolutely ridiculous that you guys had to do this on a upscale car like the Maxima! This is something Nissan should be doing themselves! Kudos to you all though for taking the initiative of protecting your Max!
Last edited by smarty666; Mar 27, 2010 at 10:21 PM.
Senior Member
Joined: Jun 2003
Posts: 8,143
From: a meadow south of Atlanta
This is great guys! I'm glad you were able to do something about this. I would love to do this, but I unfortunately had a spinal fusion done last year so there is no way in hell I can jack the car up and take the tires off and put them back on to do this. Those days are over for me.
That may sound like it would look 'funny', but it really won't, because these very subtle black flaps are totally unnoticable.
Senior Member
Joined: Nov 2009
Posts: 738
From: New Jersey
One thought - Over 90% of the crud on the sides of the car comes from the FRONT tires. You could put flaps only on the FRONT, and do that with NO jacking the car or removing wheels/tires. Just turn the front wheels all the way one direction, add the flap on that side, then turn the wheels all the way the other direction and add the flap to that side.
That may sound like it would look 'funny', but it really won't, because these very subtle black flaps are totally unnoticable.
That may sound like it would look 'funny', but it really won't, because these very subtle black flaps are totally unnoticable.

 !!!
!!!What really busts my chops is manufacturers, like Toyota, who still don't even have color keyed splash guards! You don't know how terrible it looks to see people on the road with white or even silver colored camry's that have black splash guards that stick out like a sore thumb against the light exterior color! It really makes the cars look bad. At least, Nissan gives colored key guards!

Senior Member
Joined: Apr 2009
Posts: 910
From: Alberta, Canada
Sorry to bring up an older thread but I didn't feel it was necessary to start a new one. For those of you that have done this mod, how are your mud flaps holding up? Like Light has mentioned our ground clearance isn't the most ideal for a mud flap so I was wondering if they have held together. I am one of "those" guys in the parking lots that creeps over any kind of speed bump so I shouldn't sheer them off and I suspect most of you are the same but as we all know *stuff* can happen.
Thread Starter
Member
Joined: Jul 2009
Posts: 105
mud flaps are holding up just fine and I have the Eibach lowering kit so my clearance is lower than most. I am also one to drive very slow over speed bump. I have been very happy with the addition of the mud flaps. I find myself cleaning the side of the car much less now.
Member
Joined: Jan 2010
Posts: 234
Three weeks ago, I moved my front flaps up so the drop is 2.5". I left the rears as described above. Neither has hit the ground since. Because the rear of the car is so much higher than the front, the installation actually looks more balanced with offset drops.
Senior Member
Joined: Jun 2003
Posts: 8,143
From: a meadow south of Atlanta
My flaps extend exactly 3 inches below the bottom of the OEM splash guards, and so far, they haven't been touched by speed bumps. That is probably due to the gradual slope up and down of the speed bumps preventing the wheels from coming completely off the bumps until the flaps are fairly clear of the bumps, because the bottom of my car drags on lots of speed bumps around where I live.
Also, many speed bumps around my home are being replaced with 'speed tables', which keep the tires up in the air for several feet.
Also, many speed bumps around my home are being replaced with 'speed tables', which keep the tires up in the air for several feet.

Member
Joined: May 2010
Posts: 179
From: Chicago, IL
Hey I'm new on here so this message may have some errors or something. But i was wondering what was the size of the screws you used for the splash guards? The screws fell off of mine and are gone. I have a 2000 Maxima
Senior Member
Joined: Jun 2003
Posts: 8,143
From: a meadow south of Atlanta
Bronx Bomber -
Any screws the same size or slightly larger than OEM should work. By going slightly larger, the grip should be better. On both front and rear, I used existing screw holes where the (mostly useless) Nissan splash guards were (or could be) attached to the face of the wheel well.
On my '09 Maxima flaps, I used #12 X 3/4" steel panhead Phillips screws on the front, where turning the wheels leaves wide open access to the flaps.
But the back flaps are very difficult to access without taking the tires off, so I switched to #10 X 1" steel hexhead screws there, so the flaps could be taken on or off from the side via a socket wrench without removing the tires.
On all front and rear screws, I used 3/4 " wide washers with holes just big enough to fit the screws through. That eliminates the chance of the screwheads working their way through the hard rubber flap.
As a finishing touch, I spray painted all screwheads and washers black, in oder to make them almost invisible against the black flaps. It might be easier if you did the painting before you installed the screws and washers on the car.
Good luck!

Newbie - Just Registered
Joined: Apr 2010
Posts: 7
One tool that makes installs like this much easier is an Off-Set Adapter (right angle) that connects to your drill. Milwaukee makes one (part number 48-32-2100) that is perfect for this job. I would hate to have to remove a stinkin tire to install a splash guard.
http://www.cpomilwaukee.com/milwauke...2-2100&sissr=1

http://www.cpomilwaukee.com/milwauke...2-2100&sissr=1


Junior Member
Joined: Mar 2011
Posts: 48
From: SLC
Great write-up guys.
I just finished this mod.
Here's a link to the Highland 15 X 9 inch mud flaps on Autozone.
I decided to take off the back wheels. Although somewhat of a hassle, I used an extra screw to secure.
I got the 10 X 1 automotive screws (black) at Lowes. Everything worked great.
Thanks.
I just finished this mod.
Here's a link to the Highland 15 X 9 inch mud flaps on Autozone.
I decided to take off the back wheels. Although somewhat of a hassle, I used an extra screw to secure.
I got the 10 X 1 automotive screws (black) at Lowes. Everything worked great.
Thanks.

Senior Member
Joined: Nov 2010
Posts: 4,020
From: Maryland
anyone done this with a lighter colored car? i was looking to do it cause i get tons of road tar on my car with the spacers now, but didnt want it to stand out against my light silver. anyone got pics??
Senior Member
Joined: Jun 2003
Posts: 8,143
From: a meadow south of Atlanta
I would try to send a picture, but I haven't been able to get a photo in which the flaps show up very clearly. Anyway, my white car is so different in that area the photos would have no meaning, because I always put black rubber molding (1" wide, 1/2 " thick) around the entire outside edge of all wheel well openings in order to help protect the car from door dings in parking lots. But with my white car, those protective rubber molding strips stood out because of the white paint inside the wheel wells.
So I masked off the side of the car outside the black rubber molding and spray painted the inside of the wheel wells with two coats of a high quality matte finish black paint. So my mud flaps are totally lost against the black paint inside the wheel well.
I did all that in January 2009, and have not had even a whisper of trouble with either the molding or the flaps or the black paint inside the wheel well.
Senior Member
Joined: Nov 2010
Posts: 4,020
From: Maryland
light - thanks for the tips. good to know i only need to bring them out as far as the tread and not the sidewall. yeah i guess for all intents and purposes they'd look the same as it does now. it'd sure keep a lot of crap off the sides of my car.
good idea with painting all that so it looks flush. how much prep did you do to the area, just a thorough cleaning or rough it up a little?
good idea with painting all that so it looks flush. how much prep did you do to the area, just a thorough cleaning or rough it up a little?


Senior Member
Joined: Jun 2003
Posts: 8,143
From: a meadow south of Atlanta
If I were a real photographer, I would have moved the car into the garage and rigged a strobe light in a way to dileneate these things more clearly. The glare of the sun makes it difficult to see detail in these pics.
http://forums.maxima.org/picture.php...ictureid=10158
http://forums.maxima.org/picture.php...ictureid=10157
http://forums.maxima.org/picture.php...ictureid=10156
http://forums.maxima.org/picture.php...ictureid=10155
http://forums.maxima.org/picture.php...ictureid=10153
Last edited by lightonthehill; Oct 19, 2011 at 11:33 AM.
Senior Member
Joined: Jun 2003
Posts: 8,143
From: a meadow south of Atlanta
light - thanks for the tips. good to know i only need to bring them out as far as the tread and not the sidewall. yeah i guess for all intents and purposes they'd look the same as it does now. it'd sure keep a lot of crap off the sides of my car.
good idea with painting all that so it looks flush. how much prep did you do to the area, just a thorough cleaning or rough it up a little?
good idea with painting all that so it looks flush. how much prep did you do to the area, just a thorough cleaning or rough it up a little?
If you are not also adding black molding around the wheel wells, I would leave the exterior color for about a fraction of an inch just inside the edge of the wheel well, because we don't want the edge of the black paint showing on the side of the car.
Last edited by lightonthehill; Oct 19, 2011 at 11:26 AM.

Junior Member
Joined: Oct 2008
Posts: 67
From: Queens, Ny
Finally installed my nonfunctional mud guards. The front ones were installed in 5 minutes. The rear is a bit tricky. I installed it without taking the wheels off. The hardest part was making holes for the screws. I took sharp drill bits to make the holes. Once the holes are made then everything fits right in. It was a simple job. I don't know why I waited so long.

Joined: Dec 2011
Posts: 17
Lightonhill: I purchased a 2012 Maxima and the "Splash Guards" are stone chip defelectors for the bottom only. I looked at your photos and was wondering if the added real splash guards at that depth ever bottomed out? Second question, have you noticed a significant reduction in the amount of road splash dirt after the water dries off since your addition of the real splash guards?

Senior Member
Joined: Jun 2003
Posts: 8,143
From: a meadow south of Atlanta
Lightonhill: I purchased a 2012 Maxima and the "Splash Guards" are stone chip defelectors for the bottom only. I looked at your photos and was wondering if the added real splash guards at that depth ever bottomed out? Second question, have you noticed a significant reduction in the amount of road splash dirt after the water dries off since your addition of the real splash guards?
In over three years of driving, the bottom of my mud flaps have not touched anything, although the bottom of the car drags on almost half of the monster speed bumps around where I live.
The added flaps have definitely helped keep muck off the side of the car, especially the front flaps. The key is to have the sides of the front flaps extend out even with the outer edge of the front tire tread when the tires are pointed straight ahead, because the tread (not the sidewall) is what is throwing up the muck.
I must admit that when the weather is bad, we usually take one of our trucks and leave the clean Maxima in its dry, climate-controlled garage. But when we do run into bad weather with the Maxima, the only places that seem to get really dirty are the insides of the doorsills. I have not found a solution for that, but haven't tried very hard.
Member
Joined: Jan 2010
Posts: 234
So, I just redid this with new flaps after the Highland ones started tearing at the screw line. I used these:
They're much better, more pliable flaps that won't turn a lighter gray or tear up when they hit the ground. They're also wider than the Highlands by about an inch, so they cover the entire wheel width. They look OEM now.
Since one of the OEM screws for the splash guard stripped on one side with the strain of holding the flaps, I added two additional screws per flap. They come with the kit. I pulled my wheels off one at a time to do it. If you're not using an air-power torque wrench, you're liable to scrape some of the paint on your wheels just outside each lugnut. Wrapping the Nissan wrench with a small cloth mitigates this.
Total time was an hour for setup and the first wheel (reading the manual about taking the tire off, finding the jack, etc.) and 15 minutes for each additional wheel. It'd have taken longer if I couldn't have used the old flaps as a template for the two initial holes.
I raised the rear drop to 2.5" like the front. I found that with passengers in the car, 3.5" was too prone to scraping.
Senior Member
Joined: Jun 2003
Posts: 8,143
From: a meadow south of Atlanta
alexdi - Nice writeup.
In my original writeup of this process that was 'stickied' here over four years ago, I mentioned that I added small flat washers under the screws to prevent them from tearing through the Highland flaps. I think my writeup was replaced around three years ago by a more comprehensive one with photos that may not have mentioned the washers. Glad you have found an analternative that does not need washers.
In my original writeup of this process that was 'stickied' here over four years ago, I mentioned that I added small flat washers under the screws to prevent them from tearing through the Highland flaps. I think my writeup was replaced around three years ago by a more comprehensive one with photos that may not have mentioned the washers. Glad you have found an analternative that does not need washers.

Thread
Thread Starter
Forum
Replies
Last Post
MaxLife17
8th Generation Maxima (2016-)
43
Jun 27, 2019 01:37 PM
kjlouis
4th Generation Maxima (1995-1999)
12
Oct 3, 2015 05:29 AM