
Plastic Tube Left Over From OEM Intake


Senior Member
Joined: Feb 2014
Posts: 500
From: CT
So if I have removed this but not capped it have I not quelled the noise for the cabin then? I have put aftermarket intake on but not interested in the noise inside the car. I remember this thing coming out too but I didn't see where it was connected and also if it needs to be capped? Thanks.


I just took the Stillen intake off and installed the stock intake back in...capped the opening for the sound generator tube, and the car is now quieter than it was stock! I put a K&N filter in there as this thing is staying in.

Member
Joined: Sep 2014
Posts: 214
From: Las Vegas, NV
Ive had 2 intakes now and i hate that our manifold gets so hot. I did a feel test and the majority of the heat that rises up out of the entire bay is right in the middle in the front of the intake manifold.
I know engines get hot from a physical mechanical standpoint, just wish there was a way to keep it cooled to a certain extent.

Member
Joined: Mar 2014
Posts: 283
From: Pittsburgh, PA
Sorry to go off topic from the OP. But yinz are making me think about the heat. Can we program our fans to turn on sooner? Perhaps run longer and come on more often. Help keeps things a little cooler if possible. Perhaps I should question this on another thread...
Senior Member
Joined: Feb 2014
Posts: 500
From: CT
Lol thats exactly what i did today as soon as i came home from work. That pos tube was a biotch to get back in. Ill cap it this weekend as i never liked the idea of more air leaving the intake tube than necessary. I have thw k&n drop in also.
Ive had 2 intakes now and i hate that our manifold gets so hot. I did a feel test and the majority of the heat that rises up out of the entire bay is right in the middle in the front of the intake manifold.
I know engines get hot from a physical mechanical standpoint, just wish there was a way to keep it cooled to a certain extent.
Member
Joined: Mar 2014
Posts: 283
From: Pittsburgh, PA
Has anybody else used these for heat reduction? Any input?
Senior Member
Joined: Feb 2014
Posts: 500
From: CT
http://cxjperformance.com/index.php?...&product_id=50
I'm actually surprised that this mod is not talked about more because when I first joined the forum it was highly rated.
I'm actually surprised that this mod is not talked about more because when I first joined the forum it was highly rated.
Senior Member
Joined: Feb 2014
Posts: 500
From: CT
So yeah, yesterday I removed this tube and blocked off the hole. This thing makes a huge difference! My car is so quite under load now in the cabin! Didn't realize how annoying that the in cabin noise was until today after driving on the highway. Love it! The black rubber cap was only $3 at home depot and fit perfectly!
 .
.
Member
Joined: Sep 2014
Posts: 214
From: Las Vegas, NV
Hey Ross can you give me the part number of the plug you used or a pic? Also, i already have the cxj spacer on the manifold and the tb. Its still hot out here and i dont run the max hard very often.
Do yall have your engine cover on? I have mine off and have so for some time. Also, the matting under the top of the hood, does that really matter? I know theres nothing i can do about how hot my engine gets, just thinking of ways to get more airflow in there.
Do yall have your engine cover on? I have mine off and have so for some time. Also, the matting under the top of the hood, does that really matter? I know theres nothing i can do about how hot my engine gets, just thinking of ways to get more airflow in there.
Senior Member
Joined: Feb 2014
Posts: 500
From: CT
Hey Ross can you give me the part number of the plug you used or a pic? Also, i already have the cxj spacer on the manifold and the tb. Its still hot out here and i dont run the max hard very often.
Do yall have your engine cover on? I have mine off and have so for some time. Also, the matting under the top of the hood, does that really matter? I know theres nothing i can do about how hot my engine gets, just thinking of ways to get more airflow in there.
Do yall have your engine cover on? I have mine off and have so for some time. Also, the matting under the top of the hood, does that really matter? I know theres nothing i can do about how hot my engine gets, just thinking of ways to get more airflow in there.
http://m.homedepot.com/p/Fernco-1-1-...101/100372302/
But yes overall you are in a very hot area so maybe that's why? But yes I've been running the car without the engine cover for over a year now but the matting is really just for insulation I'm assuming but idk if it holds more value

Any of you guys got a pic of where this bad boy is located? I won't be under the hood for another month or so and mentally can't place it right now.
I'll admit this thread has piqued my curiosity and I'm thinking about doing it provided it's not a PITA. From what it looks like there has been no negative feedback from people who have done this...
Ross - thanks for the pic there of the cap..
I'll admit this thread has piqued my curiosity and I'm thinking about doing it provided it's not a PITA. From what it looks like there has been no negative feedback from people who have done this...
Ross - thanks for the pic there of the cap..

Nope.
It is called NVH insulator. Noise, vibration, and harshness.
It does pass FMVSS302 burn standard, but is not there to stop fires. Just less noise from the engine bay, and stop a small amount of resonant vibration through the hood.
I used to work in the NVH industry supplying parts to all the OEMs.
It is called NVH insulator. Noise, vibration, and harshness.
It does pass FMVSS302 burn standard, but is not there to stop fires. Just less noise from the engine bay, and stop a small amount of resonant vibration through the hood.
I used to work in the NVH industry supplying parts to all the OEMs.
Senior Member
Joined: Feb 2014
Posts: 500
From: CT
Any of you guys got a pic of where this bad boy is located? I won't be under the hood for another month or so and mentally can't place it right now.
I'll admit this thread has piqued my curiosity and I'm thinking about doing it provided it's not a PITA. From what it looks like there has been no negative feedback from people who have done this...
Ross - thanks for the pic there of the cap..
I'll admit this thread has piqued my curiosity and I'm thinking about doing it provided it's not a PITA. From what it looks like there has been no negative feedback from people who have done this...
Ross - thanks for the pic there of the cap..
But you're welcome buddy I had no idea what to look for because the original picture was deleted but now new members on here should be able to find this no problem.

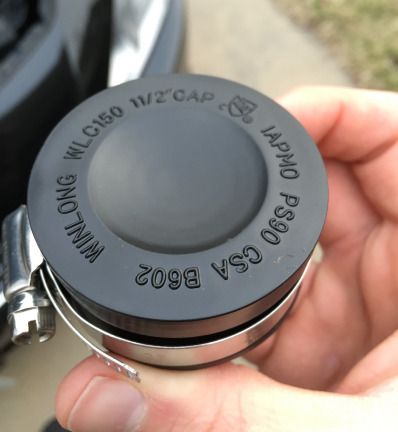
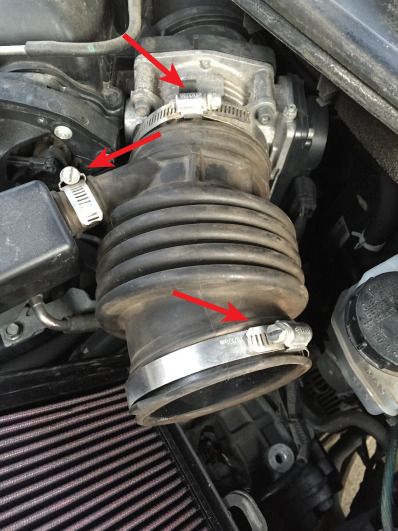
Hey, I did this today and snapped a couple pictures. It literally took me 10 min. **Do this at your own risk. I'm not responsible for anything that happens to your car due to this post. This is just a recap of what I did to my car.** This is the cap I got. it was $2.90 at Lowes. 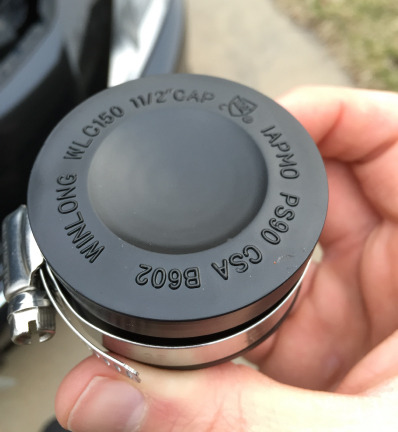 This is the rubber intake hose I removed to get at the plastic noise maker tube. It connects the air box and throttle body.
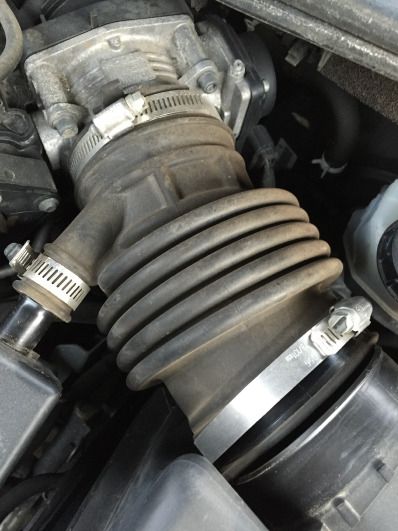
  As you can see, there are three hose clamps that needed to be removed to take the intake hose out. I started by removing the cover to the air filter box. I needed to remove the hose clamp and then also disconnect the mass air flow sensor and the cable ties that held it in place. Here's what it looked like after I removed the air box lid exposing my air filter (red filter at bottom of picture).
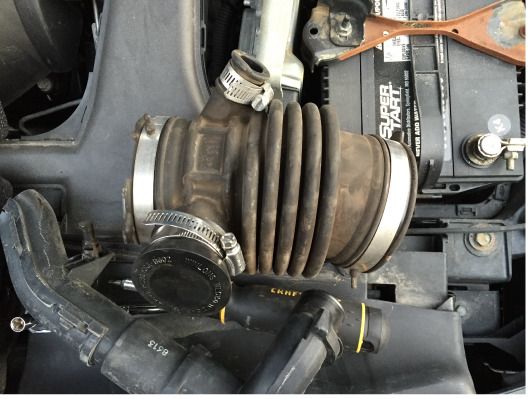
  After I loosened all three hose clamps. I just pulled up and out on the rubber tube and the plastic "noise maker" slid out (it was held to the rubber tube with another hose clamp, but I didn't need to loosen this one until after I got it out). Here's the rubber intake hose with the plastic noise maker still attached (It's resting on the battery in the picture).
 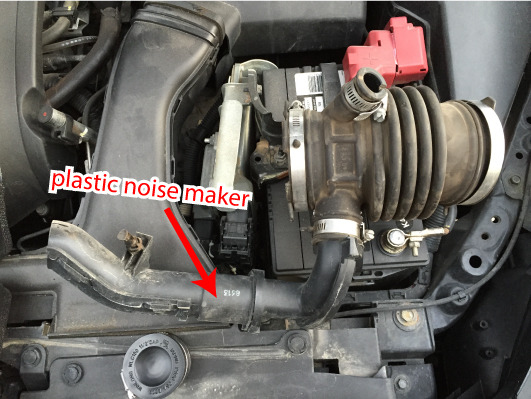 I then removed the plastic noise maker and secured the cap over the hole. I could actually tighten it fairly tight, I kept checking the inside of the hole to make sure it wasn't collapsing, and it withheld quite a bit of pressure.
  After that, I just hooked the rubber intake hose back into place and tightened all the hose clamps back down. BAM. Quiet cabin.
This is the rubber intake hose I removed to get at the plastic noise maker tube. It connects the air box and throttle body. As you can see, there are three hose clamps that needed to be removed to take the intake hose out. I started by removing the cover to the air filter box. I needed to remove the hose clamp and then also disconnect the mass air flow sensor and the cable ties that held it in place. Here's what it looked like after I removed the air box lid exposing my air filter (red filter at bottom of picture). After I loosened all three hose clamps. I just pulled up and out on the rubber tube and the plastic "noise maker" slid out (it was held to the rubber tube with another hose clamp, but I didn't need to loosen this one until after I got it out). Here's the rubber intake hose with the plastic noise maker still attached (It's resting on the battery in the picture). I then removed the plastic noise maker and secured the cap over the hole. I could actually tighten it fairly tight, I kept checking the inside of the hole to make sure it wasn't collapsing, and it withheld quite a bit of pressure. After that, I just hooked the rubber intake hose back into place and tightened all the hose clamps back down. BAM. Quiet cabin.
Last edited by JakeOfAllTrades; Mar 22, 2015 at 01:49 AM.
Hey, I did this today and snapped a couple pictures. It literally took me 10 min. **Do this at your own risk. I'm not responsible for anything that happens to your car due to this post. This is just a recap of what I did to my car.** This is the cap I got. it was $2.90 at Lowes. This is the rubber intake hose I removed to get at the plastic noise maker tube. It connects the air box and throttle body. As you can see, there are three hose clamps that needed to be removed to take the intake hose out. I started by removing the cover to the air filter box. I needed to remove the hose clamp and then also mass air flow sensor and the cable ties that held it in place. Here's what it looked like after I removed the air box lid exposing my air filter (red filter at bottom of picture). After I loosened all three hose clamps. I just pulled up and out on the rubber tube and the plastic "noise maker" slid out (it was held to the rubber tube with another hose clamp, but I didn't need to loosen this one until after I got it out). Here's the rubber intake hose with the plastic noise maker still attached (It's resting on the battery in the picture). I then removed the plastic noise maker and secured the cap over the hole. I could actually tighten it fairly tight, I kept checking the inside of the hole to make sure it wasn't collapsing, and it withheld quite a bit of pressure. After that, I just hooked the rubber intake hose back into place and tightened all the hose clamps back down. BAM. Quiet cabin.
Senior Member
Joined: Feb 2014
Posts: 500
From: CT
Hey, I did this today and snapped a couple pictures. It literally took me 10 min.
**Do this at your own risk. I'm not responsible for anything that happens to your car due to this post. This is just a recap of what I did to my car.**
This is the cap I got. it was $2.90 at Lowes.
This is the rubber intake hose I removed to get at the plastic noise maker tube. It connects the air box and throttle body.
As you can see, there are three hose clamps that needed to be removed to take the intake hose out.
I started by removing the cover to the air filter box. I needed to remove the hose clamp and then also mass air flow sensor and the cable ties that held it in place.
Here's what it looked like after I removed the air box lid exposing my air filter (red filter at bottom of picture).
After I loosened all three hose clamps. I just pulled up and out on the rubber tube and the plastic "noise maker" slid out (it was held to the rubber tube with another hose clamp, but I didn't need to loosen this one until after I got it out).
Here's the rubber intake hose with the plastic noise maker still attached (It's resting on the battery in the picture).

I then removed the plastic noise maker and secured the cap over the hole. I could actually tighten it fairly tight, I kept checking the inside of the hole to make sure it wasn't collapsing, and it withheld quite a bit of pressure.
After that, I just hooked the rubber intake hose back into place and tightened all the hose clamps back down.
BAM. Quiet cabin.
**Do this at your own risk. I'm not responsible for anything that happens to your car due to this post. This is just a recap of what I did to my car.**
This is the cap I got. it was $2.90 at Lowes.
This is the rubber intake hose I removed to get at the plastic noise maker tube. It connects the air box and throttle body.
As you can see, there are three hose clamps that needed to be removed to take the intake hose out.
I started by removing the cover to the air filter box. I needed to remove the hose clamp and then also mass air flow sensor and the cable ties that held it in place.
Here's what it looked like after I removed the air box lid exposing my air filter (red filter at bottom of picture).
After I loosened all three hose clamps. I just pulled up and out on the rubber tube and the plastic "noise maker" slid out (it was held to the rubber tube with another hose clamp, but I didn't need to loosen this one until after I got it out).
Here's the rubber intake hose with the plastic noise maker still attached (It's resting on the battery in the picture).
I then removed the plastic noise maker and secured the cap over the hole. I could actually tighten it fairly tight, I kept checking the inside of the hole to make sure it wasn't collapsing, and it withheld quite a bit of pressure.
After that, I just hooked the rubber intake hose back into place and tightened all the hose clamps back down.
BAM. Quiet cabin.

Senior Member
Joined: Jul 2011
Posts: 369
From: Delaware

Senior Member
Joined: Jun 2011
Posts: 1,690


Junior Member
Joined: Oct 2014
Posts: 38
I removed my sound generator today. Capped the opening with the one from Lowe's. Happy with the results.
I always wondered what the Nissan engineers said when they got the original feedback from marketing.....
"WTF? We've spent years trying to make the cabin quieter. And now you want it to be noisier?"
I always wondered what the Nissan engineers said when they got the original feedback from marketing.....
"WTF? We've spent years trying to make the cabin quieter. And now you want it to be noisier?"

Senior Member
Joined: Jan 2005
Posts: 423
From: Bristol, VA
Hey Ross can you give me the part number of the plug you used or a pic? Also, i already have the cxj spacer on the manifold and the tb. Its still hot out here and i dont run the max hard very often.
Do yall have your engine cover on? I have mine off and have so for some time. Also, the matting under the top of the hood, does that really matter? I know theres nothing i can do about how hot my engine gets, just thinking of ways to get more airflow in there.
Do yall have your engine cover on? I have mine off and have so for some time. Also, the matting under the top of the hood, does that really matter? I know theres nothing i can do about how hot my engine gets, just thinking of ways to get more airflow in there.
The stock intake keeps everything nice and cool - intake air temps never rise more than 5-10 degree over ambient. With a short-ram intake, you may as well hold a flame torch to the intake. Might sound good for a while, but it's no bueno. You best bet is to actually run a true CAI (which the stock air intake is a CAI).
Late,
Travis

Junior Member
Joined: Oct 2014
Posts: 38
One thing about this mod that bugged me was that when I tightened the screw for the cap hose clamp, there was no way to know when you were done. It was just a hose covering another rubber hose.
So today I dug out the plastic noise maker and sawed off the part of the connector tube that was originally in there. When I reconnected everything I was happy to find that there is now a true stopping point when tightening the hose clamp for the new cap.
Another note: the outside of the housing tube had a little rubber nub to hold on the original hose clamp. This time I took an exacto blade and trimmed the remnants of the nub so that the new hose clamp is totally flush.

Junior Member
Joined: Nov 2013
Posts: 56
From: Phoenix AZ
New sound generator 2016
I understand the new gen Max has a sound generator as well. It's part of the audio system. So one would guess if you had the Bose system you would have the High Performance version. 

Newbie - Just Registered
Joined: Dec 2019
Posts: 1
Bump
Hey everyone so I posted on here a while while back when I took out my OEM intake about a black tube that was just left hanging there. Well my buddy decided to play with it today and it came off of the car and I was able to snap some pictures. Does anyone know what this could be and if I should put it back on with a filter on the end or something?
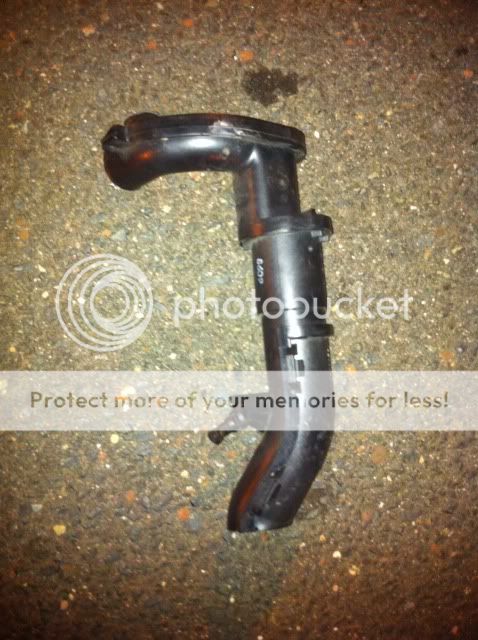
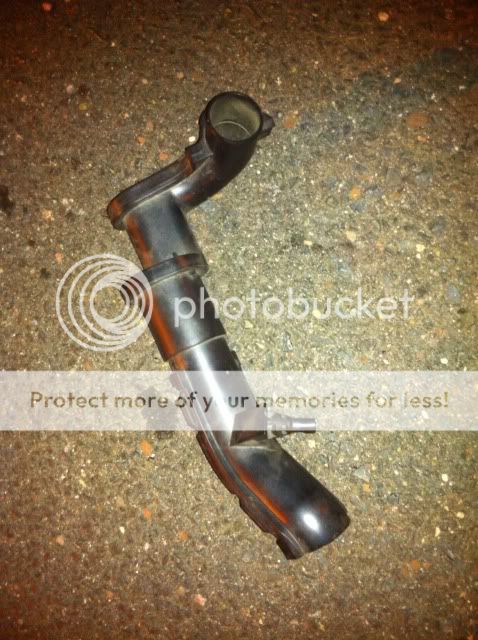
Look forward to hearing what you guys have to say about it.
Look forward to hearing what you guys have to say about it.


Thread
Thread Starter
Forum
Replies
Last Post
Canuck
3rd Generation Maxima (1989-1994)
7
Dec 4, 2000 05:04 PM