
Nexus 7 In-Dash + On-Face Custom Mount


Thread Starter
Senior Member
Joined: Jun 2012
Posts: 696
From: Honolulu, Hawaii
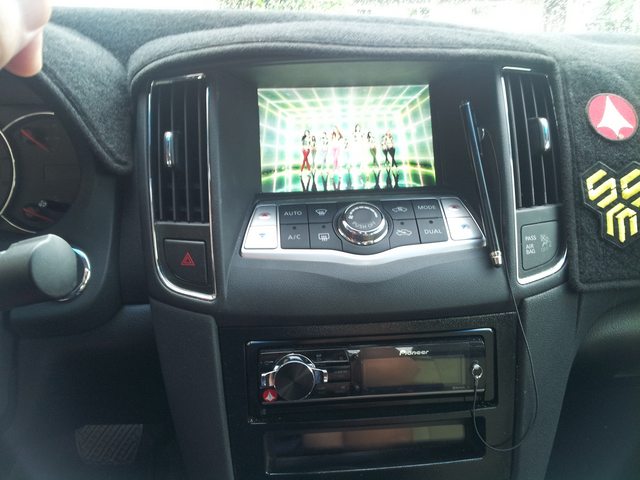
Nexus 7 In-Dash + On-Face Custom Mount
Hey guys, I remember a while back I meant to make one of these on my build.
Firstly, a video overviewing it:
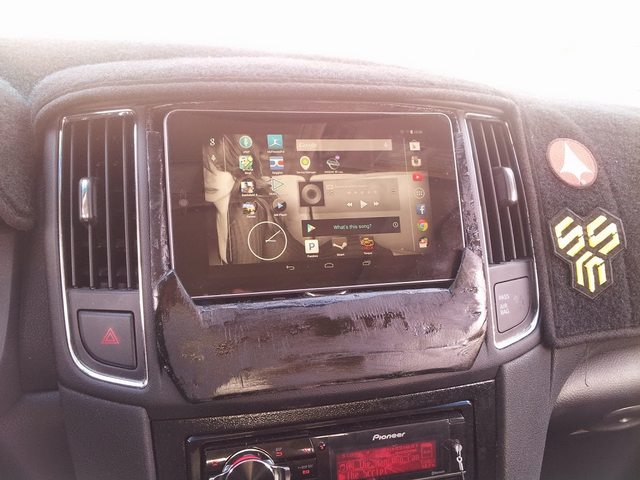
Here's how the tablet is held in:
Yes, a bit Ghetto, but I assure you, it's solid in there. Not moving one bit.
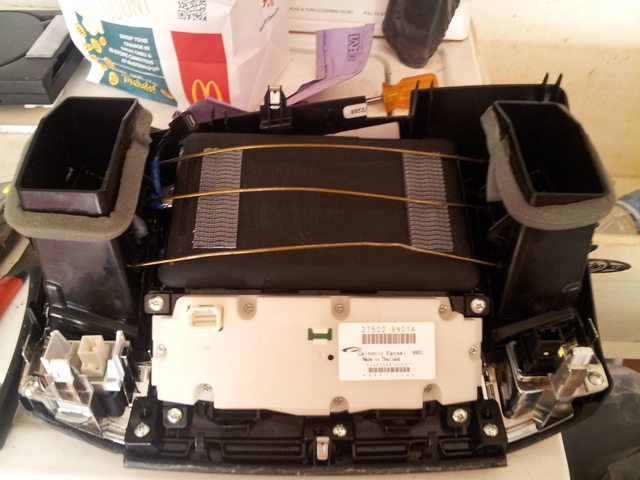
Note: Right angle cable jacks were needed for the 3.5mm jack and the micro usb. This connects to a 3ft. Female USB cable to Male which then connects to the charging point below...
Pic of the tablet's power/data source: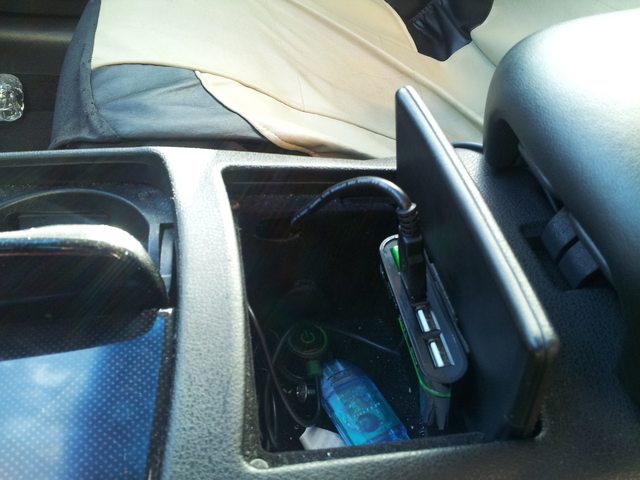
That unit can charge at 2.1 Amps or 1 Amp, depending on the slot and how many devices are plugged in.
Anyway... if there's any questions I'll try to answer them the best I can. This is all very straightforward though.
The main event: The On-Face Custom Mounts.
Mark I and Mark II (in progress) side by side
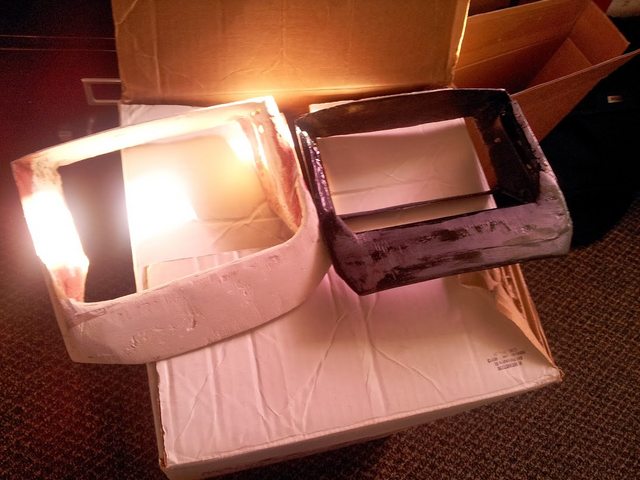
The Mark I is really heavy so I decided to try again with the fiberglass, moving from 4 matts thick to 2, and using much less resin and bondo.
Here's the Mark II and how it currently sits:

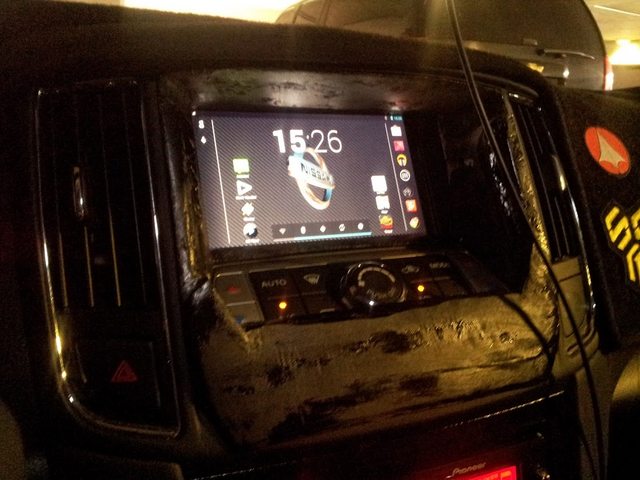
Anyway, progress is slow and steady, but currently I'm happy with how this idea is turning out. Any input from you fiberglass gurus would be great. Thanks for viewing.
Firstly, a video overviewing it:
Here's how the tablet is held in:
Yes, a bit Ghetto, but I assure you, it's solid in there. Not moving one bit.
Note: Right angle cable jacks were needed for the 3.5mm jack and the micro usb. This connects to a 3ft. Female USB cable to Male which then connects to the charging point below...
Pic of the tablet's power/data source:
That unit can charge at 2.1 Amps or 1 Amp, depending on the slot and how many devices are plugged in.
Anyway... if there's any questions I'll try to answer them the best I can. This is all very straightforward though.
The main event: The On-Face Custom Mounts.
Mark I and Mark II (in progress) side by side
The Mark I is really heavy so I decided to try again with the fiberglass, moving from 4 matts thick to 2, and using much less resin and bondo.
Here's the Mark II and how it currently sits:
Anyway, progress is slow and steady, but currently I'm happy with how this idea is turning out. Any input from you fiberglass gurus would be great. Thanks for viewing.
Last edited by Shipwreck; Apr 15, 2014 at 04:19 PM.


Thread Starter
Senior Member
Joined: Jun 2012
Posts: 696
From: Honolulu, Hawaii
It's just a cheap 2.1 amp charger with a switch. The switch is on that "hub." That one slot it's plugged in charges at 2.1 amps. The other two at 1 amp.
Nah, that one in the car stays there. This is kind of just a project for fun.
Nah, that one in the car stays there. This is kind of just a project for fun.


 What should I do?

Senior Member
Joined: Jan 2012
Posts: 354
Thread Starter
Senior Member
Joined: Jun 2012
Posts: 696
From: Honolulu, Hawaii
Thanks! I considered moving the temp controls below, but that's a lot of fabrication work. It certainly would free up more space for a tablet build along the face of the dash unit though. If I did it that way, I'd just fiberglass directly on the dash, creating a flat face, then inlay area for a tablet to fit in. There's certainly a lot of options, but the current motivation was something non-permanent that could be reverted to stock if needed. It'd be easy to revert to stock any time.


Member
Joined: Apr 2010
Posts: 208
From: Indianapolis, IN
Here is how I did mine. I just created a fiberglass mold of the OEM monochrome mount and used magnets. It's so easy to remove that top piece of the waterfall that I didn't even care to make the nexus completely removable. Took a good amount of testing to get mine right. I fixed the dip in the stereo/HVAC harness and looks a lot better now.


Here is a picture of it a little cleaned up. Looks a lot better in person. The camera on my phone sucks. To power the thing, I simply ran an accessory outlet from the fuse panel (using an add a fuse) and bought a 2.1 amp charger along with a low profile right angle micro usb plug in. I created my own charging cable by soldering appropriate wires between the two. Makes everything a lot cleaner then clogging up the power outlet. I use the Tasker app to control different things when the car is powered on and when the car is powered off. The battery goes down about 1% over night when leaving the tablet in the car. I also don't have access to the bottom home controls because the size of the opening is a little smaller than the tablet screen. I just rooted my device and downloaded Xposed Framework and Gravity Box to add PIE Controls to my device. This allows me to swipe from the left edge of the screen and gives me a full range of options. Gives me Back, Home, Menu, as well as allowing both pull down menus from the notification bar by long holding the Back and Home buttons. Just a software workaround for the issue of not being able to use the edges of the touchscreen.

Here is a picture of it a little cleaned up. Looks a lot better in person. The camera on my phone sucks. To power the thing, I simply ran an accessory outlet from the fuse panel (using an add a fuse) and bought a 2.1 amp charger along with a low profile right angle micro usb plug in. I created my own charging cable by soldering appropriate wires between the two. Makes everything a lot cleaner then clogging up the power outlet. I use the Tasker app to control different things when the car is powered on and when the car is powered off. The battery goes down about 1% over night when leaving the tablet in the car. I also don't have access to the bottom home controls because the size of the opening is a little smaller than the tablet screen. I just rooted my device and downloaded Xposed Framework and Gravity Box to add PIE Controls to my device. This allows me to swipe from the left edge of the screen and gives me a full range of options. Gives me Back, Home, Menu, as well as allowing both pull down menus from the notification bar by long holding the Back and Home buttons. Just a software workaround for the issue of not being able to use the edges of the touchscreen.
Last edited by mjhuffer; Apr 10, 2014 at 05:21 AM.

Senior Member
Joined: May 2012
Posts: 441
From: Dallas
Here is how I did mine. I just created a fiberglass mold of the OEM monochrome mount and used magnets. It's so easy to remove that top piece of the waterfall that I didn't even care to make the nexus completely removable. Took a good amount of testing to get mine right. I fixed the dip in the stereo/HVAC harness and looks a lot better now.
Here is a picture of it a little cleaned up. Looks a lot better in person. The camera on my phone sucks. To power the thing, I simply ran an accessory outlet from the fuse panel (using an add a fuse) and bought a 2.1 amp charger along with a low profile right angle micro usb plug in. I created my own charging cable by soldering appropriate wires between the two. Makes everything a lot cleaner then clogging up the power outlet. I use the Tasker app to control different things when the car is powered on and when the car is powered off. The battery goes down about 1% over night when leaving the tablet in the car. I also don't have access to the bottom home controls because the size of the opening is a little smaller than the tablet screen. I just rooted my device and downloaded Xposed Framework and Gravity Box to add PIE Controls to my device. This allows me to swipe from the left edge of the screen and gives me a full range of options. Gives me Back, Home, Menu, as well as allowing both pull down menus from the notification bar by long holding the Back and Home buttons. Just a software workaround for the issue of not being able to use the edges of the touchscreen.
Here is a picture of it a little cleaned up. Looks a lot better in person. The camera on my phone sucks. To power the thing, I simply ran an accessory outlet from the fuse panel (using an add a fuse) and bought a 2.1 amp charger along with a low profile right angle micro usb plug in. I created my own charging cable by soldering appropriate wires between the two. Makes everything a lot cleaner then clogging up the power outlet. I use the Tasker app to control different things when the car is powered on and when the car is powered off. The battery goes down about 1% over night when leaving the tablet in the car. I also don't have access to the bottom home controls because the size of the opening is a little smaller than the tablet screen. I just rooted my device and downloaded Xposed Framework and Gravity Box to add PIE Controls to my device. This allows me to swipe from the left edge of the screen and gives me a full range of options. Gives me Back, Home, Menu, as well as allowing both pull down menus from the notification bar by long holding the Back and Home buttons. Just a software workaround for the issue of not being able to use the edges of the touchscreen.
Member
Joined: Apr 2010
Posts: 208
From: Indianapolis, IN
1.) Always buy more than you think.
2.) Make sure you use enough MEKP hardener as this is what creates the heat to make the resin harden. If you don't add enough, you can always use a heat gun to help accelerate the hardening
3.) 1oz Fiberglass Mat is better than the crappy bondo cloth sold in the store.
4.) Rough up or drill through any plastic surface before applying any resin. Resin holds extremely well to roughed surfaces but really badly to smooth surfaces
5.) Wear latex gloves, sleeves, pants, a hat, and invest in safety glasses and a respirator.
6.) Fiberglass outside in a temp about 60. Anything below will cause extremely long drying times no matter how hot you make the mix. Also the fumes from fiberglass will make you sick in no time so make sure you do any fiberglass in a well ventilated area preferably outside.
7.) Sanding fiberglass sucks.
8.) Use a dabbing not a wiping motion when saturating the cloth/mat with the resing/mekp mix. Use crappy brushes but not foam. I just buy the $1 2 inch ones from Lowes. They also have them at wal mart.
9.) Be patient but work with a purpose. Mix small batches while you are first learning because it will harden quicker then you think. Body filler and kitty hair will only make up for certain defects.
10.)When you are done, just leave the brush in the fiberglass container and let harden. You will then be able to remove the fiberglass like a popsicle and reuse the container.
11.) Invest the money into the more expensive blue painters tape. It works a lot better than the cheaper white masking tape. Also aluminum foil can help prevent resin from going through your mold.
Last edited by mjhuffer; Apr 10, 2014 at 10:31 AM.
Thread Starter
Senior Member
Joined: Jun 2012
Posts: 696
From: Honolulu, Hawaii
Advice for fiberglassing:
1.) Always buy more than you think.
2.) Make sure you use enough MEKP hardener as this is what creates the heat to make the resin harden. If you don't add enough, you can always use a heat gun to help accelerate the hardening
3.) 1oz Fiberglass Mat is better than the crappy bondo cloth sold in the store.
4.) Rough up or drill through any plastic surface before applying any resin. Resin holds extremely well to roughed surfaces but really badly to smooth surfaces
5.) Wear latex gloves, sleeves, pants, a hat, and invest in safety glasses and a respirator.
6.) Fiberglass outside in a temp about 60. Anything below will cause extremely long drying times no matter how hot you make the mix. Also the fumes from fiberglass will make you sick in no time so make sure you do any fiberglass in a well ventilated area preferably outside.
7.) Sanding fiberglass sucks.
8.) Use a dabbing not a wiping motion when saturating the cloth/mat with the resing/mekp mix. Use crappy brushes but not foam. I just buy the $1 2 inch ones from Lowes. They also have them at wal mart.
9.) Be patient but work with a purpose. Mix small batches while you are first learning because it will harden quicker then you think. Body filler and kitty hair will only make up for certain defects.
10.)When you are done, just leave the brush in the fiberglass container and let harden. You will then be able to remove the fiberglass like a popsicle and reuse the container.
11.) Invest the money into the more expensive blue painters tape. It works a lot better than the cheaper white masking tape. Also aluminum foil can help prevent resin from going through your mold.
I wish I had all that advice starting off. It's a very messy process that I'm still only now getting the hang of. It's quite expensive too. And using body filler is another skill, entirely!
Let us know how it goes, GNCMaxima!
Member
Joined: Apr 2010
Posts: 208
From: Indianapolis, IN
Your setup is excellent! I love how you made your own fiberglass framing for the tablet inside. Are you using a Pioneer 80prs as well? If you slightly shave the edges off your oem dash panel, you'll be able to fully fit a Gen-1 Nexus 7. I'll have to look into PIE, gravitybox, etc.
I wish I had all that advice starting off. It's a very messy process that I'm still only now getting the hang of. It's quite expensive too. And using body filler is another skill, entirely!
Let us know how it goes, GNCMaxima!
I wish I had all that advice starting off. It's a very messy process that I'm still only now getting the hang of. It's quite expensive too. And using body filler is another skill, entirely!
Let us know how it goes, GNCMaxima!
Tips for body filler:
1.) Buy a quality body filler: Rage Extreme, Dolphin, Sonus is apparently really good stuff. It makes a world of difference. There is nothing wrong with Bondo but it will leave small pin holes which you will need to follow up with glazing putty. You don't have to but you cant just do multiple levels of bondo with sanding in between.
2.) Mix small amounts at a time. The stuff will harden faster than fiberglass resin.
3.) Make sure you mix the body filler and the hardener to a consistent color with no streaks
4.) You don't need to buy expensive spreaders if you don't mind sanding. I usually use the cheap plastic spreaders I can get from lowes.
5.) Sand the filler when it is in the "green" phase. Do not let it harden overnight or you will have a hell of a time sanding it. Start with around a 220 and I usually end up wet sanding with 600 depending on whether I'm painting or covering.
6.) Don't be afraid to use more than one coat. Take you time and get it right.
Senior Member
Joined: May 2012
Posts: 441
From: Dallas
Thanks for this write up man! How about I pay for your flight and you come to Texas to this for me? lol
I was trying to add the tablet without adding an aftermarket cd/dvd player
I currently use
-Nexus 7 Tablet
-3.1 amp charger
-Drilled a hole in the vent to bypass the USB charger
Im trying to do this without cutting any wires just because I dont know how to do that but if anyone would give me advice on how to relocate the AC display to the dash to the glove box I would love you forever haha
I'll have to hold off on the Fiberglass part. It looks like I gotta do deal with alot of trail and error?

Hey shipwreck, any way you can pm me your tasker settings? I'm in the process of putting the nexus 7 1st Gen in my other car, 02 BMW 540i. I'm just want to make sure I have the essentials so that is starts up when you start the car..etc
thanks man
thanks man
Thread Starter
Senior Member
Joined: Jun 2012
Posts: 696
From: Honolulu, Hawaii
Thanks for this write up man! How about I pay for your flight and you come to Texas to this for me? lol
I was trying to add the tablet without adding an aftermarket cd/dvd player
I currently use
-Nexus 7 Tablet
-3.1 amp charger
-Drilled a hole in the vent to bypass the USB charger
Im trying to do this without cutting any wires just because I dont know how to do that but if anyone would give me advice on how to relocate the AC display to the dash to the glove box I would love you forever haha
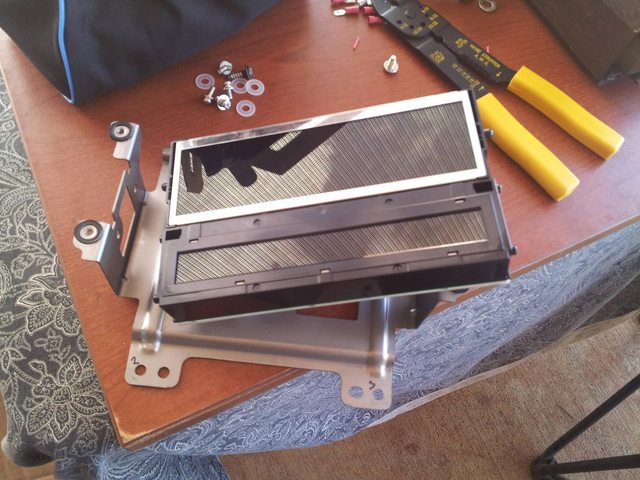
You really have little option but to cut the wiring and extend it by soldering or crimping wire connects (like I did).
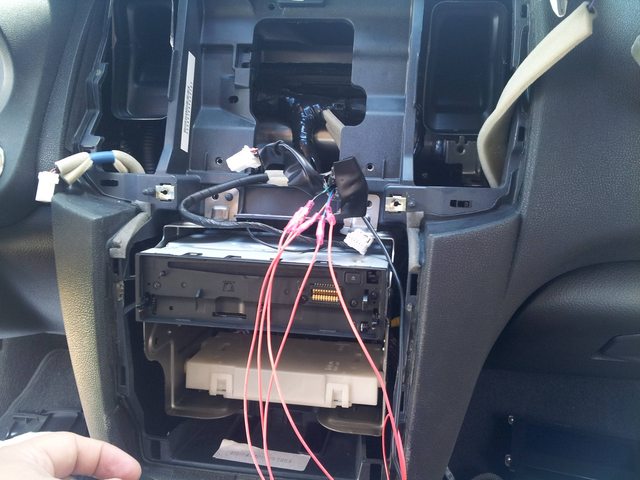
Those are simple crimp connectors that you pinch on each end of the exposed wire. They're not the best thing to use when you consider thermal expansion, but crimp them hard enough and ensure the connection is tight, and you should be fine. I taped each one up after testing as well.
The endwires and harness were fitted with male/female wire connectors that also require you to crimp the wire to fasten on. Note: you can still use those simple crimp connections on the previous joints. I forgot why I decided to use the slide connects...
That's basically it! Use about 1-2ft of length on each wire to extend and make sure you match up the correct colors to the end points on the harness. Yes, nerve wracking to cut OEM stuff, but once you get past that it's all cherry. Best part is if you do need to go back to factory, you've still got that line intact and never really have to remove the added wire.
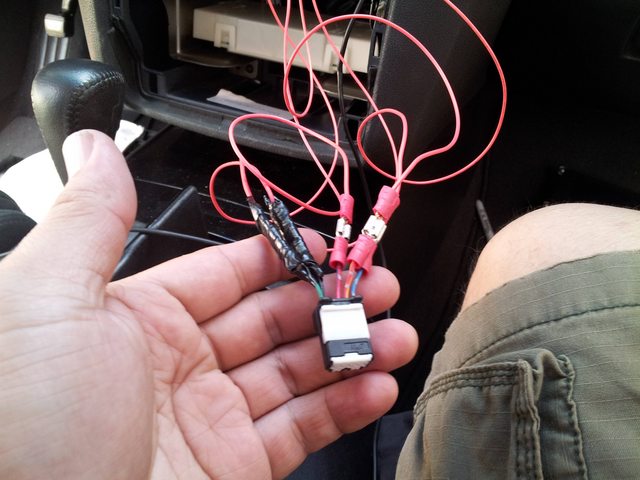
If you're not too confident about cutting and stripping wire, practice a bit on some 16-18 gauge with a wire stripper. Depending on what wire stripper you use, the job can be easier. If you look up "heavy duty wire stripper" or "automatic wire stripper" you'll find the easiest of the bunch to use.
I used one of those manual ones in the upper right (yellow grip)
Member
Joined: Apr 2010
Posts: 208
From: Indianapolis, IN
Thanks for this write up man! How about I pay for your flight and you come to Texas to this for me? lol
I was trying to add the tablet without adding an aftermarket cd/dvd player
I currently use
-Nexus 7 Tablet
-3.1 amp charger
-Drilled a hole in the vent to bypass the USB charger
Im trying to do this without cutting any wires just because I dont know how to do that but if anyone would give me advice on how to relocate the AC display to the dash to the glove box I would love you forever haha
I'll have to hold off on the Fiberglass part. It looks like I gotta do deal with alot of trail and error?
I honestly thought above moving the HVAC to the glove box but I need to be able to see it especially with the woman in the car. Someone may want to butt in and correct me but it doesn't look like their is a way to pass wires from the waterfall to the glove box without drilling a hole.
Member
Joined: Apr 2010
Posts: 208
From: Indianapolis, IN
My biggest issue was trying to match the stock texture and color on the dashboard. I ended up just using plasti dip with light far away coats to create a textured look. not perfect but it will do and can always be changed. I tried vinyl wrapping it and it became extremely hard to get into the head unit slot corners of the metra kit.

Member
Joined: May 2002
Posts: 128
Good work!!! You guys have cleared up some questions and given me inspiration to get off my duff and get to work!! My plan is to use a full Double Din touch screen unit and extend the A/C control all the way down to the carbon trim panel. My fiberglass is not that good but I have done some glasswork. I have a good friend base that have the custom thumb that can help when I get stuck....I will try to take good pics so I can share with everyone.
Member
Joined: Apr 2010
Posts: 208
From: Indianapolis, IN
Good work!!! You guys have cleared up some questions and given me inspiration to get off my duff and get to work!! My plan is to use a full Double Din touch screen unit and extend the A/C control all the way down to the carbon trim panel. My fiberglass is not that good but I have done some glasswork. I have a good friend base that have the custom thumb that can help when I get stuck....I will try to take good pics so I can share with everyone.
Thread Starter
Senior Member
Joined: Jun 2012
Posts: 696
From: Honolulu, Hawaii
I honestly thought above moving the HVAC to the glove box but I need to be able to see it especially with the woman in the car. Someone may want to butt in and correct me but it doesn't look like their is a way to pass wires from the waterfall to the glove box without drilling a hole.
The textures look great, mjhuffer! I'm thinking about getting another Metra dash kit to fix mine for better fitting. If I can find another OEM lower trim piece, I might try moving the HVAC screen down there.
Can't wait to see your stuff, fattamax!
Member
Joined: May 2002
Posts: 128
I saw this stuff on the DIY channel one day that they used to make a mold of an antique molding from a house and maybe we could use that to make a mold of the carbon fiber piece and the glass it to make it like a piece of dash.
Member
Joined: Apr 2010
Posts: 208
From: Indianapolis, IN
It would be cheaper and a lot less effort to just try to find a place that sells the replacement part. I haven't found it anywhere but maybe someone can chip in. You could always tape it up and try to fiberglass mold it but unless you have really good fiberglass and body filler skills, it won't fit or come out looking good. I wonder if there is a 3D printing company around that might be able to scan it, model it, and recreate it for cheap. Probably not.

Thread
Thread Starter
Forum
Replies
Last Post
BPuff57
Advanced Suspension, Chassis, and Braking
33
Apr 16, 2020 05:15 AM
Unclejunebug
5th Generation Maxima (2000-2003)
10
Apr 2, 2016 05:42 AM

