

shadyonedeath's 00vi swap - 1999 SE-L


Quick question when wiring in a safc 2 for the maf. I cut the wire for the maf so the wire still connected to the ECU plug I connect the yellow wire from the safc and then the wire coming from the harness I connect the white wire correct? I'm getting 3% on my safc for AF is the common? No corrections mades

Senior Member
Joined: May 2009
Posts: 1,352
From: ELGIN,IL
Quick question when wiring in a safc 2 for the maf. I cut the wire for the maf so the wire still connected to the ECU plug I connect the yellow wire from the safc and then the wire coming from the harness I connect the white wire correct? I'm getting 3% on my safc for AF is the common? No corrections mades
Before you do ANY of this, make sure you disconnect your Negative battery terminal before you work on splicing into the ECU.
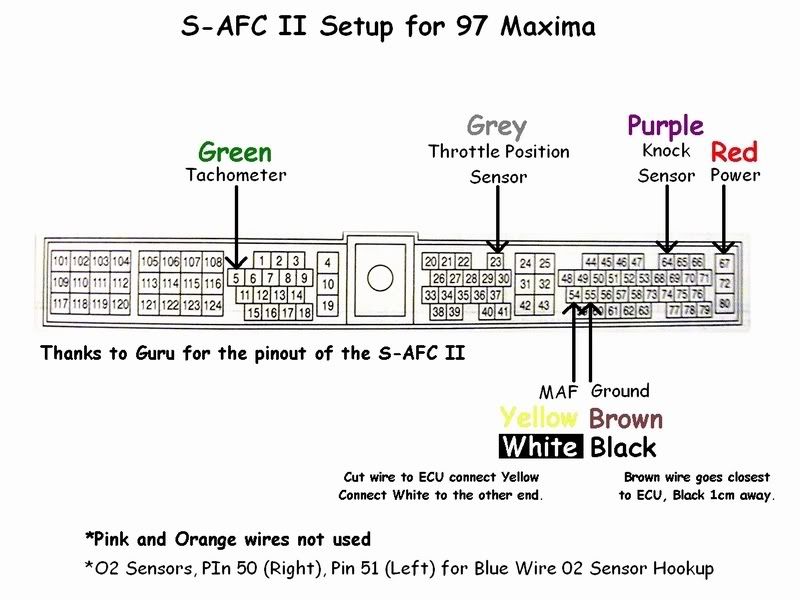
Here we have the wiring. There are two power wires (red) and two ground wires (one black and one brown) required to function the VAFC2. Each set is spliced into the same Power or Ground in on the ECU harness and spaced apart 1cm or more. The MAF wire on the ECU harness must be CUT, not spliced. Once cut, the end still attached to the ECU CONNECTOR/CLIP is connected to the YELLOW wire on the VAFC2 harness. The other end of the MAF wire we cut is attached to the WHITE wire of the VAFC2 harness.
Refer to YOUR Maxima model's Factory Service Manual for correct wire colors on the ECU harness. Wire listings can be found in section EC under ECM Terminals and Reference Value.
Note: I haven't messed with the MAF wire yet because i need to get some plugs for the wiring. These plugs will allow the MAF wire to be reconnected to its original form easily should you choose to remove the VAFC2. Also it helps make a cleaner and secure install. I also avoided splicing into the Knock Sensor wire, apparently this caused some issues with the car starting and previous installers have avoided this part of the install. Please correct me if im wrong on this.
Edit: DO NOT use knock sensor wire. We dont need it. - per gtr_rider. Its not designed for our cars
Go to the Passenger side and remove the cover concealing the rear of the ECU/ECM. You will see a white plastic cover over the wire harness. Use a 10mm socket wrench to remove the bolt and then proceed to remove the harness/clip from the ECU. Once off, give the harness a bit of a tug to expose more working space. Nothing to drastic, just enough to get an extra inch or two. Remove the white/clear plastic cover from the harness clip using a flat head screw driver. Now we can begin searching for our desired wires.

Splice connectors are pretty self explanatory.
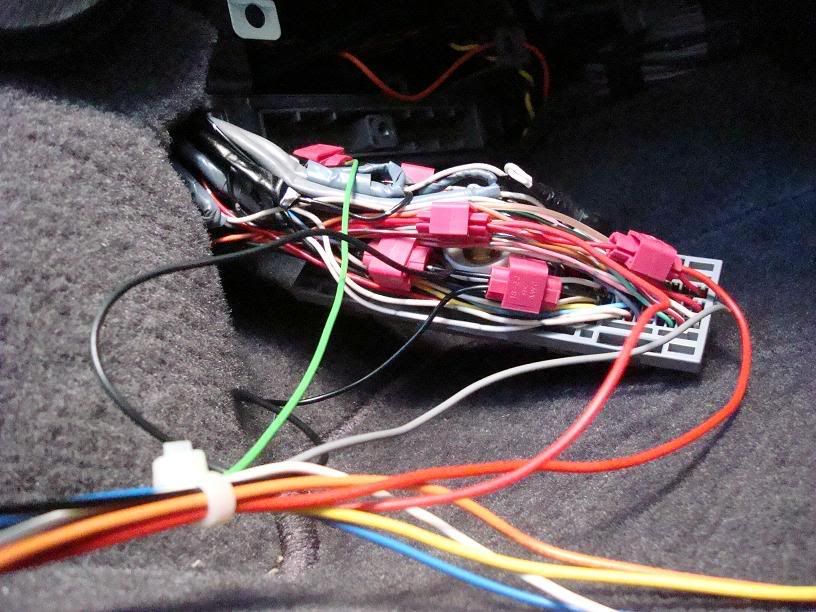
Don't ask me how im going to get the plastic cover from the ECU harness back on, i probably wont.
Here we have the wiring. There are two power wires (red) and two ground wires (one black and one brown) required to function the VAFC2. Each set is spliced into the same Power or Ground in on the ECU harness and spaced apart 1cm or more. The MAF wire on the ECU harness must be CUT, not spliced. Once cut, the end still attached to the ECU CONNECTOR/CLIP is connected to the YELLOW wire on the VAFC2 harness. The other end of the MAF wire we cut is attached to the WHITE wire of the VAFC2 harness.
Refer to YOUR Maxima model's Factory Service Manual for correct wire colors on the ECU harness. Wire listings can be found in section EC under ECM Terminals and Reference Value.
Note: I haven't messed with the MAF wire yet because i need to get some plugs for the wiring. These plugs will allow the MAF wire to be reconnected to its original form easily should you choose to remove the VAFC2. Also it helps make a cleaner and secure install. I also avoided splicing into the Knock Sensor wire, apparently this caused some issues with the car starting and previous installers have avoided this part of the install. Please correct me if im wrong on this.
Edit: DO NOT use knock sensor wire. We dont need it. - per gtr_rider. Its not designed for our cars
Go to the Passenger side and remove the cover concealing the rear of the ECU/ECM. You will see a white plastic cover over the wire harness. Use a 10mm socket wrench to remove the bolt and then proceed to remove the harness/clip from the ECU. Once off, give the harness a bit of a tug to expose more working space. Nothing to drastic, just enough to get an extra inch or two. Remove the white/clear plastic cover from the harness clip using a flat head screw driver. Now we can begin searching for our desired wires.
Splice connectors are pretty self explanatory.
Don't ask me how im going to get the plastic cover from the ECU harness back on, i probably wont.

Newbie - Just Registered
Joined: Apr 2013
Posts: 2
From: Downey
Jus wanted to know if this was needed if i had the emanage ultimate which i plan to put on once i go 00vi with cams

^^Updated with 00vi painting
I finally got some more brass fittings from ebay. My local source ran out of them and they were getting a bit pricey. (5$ a elbow). I got (6) 3/8 x 1/4 elbow fittings for about 10$.
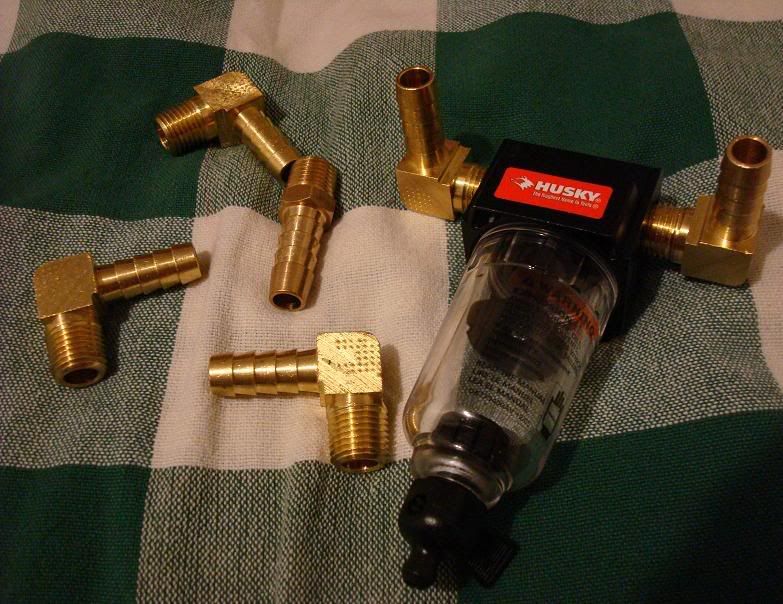
Why six? Well, i need two for the 2nd 00vi im going to sell, 2 for my oil catch can, and 1 for my current 00vi, which i painted in above posts.
I finally got some more brass fittings from ebay. My local source ran out of them and they were getting a bit pricey. (5$ a elbow). I got (6) 3/8 x 1/4 elbow fittings for about 10$.
Why six? Well, i need two for the 2nd 00vi im going to sell, 2 for my oil catch can, and 1 for my current 00vi, which i painted in above posts.


Senior Member
Joined: Jun 2011
Posts: 1,218
From: Mississauga, ON, CANADA

Quick question Shady,
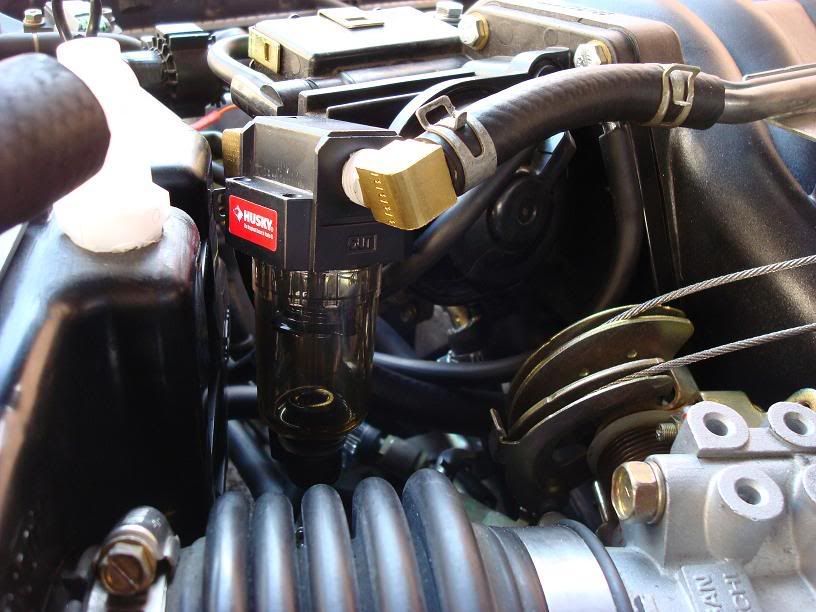
your catch can, it seems to have a suction valve on the bottom, did you disable it somehow?
Edit: Nevermind, just noticed the date of the original posts lol
your catch can, it seems to have a suction valve on the bottom, did you disable it somehow?
Edit: Nevermind, just noticed the date of the original posts lol
Last edited by risingmist; May 6, 2013 at 10:08 AM.


All of the parts come from a 5th gen so everything can be found at your local junkyard.
However, theres at least one thread on the 4th gen classifieds with an entire setup listed. You may wish to check one of those out.
Keep in mind, this isnt a bolt on setup. Even if you buy the whole swap its not something you just throw on. If you enjoy having a car you better do your homework.
However, theres at least one thread on the 4th gen classifieds with an entire setup listed. You may wish to check one of those out.
Keep in mind, this isnt a bolt on setup. Even if you buy the whole swap its not something you just throw on. If you enjoy having a car you better do your homework.


Junior Member
Joined: Oct 2013
Posts: 41
From: Chateauguay, Quebec
Thanks for the writeup I know this thread is old but it might help me troubleshoot my no start issue with a 98 max 00vi swap I just bought. Plus I gotta clean up the swap the previous owner did.. (terrible job) seems alot easier than my 3.5 swap with megasquirt I did on my other 4th gen. 
Dallas Nissan Enthusiast

Joined: Apr 2002
Posts: 1,452
From: DWF
I just did complete dek swap ,it's a little hard to start on cold mornings ,I think because of the delete but other than that totally worth the work .still need to get my neo apexi installed for the RPM switch and to tune the fuel on the larger dek injectors ,car runs strong but I think it's using more fuel than it should .
Junior Member
Joined: Oct 2013
Posts: 41
From: Chateauguay, Quebec

Thread
Thread Starter
Forum
Replies
Last Post
TallTom
5th Generation Maxima (2000-2003)
57
Oct 14, 2025 05:16 PM
litch
4th Generation Maxima (1995-1999)
123
Jan 4, 2024 07:01 PM
jmlee44
4th Generation Maxima (1995-1999)
8
Oct 2, 2022 02:13 PM
ef9
4th Generation Maxima (1995-1999)
10
Oct 4, 2015 08:43 AM
HerpDerp1919
3rd Generation Maxima (1989-1994)
2
Sep 29, 2015 02:02 PM