

VQ35 / 350Z Heads / 350Z ECU Build


VQ35 / 350Z Heads / 350Z ECU Build
After talking to Aaron, Kevin and Mark its apparent no tuning option exits for the 02 maxima ECU thats worth a damn in racing. No offense to the UTEC users, its a great street system but I needed more functionality in a purpose built track car.
We need a way we can control HP, timing, fuel, cams, and wheel spin without running a stand alone ECU. UpRev has that functionality, but that means switching to the +04 CANbus supported ECU. UpRev can shut off any DTC, so choosing which sensors to keep, and which to remove is relatively simple.
My B15 has all of its wiring intact - all its harnesses, relays, fuses, etc. It takes a little work to get a VQ35 with an '02 Maxima ECU to work in a B15 SE-R, but its not hard by any means.
That was the old way..
Justin and I are going to remove every fuse box, harness and relay box in the car. Everything. Then we are going to replace it with just the bare essentials from a 350Z. Gauge cluster and ECU. We'll run wiring for the fuel pump, headlights, tail lights, wipers and starter to a box in the center of the dash. The ECU will control/monitor only these functions (I'm thinking off the top of my head) - cam pos sensors, crank angle, VTC, magnet retarder actuator, evt, coils and amplifier, injectors, knock, water temp, MAF, IAT, TB & pedal, wheel sensor (through can line), wideband or 02 and fuel level.
The toughest task I think will be the wheel speed sensor - the signal is sent from with the ABS box or TCS over the can wire. None of which my motor will have.
If anyone has any insight into how to get a maxima tranny to relay speed to a 350Z ECU, please let me know.
We're going to hit the junk yards and see what we can dig up. We're looking for an 05 6spd ECU, harness, and gauge cluster..for starters. Tonight we removed the dash, heater core, sound deadening, everything but the fuse box.
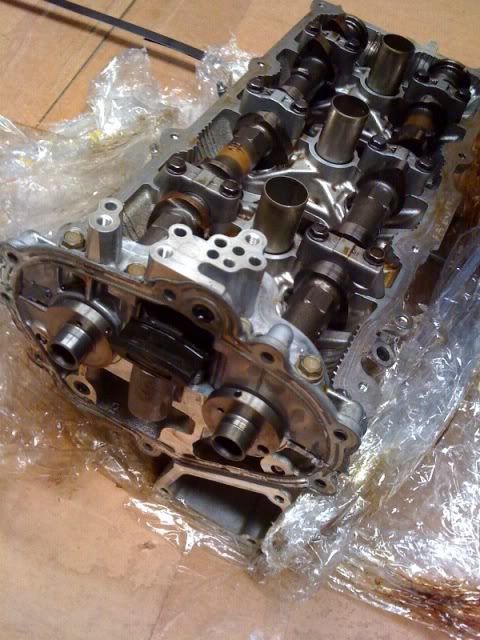
Next is all the harnesses. We'll also go to Forged Perf and see if we can borrow a Z head to test fit. Mark seems to think it will fit perfectly - maybe a couple of the inside timing cover bolts might not line up. But the LIM should bolt up.
Should be fun..
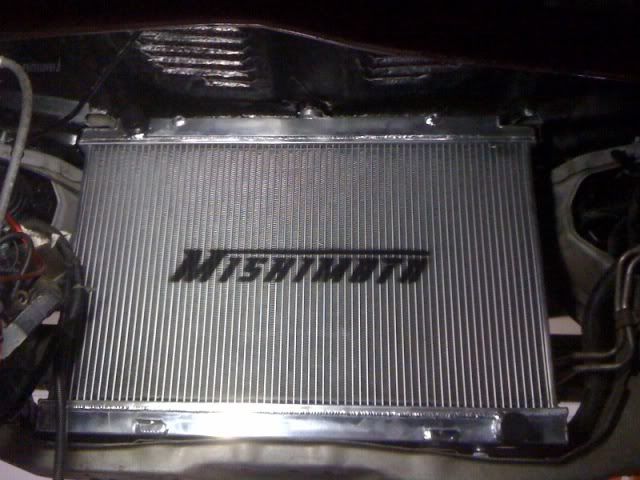
We ordered new rings, bearings, orings, etc from Dave. We'll modify the water passage for HR HG. And we got in the 2row Infiniti I30 radiator, which is exactly the same width as the B15, just 2" higher. Now we have the inlet/outlets on the correct sides unlike the B15 radiator.
Yesterday

Today
We need a way we can control HP, timing, fuel, cams, and wheel spin without running a stand alone ECU. UpRev has that functionality, but that means switching to the +04 CANbus supported ECU. UpRev can shut off any DTC, so choosing which sensors to keep, and which to remove is relatively simple.
My B15 has all of its wiring intact - all its harnesses, relays, fuses, etc. It takes a little work to get a VQ35 with an '02 Maxima ECU to work in a B15 SE-R, but its not hard by any means.
That was the old way..
Justin and I are going to remove every fuse box, harness and relay box in the car. Everything. Then we are going to replace it with just the bare essentials from a 350Z. Gauge cluster and ECU. We'll run wiring for the fuel pump, headlights, tail lights, wipers and starter to a box in the center of the dash. The ECU will control/monitor only these functions (I'm thinking off the top of my head) - cam pos sensors, crank angle, VTC, magnet retarder actuator, evt, coils and amplifier, injectors, knock, water temp, MAF, IAT, TB & pedal, wheel sensor (through can line), wideband or 02 and fuel level.
The toughest task I think will be the wheel speed sensor - the signal is sent from with the ABS box or TCS over the can wire. None of which my motor will have.
If anyone has any insight into how to get a maxima tranny to relay speed to a 350Z ECU, please let me know.
We're going to hit the junk yards and see what we can dig up. We're looking for an 05 6spd ECU, harness, and gauge cluster..for starters. Tonight we removed the dash, heater core, sound deadening, everything but the fuse box.
Next is all the harnesses. We'll also go to Forged Perf and see if we can borrow a Z head to test fit. Mark seems to think it will fit perfectly - maybe a couple of the inside timing cover bolts might not line up. But the LIM should bolt up.
Should be fun..
We ordered new rings, bearings, orings, etc from Dave. We'll modify the water passage for HR HG. And we got in the 2row Infiniti I30 radiator, which is exactly the same width as the B15, just 2" higher. Now we have the inlet/outlets on the correct sides unlike the B15 radiator.
Yesterday
Today
Last edited by smokinjoe; Jan 29, 2010 at 04:10 AM.


We're going to build it to make peak hp sooner, then use the timing or TB to hold it at around 250-255whp. We'll talk to Clark at JWT and the local folks at Forged Perf for some ideas.
I'm hoping Forged will let us "borrow" a Revup head so we can check fitment. Aaron, where did you find the tool to get the measurements so precise on your heads?
I'm hoping Forged will let us "borrow" a Revup head so we can check fitment. Aaron, where did you find the tool to get the measurements so precise on your heads?

Fyi, uprev can also disable the drive by wire function and you will not need the e-pedal encase you can not find it or did not want to use it
Also uprev can diable the nats and you can use a 2nd ecu from a maxima as well. Long as the ecu has the rounded connectors it should work just fine
Also uprev can diable the nats and you can use a 2nd ecu from a maxima as well. Long as the ecu has the rounded connectors it should work just fine
Didnt know that. The 350 uses two sensors on the pedal..and I believe the B15 has the same set up (according the the FSM). I havent checked the voltages yet. How would Uprev open the TB without the drive by wire?
We're gonna run a push start, no key, no nats
We're gonna run a push start, no key, no nats
the same way every car did before drive by wire. get a cable driven tb or convert the 3.5 like alot of people do
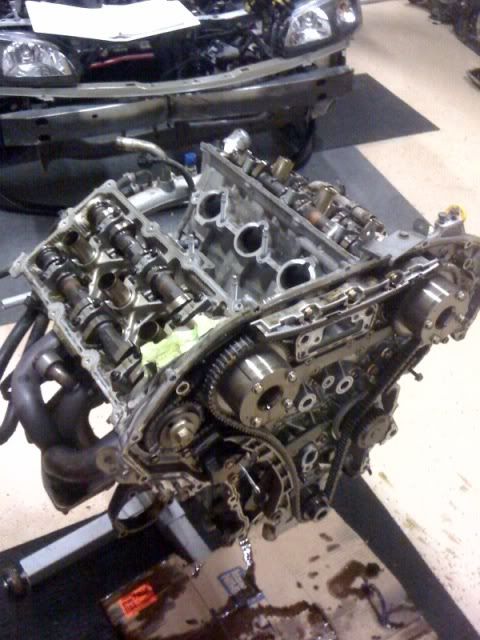
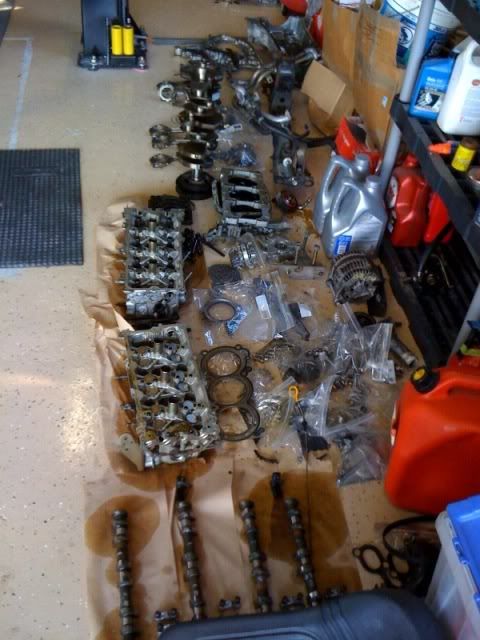
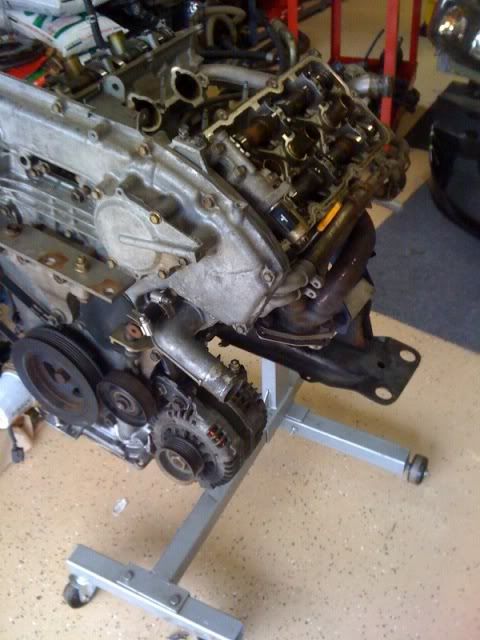
Made some progress this weekend. Justin and I got the motor torn down and we waiting on the new rings, bearings, etc from Dave B. I am going to head over to Forged Perf and talk to Sharif about the swap.
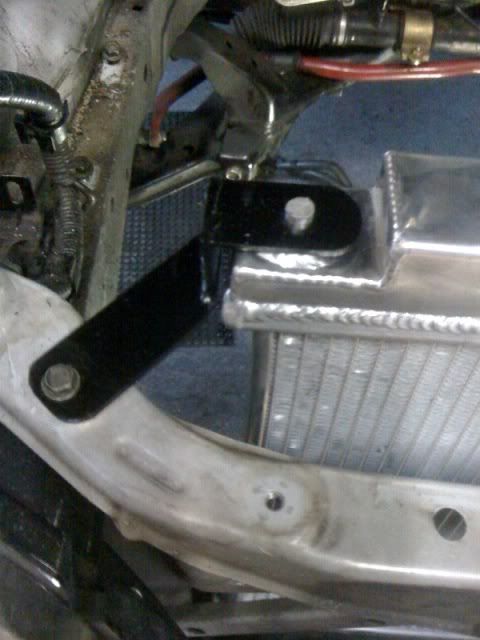
I took some measurements and found out that an Infiniti I30 2row radiator fits in the SpecV bay. Its about 2" taller, same width. The works out nice because the inlet/outlet match up to the VQ35 perfectly without having to use that ridiculous cross over lower radiator hose. To get the I30 rad to fit, all you need to do is fab up a simple bracket for the top.
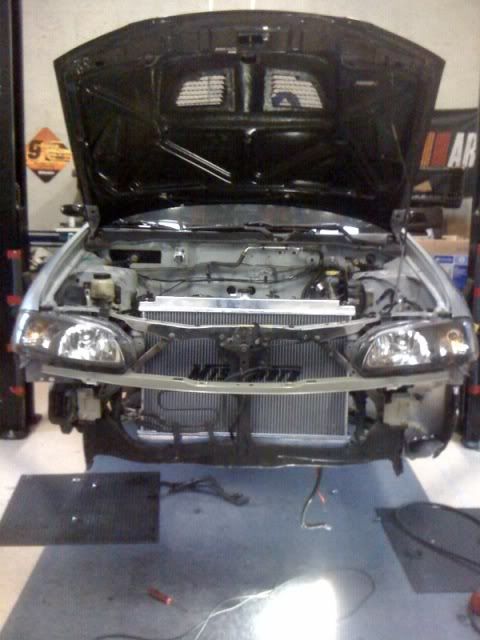
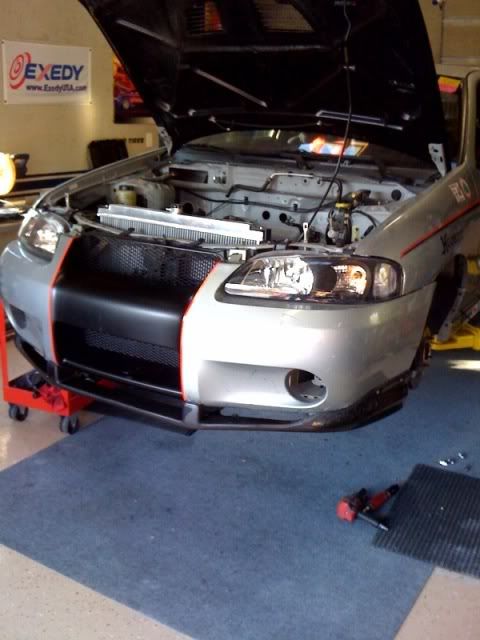
I also added the lower CF lip and lowered it about an inch and sealed it against the bumper. Its slowly coming together
I took some measurements and found out that an Infiniti I30 2row radiator fits in the SpecV bay. Its about 2" taller, same width. The works out nice because the inlet/outlet match up to the VQ35 perfectly without having to use that ridiculous cross over lower radiator hose. To get the I30 rad to fit, all you need to do is fab up a simple bracket for the top.
I also added the lower CF lip and lowered it about an inch and sealed it against the bumper. Its slowly coming together
Check out Harbor Freight. I've used some surprisingly nice calipers from there.

A nice linear powerband!
Holding the power from 5-7K shouldn't be hard since you may be making 280+whp on top end when fully tuned. Just make sure you are making 250whp as early as you can.
Thanks Aaron. Will you have some numbers from your car this weekend?
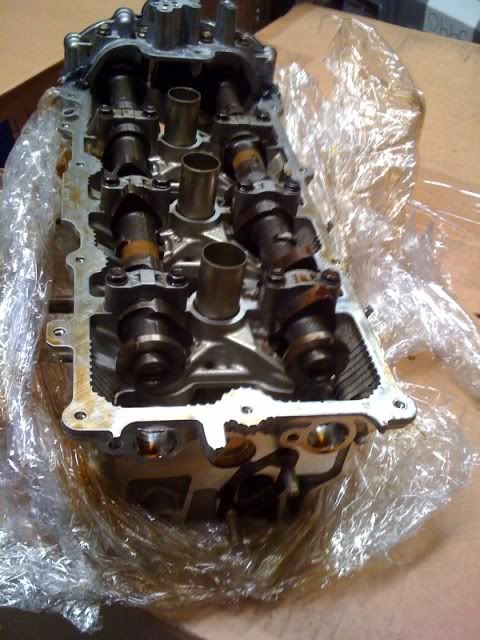
Did some deeper digging into the revup swap and its a PITA if you are piecing it together. You'll need both timing covers, the VTC covers, ETC chain and ETC itself, cams, ETC sensors, wiring and ECU. I havent confirmed if the inner cover will match up to the block, it looks like the lower right side is completely different than ours over by the oil filter plate. Its a lot of work for adj exh cams. Unless the stuff falls from the sky, this idea may get put on the shelf. I do want to confirm if the covers fit otherwise it will linger in my head.
I did pick up the more aggresive revup cams (more than HR). Just waiting on some bearings on b/o and 1 thrust washer. Dave B is working his magic to get them in and he's been a great resource. Other cool stuff came in this week. NWP's spacers are here! They look great. And a pair of huge idiots lights/sensors for water temp (230) and oil pressure (20). And I found that the Eclipse 2.4L uses the same M20 oil adapter as our car. Perma cool makes a kit for the Eclipse for $49 that includes a good sized oil cooler, sandwich plate, hoses, etc. You can use a VW inline thermostat ($20) to keep the oil from going to the cooler till after 180.
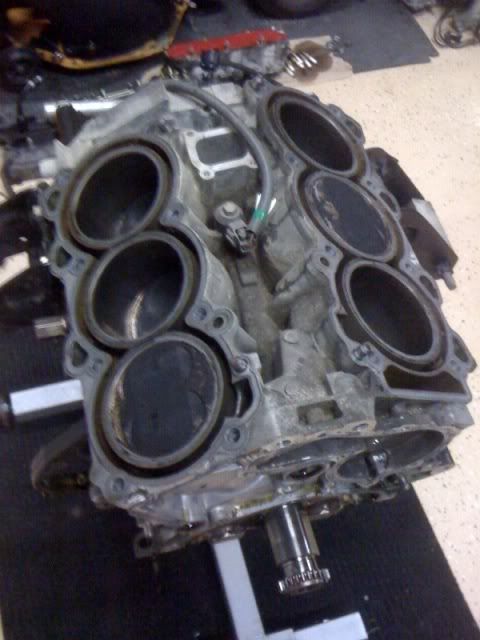
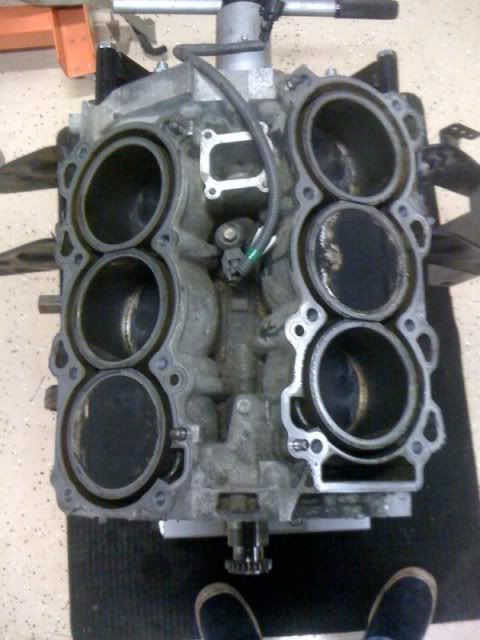
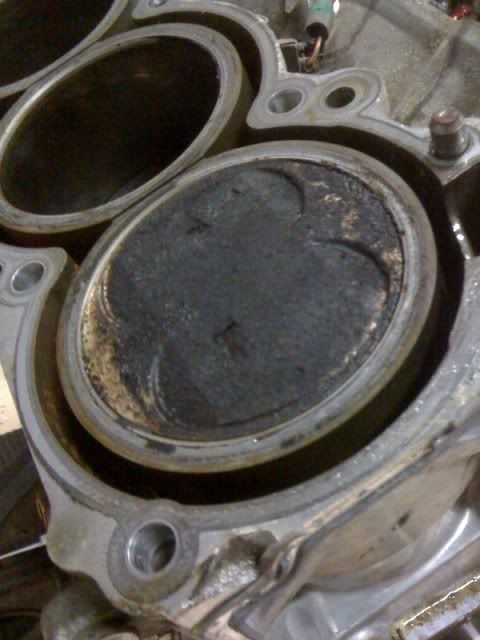
Tonight I'll follow streetz instructions on the water passage mod while the pistons soak in acetone. I'll also remove the valves/seals and clean up the combustion chambers. I'm not going after a spit shine on the pistons/heads rather clean up the deposits. And if I can pick up the correct dia flex hone brush I'll bump the walls for a couple secs then wash it all out.
If Dave comes through, I'm hoping to have it all back together very soon.
Did some deeper digging into the revup swap and its a PITA if you are piecing it together. You'll need both timing covers, the VTC covers, ETC chain and ETC itself, cams, ETC sensors, wiring and ECU. I havent confirmed if the inner cover will match up to the block, it looks like the lower right side is completely different than ours over by the oil filter plate. Its a lot of work for adj exh cams. Unless the stuff falls from the sky, this idea may get put on the shelf. I do want to confirm if the covers fit otherwise it will linger in my head.
I did pick up the more aggresive revup cams (more than HR). Just waiting on some bearings on b/o and 1 thrust washer. Dave B is working his magic to get them in and he's been a great resource. Other cool stuff came in this week. NWP's spacers are here! They look great. And a pair of huge idiots lights/sensors for water temp (230) and oil pressure (20). And I found that the Eclipse 2.4L uses the same M20 oil adapter as our car. Perma cool makes a kit for the Eclipse for $49 that includes a good sized oil cooler, sandwich plate, hoses, etc. You can use a VW inline thermostat ($20) to keep the oil from going to the cooler till after 180.
Tonight I'll follow streetz instructions on the water passage mod while the pistons soak in acetone. I'll also remove the valves/seals and clean up the combustion chambers. I'm not going after a spit shine on the pistons/heads rather clean up the deposits. And if I can pick up the correct dia flex hone brush I'll bump the walls for a couple secs then wash it all out.
If Dave comes through, I'm hoping to have it all back together very soon.
Last edited by smokinjoe; Feb 4, 2010 at 07:32 AM.
I'm hitting the dyno this weekend and should have several good pulls. My powerband should look different than yours though since I don't make any power below 4K. The cams, headwork, and SSIM lowered my low end power. But I should be making plenty of power at 7200rpm.
Since you've probably already looked over every page of my insanely long 3rd gen Swap Thread, you may have already seen these pics. But here's how I enlarged my coolant passage for the HR headgaskets. It only took me 15 minutes. I first tried grinding it down using a carbide cutting bur with my die grinder. But that would have taken me way too long to remove 10mm worth of material. So I clipped a hacksaw blade so I can reach in there. Then I used a worn down dremel cutting disc in order to score it 10mm deep. Then, with my vicegrips carefully clamped in the right spot, I was able to snap the piece out. Then I cleaned it up a tad with a dremel sanding drum I think.
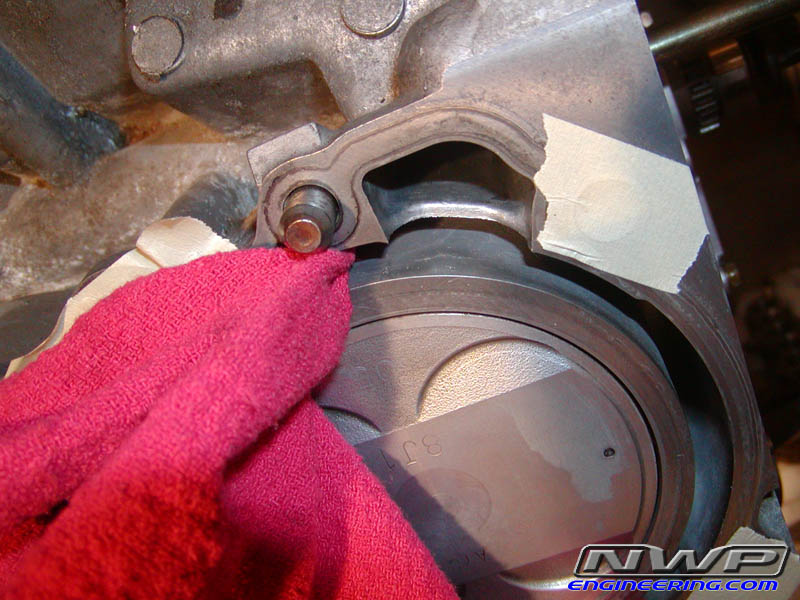
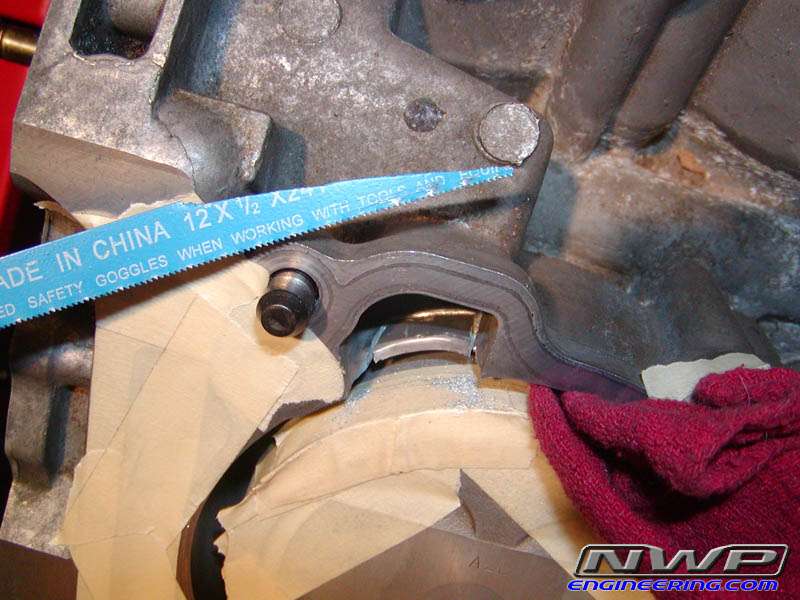
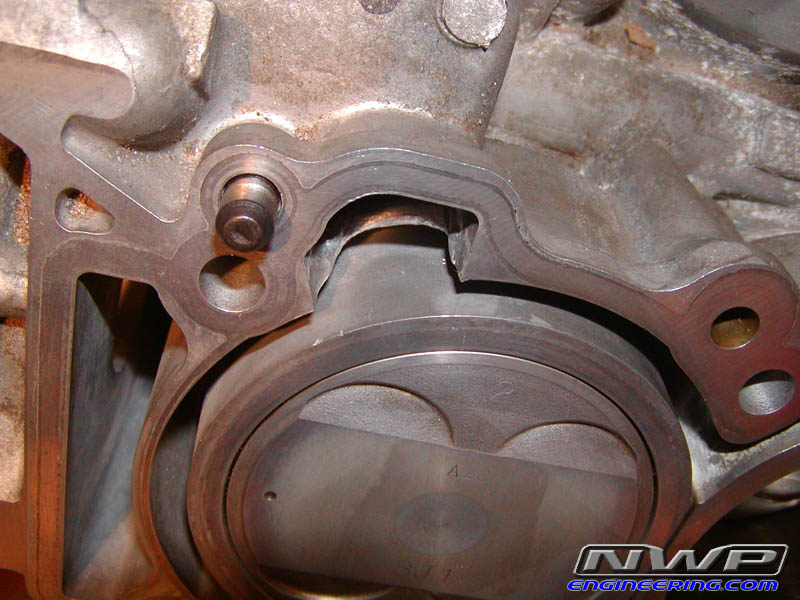
Since you've probably already looked over every page of my insanely long 3rd gen Swap Thread, you may have already seen these pics. But here's how I enlarged my coolant passage for the HR headgaskets. It only took me 15 minutes. I first tried grinding it down using a carbide cutting bur with my die grinder. But that would have taken me way too long to remove 10mm worth of material. So I clipped a hacksaw blade so I can reach in there. Then I used a worn down dremel cutting disc in order to score it 10mm deep. Then, with my vicegrips carefully clamped in the right spot, I was able to snap the piece out. Then I cleaned it up a tad with a dremel sanding drum I think.
I used needle nose vice grips. Plus, those worked GREAT in removing all the old valve seals.
I forget the exact sized socket I used. But it wasn't a hex socket. It was the star pattern one. I think it may have been a 10mm socket. I hope you know what I mean.
Last edited by Aaron92SE; Feb 4, 2010 at 08:58 AM.

at first i thought aaron was throwing a 350z+ecu in a 4th gen now when i saw the last post in the thread+name, and i got interested,then i realized in a b15 it will be even better!
good luck on your build and keeping that tune down low. when i read your other thread i was thinking you were gonna build it up to that HP point. but this idea is really outside the box!
good luck on your build and keeping that tune down low. when i read your other thread i was thinking you were gonna build it up to that HP point. but this idea is really outside the box!
It would have been a handful to tackle without the help of the folks on this forum. I'm interested in seeing how this motor performs in a 2600lb chassis on the road course. This is the motor the Spec-V should have came with.

Today we took the block over to Z1 motorsports to get honed and had an opportunity to look at the revup parts. Bringing the block to Russel was to correct a mistake on my part. I borrowed a flex-hone brush from a motor builder and assumed it was the correct material. Right size, wrong grit. After I hit the first bore, I knew I screwed up. Turned out to be 180grit. The bore size went from grade 2 to the trailing edge of grade 3. No way I'd get an RA of 10. Now the bore was something like 3.7610.. So its getting bored 020 over and maybe a set of 11.0 JEs. Someone @ JE owes a favor and we've called it in.
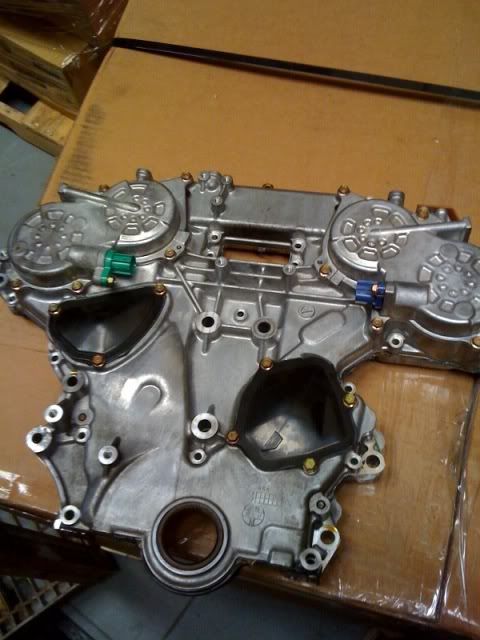
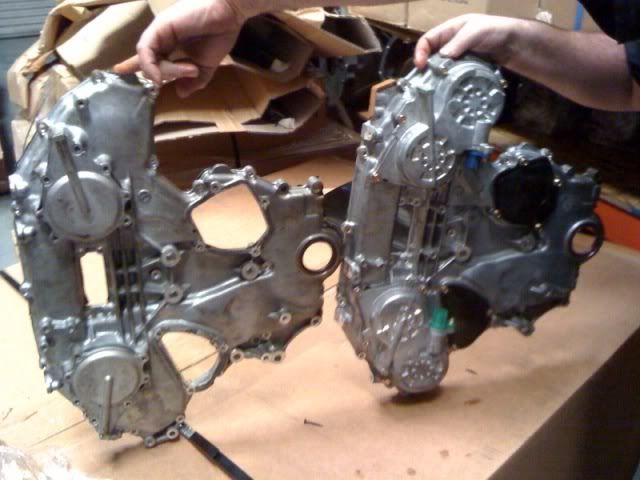
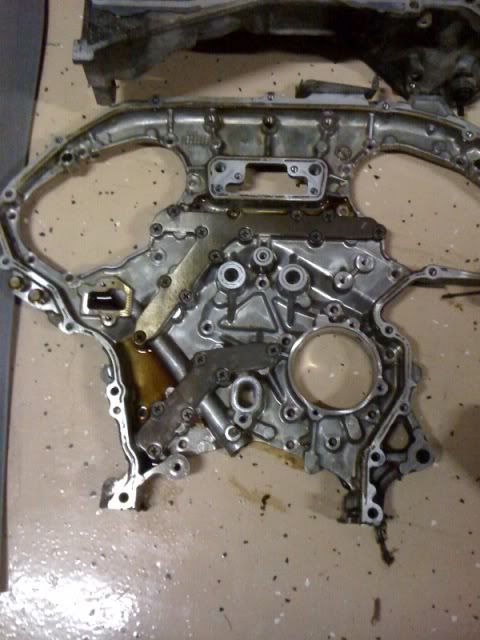
Anyway, Z1 had a revup we could compare and ITS GOOD NEWS for some. Not so good for others. First we compared an 03 350Z timing chain cover to an 06. The bolt holes are identical. Good news. Next we test fitted the revup inside tc cover to the Maxima block. It lined up PERFECTLY. Then we lined up the heads, perfect fit (no surprise). For the 5.5 ecu folks, technosquare can load the Z33 CVTC intake maps (again, no surprise) if you want more aggressive timing (not required). To run the exhaust VTC, you dont need a revup ECU and wiring harness. Since its either advanced or off a simple trigger will make it go. One way is a accelerator voltage switch in line with a rpm switch. You dont want just a rpm switch. Anyway, thats the extent of the good news.
The bad news? The 350Z tc covers have different mounts for the accessories. I assume the AC and PS - some of you will see this and know which ones. If you dont have AC, this may not be an issue. I dont yet know how this will impact us, I can just show you thats where the only difference lies if you want to run an adj exh cam.
On to the differences..
revup outer tc cover:
350z non revup v revup covers:
inner revup tc cover:
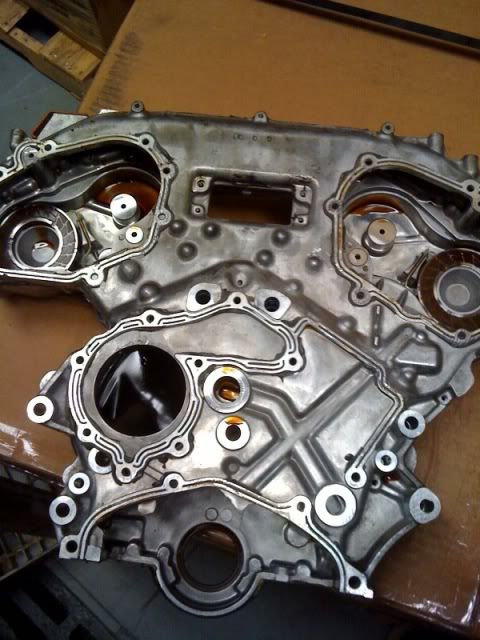
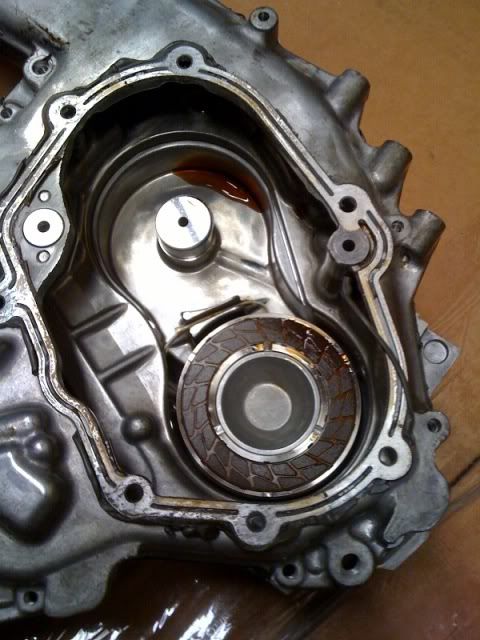
inner revup mounted on the maxima block:

Anyway, Z1 had a revup we could compare and ITS GOOD NEWS for some. Not so good for others. First we compared an 03 350Z timing chain cover to an 06. The bolt holes are identical. Good news. Next we test fitted the revup inside tc cover to the Maxima block. It lined up PERFECTLY. Then we lined up the heads, perfect fit (no surprise). For the 5.5 ecu folks, technosquare can load the Z33 CVTC intake maps (again, no surprise) if you want more aggressive timing (not required). To run the exhaust VTC, you dont need a revup ECU and wiring harness. Since its either advanced or off a simple trigger will make it go. One way is a accelerator voltage switch in line with a rpm switch. You dont want just a rpm switch. Anyway, thats the extent of the good news.
The bad news? The 350Z tc covers have different mounts for the accessories. I assume the AC and PS - some of you will see this and know which ones. If you dont have AC, this may not be an issue. I dont yet know how this will impact us, I can just show you thats where the only difference lies if you want to run an adj exh cam.
On to the differences..
revup outer tc cover:
350z non revup v revup covers:
inner revup tc cover:
inner revup mounted on the maxima block:

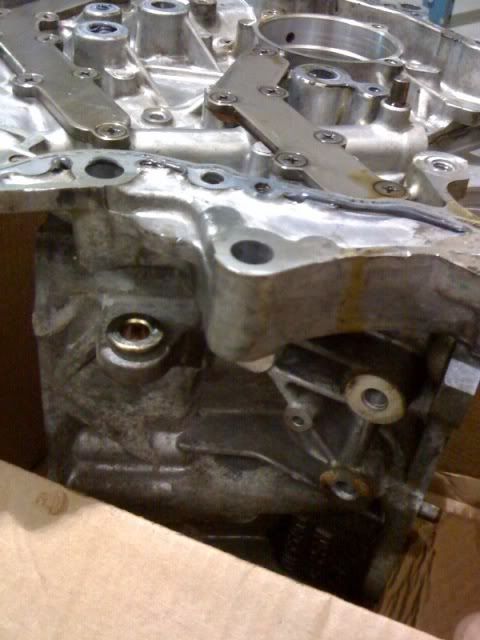
The a/c is mounted to a bracket which bolts to the oil pan so that will not be affected. The biggest difference is the inner cover not having a provision for the P/S tensioner bracket. The other thing to worry about is alternator mounting.
Last edited by nismology; Feb 20, 2010 at 08:45 PM.
I didnt think of that. The alternator was moved on the race motor to the bottom. And I thought the PS tensioner was integrated in the PS bracket, and the PS mounts directly to the block for Maximas. The revup inner cover could be trimmed with a bandsaw on the lower left to remove the 350Z bracket hole.
Were you talking about the AC tensioner?
Were you talking about the AC tensioner?
Looks like you might have one part of the alternator issue ironed out by swinging it down away from the stock location where the maxima inner cover has a hole for a bolt. I still think you might have issues with the main throughbolt as I'm not sure the revup outer cover can accommodate it.
And yes you're right the power steering pump is mounted to the block but the tensioner bracket bolts to the inner cover here:
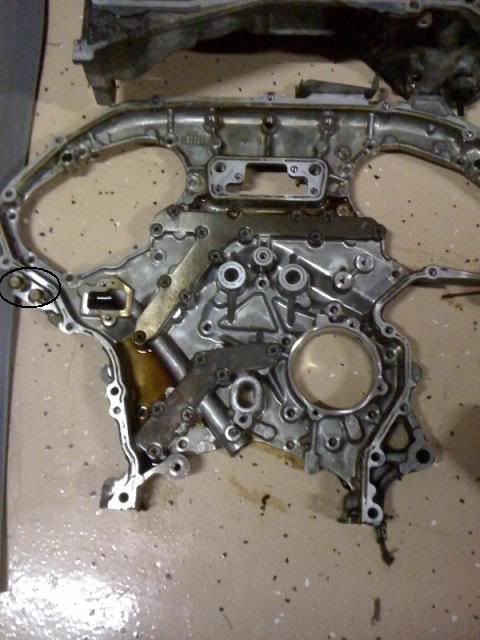
There is no such provision on the revup inner cover. I also forgot to mention the accessory belt tensioner bracket. The revup outer cover doesn't have it in the same spot either. I think DandyMax was the one that discovered all of this when he attemted to see if there was any reverse compatibility.
And yes you're right the power steering pump is mounted to the block but the tensioner bracket bolts to the inner cover here:
There is no such provision on the revup inner cover. I also forgot to mention the accessory belt tensioner bracket. The revup outer cover doesn't have it in the same spot either. I think DandyMax was the one that discovered all of this when he attemted to see if there was any reverse compatibility.
Last edited by nismology; Feb 21, 2010 at 11:45 AM.

Member
Joined: Jan 2010
Posts: 78
nothing to it. A little cut and weld job. I always like moving the accessories lower on the motor anyway because it keeps the center of gravity lower 
Did the coolant passage mods, used a piece of aluminum sheet stuck into the water jacket and bent over the top of the cylinder to protect it. Cut the sides with a small ball end bit, then the bottom with a worn down dremel cut off blade. Used a large carbide on a die grinder to clean everything up and remove any high or low spots where cracks could form.
The Rev Up head swap looks pretty straight foreward. Voltage switch looking at throttle voltage and an RPM switch for exhaust cam switching, or just use the Rev Up ECU.
P.S. I'm Joe's mechanic
Figured it wouldn't be much of an issue for someone with the equipment and skills necessary to successfully weld aluminum.. Just pointing out some differences for those who didn't know...anyhooo
If you can get around the accessory tensioner pulley bracket issue you're golden. And do you have other shots of your alternator mounting?
Just pointing out some differences for those who didn't know...anyhoooIf you can get around the accessory tensioner pulley bracket issue you're golden. And do you have other shots of your alternator mounting?


Its a hybrid we found. Getting it back together and hoping to drop it 1-2" in the bay for better CG. The xmember mounts act as a swivel, so we may use the mounts from a maxima cut and fabbed to the B15 xmember. mark did something similar for the VQ B13. Came out nice.
Hmm.. well, it's at least 3 years old, as it's got my older mounting setup..
Not sure what you mean by swivel..? The front mount does allow just a hair of engine rotation, but, it's minimal. Is that what you're talking about? The rear mount is solid.. which is the one that bares most 75% of the brunt. We actually use a press-in CNC'd nylatron front/rear mount, now.. as I'm sure that you've seen on Barry's car.
Travis
Yes, it looks good. The motor height is shifting the weight back to the rear. The lower we can get it, more grip will stay on the wheels.
Did you find an off the shelf solution for the shorty headers?
Did you find an off the shelf solution for the shorty headers?