
cardana24's 3.5 swap
 09-02-2010, 01:40 PM
#41
Junior Member

Join Date: Dec 2002
Location: Hopewell Junction, NY
Posts: 92
No problem. I started my project almost 2 months ago but with work and a 1 year old at home I don't have a lot of time to spend on it. I just put the engine back in the car last week but, I still have to work out the fuel lines and how to adapt up the EGR back on to the car. I know most people do away with it but I live in NY and need to pass emissions with no codes. I will keep up with this thread and try to help along the way. At the rate you seem to be going you will finish before me and I will have some questions for you.
 09-02-2010, 01:51 PM
#42


No problem. I started my project almost 2 months ago but with work and a 1 year old at home I don't have a lot of time to spend on it. I just put the engine back in the car last week but, I still have to work out the fuel lines and how to adapt up the EGR back on to the car. I know most people do away with it but I live in NY and need to pass emissions with no codes. I will keep up with this thread and try to help along the way. At the rate you seem to be going you will finish before me and I will have some questions for you.
 I am hoping to have some free time this weekend. I know all about being busy, I am working 3 jobs right now.
 09-02-2010, 01:57 PM
#43
Thanks Paramy, I'll take that with me tomorrow. I had the tensioner overnighted, and the two orings that I mentioned and the crank seal was in stock. Do most people replace the crank seal during the swap if it is not leaking? I don't see any mention of it in peoples threads.
Also is it fine to reuse the exhaust gaskets or should I get new ones? I have read different opinions about this. I would obviously like to use the old ones since new ones will cost me around $70.
Also is it fine to reuse the exhaust gaskets or should I get new ones? I have read different opinions about this. I would obviously like to use the old ones since new ones will cost me around $70.
Same goes for the exhaust gasket if it's in good condition. There's not much of a known issue with exhaust gaskets on the headers side. I replaced mine only because they were in the kit.
 09-03-2010, 06:34 PM
#45
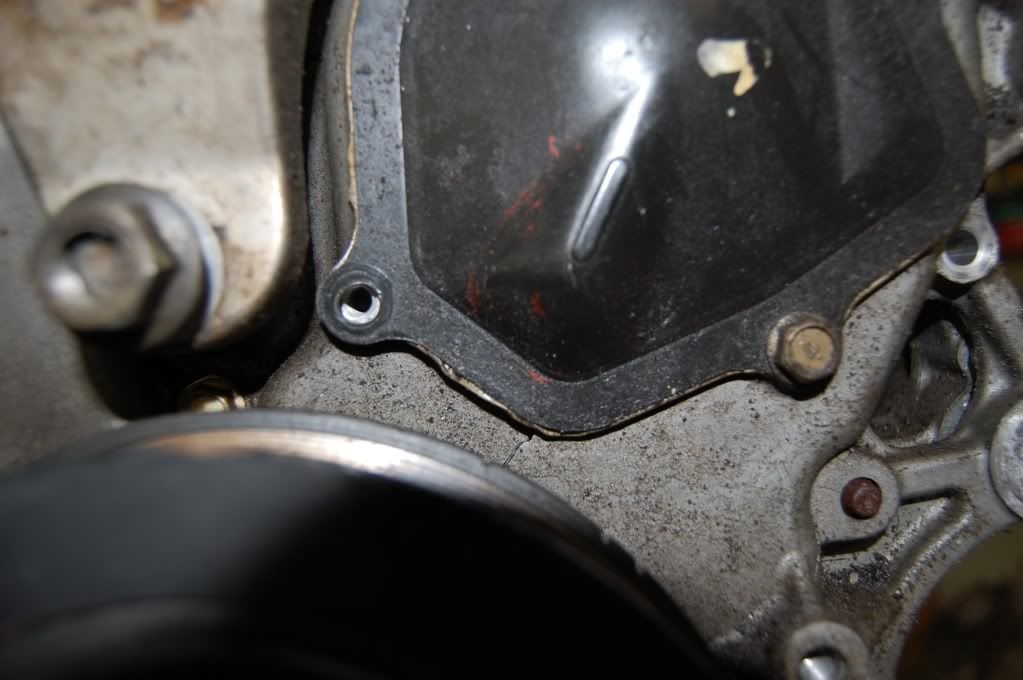
So I flipped the 3.0 over so it can be ready to have the oil pans taken off of it. I want to set the 3.5 at TDC before I start, so I went off what I could find in the FSM, I think it was around EM47. Basically I lined up the single mark on the crank pulley with the mark on the water pump cover. Is that how you do it when the timing chain cover is still on? here is a picture of how I have it.
09-03-2010, 08:40 PM
#46

If you've taken the crank pulley bolt off, just check the key-way on the pulley so that it is lined up with cylinder 1 to the center of the head.
When I did Grant's car and my motor, I slid the crank pulley back on after we pulled the timing cover off the 3.5 and rotated it till it was indexed correctly with all the timing chain marks (cams and main chain). Then we slid took everything off and put on the 3.0 timing components. His motor runs like a champ and I assume mine will too (when I finally get around to finishing it up here in a couple weeks).
When I did Grant's car and my motor, I slid the crank pulley back on after we pulled the timing cover off the 3.5 and rotated it till it was indexed correctly with all the timing chain marks (cams and main chain). Then we slid took everything off and put on the 3.0 timing components. His motor runs like a champ and I assume mine will too (when I finally get around to finishing it up here in a couple weeks).
 09-07-2010, 06:55 PM
#48
Well I did not have a whole lot of time to work on the project over the holiday weekend, but I did get a little bit done.
I took the oil pans off of both engines, and I took the outer timing chain covers off of both engines. I installed ARP rod bolts after I took the upper oil pan off of the 3.5. Since I did not have a stretch gauge, I torqued them down to 28ft/lbs, then loosened them then repeated this process five times. This is what arp recomends, and I just did it two extra times just because
I am pretty sure I have the 3.5 set to TDC, thanks to George for helping me out with this. I am calling it quits for the night, and I hope to start taking more stuff apart soon. Any advice before I tear into this more?
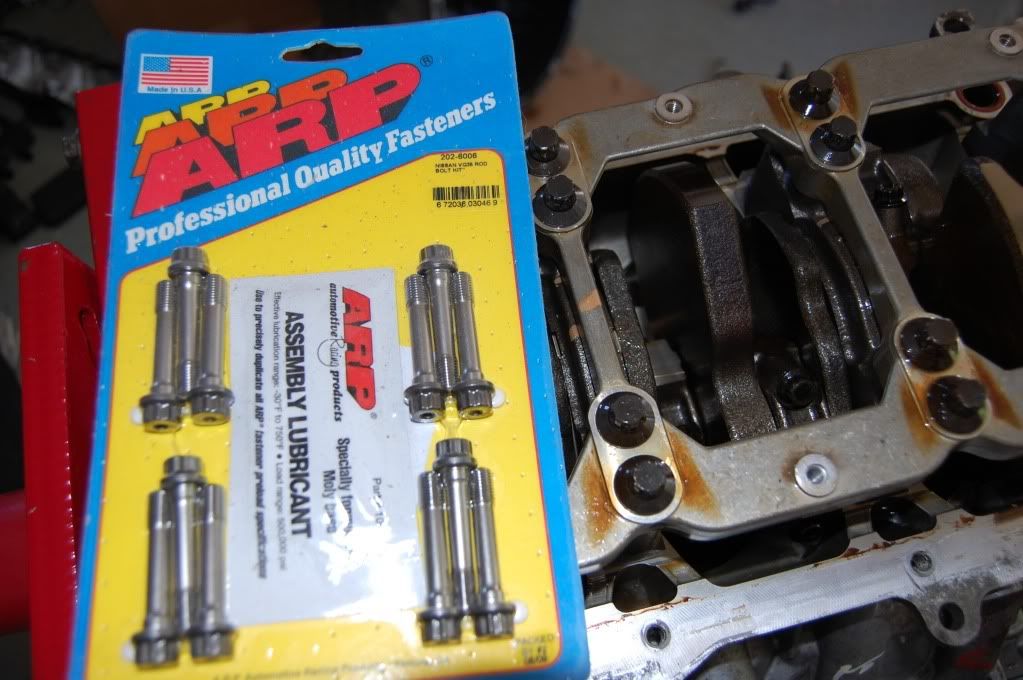
 09-08-2010, 10:02 AM
#50
 09-08-2010, 04:37 PM
#53
yeah I am doing a few things while I have it apart. My parts list looks very similar to Aaron's. I know he did a full swap, but as far as internal parts I am using a lot of the same parts. I will post my parts list when I pull every thing out of the boxes.
09-08-2010, 07:35 PM
#54
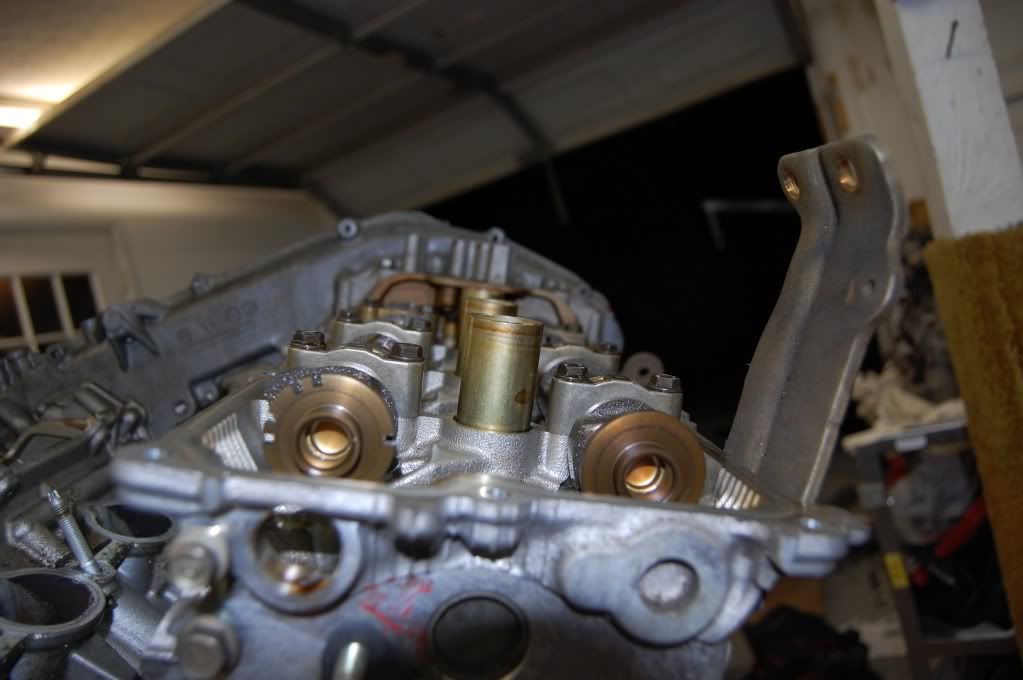
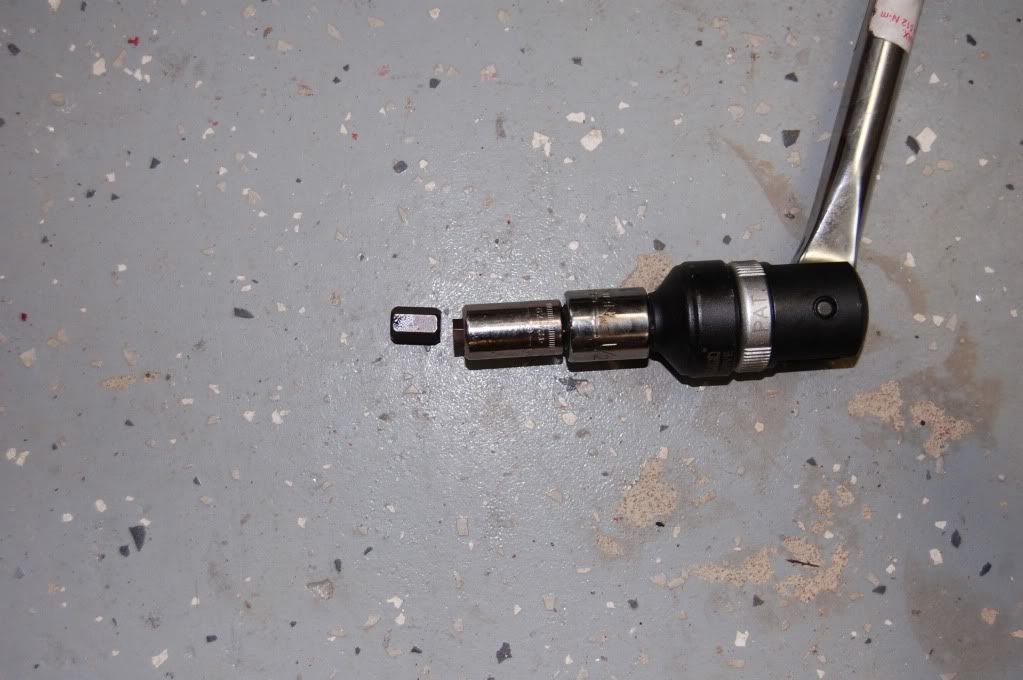
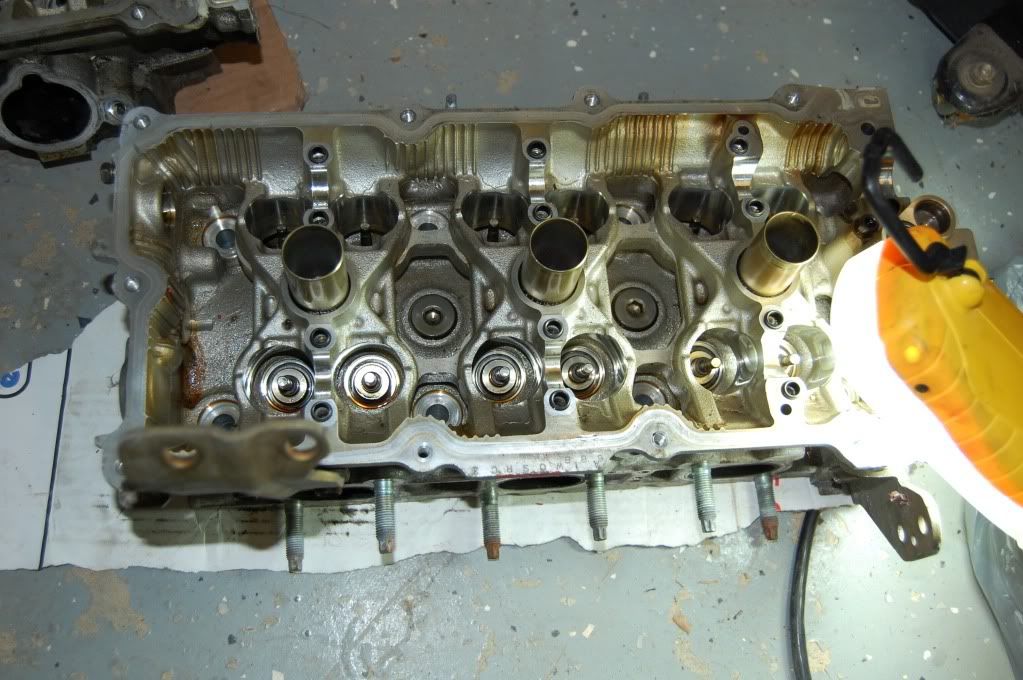
I did not touch the 3.0 tonight, I only worked on the 3.5. I got the cam gears taken off, along with the chains. I took off the inner timing chain, and took the cams out...then I wanted to take the heads off I put my 10mm hex socket onto the first bolt, I eventually got that one loosened a half turn so I moved to the next one, and I snapped the hex socket in two What are you guys using to take your head bolts off? My impact will not touch them, and I just broke this socket. I hope to get the heads off soon and take the timing stuff off of the 3.0. Here are a few pictures.
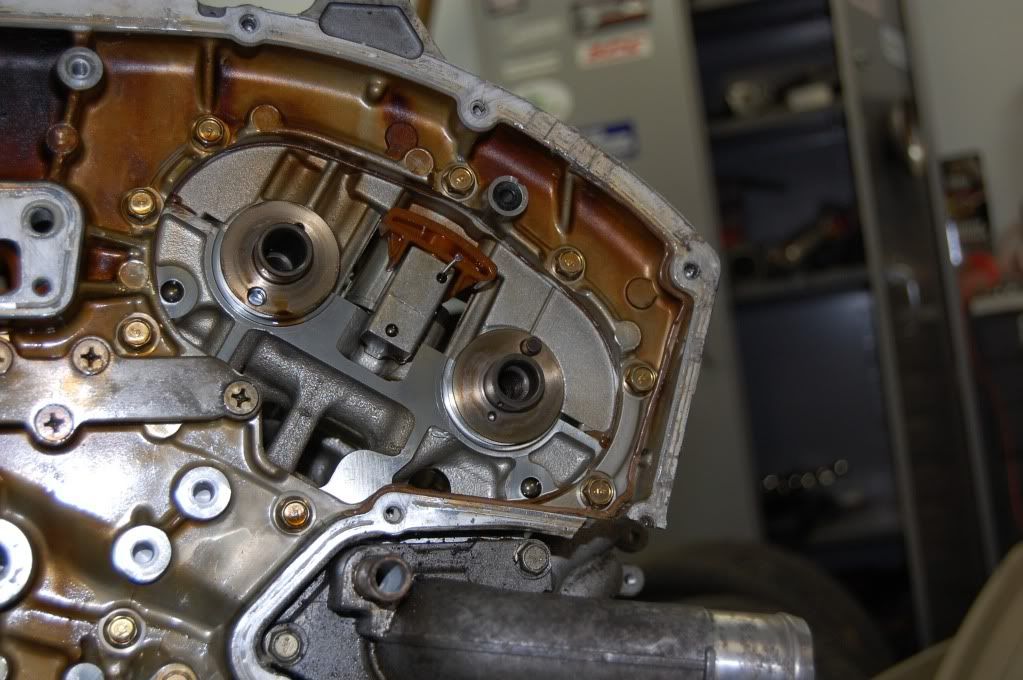
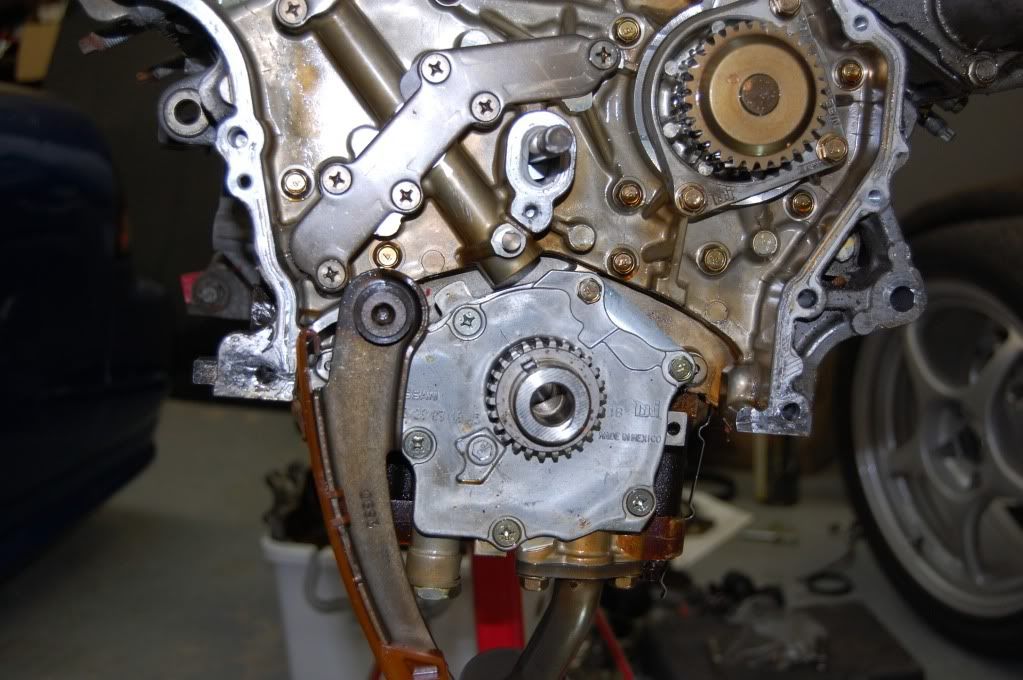
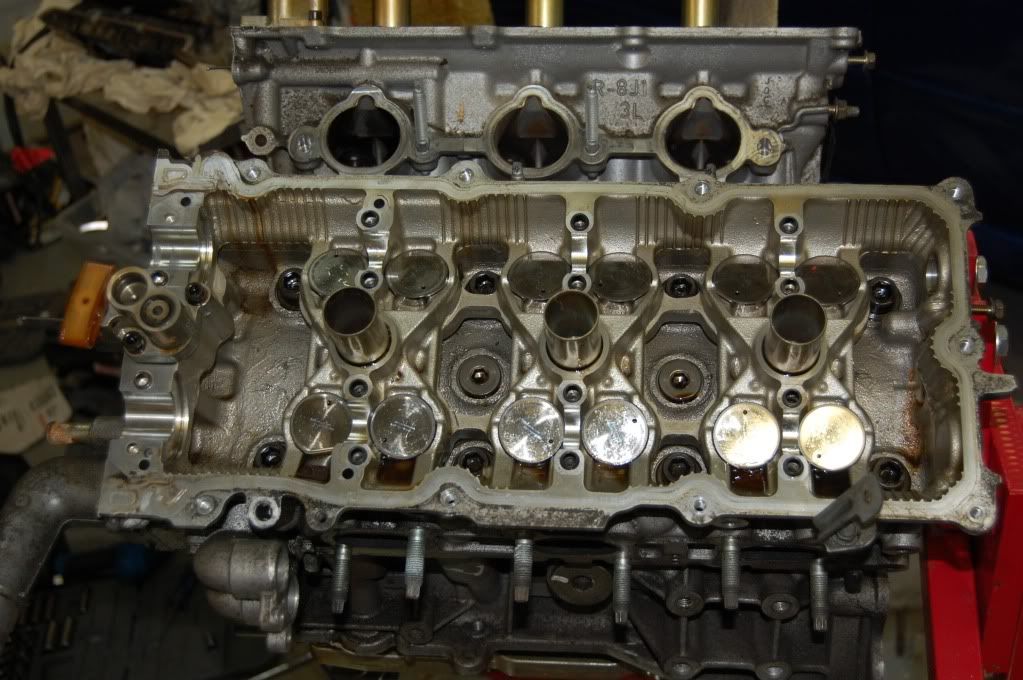
I put my 10mm hex socket onto the first bolt, I eventually got that one loosened a half turn so I moved to the next one, and I snapped the hex socket in two What are you guys using to take your head bolts off? My impact will not touch them, and I just broke this socket. I hope to get the heads off soon and take the timing stuff off of the 3.0. Here are a few pictures.
 09-08-2010, 08:19 PM
#56
The times I have taken off heads, I have used one of those big steel pipes construction workers use to bend steel rods lol, put the 14" breaker bar inside of it and go to town. Try to loosen all the bolts in steps. dont loosen one all the way, to prevent warping of the head.
09-09-2010, 05:54 AM
#57
The times I have taken off heads, I have used one of those big steel pipes construction workers use to bend steel rods lol, put the 14" breaker bar inside of it and go to town. Try to loosen all the bolts in steps. dont loosen one all the way, to prevent warping of the head.
09-09-2010, 07:03 AM
#58
I actually think that's the same socket I used. Everything's in storage at the moment so I can't verify if it was a 3/8's drive or a 1/2" socket. Maybe move up to a 1/2" hex socket might help.
09-09-2010, 07:08 AM
#59
09-09-2010, 07:22 AM
#60

Also, you "might" be able to find an Impact Hex Socket. That would surely be stronger.
09-09-2010, 11:02 AM
#61
Sears did not have any more in stock, and I could not find a 1/2" drive 10mm hex, so I got one from Fisher, it is a performance tool brand. It is a 3/8" drive, but it does not taper like the craftsman one does...I'll see if it works any better tonight.
09-09-2010, 05:20 PM
#62
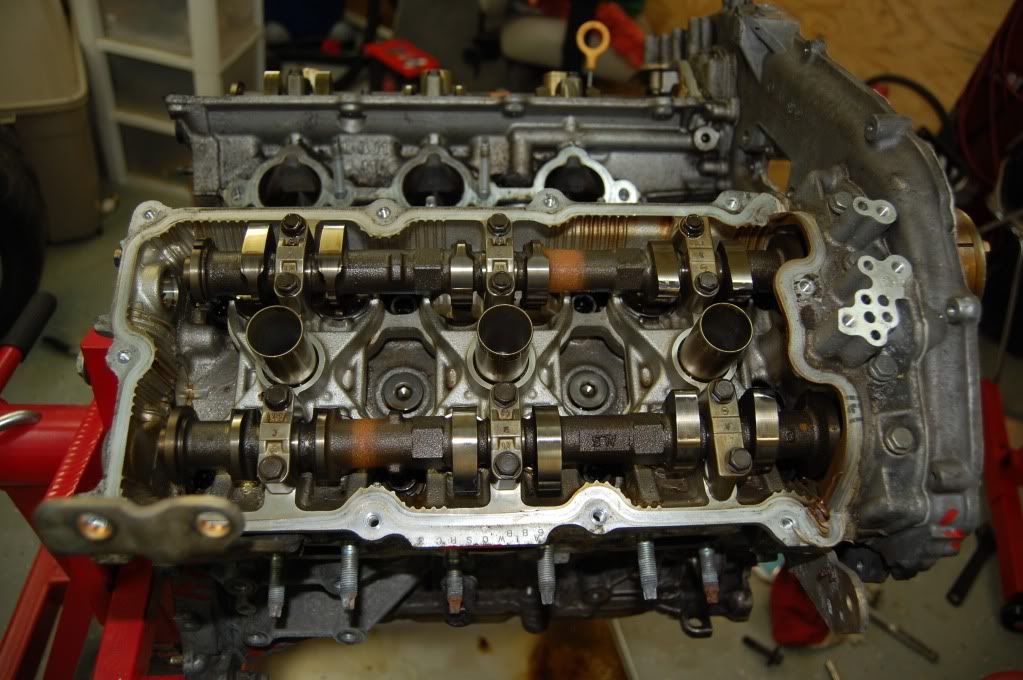
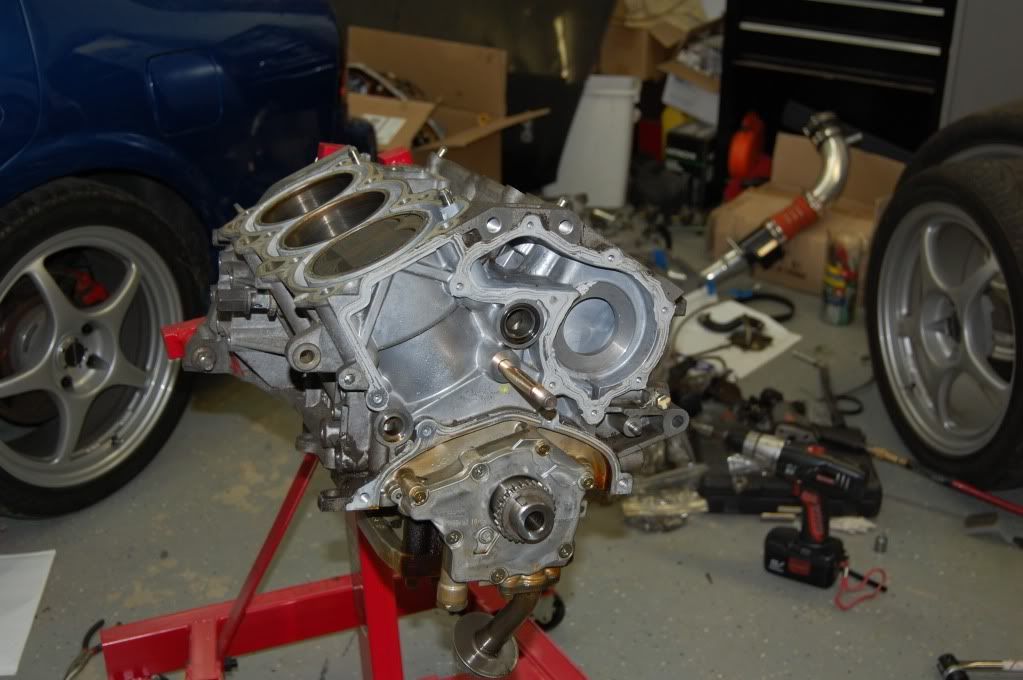
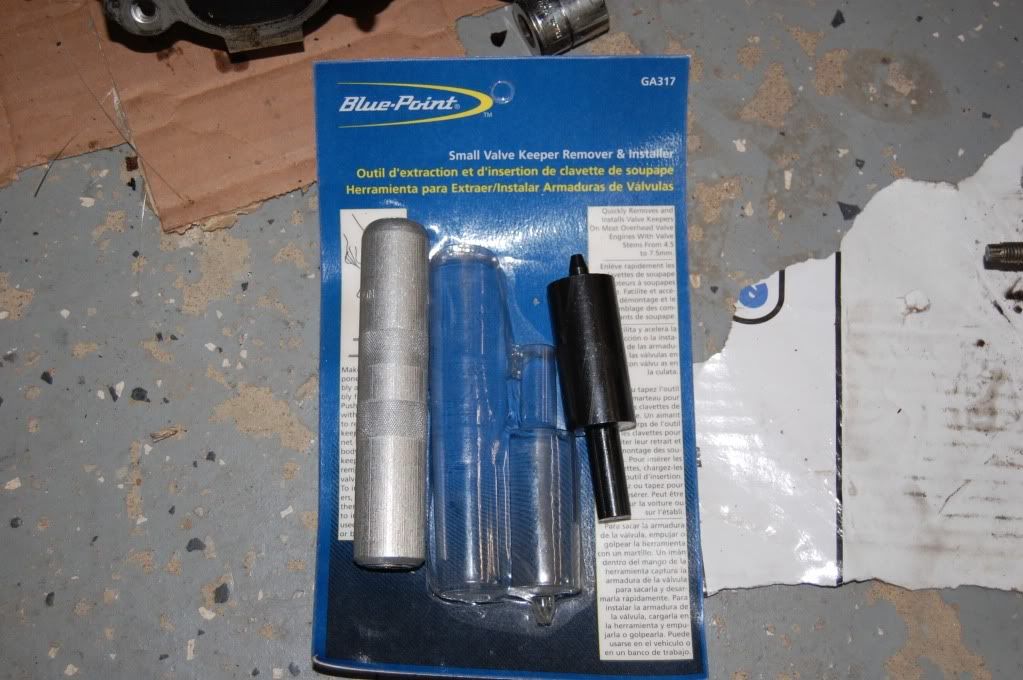
okay I have the heads off and I am starting to take things apart, but I need to know how to properly install the oil valve seals. The FSM just says to use some tool. I am pulling them off with vice grips, but I want to know how to put them back on properly. I post pictures in a little bit.
 09-10-2010, 06:01 AM
#64
This was a pain in the **** for Matt and I just because there's so many steps and it gets more and more difficult with each step, and we did every one of them to the, "T". You might want to get a friend to help you here also. Order and procedures are on EM-62. In order to get the degrees you will need a Torque Angle Meter. It's the d. and e. in the procedures that really wear you out. 90*-95* on all bolts, then again 90*-95* on all bolts. Don't forget to do them all in order.
http://www.amazon.com/Lisle-28100-To...d=OL279QI3TNZS

http://www.amazon.com/Lisle-28100-To...d=OL279QI3TNZS
09-10-2010, 06:22 AM
#65
This was a pain in the **** for Matt and I just because there's so many steps and it gets more and more difficult with each step, and we did every one of them to the, "T". You might want to get a friend to help you here also. Order and procedures are on EM-62. In order to get the degrees you will need a Torque Angle Meter. It's the d. and e. in the procedures that really wear you out. 90*-95* on all bolts, then again 90*-95* on all bolts. Don't forget to do them all in order.
http://www.amazon.com/Lisle-28100-To...d=OL279QI3TNZS
http://www.amazon.com/Lisle-28100-To...d=OL279QI3TNZS
Ordered the tool.
What is the proper installation tool for the oil valve seals?
09-10-2010, 06:29 AM
#66
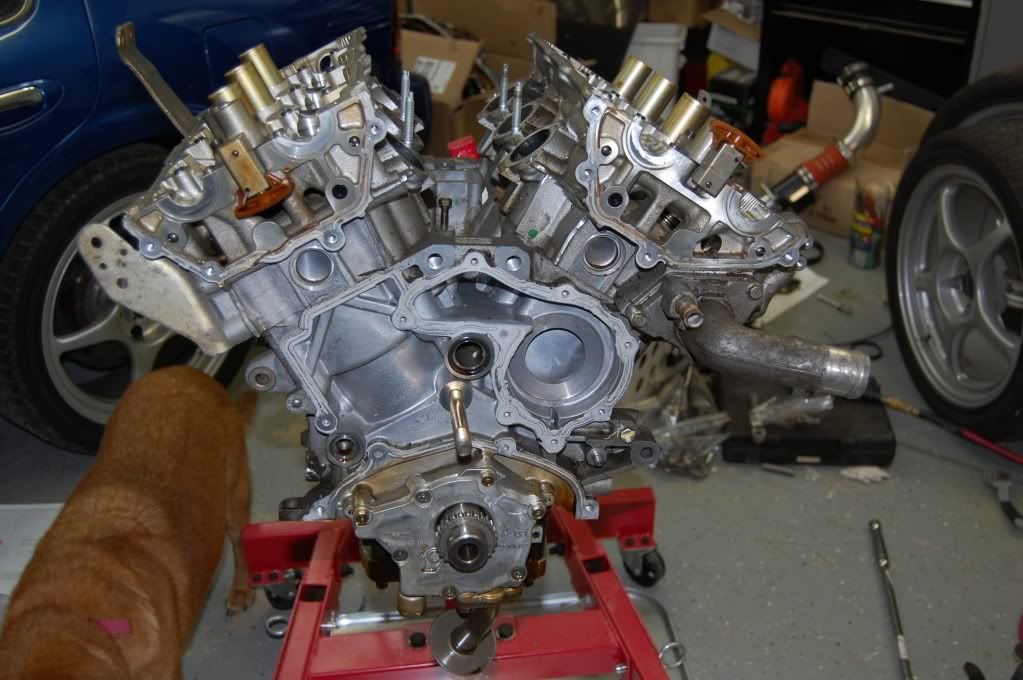
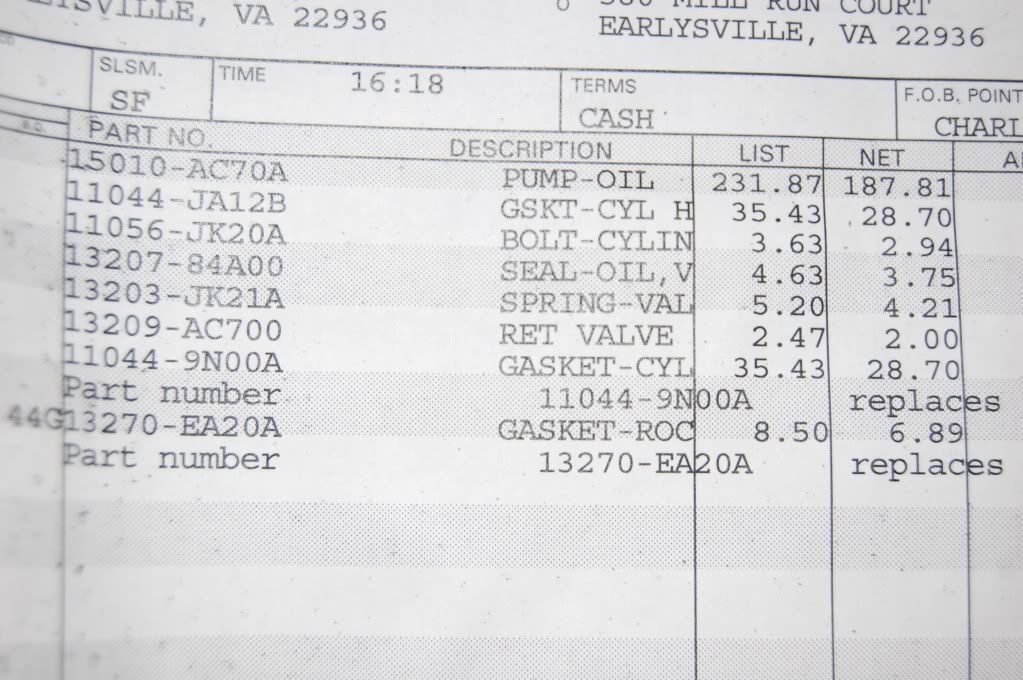
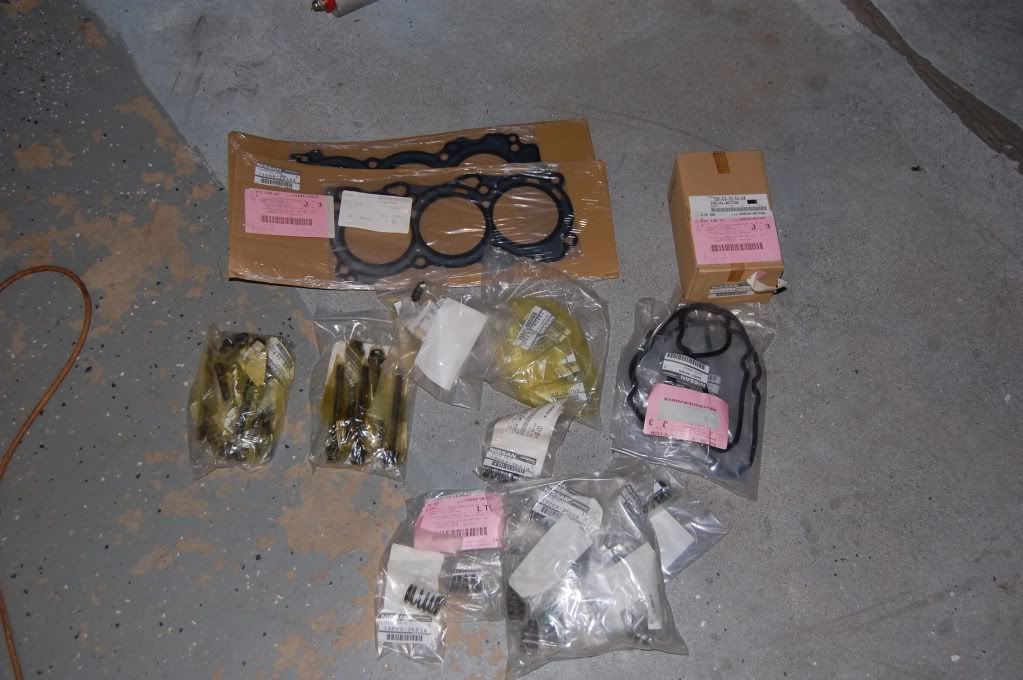
Here is a list of parts that is going in at this stage. Hopefully the part numbers can help out other people. All the parts are from the VQ35HR, except for the oil pump, that is from a rev up engine.
What do you guys use to clean the pistons/valves/cylinder walls?


What do you guys use to clean the pistons/valves/cylinder walls?
 09-10-2010, 11:28 AM
#68
09-14-2010, 07:52 AM
#69
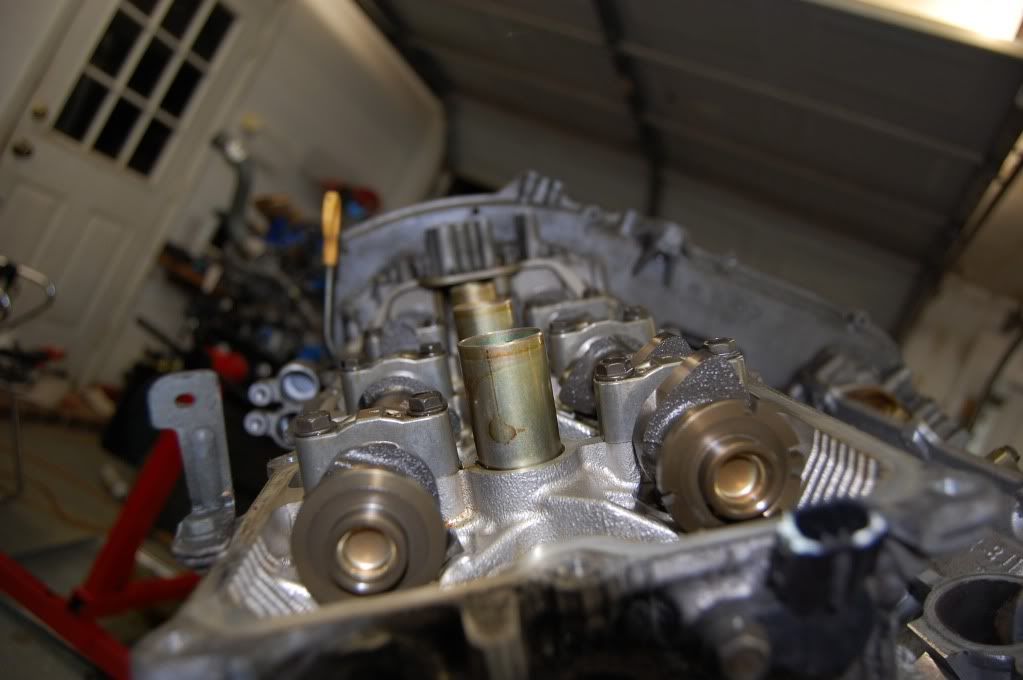
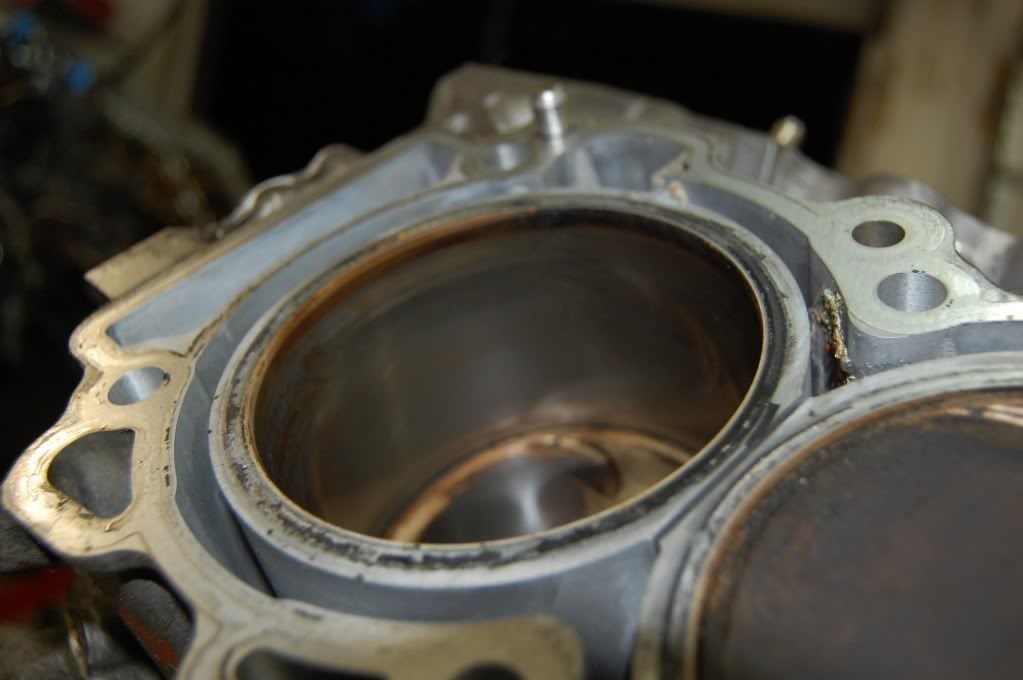
okay, I hope to work on this tonight. I am going to use a deep socket to install the valve stem oil seals. I am planning on soaking them in fresh engine oil before I put them on. Is this what you guys recomend? Also I was just going to clean off the cylinder walls and piston tops with aceatone and a rag. I was going to do the same for the matting surface between the heads and the block. Do you have any more advice for me at this stage?
09-14-2010, 09:20 AM
#71
okay, I hope to work on this tonight. I am going to use a deep socket to install the valve stem oil seals. I am planning on soaking them in fresh engine oil before I put them on. Is this what you guys recomend? Also I was just going to clean off the cylinder walls and piston tops with aceatone and a rag. I was going to do the same for the matting surface between the heads and the block. Do you have any more advice for me at this stage?
09-14-2010, 10:10 AM
#72
For what it's worth, when I cleaned up my first 3.5, which looked a lot like yours inside, I uses acetone and a wire brush on a drill to clean off the ridges of crud at the top of the cylinders and the piston tops - one at a time. It looked good when I was done, so I did the same to the heads and top of the block, using a gentler touch with the wire brush.
09-14-2010, 11:02 AM
#73
I sure remember breaking off the 10mm hex socket on head bolts. I always go through one or two Craftsman sockets when pulling or replacing heads.
Last edited by grey99max; 09-14-2010 at 11:06 AM.
09-14-2010, 11:29 AM
#74
Since I used the HR gaskets, for better water flow around each exhaust port I dremeled down the water restrictor on the right bank side of the block, where the water pump pushes water into the block. Aaron has good pix in his 3rd Gen.... thread. I used HR head bolts on this engine - and ARP studs on the new engine. But no, I didn't have the heads or blocks checked for alignment - things sealed up just fine.
I sure remember breaking off the 10mm hex socket on head bolts. I always go through one or two Craftsman sockets when pulling or replacing heads.
I sure remember breaking off the 10mm hex socket on head bolts. I always go through one or two Craftsman sockets when pulling or replacing heads.
As for the Craftsman bits I think they are weaker because they are tapered to fit into the socket. Mine broke where it goes into the socket. I bought a performance tool (I don't think this is an expensive brand) 10mm hex socket and it worked just fine, but it is not tapered like the craftsman socket.
09-14-2010, 12:49 PM
#75
I am also using HR head studs and HR head gaskets, so I will be doing the same mod on the water restrictor, I will post a picture once I am done. How far down are you supposed to cut it out? Is there a spacific measurement I need to use?
As for the Craftsman bits I think they are weaker because they are tapered to fit into the socket. Mine broke where it goes into the socket. I bought a performance tool (I don't think this is an expensive brand) 10mm hex socket and it worked just fine, but it is not tapered like the craftsman socket.
As for the Craftsman bits I think they are weaker because they are tapered to fit into the socket. Mine broke where it goes into the socket. I bought a performance tool (I don't think this is an expensive brand) 10mm hex socket and it worked just fine, but it is not tapered like the craftsman socket.
Better safe than doing without at 10PM on Sunday.
09-14-2010, 01:04 PM
#76
I cut my restrictor down about 1/2" - streetz did his, too, I think. No specific measurement that I ever saw posted. I see above that you bought a Fisher performance tool hex socket - I gotta me me one. Craftman will replace, but they don't always have one - so I bought and maintain two in my inventory.
Better safe than doing without at 10PM on Sunday.
Better safe than doing without at 10PM on Sunday.
 09-14-2010, 07:47 PM
#77
Okay. So when doing the enlarging for the HR head gaskets, do you do the mod to both sides of the block? I did not see any mention of this, but I see that from the water pump there is a passage that goes up to either side of the engine? So do I enlarge both sides.
Also, I bought a rev up oil pump....I am guessing I cannot use this because of the timing chain difference. Is everyone that is doing the hybrid swap just running the vq30 oil pump? Do I have any options on the oil pump?
Also, I bought a rev up oil pump....I am guessing I cannot use this because of the timing chain difference. Is everyone that is doing the hybrid swap just running the vq30 oil pump? Do I have any options on the oil pump?
09-14-2010, 09:11 PM
#78
Okay. So when doing the enlarging for the HR head gaskets, do you do the mod to both sides of the block? I did not see any mention of this, but I see that from the water pump there is a passage that goes up to either side of the engine? So do I enlarge both sides.
Also, I bought a rev up oil pump....I am guessing I cannot use this because of the timing chain difference. Is everyone that is doing the hybrid swap just running the vq30 oil pump? Do I have any options on the oil pump?
Also, I bought a rev up oil pump....I am guessing I cannot use this because of the timing chain difference. Is everyone that is doing the hybrid swap just running the vq30 oil pump? Do I have any options on the oil pump?
http://www.jimwolftechnology.com/wol...HEAD_BOLTS.pdf
09-15-2010, 05:59 AM
#79
Yes you have to modify both sides: (bottom of first page has details)
http://www.jimwolftechnology.com/wol...HEAD_BOLTS.pdf
http://www.jimwolftechnology.com/wol...HEAD_BOLTS.pdf
How about the oil pump suff?
09-15-2010, 06:45 AM
#80
I reused the stock 3.5 pump that came with the motor but from the looks of the build and depending on how high you plan to rev it may not be the best option but it does work. Just swap the crank sprokets