When you click on links to various merchants on this site and make a purchase, this can result in this site earning a commission. Affiliate programs and affiliations include, but are not limited to, the eBay Partner Network.
I'm happy to say that I finally have a 6 speed swap under my belt now. This one was done on a buddies '99 (deloa84), so I thought I'd show what I did differently than the procedure in the write ups. In my opinion my changes are cheaper and easier than the alternatives.
The main hurdles I've identified with the swap are the timing ring and the transmission mount.
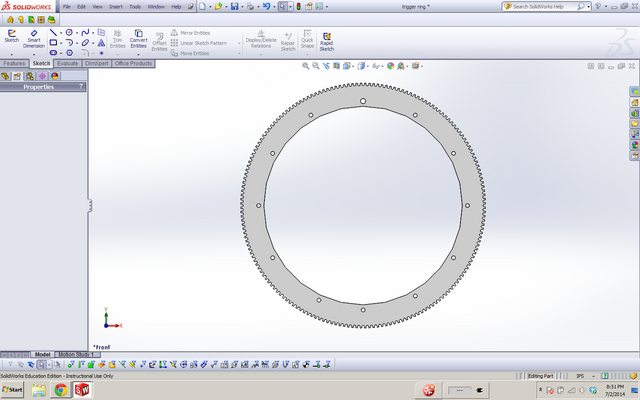
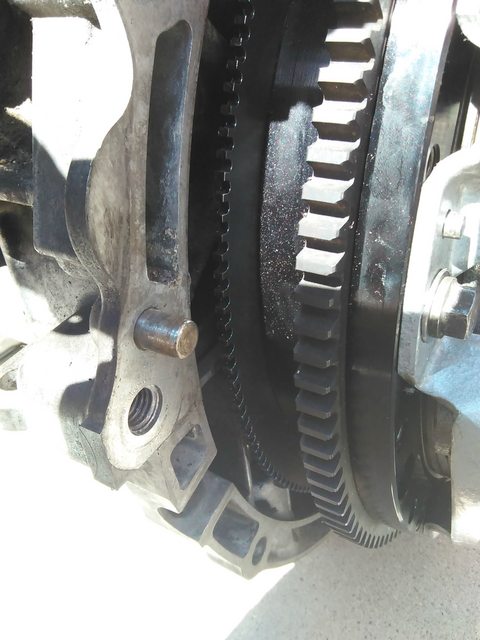
For the timing ring, I drafted it up in my favorite CAD software and had it cut at a local machine shop. It is just a matter of unbolting the old ring off of a 6MT JWT Flywheel and bolting the new one on.
----------
Next up is the transmission mount. I am a fan of being able to revert back to stock should the need arise, and this swap is no exception. It actually ended up being a lot easier than I had anticipated.
I used the stock 6mt mount bracket that bolts to the transmission, and ground the sides down a little. I also cut a bit of material off of the trans mount bracket attached to the frame rail. With the remaining three engine mounts (all are solid/polyurethane) bolted up, I drilled two new holes for the 6mt mount. Next, I drilled a hole large enough for the 6mt transmission mount bolt through the center of two and a half hockey pucks.
The only thing I would do differently with this mounting solution is buy a longer bolt and a nut to include the back half of the trans mount on the chassis.
I would not recommend this method without having some sort of filled or polyurethane mounts, as having only one solid mount can lead to the mount bracket on the chassis failing.
Hockey puck mount images removed 5/7/2020. DO NOT USE THIS METHOD.
By the powers that be, the owner of this 6mt maxima contacted me after moving from AZ to Colorado for work. After ~250k chassis miles and ~100k engine swapped miles, the 3.5 started knocking and eventually wouldn.t turn over. I ended up buying the car off of him and towing it back to AZ over a very long two days. I tore the car down to the shell, sold some parts, and kept some for my 4th gen. After 4 years in service the chassis mount was beginning to crack.
I am currently working on a new mount solution that will allow you to keep your chassis mount without any drilling, cutting, or welding. So stay tuned
Everything else in the swap was completed as usual.
Parts used for this swap:
02-03 HLSD Maxima 6MT
FWD JWT Flywheel with my custom timing ring
JWT Clutch
02-03 Shifter Cables
02-03 Shifter
Ralco STS
ES Shifter Bushings
One piece SS Clutch line
Last but not least, a short vid of it back on the road.
Last edited by schmellyfart; May 7, 2020 at 08:20 PM.
Very nice work Schmelly!! For those looking to do this swap, will your local machine shop be able to replicate these as needed or will you be emailing the CAD files to prospective swappers? Again, great work as usual.
Thank you! Yes, I can have them reproduce some rings as needed, but it will be more expensive than ordering multiple so I will ordering a batch of the rings to sell within the month.
Hell yeah on not having to hack out the unibody mount.
I've always wondered why people just don't make a custom trans mount or something else to make it work.
You being able to fit hockey pucks in there also means it's possible to modify the 6-speed trans mount bracket to accept a 4th-gen loop and bushing type mount. You would just need to get what ever ES bushing fits in a 4th gen trans mount, find the right ID pipe to press it into, and weld the pipe to a modified 6-speed mount. If the 4th gen bushing/pipe OD is too big, you can go smaller.
I thought about that, but I don't have a welder so I just started drawing one up in Solidworks to accept a 2.5" universal Energy Suspension bushing. Only downside is that the 6" cube of AL is already $100, not even taking machine time into account.
You know, a welder doesn't sound so bad now.
Originally Posted by aackshun
As soon as I get a guineapig 4th gen I'll have a cleaner mount solution.
You work on those rings and count me in for a pair.
I'll be putting the order in at the shop by Friday.
Great idea on using CAD software to make the timing ring. Any chance you'll share your project files on a collaboration website for future swappers if they want a local shop to make their rings? I personally have never used CAD software but software developers often share code on websites like Github so that other people can recreate their projects.
Nice... And so far the car is running great. Keeping a very close and keen eye on the mount. Haven't gotten too crazy with the car being as I still have to break in the clutch but so far so good.
I'll just piggyback on this thread with some more info I came across for my personal 6MT swap.
First off heres my parts list:
05 open diff Maxima/Altima trans 4.1FD
6th gen Maxima or Altima shifter cables
5.5 gen Maxima Shifter
Red Lion nylatron shifter bushings.
RWD Fidanza lightweight flywheel
OEM 6th gen Maxima Pressure Plate
OEM 350z Clutch Disc
OEM Throwout Bearing
2013 Maxima CVT Starter
Solid Trans mount for now
~I have a RWD JWT and Fidanza lightweight flywheel in my possession, both flywheels needed some sanding to fit the flywheel onto the crank hub.
~The RWD flywheel needs the Crank Senor to be moved 7.5mm closer to the transmission. I drilled & tapped a new hole for the sensor and made sure it all lined up before mating the transmission to the engine. Material did need to be removed from the transmission as well.
~6th gen Maxima / Altima shifter cables are longer than 5.5gen Maxima shifter cables so the hole will need to be cut closer towards the passenger side on the firewall. Also the metal cover plate on the 6th gen cables are on the reverse side and intended to bolt to the firewall from inside the cabin, whereas the 5.5 gen cables bolt to the firewall from inside the engine bay.
I researched axles far and wide before purchasing these(both sides) and installing in August. These axles, fabricated in China for Diversified Shaft Solutions (http://www.dsscvaxles.com/) are new rather than remanufactured. I found some positive feedback from Subaru forums, but not much for Nissans.
Purchased from EBay, seller theimportexperts in case the links don't function. I was suspicious because of the price, but decided to give them a try. The seller also indicated they felt these were the best bang for the buck in the market, after selling several other brands in the past. They are as pictured in the listing, with vibration dampeners integrated, and correct length for the 6 speed. I've had zero issues with them since installation, and I don't baby my car. Note-no issues includes no vibration.
The only thing I didn't like about them is the axle nut is not OEM style, but rather a castle nut. I chose to purchase new Nissan axle nuts, which are flanged, because they have more contact area at the base.
~I am using a 7th gen CVT starter and has been ground down a bit. The original 6mt starter than came with my transmission would not engage my Fidanza Flywheel. The electrical connectors on the CVT starter do not need to be modified like the 6MT starter does.
~Lastly I believe that my speedo is incorrect. Still need to verify speed with an actual GPS rather than a phone, but my odometer reads 1.1 miles for every 1 mile driven.
Last edited by schmellyfart; Dec 8, 2015 at 08:46 PM.
After I did my 6 speed swap I noticed my odometer was off as well. I downloaded a speedometer app to my phone and there was like a 2.5 mile per hour difference.
I like the mount idea actually, this is the first time im reading this thread. I think we do need a custom mount of some sort, seems we only have to move the stock 6spd mount back about 1/2" and we are golden.
After I did my 6 speed swap I noticed my odometer was off as well. I downloaded a speedometer app to my phone and there was like a 2.5 mile per hour difference.
Which Final Drive are you using?
Originally Posted by Crusher103
I like the mount idea actually, this is the first time im reading this thread. I think we do need a custom mount of some sort, seems we only have to move the stock 6spd mount back about 1/2" and we are golden.
Thanks, I've been working on a few ideas for a custom mount in my spare time - which isn't much unfortunately.
Originally Posted by ABIGBRAIN
New final drive ratio divided by old final drive ratio?
4.10�3.8=1.079
If you are running stock sized 15" tire your overall diameter is 25.5" you will need to either correct it electronically (in-line resistor on speedo wire?) or mechanically by going larger in overall diameter of tire.
25.5�1.079=27.5" During the summer months I used 225/65/16 rubber mounted,onto 16" 4th gen 5 spokes. They fit nicely even with a small suspension drop. They really filled the wheel well., and we're 27.5 inches tall.
I'd rather fix it electronically, since I can't stand the handling (or lack thereof) of a tire with such a tall sidewall. I had went from a 245/50R16 down to a 205/65R15
I have an Oscilloscope in conjunction with LabView that I will use to read and tamper with the VSS signal.
Junkyard was 50% off today so I went and bought a couple speed sensors out before I dug out the O-Scope. I tried both an auto B15 VSS (not qr25 if it matters), and an auto A32 VSS. In the end, the auto A32 VSS was the closest.
Note: speeds are approximate, and were measured using the Sygic Android App.
The vehicle has 205/65R15 Tires on 15x6 Millennia wheels.
Hockey puck mount images removed 5/7/2020. DO NOT USE THIS METHOD.
By the powers that be, the owner of this 6mt maxima contacted me after moving from AZ to Colorado for work. After ~250k chassis miles and ~100k engine swapped miles, the 3.5 started knocking and eventually wouldn't turn over. I ended up buying the car off of him and towing it back to AZ over a very long two days. I tore the car down to the shell, sold some parts, and kept some for my 4th gen. After 4 years in service the chassis mount was beginning to crack. I'll upload photos at some point.
I am currently working on a new mount solution that will allow you to keep your chassis mount without any drilling, cutting, or welding. So stay tuned
I'm happy to say that I finally have a 6 speed swap under my belt now. This one was done on a buddies '99 (deloa84), so I thought I'd show what I did differently than the procedure in the write ups. In my opinion my changes are cheaper and easier than the alternatives.
The main hurdles I've identified with the swap are the timing ring and the transmission mount.
For the timing ring, I drafted it up in my favorite CAD software and had it cut at a local machine shop. It is just a matter of unbolting the old ring off of a 6MT JWT Flywheel and bolting the new one on.
----------
Next up is the transmission mount. I am a fan of being able to revert back to stock should the need arise, and this swap is no exception. It actually ended up being a lot easier than I had anticipated.
I used the stock 6mt mount bracket that bolts to the transmission, and ground the sides down a little. I also cut a bit of material off of the trans mount bracket attached to the frame rail. With the remaining three engine mounts (all are solid/polyurethane) bolted up, I drilled two new holes for the 6mt mount. Next, I drilled a hole large enough for the 6mt transmission mount bolt through the center of two and a half hockey pucks.
The only thing I would do differently with this mounting solution is buy a longer bolt and a nut to include the back half of the trans mount on the chassis.
I would not recommend this method without having some sort of filled or polyurethane mounts, as having only one solid mount can lead to the mount bracket on the chassis failing.
Hockey puck mount images removed 5/7/2020. DO NOT USE THIS METHOD.
By the powers that be, the owner of this 6mt maxima contacted me after moving from AZ to Colorado for work. After ~250k chassis miles and ~100k engine swapped miles, the 3.5 started knocking and eventually wouldn.t turn over. I ended up buying the car off of him and towing it back to AZ over a very long two days. I tore the car down to the shell, sold some parts, and kept some for my 4th gen. After 4 years in service the chassis mount was beginning to crack.
I am currently working on a new mount solution that will allow you to keep your chassis mount without any drilling, cutting, or welding. So stay tuned
Everything else in the swap was completed as usual.
Parts used for this swap:
02-03 HLSD Maxima 6MT
FWD JWT Flywheel with my custom timing ring
JWT Clutch
02-03 Shifter Cables
02-03 Shifter
Ralco STS
ES Shifter Bushings
One piece SS Clutch line
Last but not least, a short vid of it back on the road.
I have a 2014 what all would I need to complete a swap
9238214[/url]]I have a 2014 what all would I need to complete a swap
Its a fair bit different on a 7th gen.
From what ive read you basically want to pull everything from a 07-12 3.5 altima and use something like uprev to delete the can code from removing the cvt.
From what ive read you basically want to pull everything from a 07-12 3.5 altima and use something like uprev to delete the can code from removing the cvt.
There's small nuances for the 07+ trans in a 09+
-Custom passenger axle, Altima inner shaft, maxima outer.
-Wiring the park neutral switch to the neutral position sensor.
-using a brand new oem csc slave cylinder - it's that important it's worth mentioning.
Outside of that it's your typical manual swap in an auto car.


 I see this after i cut my mount!!!!


