
Infiniti Clock Light replacement?


Newbie - Just Registered
Joined: Aug 2004
Posts: 7
Originally Posted by kingofsorrow
i've done this on my I35, let me tell you it is a serious biatch to do. let the delership, deal with it. mine weren't even blown, i just wanted them to be blue. most painful 4 hrs of my life. 4 hrs for two tiny bulbs.

Senior Member
Joined: Mar 2003
Posts: 342
Originally Posted by kingofsorrow
i've done this on my I35, let me tell you it is a serious biatch to do. let the delership, deal with it. mine weren't even blown, i just wanted them to be blue. most painful 4 hrs of my life. 4 hrs for two tiny bulbs.
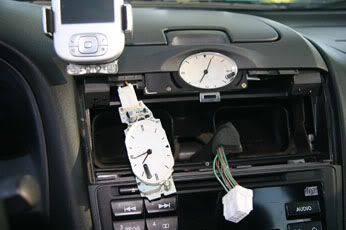
First you need to remove the dash (obviously). Use the diagram at www.carstereohelp.com to se where the necessary screws are. Then to access the clock you will need to pry out the vents - this is not as hard as it sounds. Just take a flat head screwdriver, cover it with a cloth and gently pry the sides of the vent "console" out. Once you have done this you can access the clock bulbs on the back side of the clock face. Simple.
For the A/C controls ...remove the dash and you will also need to remove the A/C unit. This is accomplished by removing (3 or 4..can't remember exactly) scres from each side of the unit. Just like removing and OEM radio. Once you have the unit out the faceplate simply pops off exposing the bulbs.
I purchased all my replacement bulbs from infiniti-parts.com. They run from $1.00-2.00 apiece....BIG SAVINGS FROM $140!!!!
Good Luck!!


Senior Member
Joined: Apr 2003
Posts: 520
Originally Posted by I30 Boogie
NOOOOOOOOOOOOOOOOOOOO!!! DO NOT GOT TO THE DEALER FOR THIS!!! It is very easy to change out your analog clock lights AND your A/C control lights if you need to. I just recently did it in my I30.
First you need to remove the dash (obviously). Use the diagram at www.carstereohelp.com to se where the necessary screws are. Then to access the clock you will need to pry out the vents - this is not as hard as it sounds. Just take a flat head screwdriver, cover it with a cloth and gently pry the sides of the vent "console" out. Once you have done this you can access the clock bulbs on the back side of the clock face. Simple.
For the A/C controls ...remove the dash and you will also need to remove the A/C unit. This is accomplished by removing (3 or 4..can't remember exactly) scres from each side of the unit. Just like removing and OEM radio. Once you have the unit out the faceplate simply pops off exposing the bulbs.
I purchased all my replacement bulbs from infiniti-parts.com. They run from $1.00-2.00 apiece....BIG SAVINGS FROM $140!!!!
Good Luck!!


Originally Posted by BikTrash
Just finished mine, Radio shack had the bulbs a dollar for two. It was pretty easy to replace, took 15 mins.

Senior Member
Joined: Mar 2003
Posts: 342
Originally Posted by tmanm3
the site doesn't show anyhting about the 2000 i30 for removing i cant find it i just see the 99and under which is not the same setup and they have a maxima setup which is't the same
only because i'm in a good mood today ...
 instructions for the I30 and J30 are identical.
Senior Member
Joined: Mar 2003
Posts: 342
Originally Posted by Colossus
I've got an '02 I35. Niether my analog clock nor my A/C controls light up at night. I just figured they did not have bulbs.
Is it actually because the bulbs are simply blown?
Is it actually because the bulbs are simply blown?

Supporting Maxima.org Member

Joined: Jun 2001
Posts: 89
I know this thread is old but does anyone have pictures of where to pry with a screwdriver and a cloth so I can get to the lightbulbs on my clock, I have a 2000 I30. Booogie's link needs to pay to see.
Thanks.
Chucky.
Thanks.
Chucky.
Supporting Maxima.org Member
Joined: Jun 2001
Posts: 89
Cool, I feel like I'm getting more confident on replacing my light bulbs and getting my signature clock back in order. I just don't want to have an dash that looks all eaten up if you know what I mean. So in this picture I pray with a clotha and screw driver in the red circles or in the blue circles?
To me pictures are worth 1000+ words.
Thank you again!
Chucky.
Edit: I finally did it, basically pry at both ends an the panel comes off, simple as that, the clipes are actually in the middle of the panel so as longs as you can get underneath, you are good to go, thanks for everyone's input!
To me pictures are worth 1000+ words.
Thank you again!
Chucky.
Edit: I finally did it, basically pry at both ends an the panel comes off, simple as that, the clipes are actually in the middle of the panel so as longs as you can get underneath, you are good to go, thanks for everyone's input!
You can pry at any of the circles. Just pry along that vertical edge. And yes, if you don't have a trim wedge then use a flathead wrapped in a cloth.
You'll have to kinda "work" the vents out with the prying, eventually you'll be able to pull them free and you'll probably hear a horrible "bang" and think you've broken the assembly - but you haven't. That's just what it does.
You'll have to kinda "work" the vents out with the prying, eventually you'll be able to pull them free and you'll probably hear a horrible "bang" and think you've broken the assembly - but you haven't. That's just what it does.


Member
Joined: May 2006
Posts: 98
Ok...I must be blond cuz Im having a hrd time figuring out why do I need to uninstall everything just for the clock??!!
http://www.carstereohelp.com/stereor...nfinitiI30.htm
I also have some lights on my radio that does not work . Is it all related?!!
http://www.carstereohelp.com/stereor...nfinitiI30.htm
I also have some lights on my radio that does not work . Is it all related?!!

Newbie - Just Registered
Joined: May 2006
Posts: 3
seems like everyone could use some clear directions... i followed these directions exactly and it took me about 30-45 minutes to replace the bulbs. (Pretty good considering it was my first time doing anything to the car...)
"You first have to remove the console vent cover directly below the clock. I have an exploded view that I can email you but for now I will try to describe the procedure. Remove the cover by inserting a flat screwdriver into the seam directly to the right or left of the console vent cover. Cover the tip of the screwdriver with a rag to prevent scratches during removal. Pry each side of the cover towards you until th clips that hold it in place break (don't worry they won't literally break) free. After you remove the cover, you will see 2 phillips screw holding the top console cover. The clock is attached to the top cover by an additional pair of phillips screws which are located behind the clock. Remove the screws that attach the top cover to the dash and pull the top cover towards you while you lift it slightly away from the dash. You should now be able to access the screws that hold the clock to the top cover. Now you can remove the bulbs by twisting the bulb holders. Make sure you use a screwdriver with a wide enough tip otherwise you will just chew up the bulb holders. Install the new bulbs (they are only $8 at http://www.everythinginfiniti.com/ part number 248603Y101 courtesy of http://www.infinitihelp.com/Ownershi.../ITB03-065.htm) and reinstall the clock, topcover and bottom cover."
This was actually listed under another string in the maxima.org forums. it was originally by Skeetch.
The hardest part i thought was the part i put in bold just because the screw is facing the other way, and it's kind of hard to get a screwdriver back there.
Here's some pictures from another site i used that helps those who need to see something- http://www.cardomain.com/ride/2375556
Anyways, hope this helps

hold on jigmoney, the 2000+ I30s have an analog clock like a grandfather clock with two hands. The clock that's in the 2000+ I30s and 35s are lit up by two bulbs. If your car is a 98 if im not mistaken you have a digital clock. this type of clock doesn't have a light bulb in which you can replace, if it's out its out. if both the radio and the clock are out check your fuses first.
the radio is more than likely just bulbs but the clock being completely out could be a fuse or the circuitry could have gone bad. In any case you still gotta take out the assembly. For your car pry at the top edge of the vent and you'll release the vents and clock. Unplug the defogger clock and hazard switch. To get the stereo and a/c unit out, pry up on the woodgrain around the shifter, be sure to unplug the cigarette lighter. Then the ashtray will need to come out there are two phillips head screws holding it in. Also, there is a electrical connection for the bulb thats in there. Once those three items are out, there are four phillips/10mm bolts that are holding the stereo and a/c control unit tower to the car. Try to first use a 10mm socket so if they're really tight you don't strip the phillips head, and not stripping the heads will allow you to use a magnetic screwdriver for easy reinstallation. From here, just unplug the vaccum hose and all plugs from the a/c control unit and head unit and you're good to go. take it easy and good luck.

Senior Member
Joined: May 2005
Posts: 202
Excellent help. I was wondering if anyone knows what amp/voltage rating goes through to the clock bulbs. I was easily able to remove it with the instructions listed above but would like to use blue color LEDs instead. I went to Radio Shack but they did not have blue LEDs in stock. If they did, would these burn out?
Hmm. Just started to look around and discovered I would require resistor(s). Has anyone installed LED's on the infiniti clock?

Hmm. Just started to look around and discovered I would require resistor(s). Has anyone installed LED's on the infiniti clock?

Senior Member
Joined: May 2005
Posts: 202
Woot. I was able to mod my first LEDs on the clock. Yah I know it is minor but for someone who is not electronically inclined, I impressed myself  .
.
However, it was not as bright as I expected and it could just be a little brighter than the OEMs. Hmm, maybe it is too light outside. I guess I could have used lower rated resistors or brighter LEDs too. I am going to change them later but will run them for a month or two to make sure they do not burn out prematurely.
.However, it was not as bright as I expected and it could just be a little brighter than the OEMs. Hmm, maybe it is too light outside. I guess I could have used lower rated resistors or brighter LEDs too. I am going to change them later but will run them for a month or two to make sure they do not burn out prematurely.
Senior Member
Joined: May 2005
Posts: 202
Originally Posted by KI30t
Uber-Oakley, What size LED did you use? I'm trying to do the same thing but I don't know where to get the LEDs from. Where did you get yours from? Thanks in advance.
I bought my LEDs from the local Radio Shack store and the size of them were close to the OEMs. There were no specs on the assorted pack I bought except for a cheezy schematic diagram. As for the resistors, I had to use one for each bulb. I was using an LED calculator assuming these lightbulbs were connected in series but after burning out 7 LEDs (also trying to determine the correct polarity on one of the clock terminals, I realized there was too much current coming through. Also you have to use the plastic screw caps from the original lightbulbs which are easy to take off.
I am planning on installing some brighter blue LEDs (cost more than the assorted pack I got) later on but we'll see if I used the correct resistors on each of the bulb.
To determine the resistor rating, look at the color code from left to right making sure the gold or silver stripe on one of its end is on your right.
I used 330 ohm resistors but you can experiment with something less to see if you can get the LEDs any brighter. Keep in mind this may reduce its life.
Hope this helps

Member
Joined: Jan 2003
Posts: 81
Originally Posted by Uber-Oakley
Hey K,
I bought my LEDs from the local Radio Shack store and the size of them were close to the OEMs. There were no specs on the assorted pack I bought except for a cheezy schematic diagram. As for the resistors, I had to use one for each bulb. I was using an LED calculator assuming these lightbulbs were connected in series but after burning out 7 LEDs (also trying to determine the correct polarity on one of the clock terminals, I realized there was too much current coming through. Also you have to use the plastic screw caps from the original lightbulbs which are easy to take off.
I am planning on installing some brighter blue LEDs (cost more than the assorted pack I got) later on but we'll see if I used the correct resistors on each of the bulb.
To determine the resistor rating, look at the color code from left to right making sure the gold or silver stripe on one of its end is on your right.
I used 330 ohm resistors but you can experiment with something less to see if you can get the LEDs any brighter. Keep in mind this may reduce its life.
Hope this helps
Thanks for the reply. What you did sounds way more complicated that what I'm capable of. Just the word resistor scares me because I real stupid when it comes to electronics. I afraid I'm going to F*** something up. I guess I'll stick to the regular dim bulbs for now, unless you would be so kind as to write a nice little how-to...
Senior Member
Joined: May 2005
Posts: 202
Hey K,
I will keep you posted when I have the next chance of upgrading my LEDs. I should have took some pics before I installed it but I was too anxious in getting it working quickly. If I can post some pics I will pm you and post it on this thread for other to review as well.
Later,
I will keep you posted when I have the next chance of upgrading my LEDs. I should have took some pics before I installed it but I was too anxious in getting it working quickly. If I can post some pics I will pm you and post it on this thread for other to review as well.
Later,
Member
Joined: Jan 2003
Posts: 81
Originally Posted by Uber-Oakley
Hey K,
I will keep you posted when I have the next chance of upgrading my LEDs. I should have took some pics before I installed it but I was too anxious in getting it working quickly. If I can post some pics I will pm you and post it on this thread for other to review as well.
Later,
I will keep you posted when I have the next chance of upgrading my LEDs. I should have took some pics before I installed it but I was too anxious in getting it working quickly. If I can post some pics I will pm you and post it on this thread for other to review as well.
Later,
Member
Joined: Jan 2003
Posts: 81
After having my center clock light blow out for longer than I can remember, it's nice to have a time piece in my car at night again. All I can say is that I hope this will be able to help someone else out. Thanks again for all who have helped me along the way.
After reading about others who have done LED bulbs replacements, I ordered some small green LEDs on eBay one day since I was bored. I also picked up a used clock for 9 bucks to mess with. I have to say that I'm not disappointed at all. The clock is like 6 times brighter than OEM. I don't know why I choose green. I guess I figured that I wanted to match the illumination on my radio. I still have the BOSE OEM crap for now anyways. LEDs only cost me 3 bucks for two including shipping, and these LEDs were made for automobile applications (so the auction said) thus I didn’t have to add any resistors. I took some pics for all to see just incase anyone was interested.
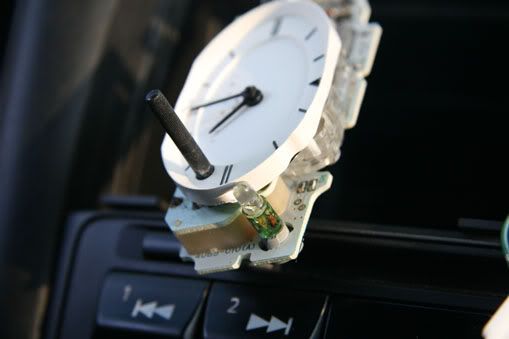
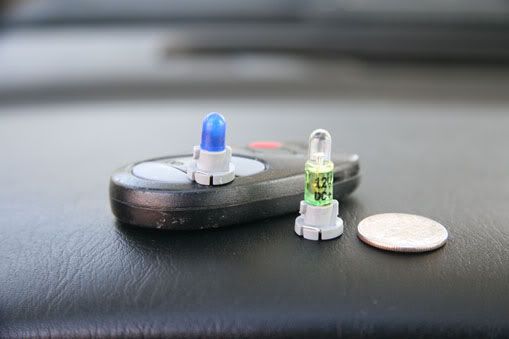

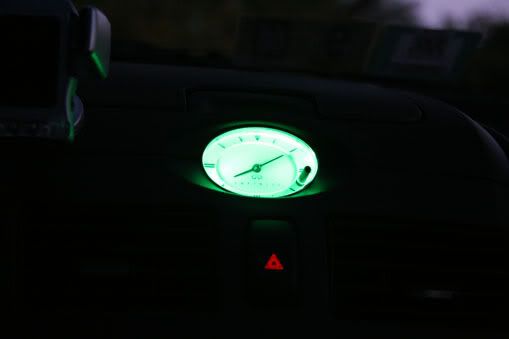
After reading about others who have done LED bulbs replacements, I ordered some small green LEDs on eBay one day since I was bored. I also picked up a used clock for 9 bucks to mess with. I have to say that I'm not disappointed at all. The clock is like 6 times brighter than OEM. I don't know why I choose green. I guess I figured that I wanted to match the illumination on my radio. I still have the BOSE OEM crap for now anyways. LEDs only cost me 3 bucks for two including shipping, and these LEDs were made for automobile applications (so the auction said) thus I didn’t have to add any resistors. I took some pics for all to see just incase anyone was interested.

WOW, KI30t. That looks awesome!
Do tell where you got those LEDs from. They look like direct drop-in replacements.
One question though, does the light still dim when you adjust the dimmer?
Do tell where you got those LEDs from. They look like direct drop-in replacements.
One question though, does the light still dim when you adjust the dimmer?