
HOW-TO: Install white LEDS for your AUTO Gear selector


HOW-TO: Install white LEDS for your AUTO Gear selector
Haven't seen anyone do this yet, so i figured i give this a shot.
TOOLS NEEDED:
Soldering iron
Rosen core
6 White 3mm LEDS (preferred) or 5mm LEDS
6 470 Ohms resistors
Breadboard
Dremel
sand paper
Flat head screwdriver
Hot glue gun
Heat shrink
Snap or slide connectors
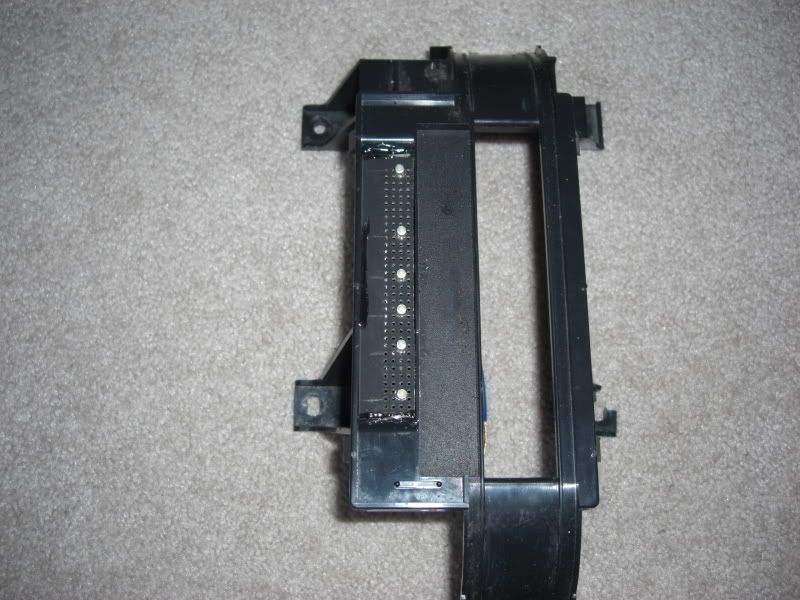
First, remove the gear selector trim from the car. Remove the shifter trim, then remove the 4 screws holding the gear selector trim. Then remove the bulb socket. the gear trim is held by 4 plastic tabs, just lightly pry each one around. Disassemble like shown:

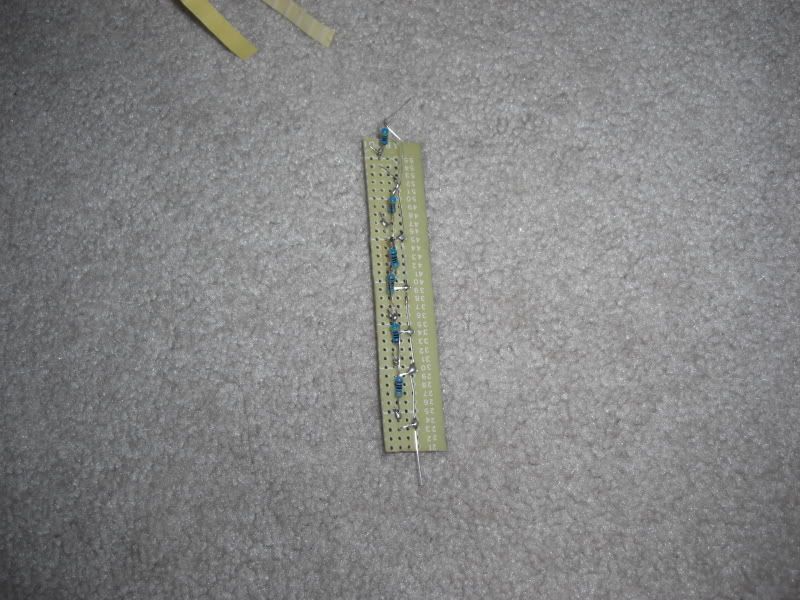
second, cut out a piece of the breadboard to fit it in the gear selector like so.
Goal is to try to get it sitting as low as possible so more light output can dissipate to reduce hotspots.
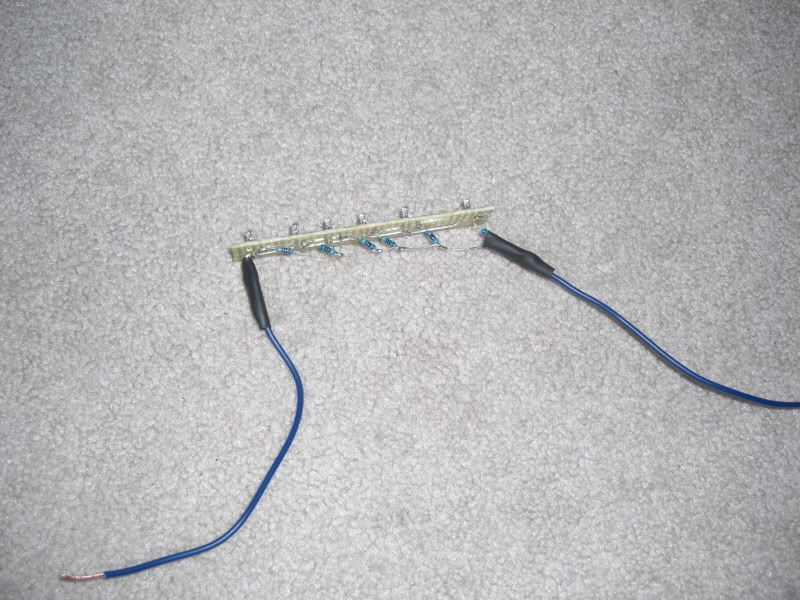
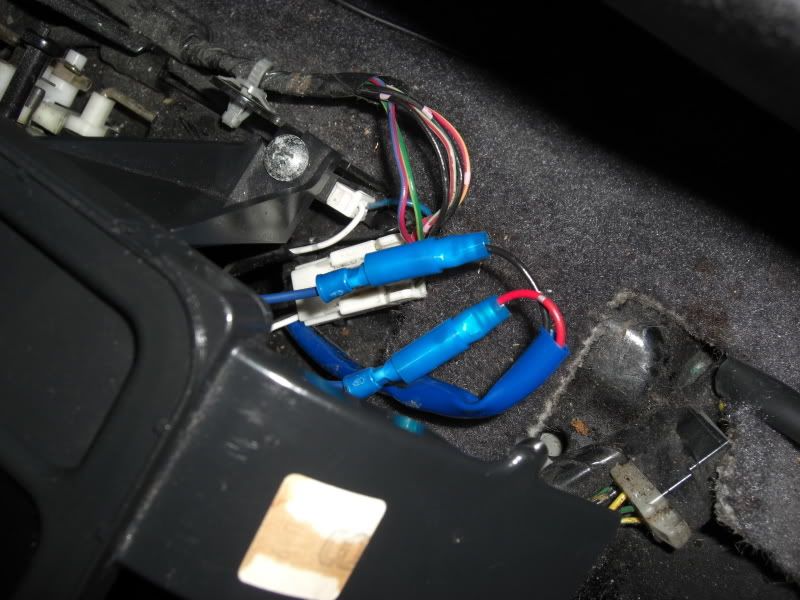
Third, Wire your LEDs:
Add a dot of hot glue on close connections from shorting out.
solder on + and - connections, wrap w/ elect tape, then heat shrink. afterwards, lightly sand off the tip of the LEDs to reduce hot spots if you want.
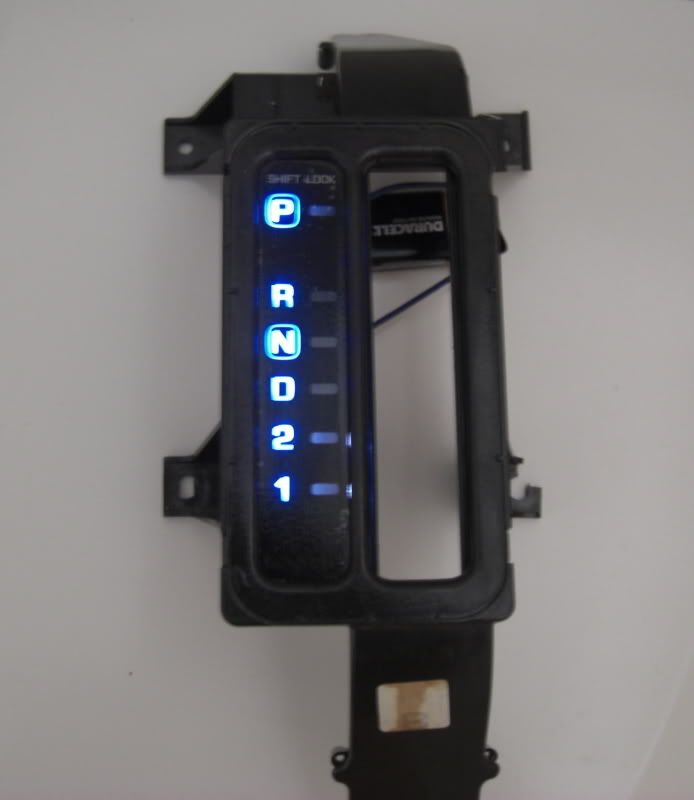
fourth, refer back to second step. place board as low as possible, then hot glue both ends.
TOOLS NEEDED:
Soldering iron
Rosen core
6 White 3mm LEDS (preferred) or 5mm LEDS
6 470 Ohms resistors
Breadboard
Dremel
sand paper
Flat head screwdriver
Hot glue gun
Heat shrink
Snap or slide connectors
First, remove the gear selector trim from the car. Remove the shifter trim, then remove the 4 screws holding the gear selector trim. Then remove the bulb socket. the gear trim is held by 4 plastic tabs, just lightly pry each one around. Disassemble like shown:
second, cut out a piece of the breadboard to fit it in the gear selector like so.
Goal is to try to get it sitting as low as possible so more light output can dissipate to reduce hotspots.
Third, Wire your LEDs:
Add a dot of hot glue on close connections from shorting out.
solder on + and - connections, wrap w/ elect tape, then heat shrink. afterwards, lightly sand off the tip of the LEDs to reduce hot spots if you want.
fourth, refer back to second step. place board as low as possible, then hot glue both ends.
Last edited by G4nismo; Jun 13, 2008 at 01:01 PM.
Results:
it appears a rather bluish b/c of the blue overlay underneath the display. theres nothing you can do about that.

now go cut off the stock bulb harnesh off and then connect it to your LED wires:
reassemble and your done
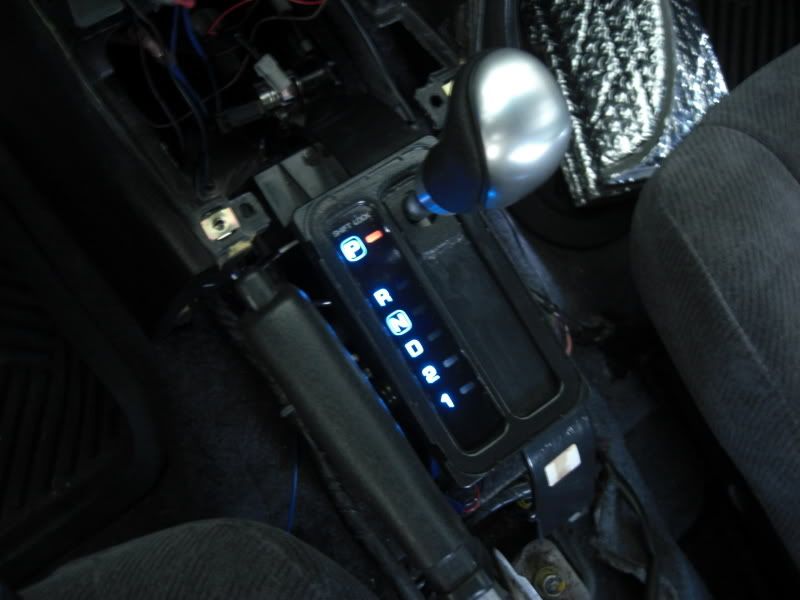
one other side note. for the last 2 LEDS displaying gear 2 and gear 1, you will be able to see some of the white and the led itself off to the side in the passenger seat, as you can sorda see in the above pic already. Not necessary but i went ahead and took care of it. just get like 1/2 inch high, 1.25 inch long piece of plastic and just stick it beside it. you can use black electrical tape as well.
it appears a rather bluish b/c of the blue overlay underneath the display. theres nothing you can do about that.
now go cut off the stock bulb harnesh off and then connect it to your LED wires:
reassemble and your done
one other side note. for the last 2 LEDS displaying gear 2 and gear 1, you will be able to see some of the white and the led itself off to the side in the passenger seat, as you can sorda see in the above pic already. Not necessary but i went ahead and took care of it. just get like 1/2 inch high, 1.25 inch long piece of plastic and just stick it beside it. you can use black electrical tape as well.
Last edited by G4nismo; Jun 13, 2008 at 01:08 PM.


The black is on the outside of the acrylic, the blue film is on the inside. I think.
I think we need a sticky update with the how tos that have been created in the last few days. Haha. Nice job man.
I think we need a sticky update with the how tos that have been created in the last few days. Haha. Nice job man.
i agree on the sticky update.
thanks mang
man i really should of just taken a pic of it but now its already put back and i don't feel like removing it again lol.
the black is on the outside but its like painted on, or i guess overlayed.
i know for a fact that, that can be scratched off if not careful cause i noticed some of it coming off in the corners to where i could see through. so i just covered the PRND21 display and painted the whole black area black again.
and i'm guessing for the blue overlay, its on top of the black overlay. thats why i didn't wanna mess w/ that.


I have tried to remove the blue tint from the letters, and its not easy to do. There are 3 layers to this, black, white and blue. They are like this:
Blue(top)
White
Black(bottom)
When you go to sand off the blue(yes, it does come off), its hard to keep everything even. In other words, you sand off some blue, but start to sand off white, and eventually(if you're stupid) you will sand off black. Its a delicate process.
I ended up just sanding off all of the white in the lettering, so they are now see through, and then I took a black marker and filled in some spots where the black wore thin. It turned out ok, and now the blue is gone.
I will get some pics later.


Nice job G4nismo. With all these LED How-to's you're producing, we're gonna have to change your username to Mr. LED 
Your How-to's give me the confidence to tackle these mini projects myself.
Your How-to's give me the confidence to tackle these mini projects myself.


Nice job!
No offense here, g4nismo. Your method gives 100% even light.
Here I have a quicker way of doing this. I ordered one of those 5-led light bulb,
http://cgi.ebay.com/ebaymotors/194-1...spagenameZWDVW, (this is not a ad, this just shows where i got it from) You can get any other kind as long as they have leds facing sideways, not only to the front only.
I directly placed the original bulb with this LED bulb and cut two strips of aluminum tape as reflectors. The bottom is actually rounded and could give a pretty good reflection.

At night, it looks like

Again, no offense.
Love your radar detector work!
Peace~
No offense here, g4nismo. Your method gives 100% even light.
Here I have a quicker way of doing this. I ordered one of those 5-led light bulb,
http://cgi.ebay.com/ebaymotors/194-1...spagenameZWDVW, (this is not a ad, this just shows where i got it from) You can get any other kind as long as they have leds facing sideways, not only to the front only.
I directly placed the original bulb with this LED bulb and cut two strips of aluminum tape as reflectors. The bottom is actually rounded and could give a pretty good reflection.
At night, it looks like
Again, no offense.
Love your radar detector work!
Peace~


I did the same as Tk563..
Used aluminum tape on the entire inside of the housing and a nice tower bulb. Bright and even light.. looks great. I give you props, that is about the most complicated way I've seen to make the light even lol
Used aluminum tape on the entire inside of the housing and a nice tower bulb. Bright and even light.. looks great. I give you props, that is about the most complicated way I've seen to make the light even lol

I did this too, but i only used two 3mm leds, simply rigged them up to the existing connector, twisted in place, and bam! blue PRND12! I was going for white too, but in the long run im happy with the blue because everything else in my car is blue 

Senior Member
Joined: Nov 2008
Posts: 145
From: br, 0, ok, Ly, n..come AGAIN?
while we are on the subject....do u know how to do this with the speedometer?
i love the vw lighting blue and red...i been wanting to do that or something close to it ...
gives a more vibrant feel without the tacky replacement gauges...
any input? plz feel free to start a new thread as i dont intent on starting a new subject here.
i love the vw lighting blue and red...i been wanting to do that or something close to it ...
gives a more vibrant feel without the tacky replacement gauges...
any input? plz feel free to start a new thread as i dont intent on starting a new subject here.

Thread
Thread Starter
Forum
Replies
Last Post
scutmud
8th Generation Maxima (2016-)
110
Aug 16, 2018 10:56 AM
Team STILLEN
Autocrossing and Road Course Racing
0
Aug 10, 2015 04:29 PM