Some pics of a recent project I have been working on (56k beware)
 07-15-2006, 12:00 PM
#1

Some pics of a recent project I have been working on (56k beware)
Well as some of you know I have been working on building another 3rd gen. I bought the car with a blown motor for dirt cheap. It already had some cool things like a RSTB, CAI, FSTB (cheap one but still), sprint springs and Tokico struts.
I took the motor out of my 93 auto and replaced the water pump, rebuilt the VTCs, replaced the exhaust studs (even though none were broke and none broke when I took them out), replaced the knock sensor, replaced all the seals, resealed the oil pan and finally just thouroughly cleaned and painted misc brackets etc. I then cleaned the inside and outside of the trans and painted the outside flat black to match the misc. brackets I painted.
I installed a Stillen AL flywheel, installed a UDP, and installed as Exedy stage1 clutch.
Recently I got a set of ST sways and Intrax springs (will sell the Sprints after I swap them out). for the suspension I also bought new ball joints and all poly bushings (front and rear).
I am sure I am missing some stuff here and there.
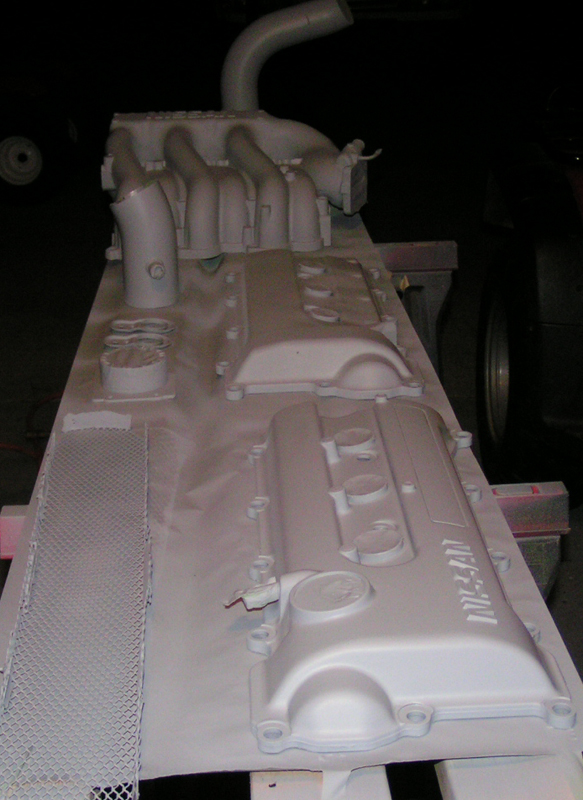
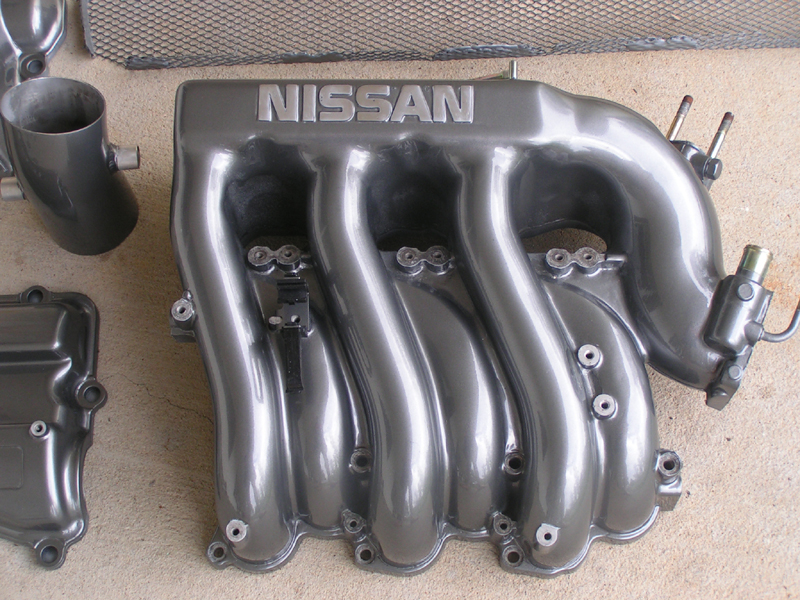
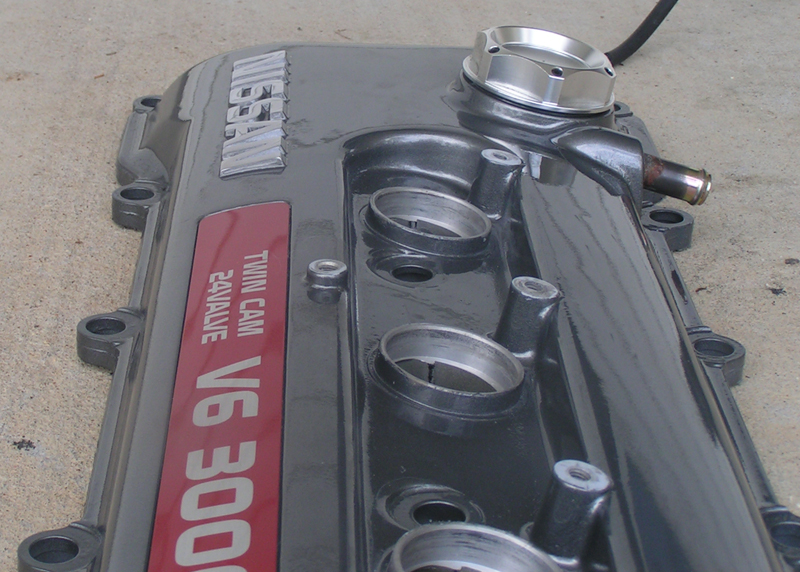
I decided I wanted the motor to look really nice so I decided to smooth the texture off the IM and VC and paint them and now they are perfectly slick. I primed them a while back but just got around to painting all of it.
While I was at it I decided to grind down the casting marks on the top of the upper IM (5 little round marks) and ground the side casting edge on the left side...little things but its that kind of attention to detail I like to do to make things different.
Once I install the motor and get it running I will fix the body and paint it back black (maybe pearl black...not sure yet).
ok on with the pics.
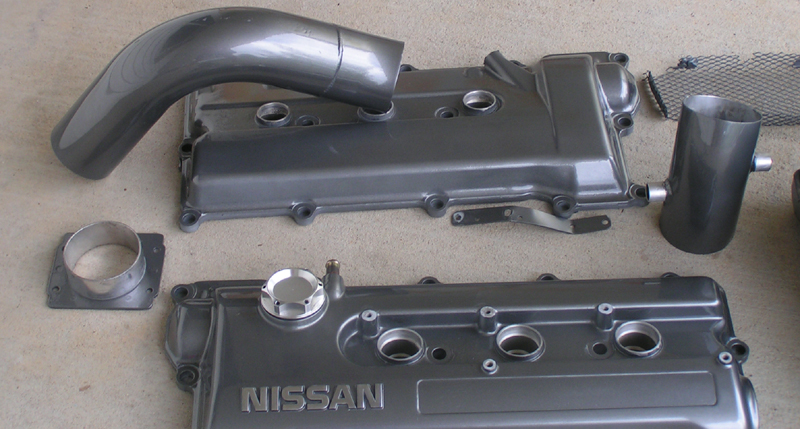
Here they are sitting primed and ready to be sanded:
here are a couple of pre paint pics:
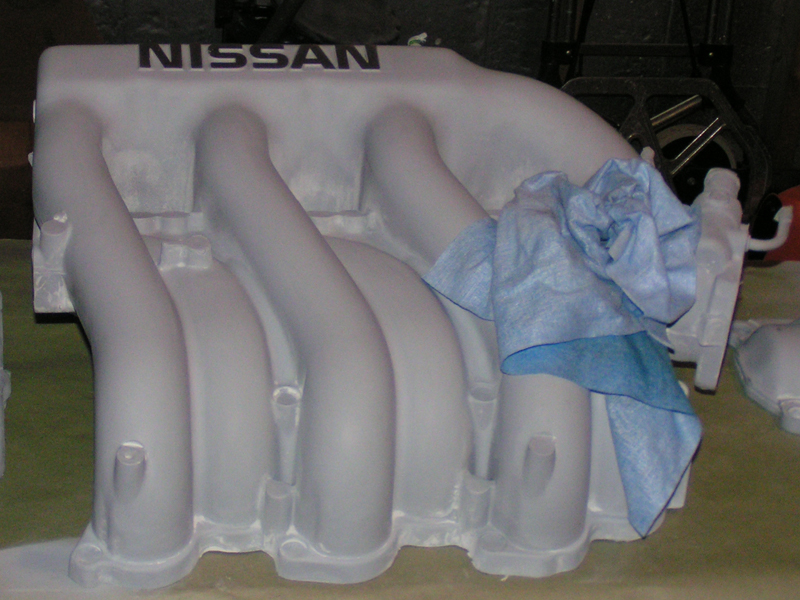
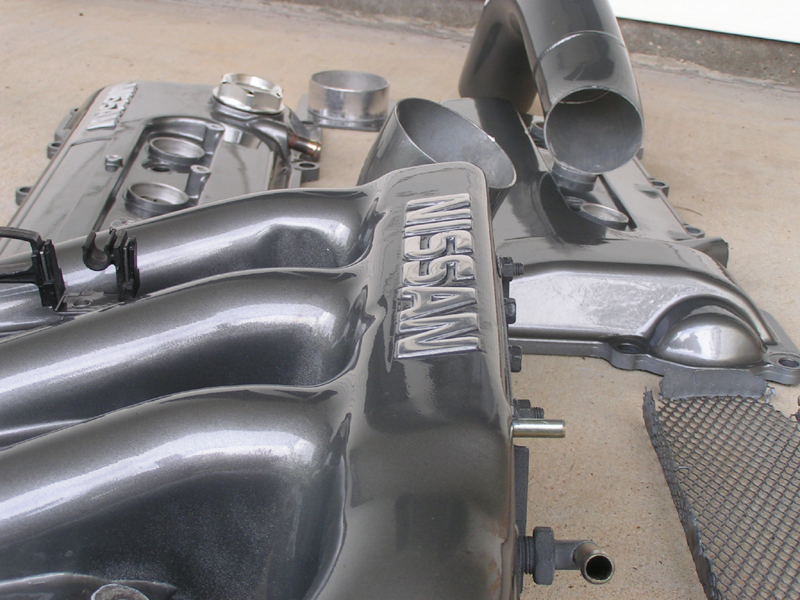
here are some pics after paint and polish (polished NISSAN):
I took the motor out of my 93 auto and replaced the water pump, rebuilt the VTCs, replaced the exhaust studs (even though none were broke and none broke when I took them out), replaced the knock sensor, replaced all the seals, resealed the oil pan and finally just thouroughly cleaned and painted misc brackets etc. I then cleaned the inside and outside of the trans and painted the outside flat black to match the misc. brackets I painted.
I installed a Stillen AL flywheel, installed a UDP, and installed as Exedy stage1 clutch.
Recently I got a set of ST sways and Intrax springs (will sell the Sprints after I swap them out). for the suspension I also bought new ball joints and all poly bushings (front and rear).
I am sure I am missing some stuff here and there.
I decided I wanted the motor to look really nice so I decided to smooth the texture off the IM and VC and paint them and now they are perfectly slick. I primed them a while back but just got around to painting all of it.
While I was at it I decided to grind down the casting marks on the top of the upper IM (5 little round marks) and ground the side casting edge on the left side...little things but its that kind of attention to detail I like to do to make things different.
Once I install the motor and get it running I will fix the body and paint it back black (maybe pearl black...not sure yet).
ok on with the pics.
Here they are sitting primed and ready to be sanded:
here are a couple of pre paint pics:
here are some pics after paint and polish (polished NISSAN):
 07-15-2006, 12:01 PM
#2
here is an angle to show the polished parts a little better:
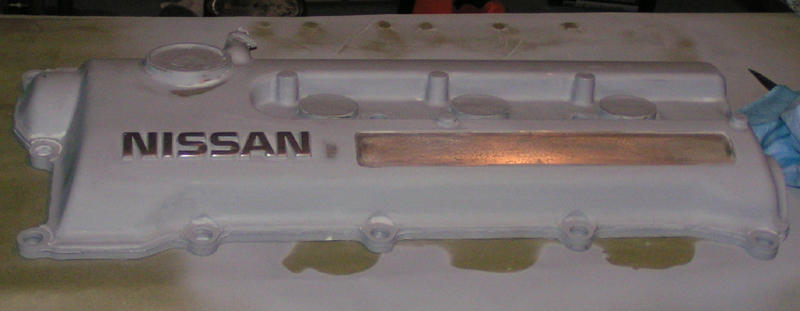
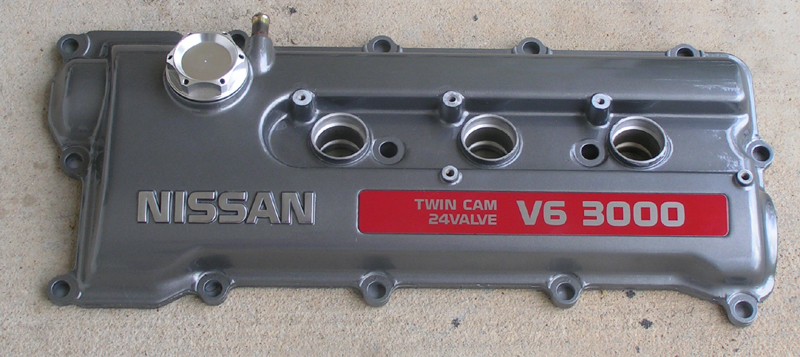
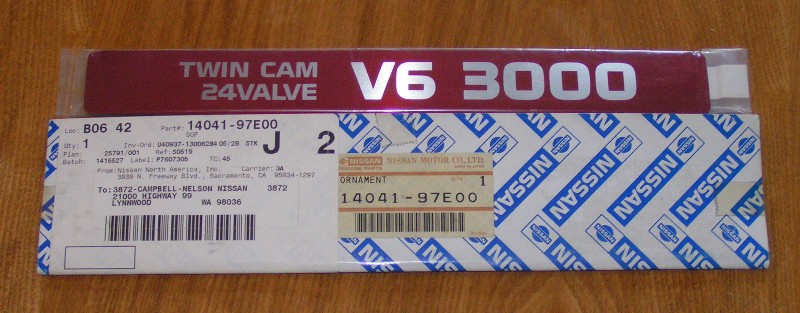
Here is the VC after I installed the new sticker I got for it (took my dealer about two weeks to get it):
There are more pics in this directory if you want to check them out.
I will update with more pics once the motor is in the car.
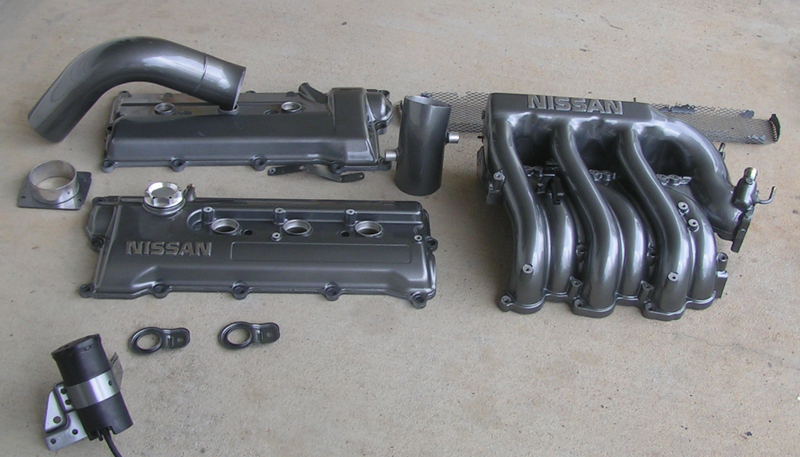
The color is silverstone btw same thing I painted the wheels on my old 92...I would get better pics in direct sunlight but there is none now since its rainy.


 07-15-2006, 04:16 PM
#10
Originally Posted by nubiannupe
Holy buckets, Mike! Good work, as usual. Hey, what brand name is that oil cap. Kinda looks like Nismo, but wasn't sure.
it was a fake nismo cap I got from another orger. I didnt like the fact it was a fake (and you could tell it was) but for the price I liked it better than the original. Then after getting it I figured I could just take the sticker off which is what I did. I like it much better this way.
Originally Posted by MyGreenMax94
What process did you do to get the intake soo smooth?
I used PPG products (primer, base and clear). I love my little touch up gun for this kind of work.
07-15-2006, 04:27 PM
#11
Originally Posted by therealgoon9
Sooo pretty. I'm going to stop using rattle cans and experiment on a detail gun.
What did you use for primer? paint? clear???
What did you use for primer? paint? clear???
throw the rattle can stuff away lol. I can do better with a paint gun for some reason. I start using rattle can stuff and I run it like crazy lol.
I used PPG stuff...their lower line (OMNI) for primer (MP282 high build primer) and base (MBC).
For clear I used PPG's fleet line clear (Delta DCB100).
Its all good stuff and is really reasonable.
for a cheap touch up gun I recommend this little gun from Harbor Freight. Yeah its cheap and if you catch it on sale locally sometimes you can get them for less than $10 but they are a copy of the Iwatta touch up gun and it sprays really well for little stuff. It can really lay down clear slick. I didnt get the VC as slick as I would like because its kind of hard to paint a valve cover and not run it in the valley...the IM is really slick though. Anyway for a cheap touch up gun I recommend that thing...its great and cheap. Just be sure to thouroughly clean it or it will not spray right again.
07-15-2006, 05:03 PM
#14
Originally Posted by therealgoon9
Incredible. I was looking at the other pics, what are you planning on doing with the tranny? I was thinking of doing something with mine while it's out.
I just cleaned it good on the inside and out and painted the outside flat black. Nothing major but the inside of it is really clean. Here is a pic of the inside after I finished it (its in a different directory for some reason). The picture I put in the other directory was an unfinished pic.
I used paint gun cleaner to clean the trans...that stuff worked better than anything I have used for cleaning that stuff. Its tough on hands and eats through gloves though.
07-15-2006, 05:08 PM
#15
Originally Posted by Michael
I just cleaned it good on the inside and out and painted the outside flat black. Nothing major but the inside of it is really clean. Here is a pic of the inside after I finished it (its in a different directory for some reason). The picture I put in the other directory was an unfinished pic.
I used paint gun cleaner to clean the trans...that stuff worked better than anything I have used for cleaning that stuff. Its tough on hands and eats through gloves though.
I used paint gun cleaner to clean the trans...that stuff worked better than anything I have used for cleaning that stuff. Its tough on hands and eats through gloves though.
07-15-2006, 05:08 PM
#16
Originally Posted by MyGreenMax94
Oh...One more thing...The oil cap....Yum..
Where did you get it?
Where did you get it?
I have seen them on ebay for like $5 or so.
07-15-2006, 05:14 PM
#17
Originally Posted by Michael
Ooops..
I guess i should read..
 07-15-2006, 06:13 PM
#20
Originally Posted by Jbr8k
That color on a 3rd gen lowered on silver 18" FTW.
hehe yeah thats why I bought that quart a while back. I was going to paint my old 93 that color but then I got the 92 5spd and never painted anything that color except a couple of sets of wheels and now these engine parts.


 07-17-2006, 06:58 AM
#24
Originally Posted by Hectic
doesn't that pervis guy have it now?
Originally Posted by tripleGmax
what are you doing with the lights? hid? or just projectors?
They are USDM lights with E36 projectors in them. I got the projectors from a set of E36 lights that were cut up pretty bad and not really usable so I decided to move them over to the USDM lights.

 07-17-2006, 11:33 AM
#26
can that paint withstand some high temps?
IMO should've went with powdercoat...but looks nice.
PPG OMNI...c'mon man...we gotta get you up to the DBC mid coats.
i might have to break open the paint cans again to touch up parts off a 68 Camaro.
oh and you missed a few spots with the clear..
IMO should've went with powdercoat...but looks nice.
PPG OMNI...c'mon man...we gotta get you up to the DBC mid coats.
i might have to break open the paint cans again to touch up parts off a 68 Camaro.
oh and you missed a few spots with the clear..
07-17-2006, 03:11 PM
#27
Originally Posted by DanNY
can that paint withstand some high temps?
IMO should've went with powdercoat...but looks nice.
PPG OMNI...c'mon man...we gotta get you up to the DBC mid coats.
i might have to break open the paint cans again to touch up parts off a 68 Camaro.
oh and you missed a few spots with the clear..
IMO should've went with powdercoat...but looks nice.
PPG OMNI...c'mon man...we gotta get you up to the DBC mid coats.
i might have to break open the paint cans again to touch up parts off a 68 Camaro.
oh and you missed a few spots with the clear..
I dont have a powdercoat set up and am too cheap to pay to have it done.
Why in the world would I use DBC on this kind of stuff...MBC is just fine and is actually a very good base at half the price. Its held up quite well on my wheels (old VE and my Jeep).
yeah you need to do some painting...you will get rusty
.I missed no spots with the clear
 ...there are some spots in the coil tunnels (in the top of the IM) that may look it but its not. Its just that I didnt prime and sand taht area very well...mainly because its covered up with the coil packs.
now go play with your chrome/polished/turbo VG
 07-17-2006, 04:56 PM
#29
Originally Posted by SurraTT
do you happen to have the part # for the sticker?? the goof ***** at my dealer dont know wtf it is
Thats why I look up my own part number on FAST and just give it to the parts guy which is what I did for this.
Here:

 love it

 07-17-2006, 05:20 PM
#34
nissan FAST is what the Nissan parts guys use to find parts. It takes a little while to get used to it but once you do you can find anything you want on it. They can too if they know how to use it.
I downloaded it from that g20 site that has online FSMs...I will try to find the link later.
I downloaded it from that g20 site that has online FSMs...I will try to find the link later.
07-17-2006, 05:38 PM
#35
07-17-2006, 05:43 PM
#36
Originally Posted by Michael
Good man rep +1
07-18-2006, 05:16 AM
#39
Originally Posted by Duckman540i
Very Nice Work! Also, how much was the sticker for?
Locally my dealer charged around $18 or so with tax. I think nissanparts wanted $10 and $8 shipping so it came out the same.
07-18-2006, 10:28 AM
#40
Senior Member

Join Date: Jul 2003
Posts: 156
Originally Posted by Michael
nissan FAST is what the Nissan parts guys use to find parts. It takes a little while to get used to it but once you do you can find anything you want on it. They can too if they know how to use it.
I downloaded it from that g20 site that has online FSMs...I will try to find the link later.
I downloaded it from that g20 site that has online FSMs...I will try to find the link later.
installed FAST, seems to be missing our 3rd gens...and I can't get VINs to link...is there a trick?