
Idea for heat shield


Idea for heat shield
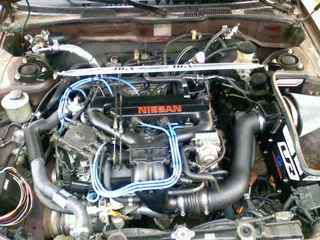
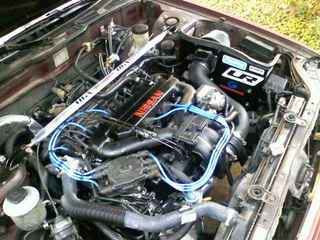
Idk if anyone has done this with a 4th Gen or not...searched but found nada... so Im tired of having heat soak, but ive played around with the rest of the intakes and i may be one of the few that like the hybrid franken and cone filter WAI setup...so i plan on trying a heat shield tomorrow...if anyone is interested i may do a small write up how to and review.
i bought a roll of 14 gauge aluminum, 15ft of insulated tape that is 1/8" thick and 3 feet of weather stripping... im going to make a box with an open top for the cone filter... any feed back thus far or am i wasting my time?
btw...i dont wanna hear which intake setup you think better
i bought a roll of 14 gauge aluminum, 15ft of insulated tape that is 1/8" thick and 3 feet of weather stripping... im going to make a box with an open top for the cone filter... any feed back thus far or am i wasting my time?
btw...i dont wanna hear which intake setup you think better


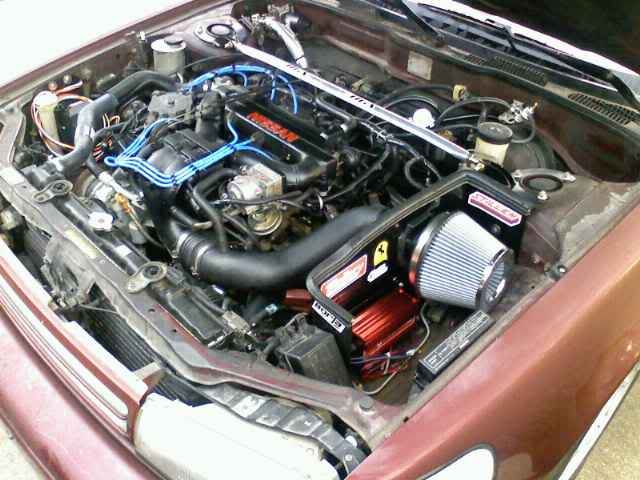
It Be done
This is a write of a "how to" Aluminum heat shield instead of those POS ebay shield and w/e ghetto idea comes up.
THIS IS FOR EDUCATIONAL PURPOSES ONLY I AM NOT RESPONSIBLE FOR ANY THING YOU SCREW UP! WARNING THE ALUMINUM USED IN THIS IS EXTREMELY SHARP HANDLE WITH CARE! AGAIN I AM NOT RESPONSIBLE.
^hard to screw this up anyways though.
Materials needed:
A 10" by at least 3ft of 14 gauge aluminum
Weather stripping
Metal screws
a cardboard template
and 1/8 in thick insulated tape
All of these materials can be purchased at the Home Depot.
Recommended ...Not necessary but would help you
Scissors
a drill
gloves
and a sharpie
Now to Begin
1. Gather the materials needed.

2. Take the Cardboard template and a sharpie, and fold it so it fits your particular setup. Then trace it out with the sharpie.

3. Cut out the template and cut a sheet of aluminum to match up with the template and cut it out...
4. Once it is cut (dont forget a hole for the MAF and Intake ) use the metal screws to fasten it to the weather stripping (i used garage door seal)

5. Once that is complete test fit it again to make sure everything is good and you clear the hood...which with 10" it should line up just right.
6. Take the insulated tape and put it across the aluminum.

7. Fit it to your car and you all done!

My first thought about this is it looks sick and dresses up the engine bay. I went for a quick drive and although i didnt have a thermometer to measure the temps i could feel it... After a 15 minute drive the filter was still relatively cool for a WAI...gotta also remember im in FL where it is about 95 degrees outside and a crap load of humidity. However, this heat shield greatly reduced the heat soak of the normal open element filter in the bay.
Thanks guys let me know what you think!
THIS IS FOR EDUCATIONAL PURPOSES ONLY I AM NOT RESPONSIBLE FOR ANY THING YOU SCREW UP! WARNING THE ALUMINUM USED IN THIS IS EXTREMELY SHARP HANDLE WITH CARE! AGAIN I AM NOT RESPONSIBLE.
^hard to screw this up anyways though.
Materials needed:
A 10" by at least 3ft of 14 gauge aluminum
Weather stripping
Metal screws
a cardboard template
and 1/8 in thick insulated tape
All of these materials can be purchased at the Home Depot.
Recommended ...Not necessary but would help you
Scissors
a drill
gloves
and a sharpie
Now to Begin
1. Gather the materials needed.
2. Take the Cardboard template and a sharpie, and fold it so it fits your particular setup. Then trace it out with the sharpie.
3. Cut out the template and cut a sheet of aluminum to match up with the template and cut it out...
4. Once it is cut (dont forget a hole for the MAF and Intake ) use the metal screws to fasten it to the weather stripping (i used garage door seal)
5. Once that is complete test fit it again to make sure everything is good and you clear the hood...which with 10" it should line up just right.
6. Take the insulated tape and put it across the aluminum.
7. Fit it to your car and you all done!
My first thought about this is it looks sick and dresses up the engine bay. I went for a quick drive and although i didnt have a thermometer to measure the temps i could feel it... After a 15 minute drive the filter was still relatively cool for a WAI...gotta also remember im in FL where it is about 95 degrees outside and a crap load of humidity. However, this heat shield greatly reduced the heat soak of the normal open element filter in the bay.
Thanks guys let me know what you think!


I'm sorry to be the one to tell you this but no matter what intake you choose over stock all your doing is making noise and hurting your performance. If your concerned with heat soak then you need to look at your cooling system. Your intake has nothing to do with heat soak.
Not gonna argue with you Joe or say your wrong. This is my setup and i just happen to like it a bit better than stock, its just my opinion and it is a bit more effective than a filter in an open bay...and by heat soak i mean the filter just sucking up hot air from the radiator fans, which the shield seems to stop a lot of, and besides, it kinda dresses up the engine

Thank you lol... yeah i was thinking about that but I wasn't sure.. the stuff i used to make my shield is pretty sturdy and heat resistant. I would've just done a CAI, but in florida...with some of the Sh*t we have to drive through, especially during hurricane season...i was a little hesitant, but i love this set up..not as much power as stock at low end, but a bit better than a WAI with now shield, and high power is quite noticeable, i do a lot of highway driving so im always about 3k rpms or over.


Last edited by CMax03; Dec 29, 2010 at 09:10 PM.
 ..
..


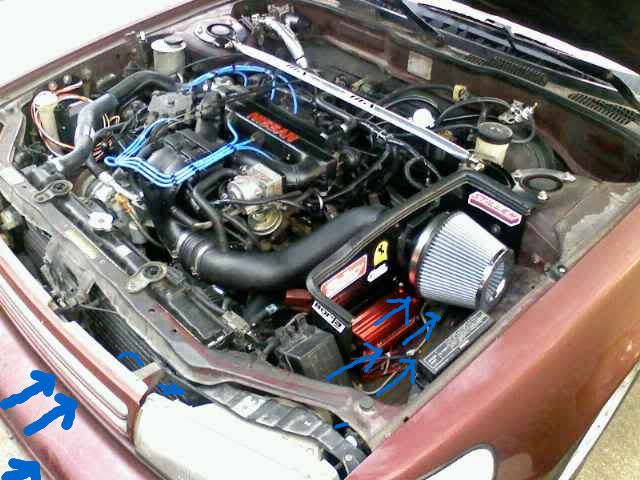
I would think that that heat shield, plus, somehow, extend it out to beyond the fuse and relay box, where the fender side duct is located, take off the wheel wall not the side wall, but the entire driver's side wheel wall) to allow for an unlimited amount of cool air in, though I don't know how much air could travel through the 4x2.5" oval opening...  but that's just what I was thinking of doing after creating the heat shield.
Could this really be safe? I mean, it's basically what I am thinking of doing, but just by using the "factory" hole in where the electrical cables swoop in from.
but that's just what I was thinking of doing after creating the heat shield. I mean, it's basically what I am thinking of doing, but just by using the "factory" hole in where the electrical cables swoop in from.


Thread
Thread Starter
Forum
Replies
Last Post
tarun900
4th Generation Maxima (1995-1999)
19
Dec 20, 2021 06:57 PM