
Tips on inner timing cover o-ring replacement


Thread Starter
Member
Joined: Jun 2014
Posts: 146
From: Anaheim, CA
Tips on inner timing cover o-ring replacement
Dear forumites,
Due to landlord pressure, I must now fix the oil leaks on my Maxima (that I was hoping to postpone indefinitely).
I believe I have a leak from the inner timing cover O-rings (I have oil dripping from all over the passenger side of the engine, including the AC compressor), a very small leak from rear main seal area (hopefully just a halfmoon seal), and a motor oil leak appearing at the PS, keeping the suspension bushings well "lubricated". I can't see any rear valve cover leak, so I imagine the PS oil leak originates where the inner timing cover meets the rear head area. I hope to fix all these leaks doing the inner timing cover O-rings ordeal.
The Maxima is 1997 GXE auto with 153k miles. No cooling issues to speak of; as for rattles, it did make a short cold start groan consistently when I bought it (at 114k), but rarely does now.
I will only have one weekend in a friend's garage to do this, I'll need all the parts ready; please look at the parts list at the end of the post.
Please help with tips and a link to that elusive how-to:
Procedure:
relieve fuel pressure (remove gas gap, fuel pump fuse, start engine)
remove Y-pipe (first try while hot)
liquid wrench
remove drive belt
loosen crank pulley bolt (mark bolt to pulley position)
disconnect battery
drain oil
remove dipstick (replace with plug)
remove Y-pipe (second try)
remove Crank Pos sensors
remove Oil Pres sensor
remove steel oil pan
remove oil strainer
support tranny with floor jack
remove crossmember
remove PS belt
remove PS pump
remove AC
remove alternator
drain coolant from radiator
remove cover plate
remove upper oil pan
reinstall crossmember
remove Camshaft Pos sensor
remove passenger motor mount
get to TDC
remove outer timing cover
mark position of chain and sprockets with nail polish
drain more coolant?
remove intake manifold collector
remove chain tensioner and guides
remove chain
remove valve covers
remove the 2 main sprockets
remove water pump (will I get coolant where oil should be)
remove inner timing cover (mark 17 short bolts and 8 long bolts)
replace inner timing cover O-rings
try not to screw up the elaborate RTV pattern described in the FSM (will use permatex grey)
...
reuse waterpump if blades seem ok (replace the 2 O-rings)
...
Questions:
For the timing cover I will use permatex ultra grey; how much do I need? I've seen no mentions on this forum about letting the RTV cure for an hour before final tightening like the instructions say, do you torque it all the way form the get go?
What RTV do I use to glue the halfmoon seals in place?
I've seen people say to use black RTV for the corners of the valve covers and not grey (do you use RTV on both sides of the gasket?). Same story with the steel oil pan; why? I see there is a gasket available for the steel pan, thoughts?
Regarding the intake manifols colector, why did Nissan decide to cool it? What length and ID hose do I need for bypassing?
Are there any coolant hoses on the back of the engine that I should replace at this point? I've had failures on coolant hoses exposed to motor oil.
I'm not sure if a need a new tensioner and guide, part suggestions please?
Do the other 2 chain guides ever go bad?
I've seen this mentioned: "A new ring for your hidden oil drain plug" but have no idea what it is.
Do I need to replace the Y-pipe gaskets?
Do I need to remove the passenger axle?
Would I have access to replace the steering rack bushings with the stuff removed for this job?
Do I have to remove the sparkplugs for removing the valve covers?
Parts:
O-rings for inner timing cover
coolant hose for bypassing UIM?
oil pump O-rings
half moon seals
crank seal
water pump seals
RTV
EGR gaskets
UIM gasket
valve cover gaskets
TB gasket

These are all common areas for leaks. I would have the engine pressure washed and cleaned good first. Get you a master gasket set. And go in. Ultra grey works well. I usually let it sit for 10 mins or so tighten down. P/S line leak and pump seal failure are common also. The timing components don't fail. However if your going in that far. Replacement of the guides, tensioner and water pump orings wouldn't be a bad idea either. You had a long post with many questions I'll try to answer..Leaks sucks.

Senior Member
Joined: Jan 2011
Posts: 3,037
From: Central AR
Here's my response to your questions below.
You�ve definitely got things organized and you are doing your homework. However, I am concerned about the weekend you have to work in a garage to do this job.
I�ve done various parts of this job multiple times, and it would take me a few weekends to get through it all. I hope you have plenty of help.
I�m answering your questions online below. Note this is all based on my past experience and opinions. Some may vary from the FSM.
Dear forumites,
Due to landlord pressure, I must now fix the oil leaks on my Maxima (that I was hoping to postpone indefinitely).
I believe I have a leak from the inner timing cover O-rings (I have oil dripping from all over the passenger side of the engine, including the AC compressor), a very small leak from rear main seal area (hopefully just a halfmoon seal), and a motor oil leak appearing at the PS, keeping the suspension bushings well "lubricated". I can't see any rear valve cover leak, so I imagine the PS oil leak originates where the inner timing cover meets the rear head area. I hope to fix all these leaks doing the inner timing cover O-rings ordeal.
The Maxima is 1997 GXE auto with 153k miles. No cooling issues to speak of; as for rattles, it did make a short cold start groan consistently when I bought it (at 114k), but rarely does now.
I will only have one weekend in a friend's garage to do this, I'll need all the parts ready; please look at the parts list at the end of the post.
Procedure:
relieve fuel pressure (remove gas gap, fuel pump fuse, start engine)
Yes.
remove Y-pipe (first try while hot)
See this thread.
https://maxima.org/forums/4th-genera...oval-tips.html
And this thread about the u-joint that is helpful.
https://maxima.org/forums/4th-genera...-question.html
liquid wrench � I use PBlaster
remove drive belt.
Ok.
loosen crank pulley bolt (mark bolt to pulley position) �
I use a torque wrench when reinstalling the crank pulley bolt. Refer to the FSM in my signature link below for the proper specs.
The crankshaft has a key for alignment to the pulley. It only goes on one way.
See following thread and link within that thread.
https://maxima.org/forums/4th-genera...-troubles.html
Timing Cover Removal Tip
https://maxima.org/forums/4th-genera...moval-tip.html
disconnect battery
drain oil
remove dipstick (replace with plug)
remove Y-pipe (second try)
remove Crank Pos sensors
remove Oil Pres sensor
remove steel oil pan
remove oil strainer
support tranny with floor jack
remove crossmember
remove PS belt
remove PS pump
remove AC
No need to depressurize A/C system.
remove alternator
drain coolant from radiator
remove cover plate
remove upper oil pan
reinstall crossmember
remove Camshaft Pos sensor
remove passenger motor mount
get to TDC - ABSOLUTELY
remove outer timing cover
mark position of chain and sprockets with nail polish
drain more coolant?
remove intake manifold collector
remove chain tensioner and guides
remove chain
remove valve covers
remove the 2 main sprockets
remove water pump (will I get coolant where oil should be)
remove inner timing cover (mark 17 short bolts and 8 long bolts)
replace inner timing cover O-rings
try not to screw up the elaborate RTV pattern described in the FSM (will use permatex grey)
...
reuse waterpump if blades seem ok (replace the 2 O-rings)
...
Questions:
For the timing cover I will use permatex ultra grey; how much do I need? I've seen no mentions on this forum about letting the RTV cure for an hour before final tightening like the instructions say, do you torque it all the way form the get go?
Never hurts to follow product usage directions.
I usually take up 10 to 15 minutes after I apply RTV before I get the part into position where it makes contact.
What RTV do I use to glue the halfmoon seals in place? I use Permatex Black on metal to rubber applications. Permatex grey is for high torque applications like metal to metal.
I've seen people say to use black RTV for the corners of the valve covers and not grey (do you use RTV on both sides of the gasket?). Same story with the steel oil pan; why? I see there is a gasket available for the steel pan, thoughts?
I apply Permatex black to the gasket corners as prescribed in the FSM.
Regarding the intake manifols colector, why did Nissan decide to cool it? No idea.. What length and ID hose do I need for bypassing?
I have it bypassed on the most recent pair (2) of my 4th gens. I will continue to bypass it if I do get yet another 4th gen.
I take it this is the EGR bypass?
Personally, I use 5/16 Thermoid brand SAE J1019 �high pressure � 217 psi� transmission oil cooler hose that is rated at 400 F for the EGR u-hose bypass. I�ve been running it for well over 5 years now. It works great for transmission cooler hose as well. So I only need to keep that one kind of hose in stock for non-fuel applications. Yeah know it�s expensive and overkill. But I like heavy duty hoses when I can find them.
Are there any coolant hoses on the back of the engine that I should replace at this point? I've had failures on coolant hoses exposed to motor oil.
While I have the UIM removed, I usually replace heater hoses because it makes it easier. I like to use Goodyear hoses and belts when I can get them.
I'm not sure if a need a new tensioner and guide, part suggestions please?
Check out tensioner and guide part numbers prices at a site like www.courtesyparts.com.
On my last TC removal job, on a 95 model engine with 78,000 miles, I decided not to replace the tensioner because of the low mileage. Today at 115,000 miles, I wish I had replaced them because the tensioner allows the chain to rattle on cold startup.
Do the other 2 chain guides ever go bad? I�m sure it is possible, but I haven�t seen many occurrences of the inner guides failing. Only a visual inspection can determine this. The main thing is the tensioner design changed a few years ago that requires a new guide design. Otherwise, I would have just replaced the tensioner on my last TC job.
I've seen this mentioned: "A new ring for your hidden oil drain plug" but have no idea what it is.
Not sure what that is either. There are two o-rings on the upper oil pan that should be replaced when it is removed and reinstalled.
Do I need to replace the Y-pipe gaskets?
I would replace them to keep from having post installation issues.
Do I need to remove the passenger axle?
Check out the upper oil pan removal threads. I may have removed mine, but for other reasons that I cannot remember.
Would I have access to replace the steering rack bushings with the stuff removed for this job?
I plan to replace my rack bushings when I remove the y-pipe later this year. It definitely makes rack bushing replacement easy when you have the all of the other stuff removed.
Do I have to remove the sparkplugs for removing the valve covers?
The spark plugs are in the VC tubes. So not necessary.
Parts:
O-rings for inner timing cover
check with www.courtesyparts.com for OEM parts. It is good to establish a relationship with an OEM supplier that you can call and get information while you prepare your order.
coolant hose for bypassing UIM? Noted above.
oil pump O-rings . OEM noted above.
half moon seals � I use FelPro that comes in a kit with other gaskets.
crank seal � I use OEM or National brand seals only and interchangeably. National and FelPro are both owned by Federal Mogul which is a Nissan Just-In-Time manufacturing supply partner.
water pump seals � OEM in most cases unless FelPro or National comes with a larger gasket kit.
RTV � On a big job like TC and UOP I buy a large tube of Permatex Grey and a caulk gun for dispensing it.
Since you have done your homework on Permatex RTV products, I know you have read which products should be used on �high torque� metal to metal applications like the TC, UOP, and LOP. I can trim the tube tip to dispense a fine bead. The large caulk gun lets me quickly apply the RTV with better control than a smaller tube.
As for �low torque� metal to rubber applications, I know you have done your homework there too. If I remember correctly, the last FelPro half-moon gasket kit came with a small tube of Permatex Black (or equivalent). So I used the RTV that came with the kit and didn�t experience any problems. I�ve had best luck using Permatex Black for �low torque� applications that require a �high level of oil resistance�. I recently removed a leaking valve cover and saw here using the wrong Permatex product resulted in leaks in the corners. It held up ok for a few years. But somewhere between 5 to 6 years later, leaks started in location where I used the wrong product. I guess it all depends on how long you plan to keep the car and your tolerance for leaks 5+ years later.
Take a look at some of my VC pictures on the 1998 model section below and let me know have any questions.
EGR gaskets � FelPro � Be sure to note there are different shaped EGR gaskets for the UIM versus the EGR assembly. See my post in this thread about removing the EGR mounting assembly and especially the 14 mm bolts that are under the assembly. Understanding the role of the 14 mm bolts that are under the mounting assembly and when to remove then can save you some time and avoiding extra work when it comes to the EGR tube nut that sits behind the EGR pipe.
https://maxima.org/forums/4th-genera...ths-p0300.html
UIM gasket � I usually get a FelPro kit that contains them.
valve cover gaskets - I usually get a FelPro kit that contains them.
TB gasket � I use FelPro or OEM interchangeably. If you lived near me, I have some extras that I would give you. I keep a plastic Ziploc bag with an assortment of extra gaskets and seals on hand for when I need one. It saves waiting for order parts to arrive when I start a big job.
If you would like to take the time to browse through my PhotoBucket pages to see pictures of my past 4th gen projects, you can visit the links below.
1998 Maxima Projects
http://s286.photobucket.com/user/Rid...?sort=4&page=1
1999 Maxima Projects
http://s286.photobucket.com/user/Rid...?sort=4&page=1
Let me know if you have any questions.
Last edited by CS_AR; Jan 28, 2017 at 06:49 AM.

Senior Member
Joined: Mar 2014
Posts: 633
From: Planet Houston
Doing all that work in a weekend is a real hard road. Look at the time it's supposed to take by the book - that's how long it takes a "professional". Better check if you can take a personal day on Monday and Tuesday if this is your only transportation.
Has the Upper Oil Pan ever been serviced? You're doing all that work to service the Timing Cover, you MIGHTASWELL do the UOP as well. You're going to hate yourself if you get that all buttoned back up and the O-Rings in the UOP are leaking.
Similarly would not recommend re-using original 20 year old water pump. Not sure what best brand of water pump is but I'd put all my pennies toward it.
You briefly mentioned power steering leaks. If your landlord is hassling you about leaks, be advised that if you're leaking PS fluid now your PS hoses are still going to leak even after you correct whatever ENGINE oil leaks you have now.
The PS hoses fail due to age/use - also from having leaking engine oil sloshed on them and cooking them. Once you replace one leaking hose, the pressure moves to the next weakest link in the chain...I ended up replacing every hose in the PS system at once. It is expensive. You could conceivably replace leaking PS hoses later after you get the engine buttoned back up without re-doing your engine sealing work.

Junior Member
Joined: Jan 2016
Posts: 53
Im having some trouble finding the o-rings at question here, could anybody clarify and let me know what this leak in particular looks like. I have a really bad leak that drips right on top of the oil pressure sensor, Im wondering if thats it or not.
Thread Starter
Member
Joined: Jun 2014
Posts: 146
From: Anaheim, CA
re
It's never to late to reply... Thanks for your reply!
I did some washing on the engine so when I work on it I'll have less crap falling on the timing chain and what not.
I did some washing on the engine so when I work on it I'll have less crap falling on the timing chain and what not.
These are all common areas for leaks. I would have the engine pressure washed and cleaned good first. Get you a master gasket set. And go in. Ultra grey works well. I usually let it sit for 10 mins or so tighten down. P/S line leak and pump seal failure are common also. The timing components don't fail. However if your going in that far. Replacement of the guides, tensioner and water pump orings wouldn't be a bad idea either. You had a long post with many questions I'll try to answer..Leaks sucks.
Thread Starter
Member
Joined: Jun 2014
Posts: 146
From: Anaheim, CA
Thanks
Many thanks for answering the questions CS_AR, you are so helpful!
I have bought a 1/2in u-joint, no air tools unfortunately.
I've bought 5/16in heater hose, it was hard to find, eventually found it at NAPA.
I've ordered the Gates heater hoses and hose between the metal pipes. The old ones don't look bad, I hope I don't break the heater core plastic tubes and regret messing with them.
I've sourced a caulk gun, and bought the big tube, thanks.
For the EGR, is there a gasket between the mounting assembly and the block?
For the half-moon seals, do you RTV them right when re-installing the UOP? Will they stay in place as you attach the UOP?
I received my ebay crank pulley, it is different than what you got (photos attached).
Here's my response to your questions below.
You�ve definitely got things organized and you are doing your homework. However, I am concerned about the weekend you have to work in a garage to do this job.
I�ve done various parts of this job multiple times, and it would take me a few weekends to get through it all. I hope you have plenty of help.
I�m answering your questions online below. Note this is all based on my past experience and opinions. Some may vary from the FSM.
Dear forumites,
Due to landlord pressure, I must now fix the oil leaks on my Maxima (that I was hoping to postpone indefinitely).
I believe I have a leak from the inner timing cover O-rings (I have oil dripping from all over the passenger side of the engine, including the AC compressor), a very small leak from rear main seal area (hopefully just a halfmoon seal), and a motor oil leak appearing at the PS, keeping the suspension bushings well "lubricated". I can't see any rear valve cover leak, so I imagine the PS oil leak originates where the inner timing cover meets the rear head area. I hope to fix all these leaks doing the inner timing cover O-rings ordeal.
The Maxima is 1997 GXE auto with 153k miles. No cooling issues to speak of; as for rattles, it did make a short cold start groan consistently when I bought it (at 114k), but rarely does now.
I will only have one weekend in a friend's garage to do this, I'll need all the parts ready; please look at the parts list at the end of the post.
Procedure:
relieve fuel pressure (remove gas gap, fuel pump fuse, start engine)
Yes.
remove Y-pipe (first try while hot)
See this thread.
https://maxima.org/forums/4th-genera...oval-tips.html
And this thread about the u-joint that is helpful.
https://maxima.org/forums/4th-genera...-question.html
liquid wrench � I use PBlaster
remove drive belt.
Ok.
loosen crank pulley bolt (mark bolt to pulley position) �
I use a torque wrench when reinstalling the crank pulley bolt. Refer to the FSM in my signature link below for the proper specs.
The crankshaft has a key for alignment to the pulley. It only goes on one way.
See following thread and link within that thread.
https://maxima.org/forums/4th-genera...-troubles.html
Timing Cover Removal Tip
https://maxima.org/forums/4th-genera...moval-tip.html
disconnect battery
drain oil
remove dipstick (replace with plug)
remove Y-pipe (second try)
remove Crank Pos sensors
remove Oil Pres sensor
remove steel oil pan
remove oil strainer
support tranny with floor jack
remove crossmember
remove PS belt
remove PS pump
remove AC
No need to depressurize A/C system.
remove alternator
drain coolant from radiator
remove cover plate
remove upper oil pan
reinstall crossmember
remove Camshaft Pos sensor
remove passenger motor mount
get to TDC - ABSOLUTELY
remove outer timing cover
mark position of chain and sprockets with nail polish
drain more coolant?
remove intake manifold collector
remove chain tensioner and guides
remove chain
remove valve covers
remove the 2 main sprockets
remove water pump (will I get coolant where oil should be)
remove inner timing cover (mark 17 short bolts and 8 long bolts)
replace inner timing cover O-rings
try not to screw up the elaborate RTV pattern described in the FSM (will use permatex grey)
...
reuse waterpump if blades seem ok (replace the 2 O-rings)
...
Questions:
For the timing cover I will use permatex ultra grey; how much do I need? I've seen no mentions on this forum about letting the RTV cure for an hour before final tightening like the instructions say, do you torque it all the way form the get go?
Never hurts to follow product usage directions.
I usually take up 10 to 15 minutes after I apply RTV before I get the part into position where it makes contact.
What RTV do I use to glue the halfmoon seals in place? I use Permatex Black on metal to rubber applications. Permatex grey is for high torque applications like metal to metal.
I've seen people say to use black RTV for the corners of the valve covers and not grey (do you use RTV on both sides of the gasket?). Same story with the steel oil pan; why? I see there is a gasket available for the steel pan, thoughts?
I apply Permatex black to the gasket corners as prescribed in the FSM.
Regarding the intake manifols colector, why did Nissan decide to cool it? No idea.. What length and ID hose do I need for bypassing?
I have it bypassed on the most recent pair (2) of my 4th gens. I will continue to bypass it if I do get yet another 4th gen.
I take it this is the EGR bypass?
Personally, I use 5/16 Thermoid brand SAE J1019 �high pressure � 217 psi� transmission oil cooler hose that is rated at 400 F for the EGR u-hose bypass. I�ve been running it for well over 5 years now. It works great for transmission cooler hose as well. So I only need to keep that one kind of hose in stock for non-fuel applications. Yeah know it�s expensive and overkill. But I like heavy duty hoses when I can find them.
Are there any coolant hoses on the back of the engine that I should replace at this point? I've had failures on coolant hoses exposed to motor oil.
While I have the UIM removed, I usually replace heater hoses because it makes it easier. I like to use Goodyear hoses and belts when I can get them.
I'm not sure if a need a new tensioner and guide, part suggestions please?
Check out tensioner and guide part numbers prices at a site like www.courtesyparts.com.
On my last TC removal job, on a 95 model engine with 78,000 miles, I decided not to replace the tensioner because of the low mileage. Today at 115,000 miles, I wish I had replaced them because the tensioner allows the chain to rattle on cold startup.
Do the other 2 chain guides ever go bad? I�m sure it is possible, but I haven�t seen many occurrences of the inner guides failing. Only a visual inspection can determine this. The main thing is the tensioner design changed a few years ago that requires a new guide design. Otherwise, I would have just replaced the tensioner on my last TC job.
I've seen this mentioned: "A new ring for your hidden oil drain plug" but have no idea what it is.
Not sure what that is either. There are two o-rings on the upper oil pan that should be replaced when it is removed and reinstalled.
Do I need to replace the Y-pipe gaskets?
I would replace them to keep from having post installation issues.
Do I need to remove the passenger axle?
Check out the upper oil pan removal threads. I may have removed mine, but for other reasons that I cannot remember.
Would I have access to replace the steering rack bushings with the stuff removed for this job?
I plan to replace my rack bushings when I remove the y-pipe later this year. It definitely makes rack bushing replacement easy when you have the all of the other stuff removed.
Do I have to remove the sparkplugs for removing the valve covers?
The spark plugs are in the VC tubes. So not necessary.
Parts:
O-rings for inner timing cover
check with www.courtesyparts.com for OEM parts. It is good to establish a relationship with an OEM supplier that you can call and get information while you prepare your order.
coolant hose for bypassing UIM? Noted above.
oil pump O-rings . OEM noted above.
half moon seals � I use FelPro that comes in a kit with other gaskets.
crank seal � I use OEM or National brand seals only and interchangeably. National and FelPro are both owned by Federal Mogul which is a Nissan Just-In-Time manufacturing supply partner.
water pump seals � OEM in most cases unless FelPro or National comes with a larger gasket kit.
RTV � On a big job like TC and UOP I buy a large tube of Permatex Grey and a caulk gun for dispensing it.
Since you have done your homework on Permatex RTV products, I know you have read which products should be used on �high torque� metal to metal applications like the TC, UOP, and LOP. I can trim the tube tip to dispense a fine bead. The large caulk gun lets me quickly apply the RTV with better control than a smaller tube.
As for �low torque� metal to rubber applications, I know you have done your homework there too. If I remember correctly, the last FelPro half-moon gasket kit came with a small tube of Permatex Black (or equivalent). So I used the RTV that came with the kit and didn�t experience any problems. I�ve had best luck using Permatex Black for �low torque� applications that require a �high level of oil resistance�. I recently removed a leaking valve cover and saw here using the wrong Permatex product resulted in leaks in the corners. It held up ok for a few years. But somewhere between 5 to 6 years later, leaks started in location where I used the wrong product. I guess it all depends on how long you plan to keep the car and your tolerance for leaks 5+ years later.
Take a look at some of my VC pictures on the 1998 model section below and let me know have any questions.
EGR gaskets � FelPro � Be sure to note there are different shaped EGR gaskets for the UIM versus the EGR assembly. See my post in this thread about removing the EGR mounting assembly and especially the 14 mm bolts that are under the assembly. Understanding the role of the 14 mm bolts that are under the mounting assembly and when to remove then can save you some time and avoiding extra work when it comes to the EGR tube nut that sits behind the EGR pipe.
https://maxima.org/forums/4th-genera...ths-p0300.html
UIM gasket � I usually get a FelPro kit that contains them.
valve cover gaskets - I usually get a FelPro kit that contains them.
TB gasket � I use FelPro or OEM interchangeably. If you lived near me, I have some extras that I would give you. I keep a plastic Ziploc bag with an assortment of extra gaskets and seals on hand for when I need one. It saves waiting for order parts to arrive when I start a big job.
If you would like to take the time to browse through my PhotoBucket pages to see pictures of my past 4th gen projects, you can visit the links below.
1998 Maxima Projects
http://s286.photobucket.com/user/Rid...?sort=4&page=1
1999 Maxima Projects
http://s286.photobucket.com/user/Rid...?sort=4&page=1
Let me know if you have any questions.
You�ve definitely got things organized and you are doing your homework. However, I am concerned about the weekend you have to work in a garage to do this job.
I�ve done various parts of this job multiple times, and it would take me a few weekends to get through it all. I hope you have plenty of help.
I�m answering your questions online below. Note this is all based on my past experience and opinions. Some may vary from the FSM.
Dear forumites,
Due to landlord pressure, I must now fix the oil leaks on my Maxima (that I was hoping to postpone indefinitely).
I believe I have a leak from the inner timing cover O-rings (I have oil dripping from all over the passenger side of the engine, including the AC compressor), a very small leak from rear main seal area (hopefully just a halfmoon seal), and a motor oil leak appearing at the PS, keeping the suspension bushings well "lubricated". I can't see any rear valve cover leak, so I imagine the PS oil leak originates where the inner timing cover meets the rear head area. I hope to fix all these leaks doing the inner timing cover O-rings ordeal.
The Maxima is 1997 GXE auto with 153k miles. No cooling issues to speak of; as for rattles, it did make a short cold start groan consistently when I bought it (at 114k), but rarely does now.
I will only have one weekend in a friend's garage to do this, I'll need all the parts ready; please look at the parts list at the end of the post.
Procedure:
relieve fuel pressure (remove gas gap, fuel pump fuse, start engine)
Yes.
remove Y-pipe (first try while hot)
See this thread.
https://maxima.org/forums/4th-genera...oval-tips.html
And this thread about the u-joint that is helpful.
https://maxima.org/forums/4th-genera...-question.html
liquid wrench � I use PBlaster
remove drive belt.
Ok.
loosen crank pulley bolt (mark bolt to pulley position) �
I use a torque wrench when reinstalling the crank pulley bolt. Refer to the FSM in my signature link below for the proper specs.
The crankshaft has a key for alignment to the pulley. It only goes on one way.
See following thread and link within that thread.
https://maxima.org/forums/4th-genera...-troubles.html
Timing Cover Removal Tip
https://maxima.org/forums/4th-genera...moval-tip.html
disconnect battery
drain oil
remove dipstick (replace with plug)
remove Y-pipe (second try)
remove Crank Pos sensors
remove Oil Pres sensor
remove steel oil pan
remove oil strainer
support tranny with floor jack
remove crossmember
remove PS belt
remove PS pump
remove AC
No need to depressurize A/C system.
remove alternator
drain coolant from radiator
remove cover plate
remove upper oil pan
reinstall crossmember
remove Camshaft Pos sensor
remove passenger motor mount
get to TDC - ABSOLUTELY
remove outer timing cover
mark position of chain and sprockets with nail polish
drain more coolant?
remove intake manifold collector
remove chain tensioner and guides
remove chain
remove valve covers
remove the 2 main sprockets
remove water pump (will I get coolant where oil should be)
remove inner timing cover (mark 17 short bolts and 8 long bolts)
replace inner timing cover O-rings
try not to screw up the elaborate RTV pattern described in the FSM (will use permatex grey)
...
reuse waterpump if blades seem ok (replace the 2 O-rings)
...
Questions:
For the timing cover I will use permatex ultra grey; how much do I need? I've seen no mentions on this forum about letting the RTV cure for an hour before final tightening like the instructions say, do you torque it all the way form the get go?
Never hurts to follow product usage directions.
I usually take up 10 to 15 minutes after I apply RTV before I get the part into position where it makes contact.
What RTV do I use to glue the halfmoon seals in place? I use Permatex Black on metal to rubber applications. Permatex grey is for high torque applications like metal to metal.
I've seen people say to use black RTV for the corners of the valve covers and not grey (do you use RTV on both sides of the gasket?). Same story with the steel oil pan; why? I see there is a gasket available for the steel pan, thoughts?
I apply Permatex black to the gasket corners as prescribed in the FSM.
Regarding the intake manifols colector, why did Nissan decide to cool it? No idea.. What length and ID hose do I need for bypassing?
I have it bypassed on the most recent pair (2) of my 4th gens. I will continue to bypass it if I do get yet another 4th gen.
I take it this is the EGR bypass?
Personally, I use 5/16 Thermoid brand SAE J1019 �high pressure � 217 psi� transmission oil cooler hose that is rated at 400 F for the EGR u-hose bypass. I�ve been running it for well over 5 years now. It works great for transmission cooler hose as well. So I only need to keep that one kind of hose in stock for non-fuel applications. Yeah know it�s expensive and overkill. But I like heavy duty hoses when I can find them.
Are there any coolant hoses on the back of the engine that I should replace at this point? I've had failures on coolant hoses exposed to motor oil.
While I have the UIM removed, I usually replace heater hoses because it makes it easier. I like to use Goodyear hoses and belts when I can get them.
I'm not sure if a need a new tensioner and guide, part suggestions please?
Check out tensioner and guide part numbers prices at a site like www.courtesyparts.com.
On my last TC removal job, on a 95 model engine with 78,000 miles, I decided not to replace the tensioner because of the low mileage. Today at 115,000 miles, I wish I had replaced them because the tensioner allows the chain to rattle on cold startup.
Do the other 2 chain guides ever go bad? I�m sure it is possible, but I haven�t seen many occurrences of the inner guides failing. Only a visual inspection can determine this. The main thing is the tensioner design changed a few years ago that requires a new guide design. Otherwise, I would have just replaced the tensioner on my last TC job.
I've seen this mentioned: "A new ring for your hidden oil drain plug" but have no idea what it is.
Not sure what that is either. There are two o-rings on the upper oil pan that should be replaced when it is removed and reinstalled.
Do I need to replace the Y-pipe gaskets?
I would replace them to keep from having post installation issues.
Do I need to remove the passenger axle?
Check out the upper oil pan removal threads. I may have removed mine, but for other reasons that I cannot remember.
Would I have access to replace the steering rack bushings with the stuff removed for this job?
I plan to replace my rack bushings when I remove the y-pipe later this year. It definitely makes rack bushing replacement easy when you have the all of the other stuff removed.
Do I have to remove the sparkplugs for removing the valve covers?
The spark plugs are in the VC tubes. So not necessary.
Parts:
O-rings for inner timing cover
check with www.courtesyparts.com for OEM parts. It is good to establish a relationship with an OEM supplier that you can call and get information while you prepare your order.
coolant hose for bypassing UIM? Noted above.
oil pump O-rings . OEM noted above.
half moon seals � I use FelPro that comes in a kit with other gaskets.
crank seal � I use OEM or National brand seals only and interchangeably. National and FelPro are both owned by Federal Mogul which is a Nissan Just-In-Time manufacturing supply partner.
water pump seals � OEM in most cases unless FelPro or National comes with a larger gasket kit.
RTV � On a big job like TC and UOP I buy a large tube of Permatex Grey and a caulk gun for dispensing it.
Since you have done your homework on Permatex RTV products, I know you have read which products should be used on �high torque� metal to metal applications like the TC, UOP, and LOP. I can trim the tube tip to dispense a fine bead. The large caulk gun lets me quickly apply the RTV with better control than a smaller tube.
As for �low torque� metal to rubber applications, I know you have done your homework there too. If I remember correctly, the last FelPro half-moon gasket kit came with a small tube of Permatex Black (or equivalent). So I used the RTV that came with the kit and didn�t experience any problems. I�ve had best luck using Permatex Black for �low torque� applications that require a �high level of oil resistance�. I recently removed a leaking valve cover and saw here using the wrong Permatex product resulted in leaks in the corners. It held up ok for a few years. But somewhere between 5 to 6 years later, leaks started in location where I used the wrong product. I guess it all depends on how long you plan to keep the car and your tolerance for leaks 5+ years later.
Take a look at some of my VC pictures on the 1998 model section below and let me know have any questions.
EGR gaskets � FelPro � Be sure to note there are different shaped EGR gaskets for the UIM versus the EGR assembly. See my post in this thread about removing the EGR mounting assembly and especially the 14 mm bolts that are under the assembly. Understanding the role of the 14 mm bolts that are under the mounting assembly and when to remove then can save you some time and avoiding extra work when it comes to the EGR tube nut that sits behind the EGR pipe.
https://maxima.org/forums/4th-genera...ths-p0300.html
UIM gasket � I usually get a FelPro kit that contains them.
valve cover gaskets - I usually get a FelPro kit that contains them.
TB gasket � I use FelPro or OEM interchangeably. If you lived near me, I have some extras that I would give you. I keep a plastic Ziploc bag with an assortment of extra gaskets and seals on hand for when I need one. It saves waiting for order parts to arrive when I start a big job.
If you would like to take the time to browse through my PhotoBucket pages to see pictures of my past 4th gen projects, you can visit the links below.
1998 Maxima Projects
http://s286.photobucket.com/user/Rid...?sort=4&page=1
1999 Maxima Projects
http://s286.photobucket.com/user/Rid...?sort=4&page=1
Let me know if you have any questions.
Senior Member
Joined: Jan 2011
Posts: 3,037
From: Central AR
The crank pulley looks better than mine. It took fewer drill holes for yours to be balanced. It looks right to me.
For the EGR, is there a gasket between the mounting assembly and the block? Nope.
It bolts to the block with two 14mm bolts. Here's a picture of the back side.
I used Permatex black to seal the half-moon to the TC. Then used it again on the UOP on the half moons when I was ready to finish the installation. So I used black with black (rubber) and grey with grey (aluminum).

When you are under the car to install the UOP, I found I needed three hands to hold the UOP into position and to start the bolts. There are some long bolts that go inside the area that the oil pan covers. On my next UOP job, I will use a couple of the long bolts as guides on the wide area of the pan to hold the UOP into position before I push it up against the block. You'll get what I'm talking about when you remove the UOP and get it ready for installation. I've found it helpful to make a couple of "dry runs" without RTV to get the swing of how the UOP and TC align before you do it with real RTV.
Did your gasket kit with the half moons come with a small tube of black RTV?
Here's how it looked after installation.
Just browse the PhotoBucket section for some pictures of the job in the link below.
http://s286.photobucket.com/user/Rid...?sort=4&page=1
For the EGR, is there a gasket between the mounting assembly and the block? Nope.
It bolts to the block with two 14mm bolts. Here's a picture of the back side.

I used Permatex black to seal the half-moon to the TC. Then used it again on the UOP on the half moons when I was ready to finish the installation. So I used black with black (rubber) and grey with grey (aluminum).

When you are under the car to install the UOP, I found I needed three hands to hold the UOP into position and to start the bolts. There are some long bolts that go inside the area that the oil pan covers. On my next UOP job, I will use a couple of the long bolts as guides on the wide area of the pan to hold the UOP into position before I push it up against the block. You'll get what I'm talking about when you remove the UOP and get it ready for installation. I've found it helpful to make a couple of "dry runs" without RTV to get the swing of how the UOP and TC align before you do it with real RTV.
Did your gasket kit with the half moons come with a small tube of black RTV?
Here's how it looked after installation.

Just browse the PhotoBucket section for some pictures of the job in the link below.
http://s286.photobucket.com/user/Rid...?sort=4&page=1
Thread Starter
Member
Joined: Jun 2014
Posts: 146
From: Anaheim, CA
Thanks for replying!
Two days is going to suck, I might have to call in sick.
I'm doing the UOP as well, it is somewhat of a requirement for properly sealing the timing cover. I haven't seen records of it being serviced.
I did buy a waterpump, your post convinced me to do it. I spent about $500 so far on parts.
About the PS leaks, I did have a slight leak in PS system (perhaps at the rack) but the PS reservoir level has been steady for a year now. As I ran out of Dexron III, I used some old Mercon V I had lying around to top off a couple of times and it seemed to have swelled some seal.
Doing all that work in a weekend is a real hard road. Look at the time it's supposed to take by the book - that's how long it takes a "professional". Better check if you can take a personal day on Monday and Tuesday if this is your only transportation.
Has the Upper Oil Pan ever been serviced? You're doing all that work to service the Timing Cover, you MIGHTASWELL do the UOP as well. You're going to hate yourself if you get that all buttoned back up and the O-Rings in the UOP are leaking.
Similarly would not recommend re-using original 20 year old water pump. Not sure what best brand of water pump is but I'd put all my pennies toward it.
You briefly mentioned power steering leaks. If your landlord is hassling you about leaks, be advised that if you're leaking PS fluid now your PS hoses are still going to leak even after you correct whatever ENGINE oil leaks you have now.
The PS hoses fail due to age/use - also from having leaking engine oil sloshed on them and cooking them. Once you replace one leaking hose, the pressure moves to the next weakest link in the chain...I ended up replacing every hose in the PS system at once. It is expensive. You could conceivably replace leaking PS hoses later after you get the engine buttoned back up without re-doing your engine sealing work.
Has the Upper Oil Pan ever been serviced? You're doing all that work to service the Timing Cover, you MIGHTASWELL do the UOP as well. You're going to hate yourself if you get that all buttoned back up and the O-Rings in the UOP are leaking.
Similarly would not recommend re-using original 20 year old water pump. Not sure what best brand of water pump is but I'd put all my pennies toward it.
You briefly mentioned power steering leaks. If your landlord is hassling you about leaks, be advised that if you're leaking PS fluid now your PS hoses are still going to leak even after you correct whatever ENGINE oil leaks you have now.
The PS hoses fail due to age/use - also from having leaking engine oil sloshed on them and cooking them. Once you replace one leaking hose, the pressure moves to the next weakest link in the chain...I ended up replacing every hose in the PS system at once. It is expensive. You could conceivably replace leaking PS hoses later after you get the engine buttoned back up without re-doing your engine sealing work.
Thread Starter
Member
Joined: Jun 2014
Posts: 146
From: Anaheim, CA
I haven't found a way to actually see the o-rings. You could try some UV dye.
In my case I could see that the leak was above the upper oil pan and crank shaft seal by the lack of dirt in that particular oily area.
Since my valve cover gaskets were done some years ago, and I could not see any leak from the valve covers the inner timing cover is what's left (or maybe god forbid the camshaft bracket).
Thread Starter
Member
Joined: Jun 2014
Posts: 146
From: Anaheim, CA
Thanks again!
I believe the halfmoon seal kit (Felpro) I bought came with 2 rtv tubes.
If I understand correctly - you first used the black rtv to glue the halfmoon to the TC in the front and UOP in the back, then you let it dry? After drying, you used black rtv on the other side of the halfmoon seals and attached the UOP to the block?
The crank pulley looks better than mine. It took fewer drill holes for yours to be balanced. It looks right to me.
For the EGR, is there a gasket between the mounting assembly and the block? Nope.
It bolts to the block with two 14mm bolts. Here's a picture of the back side.

I used Permatex black to seal the half-moon to the TC. Then used it again on the UOP on the half moons when I was ready to finish the installation. So I used black with black (rubber) and grey with grey (aluminum).
When you are under the car to install the UOP, I found I needed three hands to hold the UOP into position and to start the bolts. There are some long bolts that go inside the area that the oil pan covers. On my next UOP job, I will use a couple of the long bolts as guides on the wide area of the pan to hold the UOP into position before I push it up against the block. You'll get what I'm talking about when you remove the UOP and get it ready for installation. I've found it helpful to make a couple of "dry runs" without RTV to get the swing of how the UOP and TC align before you do it with real RTV.
Did your gasket kit with the half moons come with a small tube of black RTV?
Here's how it looked after installation.

Just browse the PhotoBucket section for some pictures of the job in the link below.
http://s286.photobucket.com/user/Rid...?sort=4&page=1
For the EGR, is there a gasket between the mounting assembly and the block? Nope.
It bolts to the block with two 14mm bolts. Here's a picture of the back side.
I used Permatex black to seal the half-moon to the TC. Then used it again on the UOP on the half moons when I was ready to finish the installation. So I used black with black (rubber) and grey with grey (aluminum).
When you are under the car to install the UOP, I found I needed three hands to hold the UOP into position and to start the bolts. There are some long bolts that go inside the area that the oil pan covers. On my next UOP job, I will use a couple of the long bolts as guides on the wide area of the pan to hold the UOP into position before I push it up against the block. You'll get what I'm talking about when you remove the UOP and get it ready for installation. I've found it helpful to make a couple of "dry runs" without RTV to get the swing of how the UOP and TC align before you do it with real RTV.
Did your gasket kit with the half moons come with a small tube of black RTV?
Here's how it looked after installation.
Just browse the PhotoBucket section for some pictures of the job in the link below.
http://s286.photobucket.com/user/Rid...?sort=4&page=1
Senior Member
Joined: Jan 2011
Posts: 3,037
From: Central AR
Thanks again!
I believe the halfmoon seal kit (Felpro) I bought came with 2 rtv tubes.
If I understand correctly - you first used the black rtv to glue the halfmoon to the TC in the front and UOP in the back, then you let it dry? After drying, you used black rtv on the other side of the halfmoon seals and attached the UOP to the block?
I believe the halfmoon seal kit (Felpro) I bought came with 2 rtv tubes.
If I understand correctly - you first used the black rtv to glue the halfmoon to the TC in the front and UOP in the back, then you let it dry? After drying, you used black rtv on the other side of the halfmoon seals and attached the UOP to the block?

Thread Starter
Member
Joined: Jun 2014
Posts: 146
From: Anaheim, CA
Thanks!
I will be doing the job this weekend (hopefully not all week).
I will be doing the job this weekend (hopefully not all week).
Thread Starter
Member
Joined: Jun 2014
Posts: 146
From: Anaheim, CA
Ok, I've started the work. The engine must have ran for about 5 minutes with the fuel pump out and the gas cap off. The crank pulley bolt got loose on the 3rd try with the starter (I went overkill with 19mm 3/4 drive socket and 3/4 breaker bar). The Y-pipe bolts were easy at the manifold, but the 2 cat bolts won't budge. They're soaking now. Another item I'm stuck on is the bolt with the 14 mm head behind the power steering pump. Paperwork indicates the PO had the PS pump replaced; whatever monkey worked on it went far and beyond the 15-20ftlb of torque needed. I've set a wrench on it, set a 1/2 extension bar on the wrench and hammered it - no luck  .
.
.
Senior Member
Joined: Jan 2011
Posts: 3,037
From: Central AR
Ok, I've started the work. The engine must have ran for about 5 minutes with the fuel pump out and the gas cap off. The crank pulley bolt got loose on the 3rd try with the starter (I went overkill with 19mm 3/4 drive socket and 3/4 breaker bar). The Y-pipe bolts were easy at the manifold, but the 2 cat bolts won't budge. They're soaking now. Another item I'm stuck on is the bolt with the 14 mm head behind the power steering pump. Paperwork indicates the PO had the PS pump replaced; whatever monkey worked on it went far and beyond the 15-20ftlb of torque needed. I've set a wrench on it, set a 1/2 extension bar on the wrench and hammered it - no luck .
.On the Y-pipe bolts into the cat, this weekend my son is trying to remove the cat from the I30 to move it to the 99 Maxima. The bolts are rusted and twisting off. I need to get a look into it. I'm not sure how that will turn out.
Thread Starter
Member
Joined: Jun 2014
Posts: 146
From: Anaheim, CA

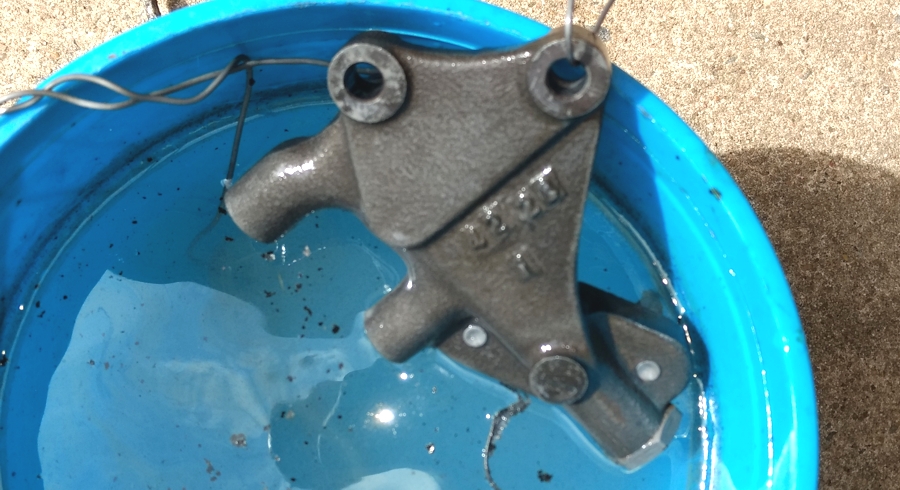
Thanks, those Cat bolts are PITA. I've got the powersteering bolt to move, but I think the bolt broke. I got it out about 10 mm, but on the pulley side it seemed not to move. Please see pic. Am I right in thinking the circled bold is the end of that 14mm head bold?
Bad news on the rear PS bolt. I've not run into an issue with that bolt at this point.
On the Y-pipe bolts into the cat, this weekend my son is trying to remove the cat from the I30 to move it to the 99 Maxima. The bolts are rusted and twisting off. I need to get a look into it. I'm not sure how that will turn out.
On the Y-pipe bolts into the cat, this weekend my son is trying to remove the cat from the I30 to move it to the 99 Maxima. The bolts are rusted and twisting off. I need to get a look into it. I'm not sure how that will turn out.
Senior Member
Joined: Jan 2011
Posts: 3,037
From: Central AR
I've been looking for pictures of the PS pump part of my TC job. I don't think I made any of the pump during the process.
If the bolt that broke off is the one in the picture, as you can see there are no threads on end. It looks to me like you can remove the TC with the head broken off of the bolt. Once the TC is removed, you should have more room and some remaining bolt stem, for extracting the bolt.
If the bolt that broke off is the one in the picture, as you can see there are no threads on end. It looks to me like you can remove the TC with the head broken off of the bolt. Once the TC is removed, you should have more room and some remaining bolt stem, for extracting the bolt.

Thread Starter
Member
Joined: Jun 2014
Posts: 146
From: Anaheim, CA
Thanks Craig!
I bit the bullet and continued removing the pivot bolt and fortunately it was not broken!
I must have misunderstood boredmdr's power steering belt youtube video. I now believe the circled bit to be a timing cover guide stud.
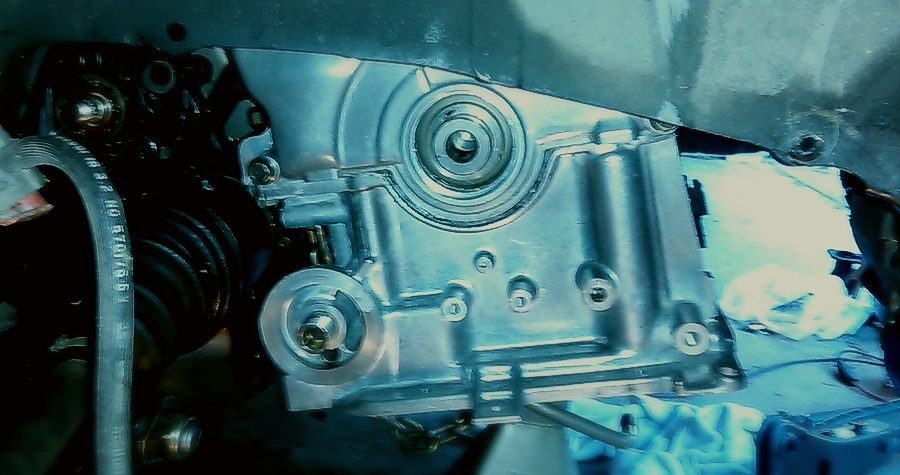
I've made slow but steady progress today, with help from my father. I'm a skinny guy, a lot of bolts were very hard for me. And removing the alternator, I don't know how people do it by themselves. I still haven't dug into the timing chain covers.
I should have removed the passenger side axle when first starting work on the car.
I bit the bullet and continued removing the pivot bolt and fortunately it was not broken!
I must have misunderstood boredmdr's power steering belt youtube video. I now believe the circled bit to be a timing cover guide stud.
I've made slow but steady progress today, with help from my father. I'm a skinny guy, a lot of bolts were very hard for me. And removing the alternator, I don't know how people do it by themselves. I still haven't dug into the timing chain covers.
I should have removed the passenger side axle when first starting work on the car.
Senior Member
Joined: Jan 2011
Posts: 3,037
From: Central AR
Thread Starter
Member
Joined: Jun 2014
Posts: 146
From: Anaheim, CA
I started Friday evening and finished Wednesday.
Things I've learned: always listen to your father (his advice was leave it the way it is).
Tips for this job:
1. Don't do it.
2. If you're crazy enough to do it, make sure you have a garage available for a week, better yet have your own garage.
3. While not absolutely necessary, I would consider buying an engine hoist and pulling out the engine.
4. Removing the passenger's side axle right from the beginning would give you more room; it sure does get in the way of the upper oil pan. I did not remove it, but wished I did.
5. Upper oil pan to transaxle bolt torque spec is xxx -couldn't find it. I'm pretty sure I stripped the aluminum threads. I would not go past 40 FTLB.
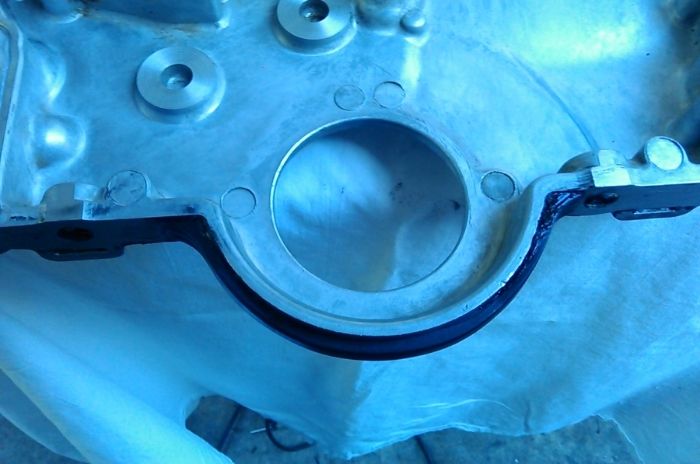
6. If you're not pulling the engine out, the engine mount bracket stud that goes through the chain covers is a PITA. The outer timing chain cover barely clears it; when reinstalling it will mess up your rtv pattern right around the stud, so be wise (unlike me) to put rtv on the corresponding mating surface of the inner TC cover. The inner TC cover won't come out unless you unthread the stud from the block and remove it - I used vice-grip plyers on the nonthreaded part of the stud.
7. For removing the y-pipe to exhaust manifold bolts, my 1/2 drive deep 14mm socket was too beefy - the heat shield got in the way - so I had to use a slimmer 3/8 drive socket. A slim 1/2 drive might have worked too.
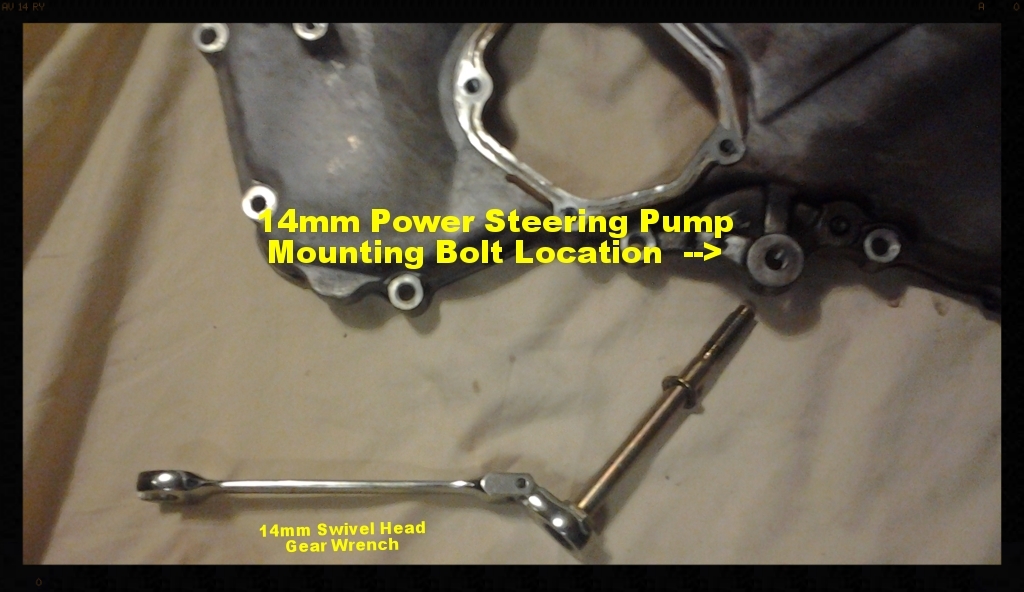
8. The inner timing cover is attached with 17mm short bolts and 8 long bolts (they are pretty close in length actually). The 8 long bolts go at locations 1,2,3,6,7,8,9,10 in the tightening sequence diagram of the FSM.
The 4 boo-boos we did:
1. when dremelling the egr stud, my father cut some into the exhaust to egr valve pipe
2. when spining the crank to check timing, one of the cams caught a rag, and spun it nice and tight. The engine still runs, I will do a compression test at some point
3. the above mentioned over-tightening of the upper oil pan to transaxle bolts
4. got all kinds of crap in the engine with all the scraping of RTV
Other thoughts: My heater hoses and WP were fine, but I changed them. Same story for tensioner and guide (the tensioner rattle after starting the car was first heard on this occasion).
I changed the O2 sensors hoping to reduce my positive long term fuel trim (+3 and +6); the LTFT stayed the same, but at least I'm getting some reading for the STFT for one the banks (previously it never moved from 0).
I replaced the steering rack bushings with MOOG parts, it was a PITA job. I had to remove the stabilizer bar to replace said bushings, but loosened the rear motor mount. Also replaced the stabilizer bar bushings with ES parts.
5/16 heater hose worked great for bypassing the IM, thanks Craig!
I discovered the AC pulley bearing is noisy.
The good news is that no leaks are making their way to the ground so far; I'm not in the mood to get under the car too soon.