Maxima HID Retrofit Build
 02-03-2012, 08:41 AM
#321

With the Bi-x low beam and halogen high beam projector setup,would the low beams (being Bi-x) operate in conjunction with the halogen high beams? By "inconjuction with" I mean does the low beam switch to a 'high beam mode' in addition to triggering the high beam projector?
TheRetrofitSource is an excellent source for the harness. They offer two-types: a microcontroller-type and a dual relay. Personally, the dual relay model is much more reliable.
 02-03-2012, 08:44 AM
#322


 02-03-2012, 08:46 AM
#323

With the Bi-x low beam and halogen high beam projector setup,would the low beams (being Bi-x) operate in conjunction with the halogen high beams? By "inconjuction with" I mean does the low beam switch to a 'high beam mode' in addition to triggering the high beam projector?
02-03-2012, 08:55 AM
#324
I've only noticed now, but the "regular" visitor of this thread are only a few of us. I was hoping more and more people would try retrofitting (motivated) after they see this thread. Yes they cost some money, but it's totally worth it. I'm not sure how it is in different gen or other cars in the family like Altima and such.
02-03-2012, 09:02 AM
#325

I've only noticed now, but the "regular" visitor of this thread are only a few of us. I was hoping more and more people would try retrofitting (motivated) after they see this thread. Yes they cost some money, but it's totally worth it. I'm not sure how it is in different gen or other cars in the family like Altima and such.
Anyways, MSU I'm working on retrofit of my own and those brackets you designed, do you know if they would work with TRS's Mini Projectors? I'm currently working on putting MH1s in my high beam spot and these brackets look like they would work great for me, especially since once the "super d2s" comes out, I plan on getting a pair of those too for a quad setup. If they are compatible, can you tell me how much it would run for a set of those brackets? Thanks!
02-03-2012, 10:35 AM
#326
I'm mechanically inclined, but don't know squat about electrical stuff. As such, I was extremely apprehensive about doing a retrofit project. After reading this thread and a couple others, I decided to give it a try and for one, it's not that difficult and also, it was worth every ounce of effort. I had a lot of fun with it - it can even turn into an addictive hobby (not to mention any names - ehem...MSU)!
Anyone running or considering HID lighting should definitely make the effort to retrofit. It's well-rewarded in satisfaction, quality of lighting and especially in keeping yourself and others safe on the road. If you can spend $500 on a stereo sytem, wheels, etc., you should not hesitate to do so on your safety. (my $0.02...)
Anyone running or considering HID lighting should definitely make the effort to retrofit. It's well-rewarded in satisfaction, quality of lighting and especially in keeping yourself and others safe on the road. If you can spend $500 on a stereo sytem, wheels, etc., you should not hesitate to do so on your safety. (my $0.02...)
 02-03-2012, 10:50 AM
#328
I've only noticed now, but the "regular" visitor of this thread are only a few of us. I was hoping more and more people would try retrofitting (motivated) after they see this thread. Yes they cost some money, but it's totally worth it. I'm not sure how it is in different gen or other cars in the family like Altima and such.

BUT....
after seeing the builds and drinking in the info of you luvlex and EuroD I realized it helps more than it hurts (hell, it doesn't hurt at all
 ).
). And even after all that said there's still folks out there who wouldn't commit to it. Maybe they don't like it for looks, or like djKevinn said: they fear hacking up their lights.
For me, tried everything and this is the best lighting setup I've ever had on any car, at any point in my life.
Last edited by Nexus67; 02-03-2012 at 10:55 AM.
02-03-2012, 11:50 AM
#329
I think most people are just a bit too scared to go hack into our headlights since they are so expensive....
Anyways, MSU I'm working on retrofit of my own and those brackets you designed, do you know if they would work with TRS's Mini Projectors? I'm currently working on putting MH1s in my high beam spot and these brackets look like they would work great for me, especially since once the "super d2s" comes out, I plan on getting a pair of those too for a quad setup. If they are compatible, can you tell me how much it would run for a set of those brackets? Thanks!
Anyways, MSU I'm working on retrofit of my own and those brackets you designed, do you know if they would work with TRS's Mini Projectors? I'm currently working on putting MH1s in my high beam spot and these brackets look like they would work great for me, especially since once the "super d2s" comes out, I plan on getting a pair of those too for a quad setup. If they are compatible, can you tell me how much it would run for a set of those brackets? Thanks!
Anyway, once everything works out, I'll source it, come up with reasonable cost, and make it available by request.
02-03-2012, 03:23 PM
#330

Yes, some factory setups shut the low beam in high beam mode. That's not my intent. With Bi-X low beam, you split the selenoid wire to the high beam (actually I will use seperate relay for high beam), so when you kick the high beam mode, both low beam and high beam are on. I think 02-03 OEM setup is like this, I can't imagine the low beam HID is shut off. In 00-01, it's different, I have to have relay harness with bypass to make it happen.
The high and low beams are ground-switched, so technically all you need to do is permanently splice into the low-beam ground wire and ground the low-beam circuit to the battery or chassis. This prevents your HID ballasts from turning off when you flip the headlight stalk to high-beam mode.
For an overall picture of my setup: I have each ballast connected to the low-beam circuit with an additional ground running to the chassis of the car (technically, I should have ran a ground to the negative terminal of my battery, but less wires = cleaner install). The positive ballast wire is connected to the single positive circuit wire, and the negative ballast wire is connected to the low-beam ground, but with an additional ground wire connecting the ground of the ballast to the car. The bi-x shutter positive wire is spliced into the single positive wire of the circuit along with the positive ballast wire, while the bi-x shutter negative is spliced into the high-beam ground wire.
So, essentially, I flip my "low-beams" on, the ballasts power up, and everything is good to go. If I need my "brights", I flip my headlight stalk and voila, the low-beam circuit stays on since it's been grounded to the chassis of the car, the high beam circuit opens up, and the shutters open for maximum projector output. Pretty simple actually, but it's probably confusing without an actual wiring diagram.
So, could someone explain the need for a relay in my case? Or is one even needed for the 2000/2001 Maxima, unlike those with a 2002/2003? I know I should have some sort of fuse system or something put in place for the safety of my ballasts (OEMs are not cheap!).
Last edited by tcaughey; 02-03-2012 at 03:32 PM.
02-03-2012, 03:28 PM
#331
I've only noticed now, but the "regular" visitor of this thread are only a few of us. I was hoping more and more people would try retrofitting (motivated) after they see this thread. Yes they cost some money, but it's totally worth it. I'm not sure how it is in different gen or other cars in the family like Altima and such.
02-03-2012, 04:16 PM
#332
So, why did someone always recommend of doing it, well it's a cheap insurance really. A pre-made relay cost $20 shipped and you don't need to splice anything, for 00-01, it even had the selenoid (high beam) wire built in the relay. If for some reason there is an increase in amp draw due to faulty ballast, it protects the OEM wiring from getting burned out.
NOW, if you run OEM ballast like Hella Gen 3, Denso, I would recommend putting relay for sure. This OEM ballasts warms up instantly (1-2 second) that it draws 8 amps for the first few milliseconds! at start up. This will make the small size wire to get hot eventually (overload). The OEM harness isn't build for this. you can get a way a first few, but I'll guarantee you'll burn it eventually. I know this since I put 15 amps fuse on my relay and it kept blowing fuse with a set of Hella Gen 3 ballasts installed. Once I bumped the fuse to 20 amps, no problem.
I always run relay, I've got 2 relay setups in the engine bay. 1 for the headlights and 1 for fogs. The good thing about relay is that I can use different ballasts with different input connector without redoing the whole thing again.
Last edited by Genes1s; 02-03-2012 at 04:22 PM.
02-03-2012, 04:51 PM
#333
Definitely didn't know you were able to reliably run the setup w/o a relay. The old ebay relays kept blowing out on me before I went w/ TRS's version.
02-03-2012, 08:56 PM
#334
Member

Join Date: Jan 2012
Posts: 175
I would attempt something like this except for the fact that (having no experience with retrofits) it probably wouldnt come out all that great on the first attempt.
So with the relay, are you using the factory wiring only as a trigger for relay? Thus the actual power going to the bulbs/ballasts is via additional wiring?
So with the relay, are you using the factory wiring only as a trigger for relay? Thus the actual power going to the bulbs/ballasts is via additional wiring?
02-03-2012, 09:00 PM
#335

I would attempt something like this except for the fact that (having no experience with retrofits) it probably wouldnt come out all that great on the first attempt.
So with the relay, are you using the factory wiring only as a trigger for relay? Thus the actual power going to the bulbs/ballasts is via additional wiring?
So with the relay, are you using the factory wiring only as a trigger for relay? Thus the actual power going to the bulbs/ballasts is via additional wiring?
02-03-2012, 09:07 PM
#336
Well almost everyone with PnP kits have no relay whatsoever...so do we need relay to fire up the ballast, I don't think so. Those aftermarket ballasts warm up slowly at start up, they only draw about 5-6 amps or so untill the capicitor is fully charged then it drops down to 3.5 amps for constant running. So in reality your wiring takes up a very slight spike of amp draw from your halogen setup (55W = 4.6 amps) but there are porbably enough safety factor in the OEM wiring setup that protects this slight amp draw for momentary.
So, why did someone always recommend of doing it, well it's a cheap insurance really. A pre-made relay cost $20 shipped and you don't need to splice anything, for 00-01, it even had the selenoid (high beam) wire built in the relay. If for some reason there is an increase in amp draw due to faulty ballast, it protects the OEM wiring from getting burned out.
NOW, if you run OEM ballast like Hella Gen 3, Denso, I would recommend putting relay for sure. This OEM ballasts warms up instantly (1-2 second) that it draws 8 amps for the first few milliseconds! at start up. This will make the small size wire to get hot eventually (overload). The OEM harness isn't build for this. you can get a way a first few, but I'll guarantee you'll burn it eventually. I know this since I put 15 amps fuse on my relay and it kept blowing fuse with a set of Hella Gen 3 ballasts installed. Once I bumped the fuse to 20 amps, no problem.
I always run relay, I've got 2 relay setups in the engine bay. 1 for the headlights and 1 for fogs. The good thing about relay is that I can use different ballasts with different input connector without redoing the whole thing again.
02-03-2012, 09:41 PM
#337
Yep. That's exactly the answer I was looking for. Crazy how I have never had any problems so far. Well now you have convinced me to wire in a few relays. I guess I better start reading up on relay wiring I guess, unless you can help me out? Again, I have a 2001 and running OEM Matsushi*ta ballasts, so any help would be greatly appreciated.
http://www.ebay.com/itm/HID-Xenon-H4...item43a6dea49d
Pretty much plug and play with your Matsu (I'm assuming you are running gen 3 since the power wire is 9006 same as this ballasts). I'm sure you will have no issue with it.
02-04-2012, 12:01 PM
#338
You don't need any other diagram other than what this Ebay seller provided. I have been using this exact ballast for 2 years now with zero issues and have recommended it to other people running the same exact setup as yours (FX-R in OEM housing).
http://www.ebay.com/itm/HID-Xenon-H4...item43a6dea49d
Pretty much plug and play with your Matsu (I'm assuming you are running gen 3 since the power wire is 9006 same as this ballasts). I'm sure you will have no issue with it.
http://www.ebay.com/itm/HID-Xenon-H4...item43a6dea49d
Pretty much plug and play with your Matsu (I'm assuming you are running gen 3 since the power wire is 9006 same as this ballasts). I'm sure you will have no issue with it.
02-04-2012, 06:57 PM
#339
00-03 Quads 2/4/12
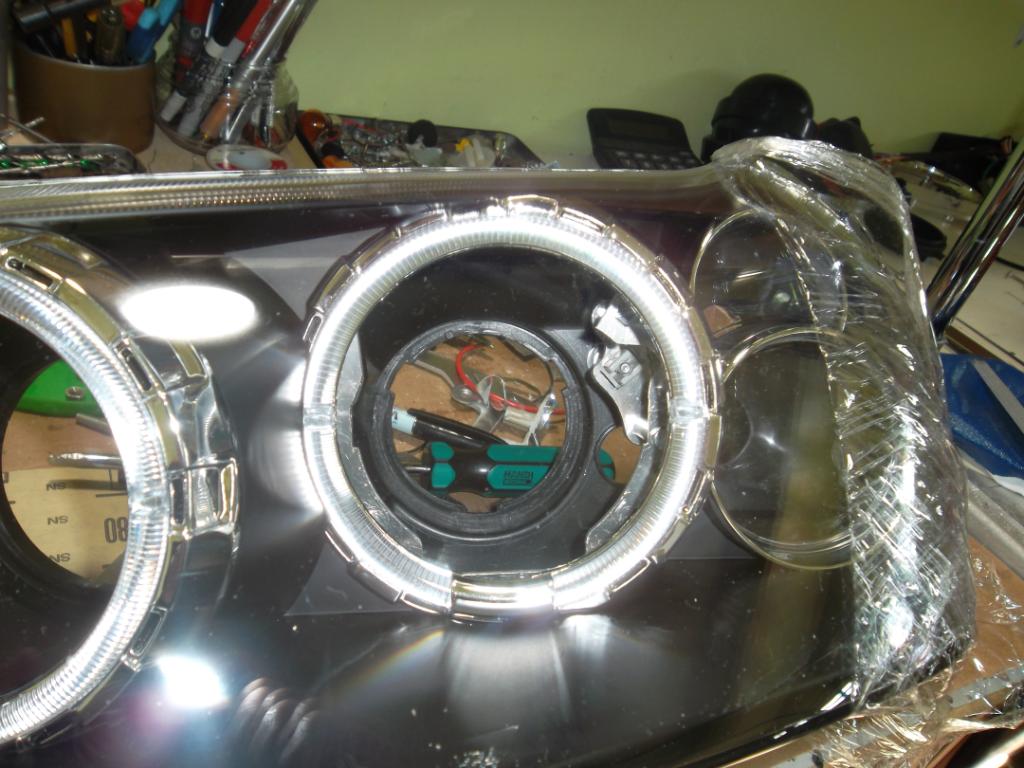
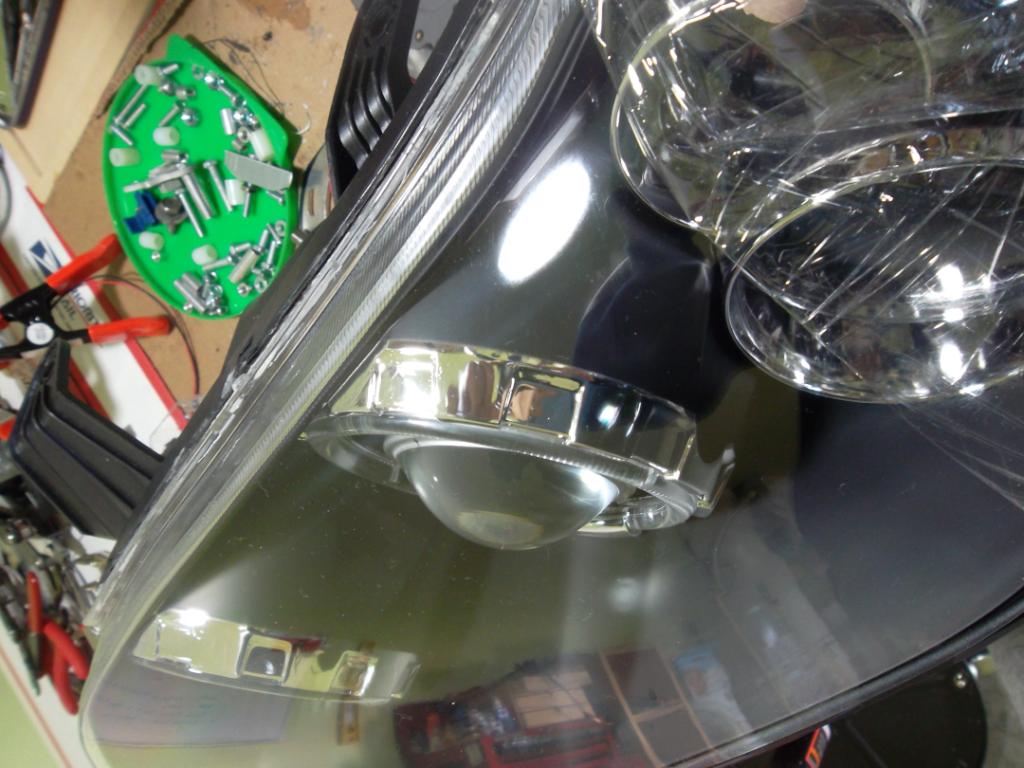
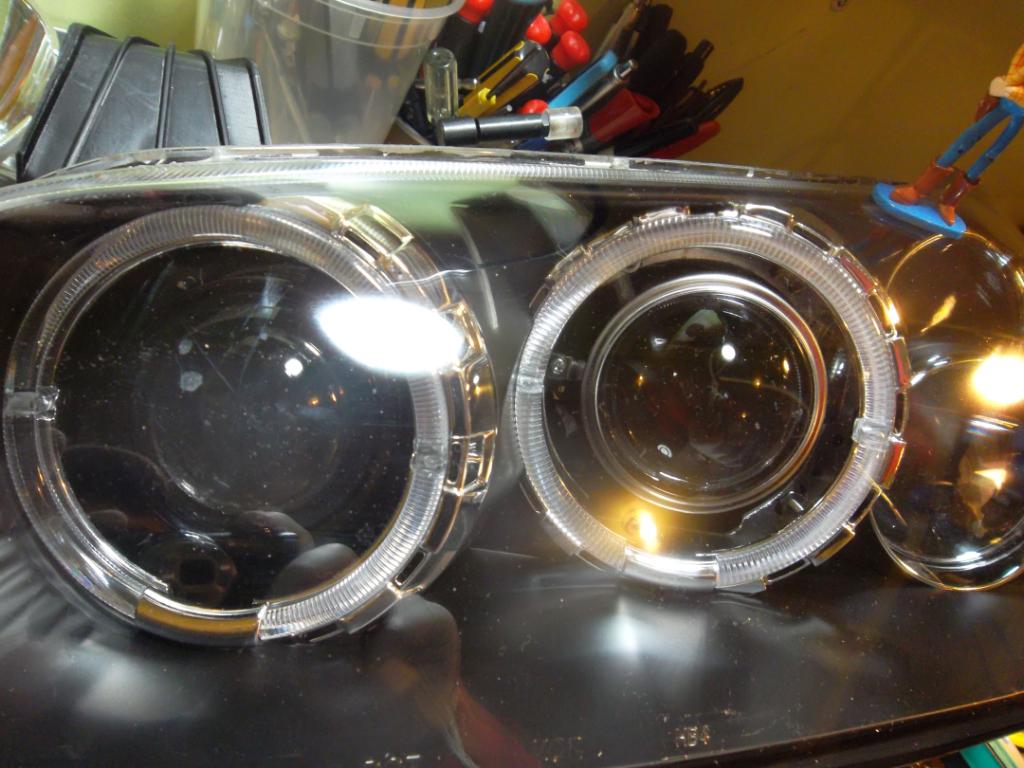
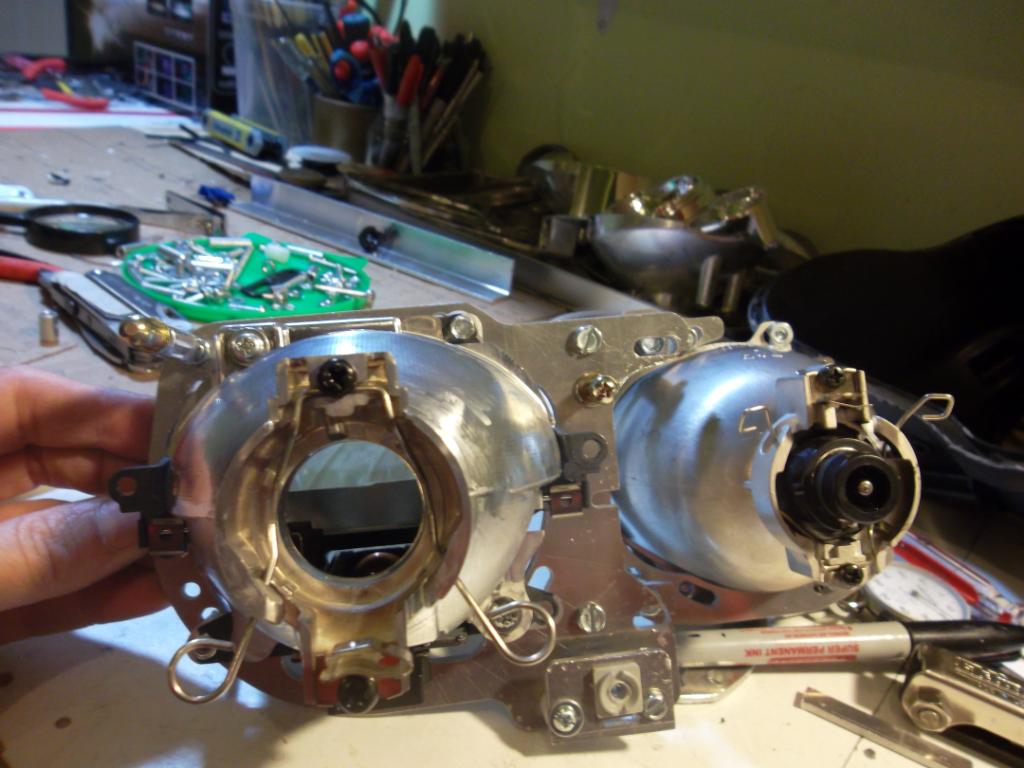
I had to mount the projector from the back of the bracket now instead of from the front since I couldn't make it look flush. So now, I really need to figure out how to relocate that dang screw adjustment. 90% of the problem is this stupid screw adjustment being on the way. I've got a plan, but this turn into science project I'm afraid which is NOT cool. While waiting for the new bracket to be made, I'm playing with RX330 Non-AFS. I mounted Mini H1 Selenoid in RX330 Non-AFS projector. This is not new stuff, someone over in HID Planet has done it before. I lowered the shield assy as much as I can to expose almost ALL the lights with a little reserve for high beam. The high beam isn't that great but it should be enough. For those of you that have 00-01 and don't use high beam too much, this option is a great option since the projector is pretty compact and it has killer low beam cut off.
This is with STOCK lens.
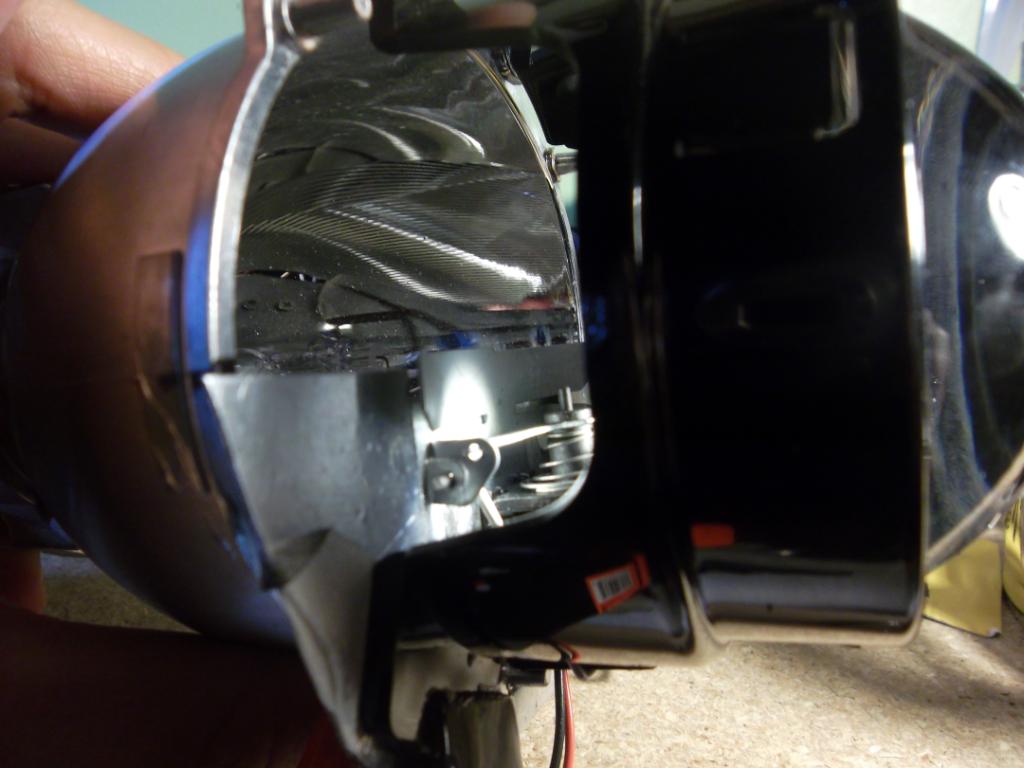
Low beam.
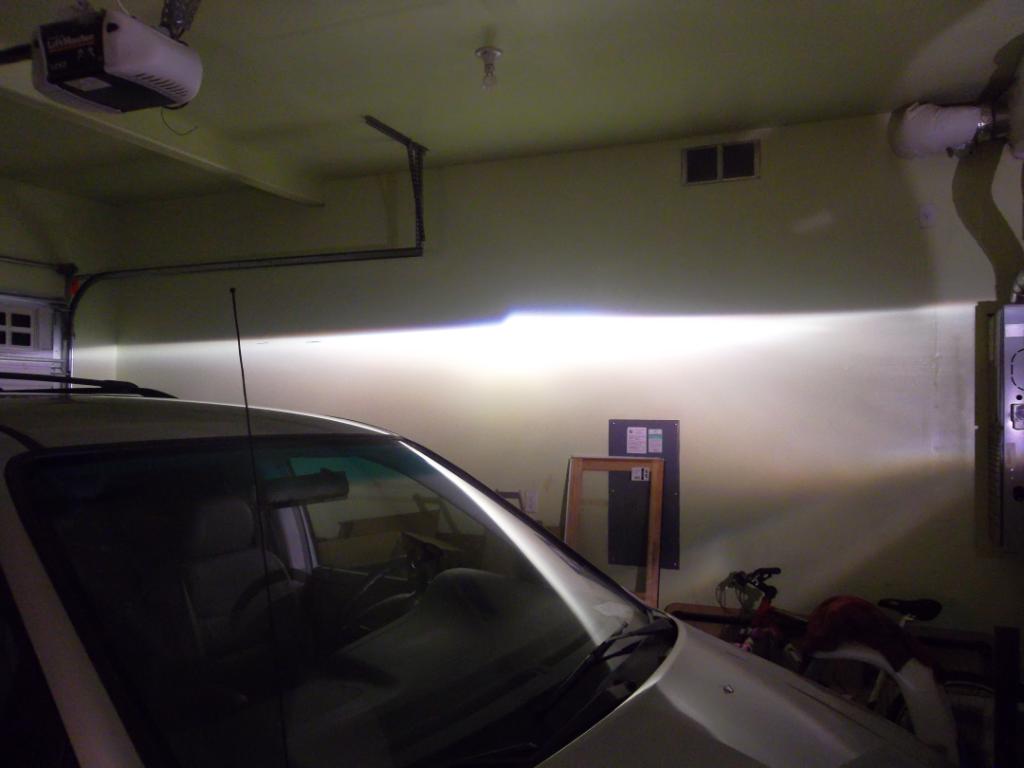
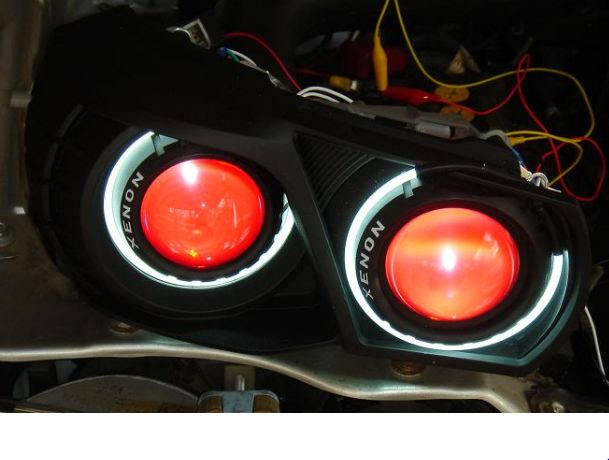
High Beam. you can see from high beam that I only cover the beam pattern so minimally to expose as much light as possible
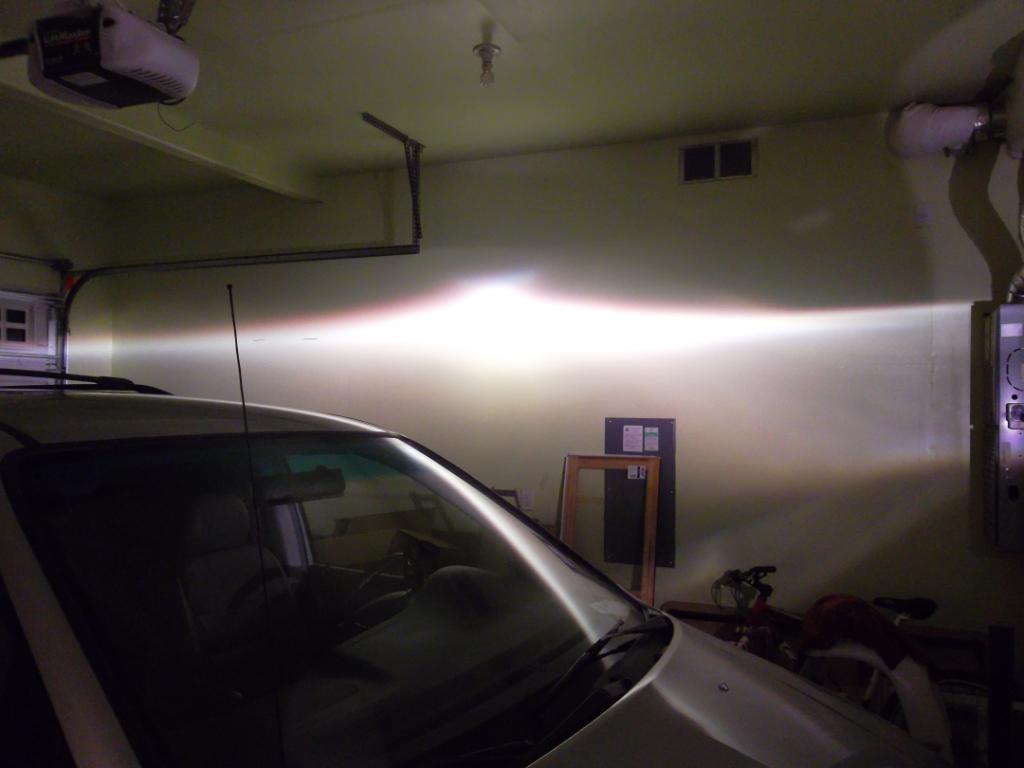
RX330 non-AFS Bi-Xenon in action!!
This is with STOCK lens.
Low beam.
High Beam. you can see from high beam that I only cover the beam pattern so minimally to expose as much light as possible
RX330 non-AFS Bi-Xenon in action!!
Last edited by Genes1s; 02-04-2012 at 08:03 PM.
02-05-2012, 01:29 PM
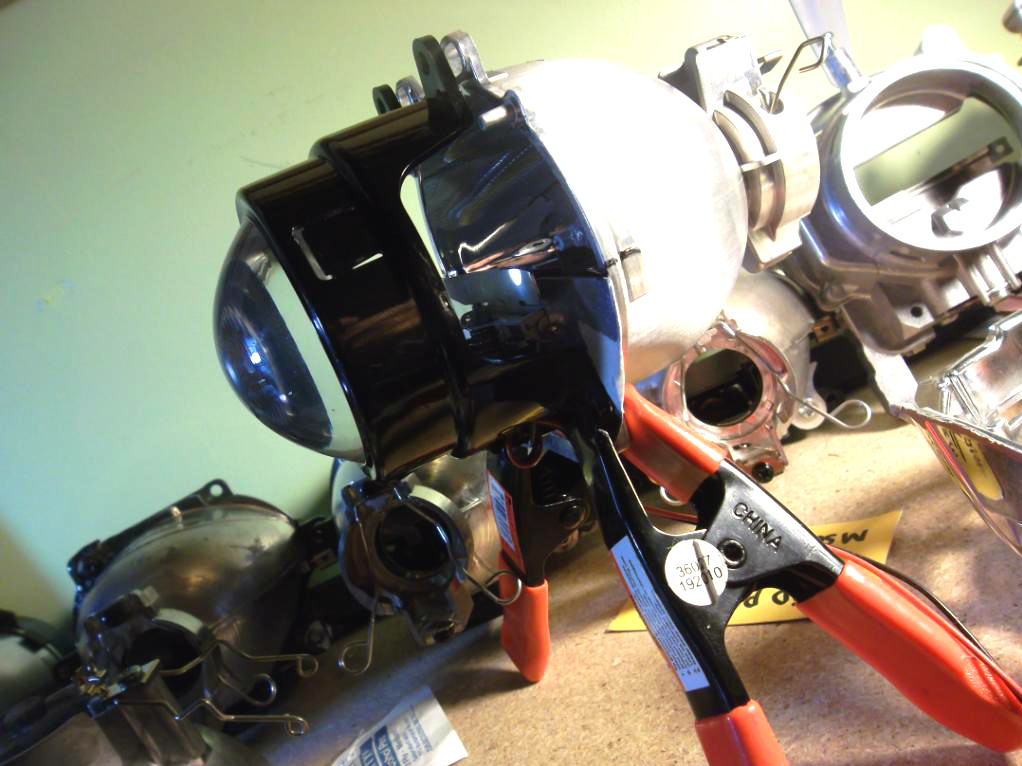
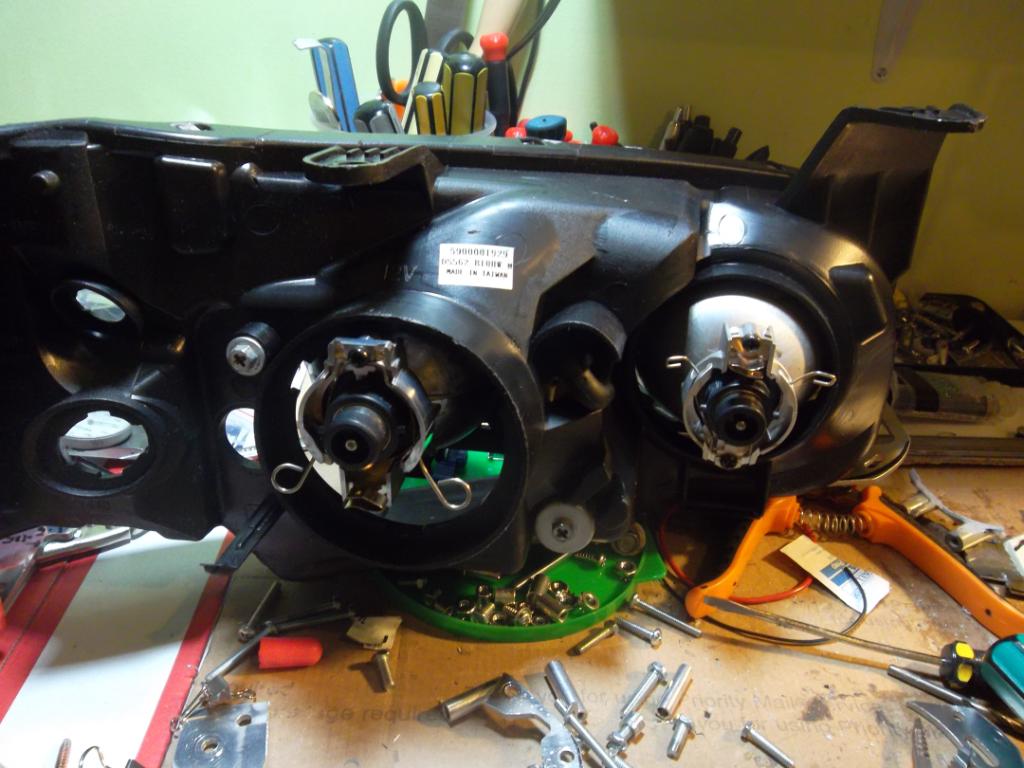
#340
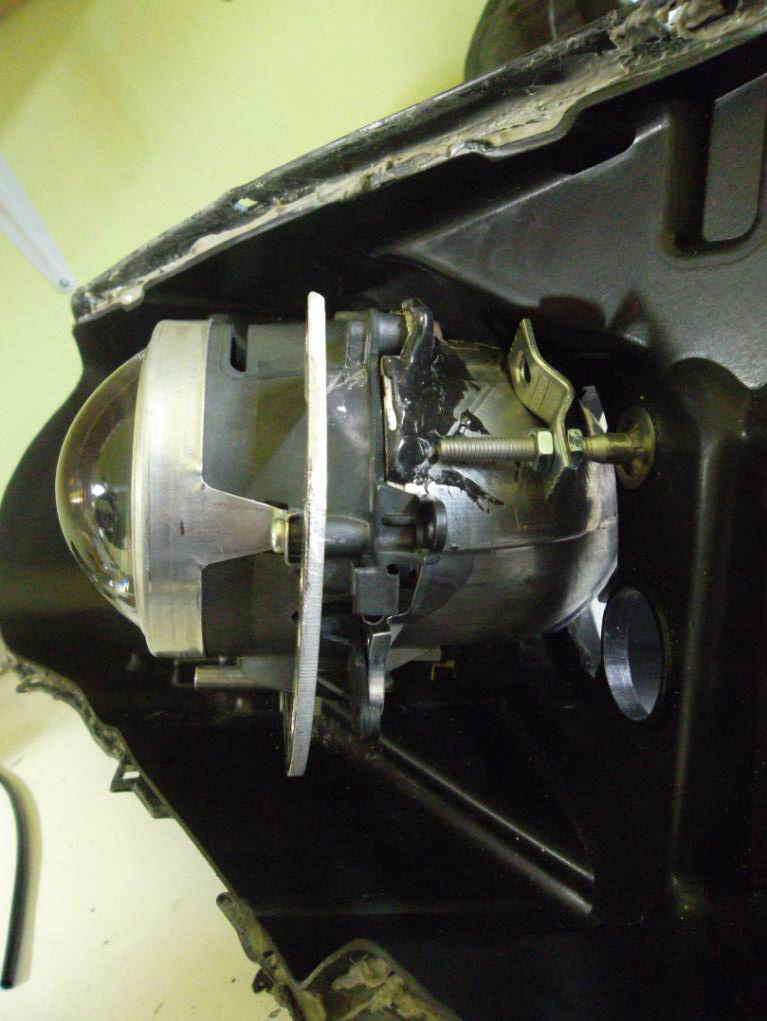
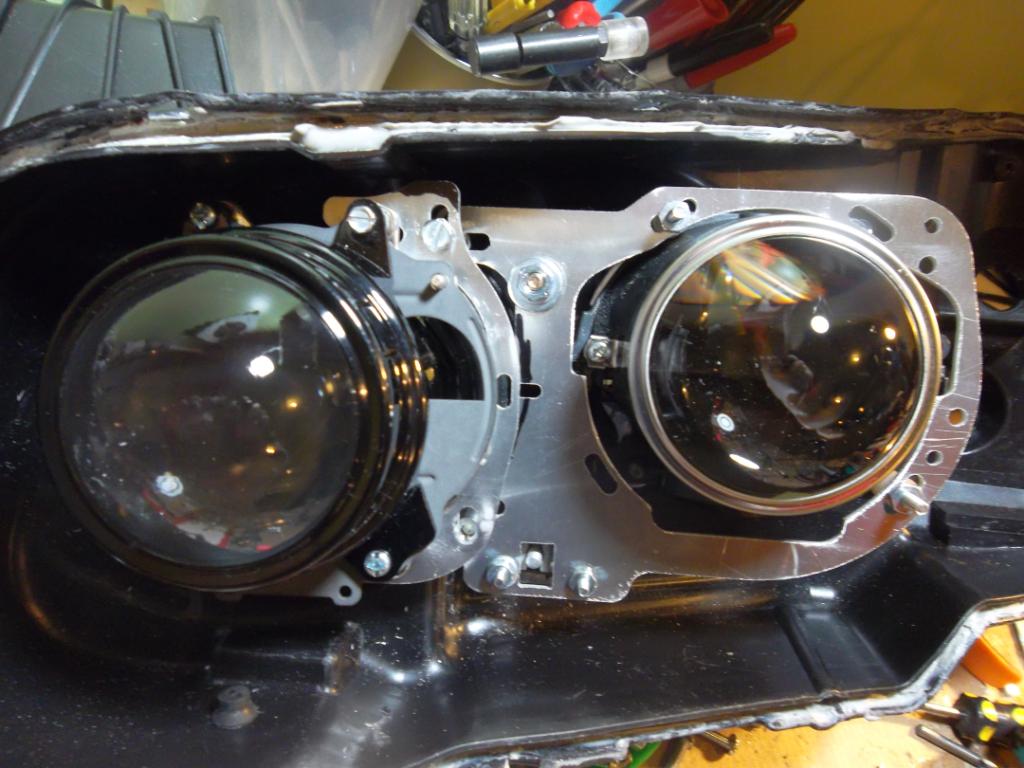
Well, found out few things that made the bracket didn't work like it supoosed to. Who designed headlights where the round opening of the shroud isn't concetric with the back hole..
Low beam. See the non-cencentricity between the bezel opening and back opening...This messed up my bracket axis, which made the projector sit too low and to the left.
high beam. Perfectly alligned.

Time to get a hack saw and cut off that beautifull water jetted bracket apart.

Still need to figure out away to relocate that adjustment screw since the projector is sitting way deep now. I'm at the point when I say screw the adjustment screw, I'm just not going to have that adjustment and mount them solid ( only up and down adjustment).
Still sitting a little low, but much better than before
Flush!!
Low beam. See the non-cencentricity between the bezel opening and back opening...This messed up my bracket axis, which made the projector sit too low and to the left.
high beam. Perfectly alligned.
Time to get a hack saw and cut off that beautifull water jetted bracket apart.
Still need to figure out away to relocate that adjustment screw since the projector is sitting way deep now. I'm at the point when I say screw the adjustment screw, I'm just not going to have that adjustment and mount them solid ( only up and down adjustment).
Still sitting a little low, but much better than before
Flush!!
Last edited by Genes1s; 02-05-2012 at 01:37 PM.
02-14-2012, 04:59 PM
#342
I got ways to go. I haven't figured out all of if. The goal is retrofit without any cutting but it turned out to be more complicated than it looks. It is probabbly easier to just plunge in and start cutting like I always did, but I'm not abandoning this yet. I hope the next iteration of bracket would be it and I can move in to customizIng it. We're still at first step here, which is projector mount and alignment.
02-17-2012, 09:04 PM
#344
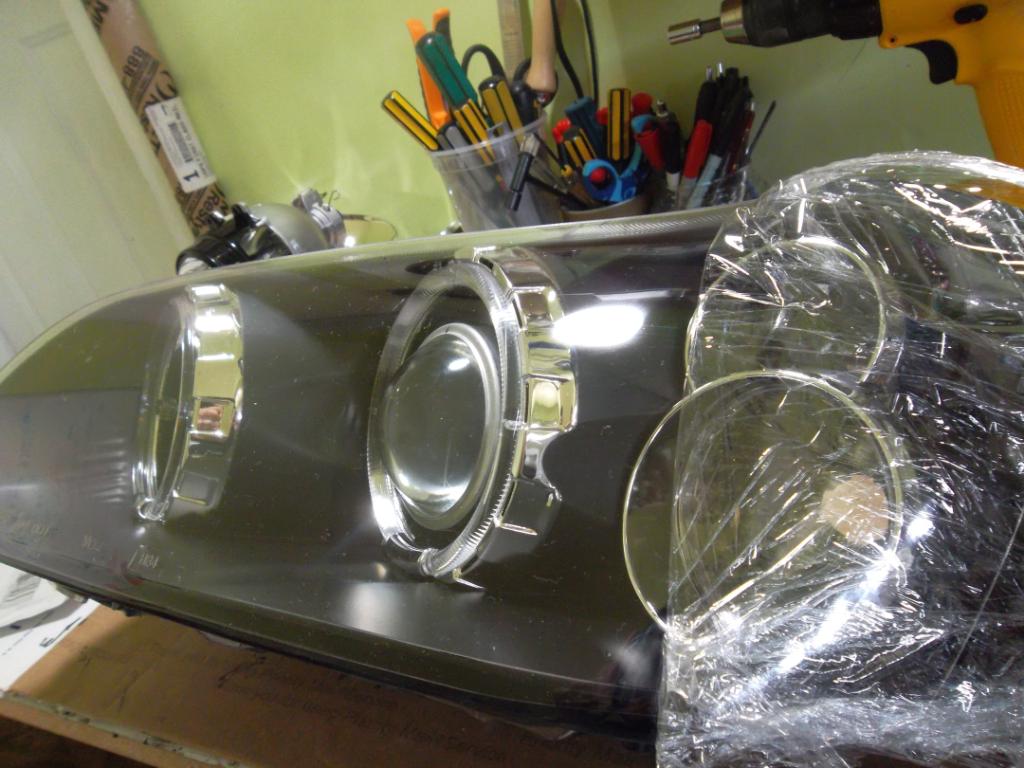
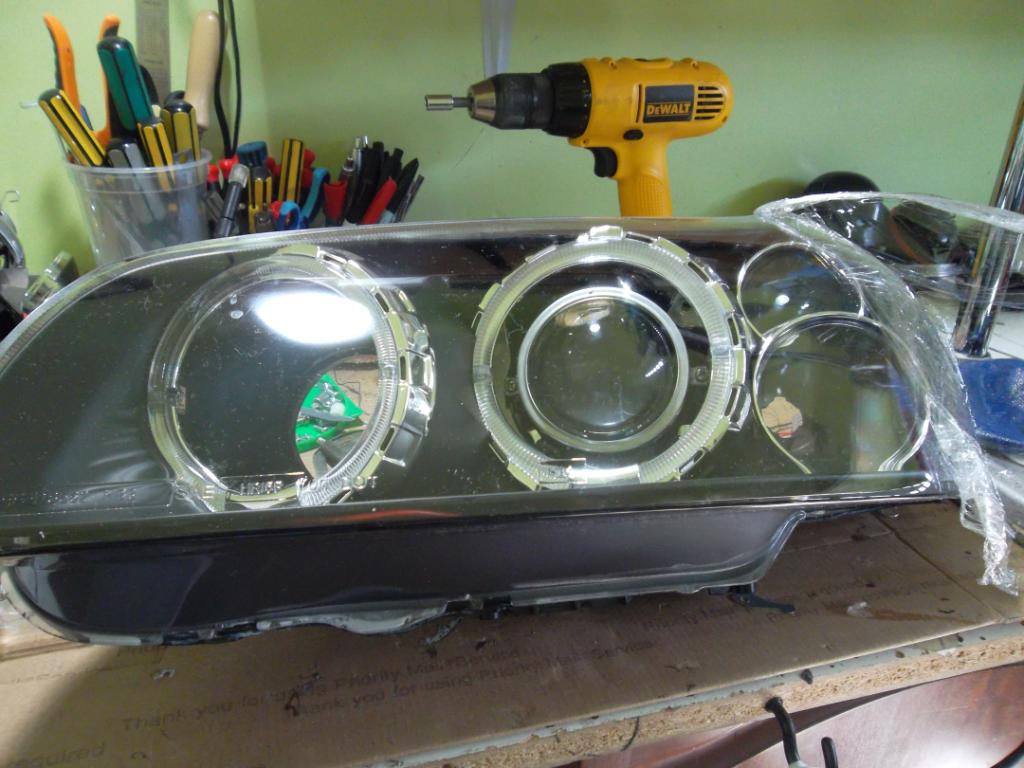
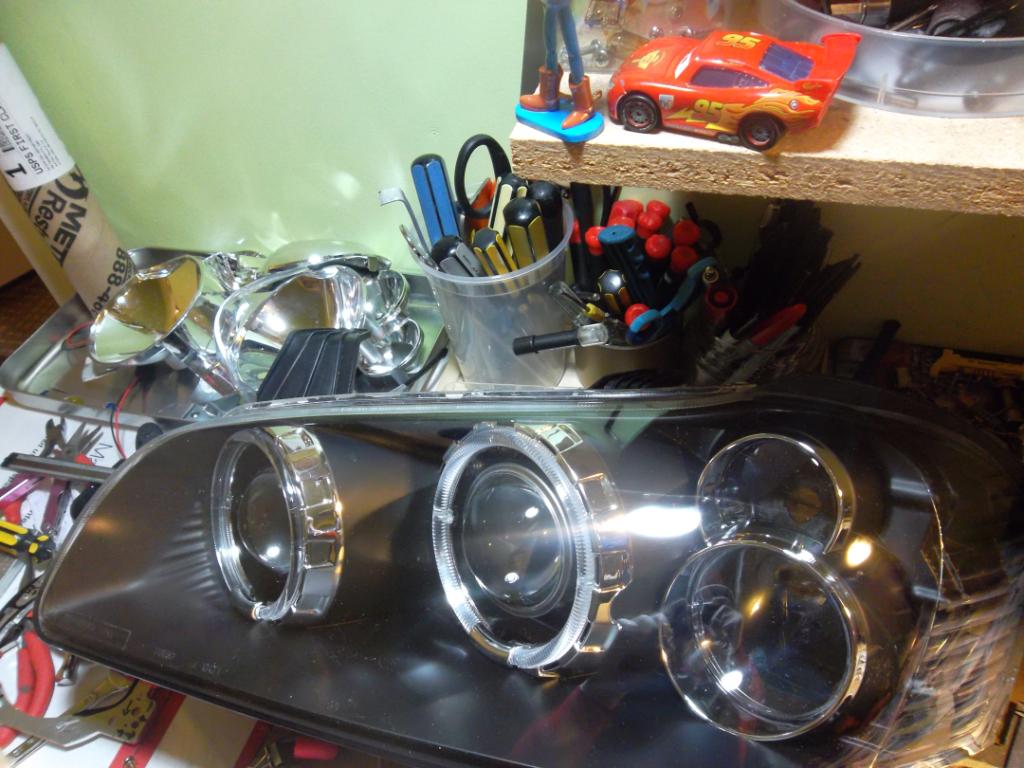
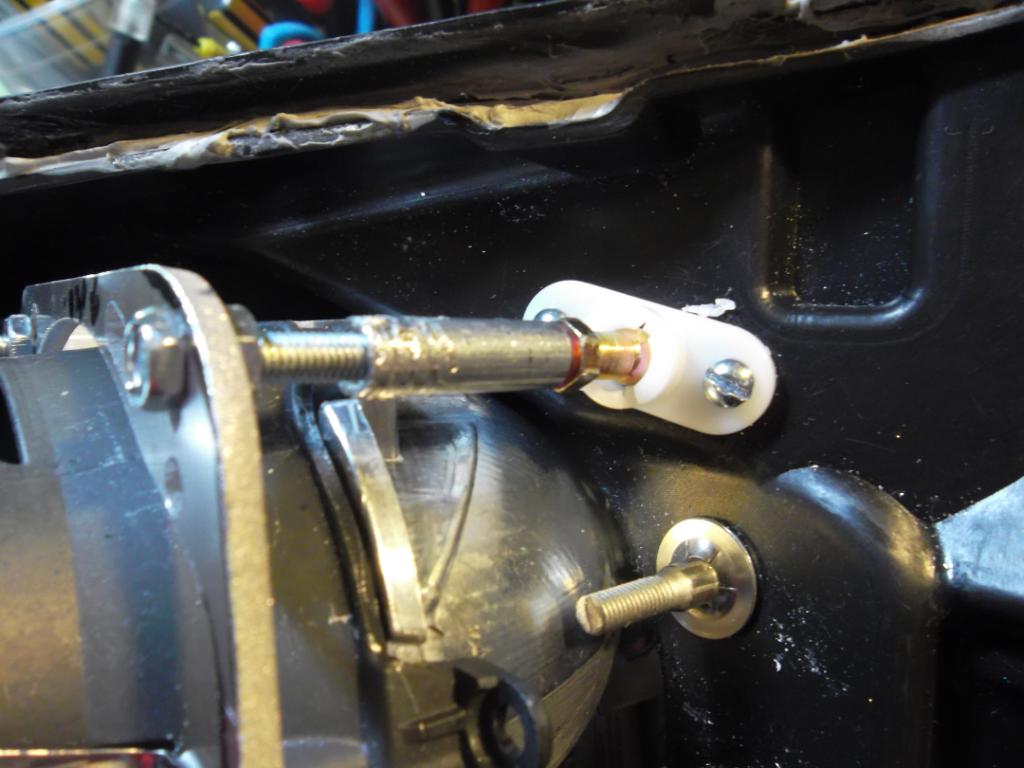
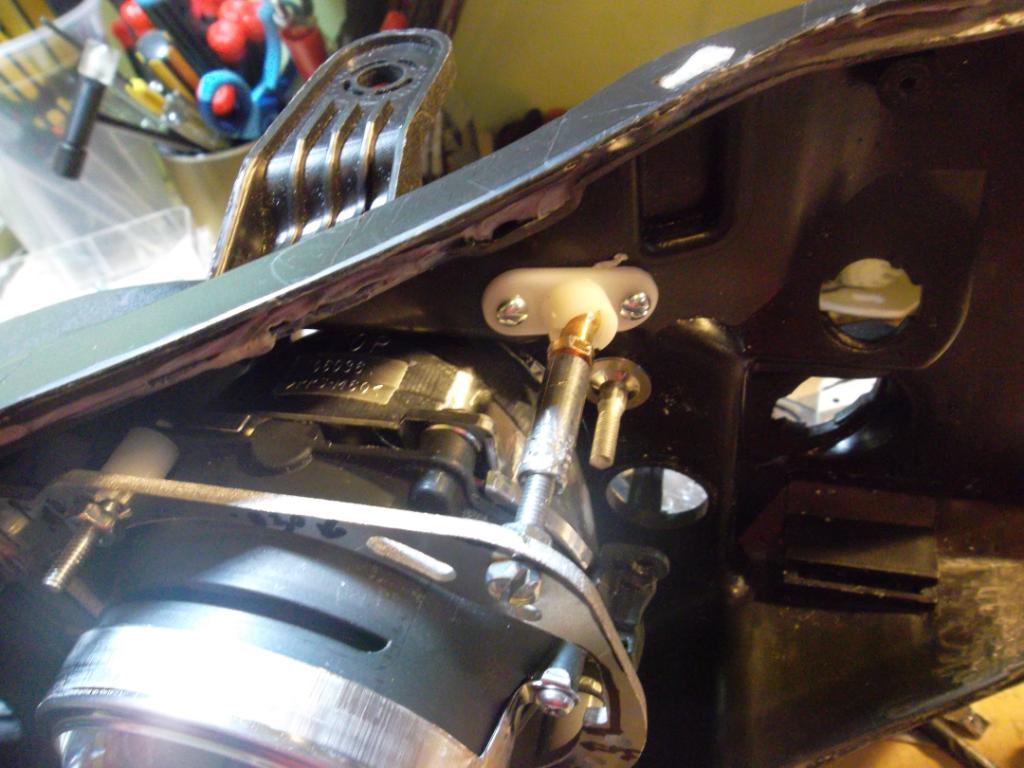
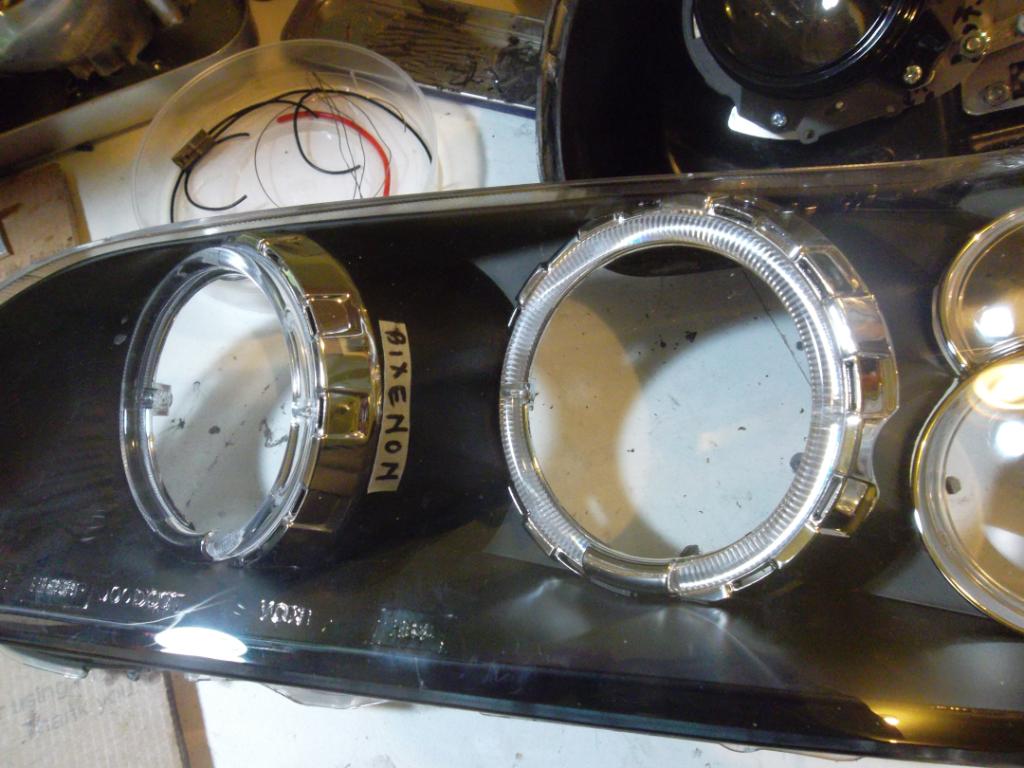
I'm on the third bracket iteration now. Finally feel good about the fit, the look, and overall progress. Got both projectors mounted and headlights lens was able to close good without hitting anything inside, so the outside geometry of the bracket is pretty good now with no major rubbing at all. One thing that made this retro much more challanging than previous ones was the fact that I had to fit the bracket and allign them between the housing AND the shroud. This would have been easier with OEM 5.5 gen since I can just cut the reflector and glue it to the bracket assy.
Fired up both projector and they were off vertically but it was expected since both didn't sit in the same axis. I can adjust the high beam (tilt) it later during aiming process.
pheww....that was good 4 hours tonight.
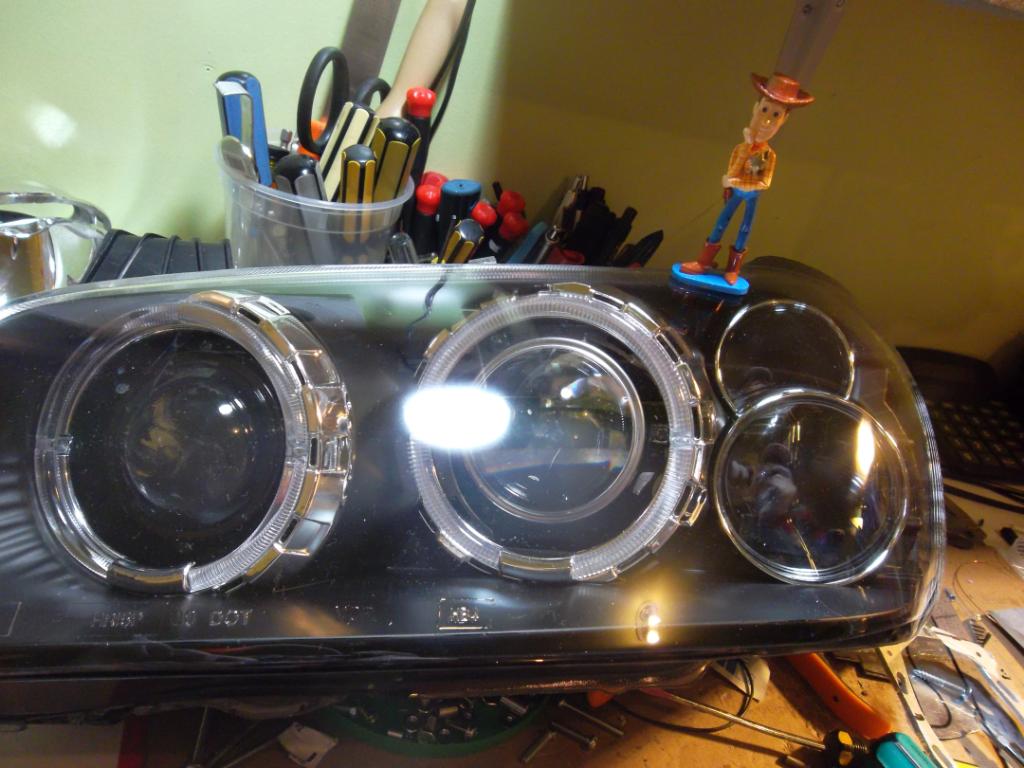
Bottom screw was the horizontal adjustment, due to interference with the projector I deleted the horizontal adustment. The third mounting point would be a ball socket joint, like in the picture below, combine with a coupler I can adjust the horizontal allignement during aiming and lock it down with jam nuts. This second ball socket joint will be just like the orginal one (pivoting), it's just like any headlights that don't have horizontal allignment, they have 2 socket joints.

Fired up both projector and they were off vertically but it was expected since both didn't sit in the same axis. I can adjust the high beam (tilt) it later during aiming process.
pheww....that was good 4 hours tonight.
Bottom screw was the horizontal adjustment, due to interference with the projector I deleted the horizontal adustment. The third mounting point would be a ball socket joint, like in the picture below, combine with a coupler I can adjust the horizontal allignement during aiming and lock it down with jam nuts. This second ball socket joint will be just like the orginal one (pivoting), it's just like any headlights that don't have horizontal allignment, they have 2 socket joints.
Last edited by Genes1s; 02-18-2012 at 08:49 PM.
02-17-2012, 10:58 PM
#345

Dude you never cease to amaze here. Though I personally thing those CCFL's are destroying the setup, the rest is just bloody amazing. Ihave no doubt that these will be the best duals ever done on a 5th gen. Not that there's much competition, but you've really got some talent there sir.
When I get into my G35's headlights and eventually go for projectors, expect some PM's
 02-18-2012, 12:25 AM
#346

Does that mean the mounting brackets only work in the ebay projector headlight? What about working on the OEM 2002 headlight? If I get any time to myself, I am going to try taking apart the BMW headlights I picked up.
02-18-2012, 09:10 AM
#347
Dude you never cease to amaze here. Though I personally thing those CCFL's are destroying the setup, the rest is just bloody amazing. Ihave no doubt that these will be the best duals ever done on a 5th gen. Not that there's much competition, but you've really got some talent there sir.
When I get into my G35's headlights and eventually go for projectors, expect some PM's
Those angle eyes are the least that I'm worry about. I'm not using it at all, it will be something different I don't know what it is yet. I'm thinking of light pipe or some sort of LED. I really want to make ""BIXENON" lettering light up using SMD LED.
Still got tons of work todo....but thanks for the support.
Last edited by Genes1s; 02-18-2012 at 09:20 AM.
02-18-2012, 09:39 AM
#348
Tuner,
Those angle eyes are the least that I'm worry about. I'm not using it at all, it will be something different I don't know what it is yet. I'm thinking of light pipe or some sort of LED. I really want to make ""BIXENON" lettering light up using SMD LED.
Still got tons of work todo....but thanks for the support.
Glad to hear it dude! This stuff works decent but doesn't put out much light.
http://thefiberopticstore.com/purcha.../SGS-Fiber.htm
It's nice and clean though, and with one SMD on either end of each ring it'll put out a nice even glow. I'm going to try it for my reverse lights and Headlights possibly.
If you want something bright then the CCFL or something like Umnitza's V2 I think is the best out still. I'm hoping to see some better stuff come out soon, LED technology is getting insane, and moving very fast.
Look forward to more updates man, again, incredible work!
02-18-2012, 10:05 AM
#349
This will not work with what you are trying to do with your BMW lights though. With yours, you're going to have to mount the whole reflector/projector assy to the housing which is more difficult to achieve.
If the Bimmer reflector/projector assy can fit inside the OEM 02 Maxima housing then it's a good start. But if it isn't, you pretty much have to trim the Bimmer reflector/projector assy to fit the housing. If you have to do this, then it will not look clean.
I don't know....this is all in my head still. You should proof me wrong
 02-18-2012, 02:34 PM
#350
Oh it all looked so darn clean I figured that was getting close to finished sneak peek.
Glad to hear it dude! This stuff works decent but doesn't put out much light.
http://thefiberopticstore.com/purcha.../SGS-Fiber.htm
It's nice and clean though, and with one SMD on either end of each ring it'll put out a nice even glow. I'm going to try it for my reverse lights and Headlights possibly.
If you want something bright then the CCFL or something like Umnitza's V2 I think is the best out still. I'm hoping to see some better stuff come out soon, LED technology is getting insane, and moving very fast.
Look forward to more updates man, again, incredible work!
Different subject, check out this Frito Lay truck full LED headlights and turn signal. I wish I could see the beam pattern, but the battery was disconnected ( 2012 Portland Auto Show)

Last edited by Genes1s; 02-18-2012 at 02:39 PM.
02-18-2012, 03:17 PM
#351
Thanks for the link, I checked it out and it's pretty cool. I wish they make rectangular cross secion, because then I can just make a template for "BIXENON" letter and paint it them over, so it only glows the letter when it is lit up. I thought about machining acrylic and polish the surface and leave some of them beadblasted to create more depth perception and stick LED in multiple sides to light them up. Basically I'm trying to make neon sign but small and not too bright.
Different subject, check out this Frito Lay truck full LED headlights and turn signal. I wish I could see the beam pattern, but the battery was disconnected ( 2012 Portland Auto Show)
Different subject, check out this Frito Lay truck full LED headlights and turn signal. I wish I could see the beam pattern, but the battery was disconnected ( 2012 Portland Auto Show)
Regarding your idea, where are you planning on installing this 'sign' and how big will it be?
02-18-2012, 08:33 PM
#352
Tuner,
This is my inspiration. The 'Xenon" sign is actually part of OEM E46 BMW shroud. The guy basically painted the shroud white and masked it before the whole shroud was painted black.
I want similart to this but not painted. The "BIXENON" would be on each low and high beam shroud. The letter would be made out off clear/frosted acrylic, bend it to match the curvature of the shroud (using heat) and have LED/lightpipe/CCFL/something else behind it. The light source would be wired to parking light, so that during the day, the letter isn't that obvious. When the parking light is on, then the "BIXENON" lit up bright. I'm not putting any angle eyes or CCFL.
02-18-2012, 10:02 PM
#354
Man that's going to be tough to do sir, it's so small. You could try just cutting it with a dremel but that'd be tough.
One way to do it would be to trace the lines out exactly as you want them onto a piece of tape, duplicate it for as many as you want to put on (4?), then place them right where you want them on the housing.
You'll then take the smallest drill bit you can and 'connect the dots' in the lettering, trying to leave an even gap between each hole so the housing doesn't break or the letters look out of place.
This will allow almost invisible writing during daytime/unlit, and you can just pop a light in behind it. Once lit up the letters wouldn't be "dots" they'd just appear normally unless you got very very close to them.
Anything else seems over the top to me, unless you can get/want to get the Bimmer shrouds that you pictured and put them on.
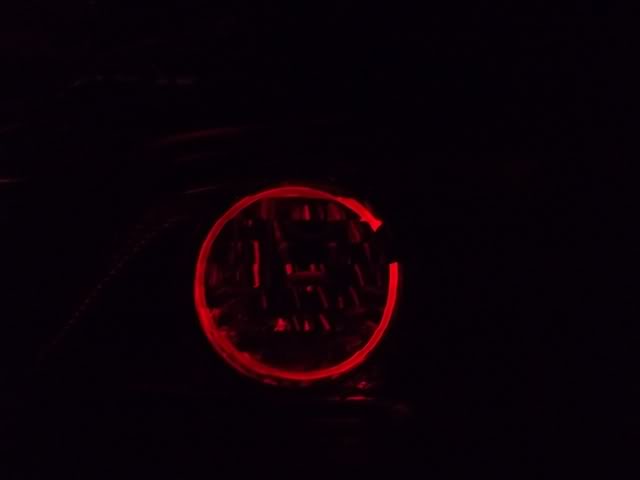
Also thought I'd post this here for you, this is with a single half-burnt red 5050 SMD on the end of the wire:

One way to do it would be to trace the lines out exactly as you want them onto a piece of tape, duplicate it for as many as you want to put on (4?), then place them right where you want them on the housing.
You'll then take the smallest drill bit you can and 'connect the dots' in the lettering, trying to leave an even gap between each hole so the housing doesn't break or the letters look out of place.
This will allow almost invisible writing during daytime/unlit, and you can just pop a light in behind it. Once lit up the letters wouldn't be "dots" they'd just appear normally unless you got very very close to them.
Anything else seems over the top to me, unless you can get/want to get the Bimmer shrouds that you pictured and put them on.
Also thought I'd post this here for you, this is with a single half-burnt red 5050 SMD on the end of the wire:
Last edited by TunerMaxima3000; 02-18-2012 at 10:06 PM.
 02-21-2012, 08:58 PM
#356
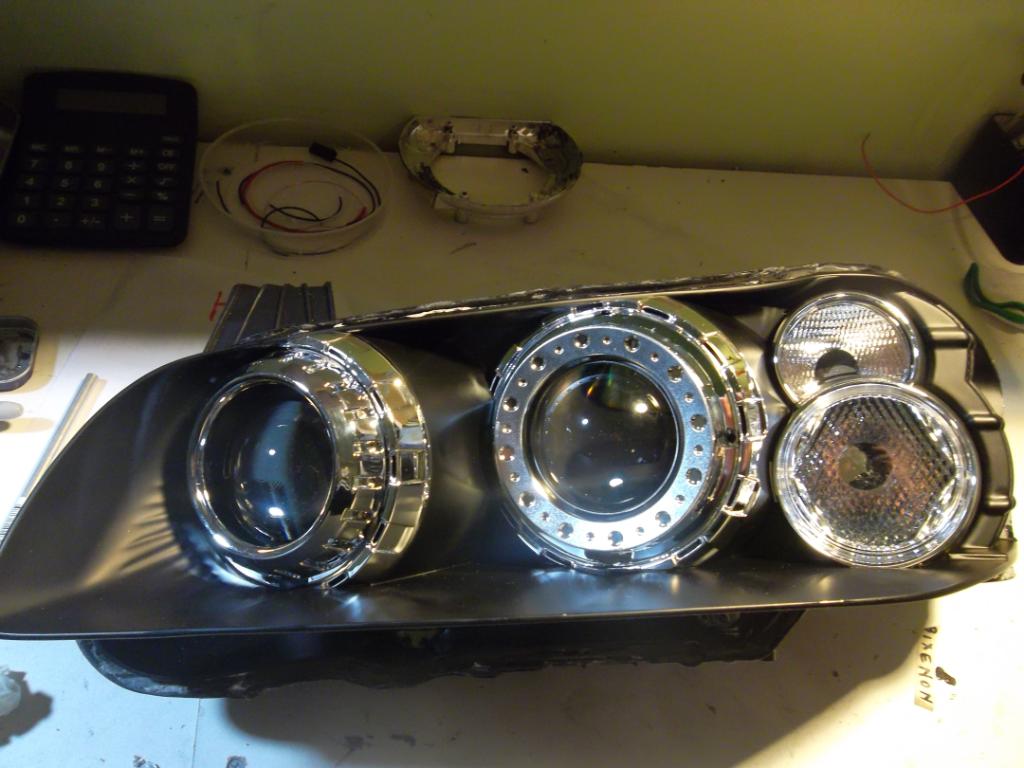
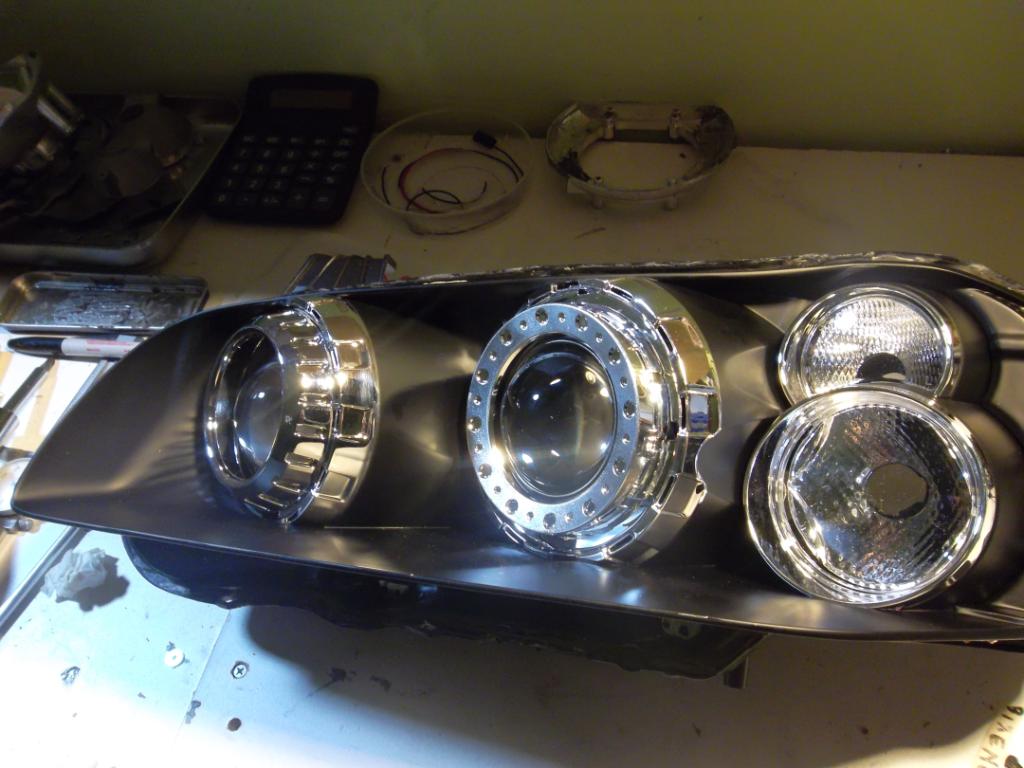
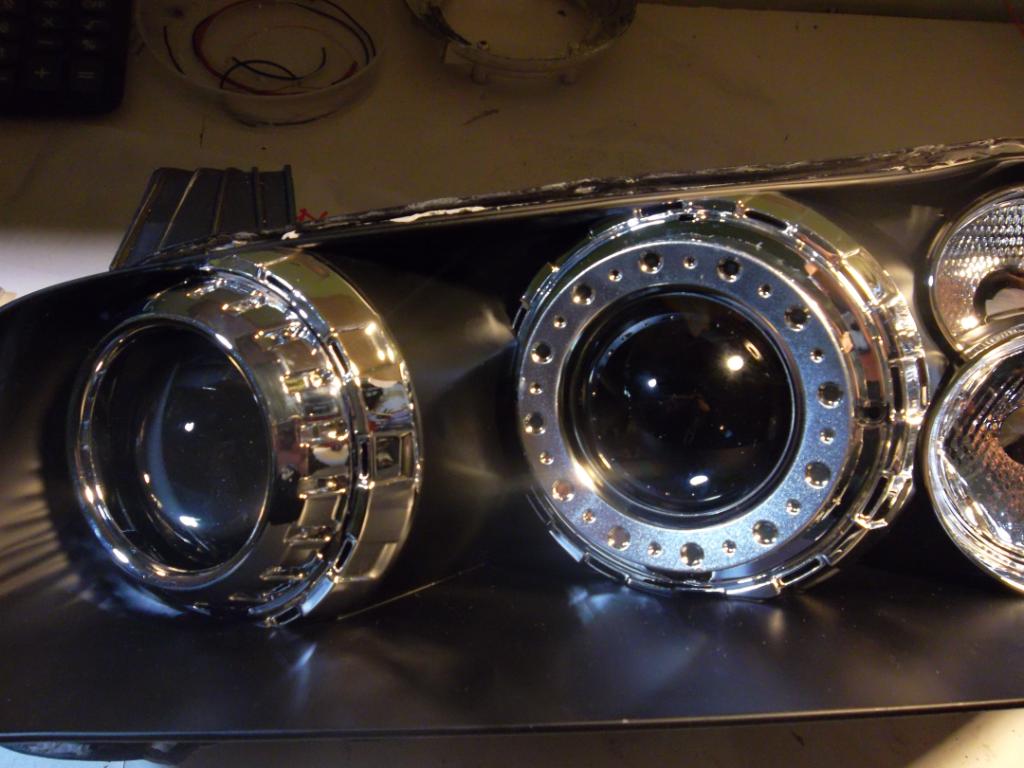
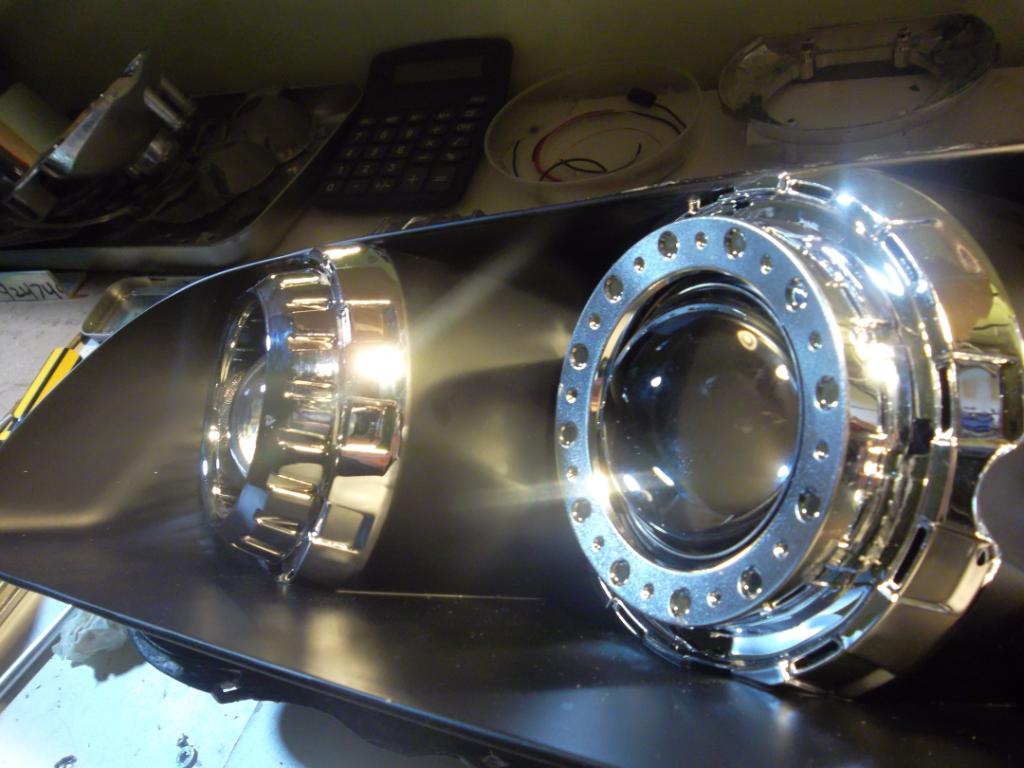
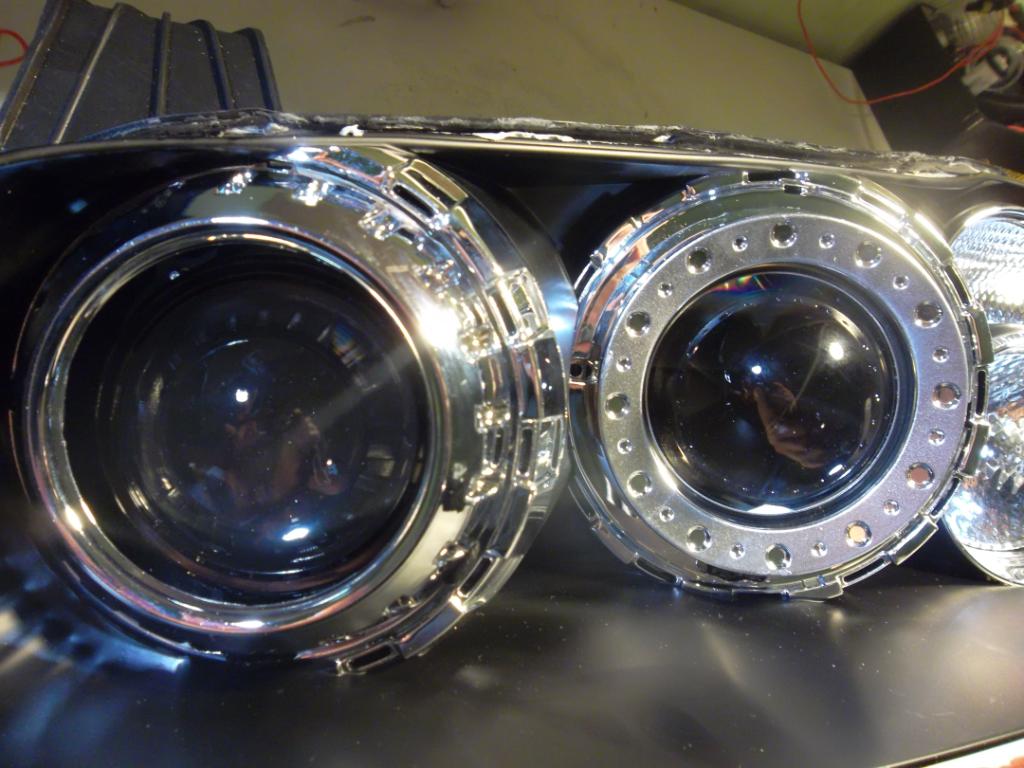
Possibly the worst thing about most projectors for me, is that spray can chrome finish. It's horrid and cheap looking. I feel this way about the bulk of even OEM projector shrouds out there. Are there many options to fix this other than just normal paint MSU? ie. Higher quality shroud material?
02-21-2012, 09:06 PM
#357
Possibly the worst thing about most projectors for me, is that spray can chrome finish. It's horrid and cheap looking. I feel this way about the bulk of even OEM projector shrouds out there. Are there many options to fix this other than just normal paint MSU? ie. Higher quality shroud material?
I'm not liking the G37 shroud in the low beam, it doesn't flow with the rest of the headlight's curve. There are better quality chrome finish out there, but it's hard to find that can be fittied well AND look good in the same time.
My favorite shrouds are G37 coupe, LS430, and M45. But these are huge and if I cut it to fit, it would look weird. It's tough..I can do everything right, but the shroud can make or break the retro IMO.
I'll keep playing with it, I just can't just keep buying shrouds hoping to find a perfect shrouds I'd be broke by the end of the month
02-21-2012, 09:49 PM
#360
Yeah the G shrouds are very weird. Look fine tucked away on the G with a single projector, but put another different one next to it and things are looking off.
I know you'll figure it out.
I might just pay someone to do my Retros, as I really don't feel like having to learn every little thing about them. And the G's headlights are insanely expensive if I mess up.
I know you'll figure it out.
I might just pay someone to do my Retros, as I really don't feel like having to learn every little thing about them. And the G's headlights are insanely expensive if I mess up.