
Interior LED Upgrade
 09-02-2005, 11:04 PM
#1
Guest
Posts: n/a
Interior LED Upgrade - Updated 9/11/05
Figured we can continue this with a new thread....OK --- so the screen is finished and he had a couple led's that fit the AC buttons....The rest of the bulbs were measured and order --- a whopping 70 total!!!!! Here are some pics


 09-03-2005, 09:21 AM
#7
Guest
Posts: n/a
Originally Posted by tototee999
dude, that looks awesome. did you use the sticky to go through with the procedure? was it easy? how much did it cost total and how much time did it take?
Thank you Tototee --- I showed my friend (I need to stop calling him my friend because I married his sister...lol) My brother-In Law the sticky when I asked him if he could do it --- he read about 2 threads and was like yeah this is easy and he had the bulbs that were listed in the sticky (he does custom audio/video electronic engineering for a living) So as far as using the sticky he didn't use it as a guide but I'm assuming its the same thing he did --- When we do the dash I'll print it out and see if its the same steps.
As far as being easy --- for him it was I didn't do anything but watch him and hold this and hold that...put this over here and get out of my light...hehehe
Total cost was free because he had the bulbs already --- I know he used the same bulbs that were in the sticky because he wrote down the part number and pulled them from his stock --- so I guess the screen bulbs cost the same as in the sticky
Total time was about 1 hour ---- he pulled the screen out of the dash in 10 minutes ---- put a bulb in to test it and then finished 40 minutes later --- so it was pretty quick.... I was surprised how fast the dash came apart and how quick the LED conversion was...
Originally Posted by 04blackmaxx
Awesome man, cant wait to see everything done

Originally Posted by akaxmrxhammer
it looks nice. how long did it take for the led swap?
Originally Posted by install30
sweet.....did you cut the pocket out for the double din?
Originally Posted by stunta666
did you do it your self? where can you get those led's?
I'll get answers to all your ???? that I can't answer --from him---- Looking forward to seeing the full conversion ---- I can tell you this once you have the blue screen and its just been a half day --- its like having a new car...
Also I think the screen is the easiest part because the dash has 56 LED's and there not all the same size --- so I think that piece will be a little more time consuming
 09-03-2005, 10:06 AM
#9
Guest
Posts: n/a
Originally Posted by SilverSL
Thats nice lookin, even better is the setup you got with the double din head unit,. what kinda head unit is that and what can it do, like play movies, GPS, XM or Sirius radio???
http://www.cardomain.com/profile/10069
Think this comparison speaks volumes
 09-03-2005, 01:19 PM
#13
Guest
Posts: n/a
Originally Posted by boone
Looks great. Are the gages next on the list?
Originally Posted by tek-niq
wow, I seen the how to on that, but f-that i know I will fu*k that up somehow... looks good now make the gauges to match..
Originally Posted by mroleg
Yeah, unless I find somebody to do it for me - I ain't touching it.
Although it looks freaking awesome. Great mod man.
Although it looks freaking awesome. Great mod man.
 09-04-2005, 12:30 PM
#16
Donating Maxima.org Member


Join Date: Jul 2005
Posts: 303
I love those LED's i got to get this done to my car those orange lights bother the hell out of me. I might try half white half blue. I just need to find someone that knows how to do it in Northern VA. any people you guys know ??
09-04-2005, 12:41 PM
#17
Guest
Posts: n/a
Hey Everybody,
So here's the deal on the screen as far as colors go (because I got a request today for pink) the standard blue, green, white, are ok.... any other colors will most likely have to be specially ordered and may take a little longer....
You can e-mail me at graham2@***.net if you have any questions or want to make arrangements --- the dash conversion will be done soon --- then the gauges...then the misc stuff ....I'll get you all a price on that when its finished.....I can hardly wait to see it myself
09-04-2005, 12:47 PM
#18
Originally Posted by gec
Hey Everybody,
So here's the deal on the screen ---- $400 for the upgrade --- we'll supply all the LED's and warranty the workmanship ---- You decide whether you want bright or superbright LED's --- there will be a 2 day turn around max time if you need to mail the screen to us, because we know you don't want to be riding around with no screen --- if you live in the Northeast then its only a drive down here....
As far as colors go (because I got a request today for pink) the standard blue, green, white, are ok.... any other colors will most likely have to be specially ordered and may take a little longer....
You can e-mail me at graham2@***.net if you have any questions or want to make arrangements --- the dash conversion will be done by the end of the week --- I can hardly wait
cool ****.... show me the finish product, and I'll show you a max that needs this install..


 09-05-2005, 05:43 PM
#20
Donating Maxima.org Member
Join Date: Apr 2005
Posts: 451
Excellant Work
Great work you are doing here . Love the screen conversion job.
I did my interior lights as well used a number of different types of leds to get the effects needed . Put some quads and even two 8 led in my Roof Mounted DvD player lights. Gives an fluro white light effect with the slight blue tinge.
Replaced me number plate and parking lights with the Four clippers too..
Eights

Four clip spots

Fat output Sixes

I did my interior lights as well used a number of different types of leds to get the effects needed . Put some quads and even two 8 led in my Roof Mounted DvD player lights. Gives an fluro white light effect with the slight blue tinge.
Replaced me number plate and parking lights with the Four clippers too..
Eights
Four clip spots
Fat output Sixes
09-05-2005, 07:50 PM
#22
Guest
Posts: n/a
Map lights do the following:
1. Pull the plastic covering off. This plastic cover clips in on all four edges, so the best way to do this is to pull out one side carefully. Once one side is out the plastic should just come off with a jiggle. Don�t be afraid to use a little pressure, as it is somewhat durable.

2. You will see the 2 ugly amber Bulbs - simply rotate them out. To put a new one in you can rotate or clip it back into place. BE SURE the bulbs on the are facing downward, other wise you will not maximize the light � and it will really look stupid if one is in correct and the other is not.
Map light slit bulb � do the following
3. This change requires you to pull the map light cover from the roof of the car. First, open the sunglass holder - using a phillips head screw driver unscrew the bolt. Second. this cover is still attached by 4 clips placed in each of the four corners. Using a butter knife wedge the knife between the roof cover and the plastic housing in one corner as outlined and pull down. This may take a bit of muscle. Repeat the steps for each corner.

4. Disconnect the plug. You will see a black **** where the LED is attached too. Twist the **** to pull bulb out. Once you swap it out simply place the **** back in and give it a quarter twist to lock into place.
5. Reconnect the plug. Line up the cover. Pick a corner and using your fist bang it back into place. Repeat for other three corners.
Rear Dome Light
6. Using your fingers pull the cover from the roof. There is a black metal piece that covers the light housing. Pull this out and discard. Be careful, as it may be hot.
7. The Bulb's will be facing you. Pull the old ones out and replace. Again, ensure the bulbs are facing downward.
8. Replace the cover by lining it up and pushing it back into place.
Note: It would be a wise idea to turn your interior lights off while doing this procedure. If you have any questions feel free to PM me.
1. Pull the plastic covering off. This plastic cover clips in on all four edges, so the best way to do this is to pull out one side carefully. Once one side is out the plastic should just come off with a jiggle. Don�t be afraid to use a little pressure, as it is somewhat durable.
2. You will see the 2 ugly amber Bulbs - simply rotate them out. To put a new one in you can rotate or clip it back into place. BE SURE the bulbs on the are facing downward, other wise you will not maximize the light � and it will really look stupid if one is in correct and the other is not.
Map light slit bulb � do the following
3. This change requires you to pull the map light cover from the roof of the car. First, open the sunglass holder - using a phillips head screw driver unscrew the bolt. Second. this cover is still attached by 4 clips placed in each of the four corners. Using a butter knife wedge the knife between the roof cover and the plastic housing in one corner as outlined and pull down. This may take a bit of muscle. Repeat the steps for each corner.
4. Disconnect the plug. You will see a black **** where the LED is attached too. Twist the **** to pull bulb out. Once you swap it out simply place the **** back in and give it a quarter twist to lock into place.
5. Reconnect the plug. Line up the cover. Pick a corner and using your fist bang it back into place. Repeat for other three corners.
Rear Dome Light
6. Using your fingers pull the cover from the roof. There is a black metal piece that covers the light housing. Pull this out and discard. Be careful, as it may be hot.
7. The Bulb's will be facing you. Pull the old ones out and replace. Again, ensure the bulbs are facing downward.
8. Replace the cover by lining it up and pushing it back into place.
Note: It would be a wise idea to turn your interior lights off while doing this procedure. If you have any questions feel free to PM me.
Congratulations on a much better looking interior!!!!!!!!!!!!!
09-05-2005, 08:48 PM
#23
Senior Member

Join Date: May 2005
Posts: 367
ok...i got a question. tis has been bothering me since i got my car. what is that little openning in between the map lights ?? light shines trough it when the headlights are on...it really doesnt seem to have any use...here it seems it is being refered to as "map light slit bulb " ?? whats is that ?? i will use one of the previously posted picstures just to explain my thing here...
luigi
luigi
09-05-2005, 08:51 PM
#24
Senior Member
Join Date: May 2005
Posts: 367
i used your own pictures to ilustrate my problem (curiosity) hope t doesnt bother you . thank you and btw...looks great !! waiting on the price for the dash led swap.
luigi
here you see it in between the map lights...

here is by itself...what is the point of it ??

luigi
Originally Posted by gec
here you see it in between the map lights...
here is by itself...what is the point of it ??
09-05-2005, 08:54 PM
#25

Originally Posted by luigi'smax
i used your own pictures to ilustrate my problem (curiosity) hope t doesnt bother you . thank you and btw...looks great !! waiting on the price for the dash led swap.
luigi
luigi
When it's really dark in your car you'll see that it illuminates the inside of your car, although pretty dim, that's what is does. My friend has an Audi and I noticed it has the same thing but it seems to put out more light...
 09-06-2005, 02:07 AM
#27
Donating Maxima.org Member
Join Date: Apr 2005
Posts: 451
My pale blue period ... LOL
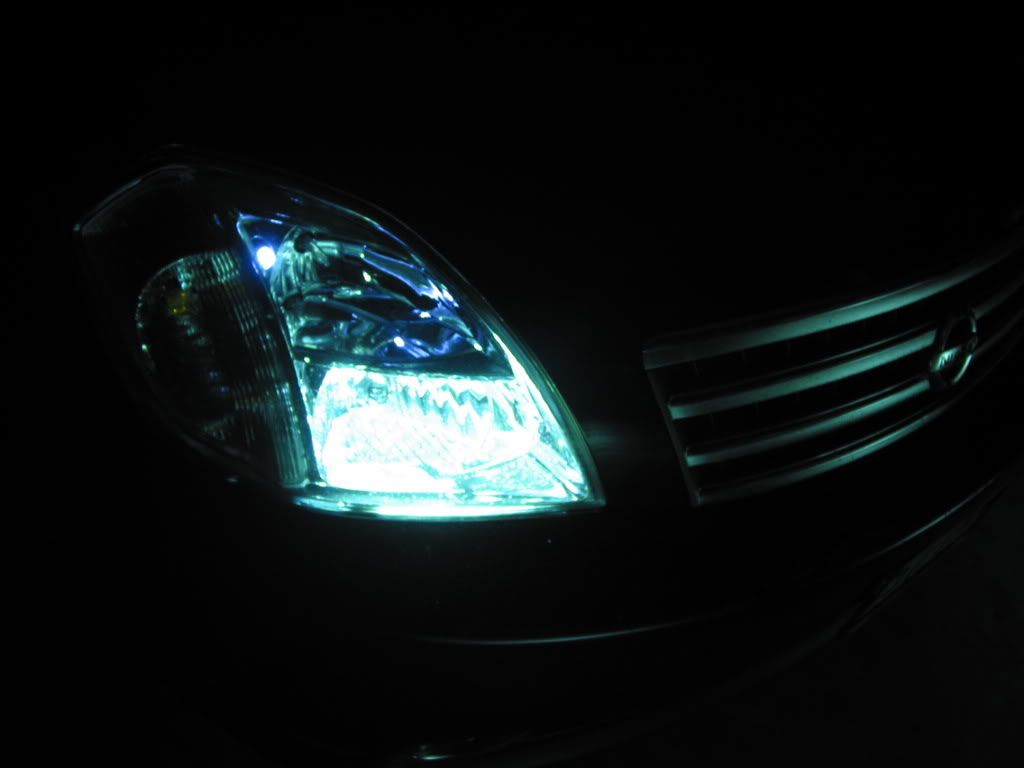
Here is my version of lighting up. The effect was to get a slight pale blue tinge to my lighting with these new LED which I hope comes out in the photos as they are in real life ( in fact they look more blueish in the photos)
Fat Output DVD roof console

Outside puddle light when you hit the remote or open doors

Number plate lighting
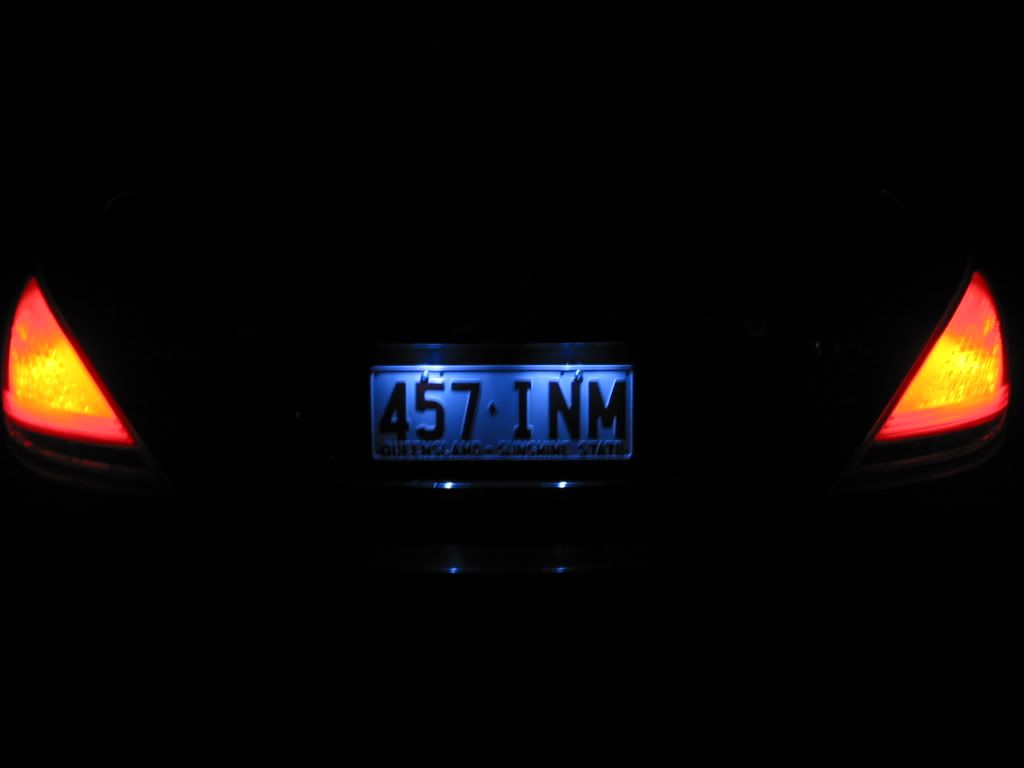
HID & park Lights
Can't do one with the hid high beams on cause it's blinding the camera and it's raining so aint movin the car out of the garage
Fat Output DVD roof console
Outside puddle light when you hit the remote or open doors
Number plate lighting
HID & park Lights
Can't do one with the hid high beams on cause it's blinding the camera and it's raining so aint movin the car out of the garage
09-06-2005, 03:11 PM
#28
Guest
Posts: n/a
Originally Posted by EdRomo86
how come the light for the ac button is still orange and the other ones are blue?
Originally Posted by luigi'smax
what is that little openning in between the map lights ?? light shines trough it when the headlights are on...it really doesnt seem to have any use....here it seems it is being refered to as "map light slit bulb
The correct name for it is Console Light ---- Not sure if there is a specific use for it other than a courtesy light while in the cabin... Notthat it provides light or anything...lol
Originally Posted by blackpaladin67
Here is my version of lighting up
 09-06-2005, 03:28 PM
#30
Originally Posted by gec
The correct name for it is Console Light ----
Gec, what bulb type is used for that console light? I tried to take the plastic piece out but wasn't sure how to get it down, now that I know what to do I want to change mine out...
09-06-2005, 05:19 PM
#31
Guest
Posts: n/a
Originally Posted by jsmithsole
Gec, what bulb type is used for that console light?
Click this link: http://www.superbrightleds.com/cgi-b...?product=OTHER
Copy and paste this part number in the search field
WLED 6-LED bulb
$2.99 and your problems gone
09-06-2005, 05:30 PM
#33
Guest
Posts: n/a
Originally Posted by jsmithsole
gonna jump on it tonight...
I have amber and wht, we'll see how they look.
I have amber and wht, we'll see how they look.
09-06-2005, 07:00 PM
#34
Senior Member
Join Date: May 2005
Posts: 367
Originally Posted by jsmithsole
When it's really dark in your car you'll see that it illuminates the inside of your car, although pretty dim, that's what is does. My friend has an Audi and I noticed it has the same thing but it seems to put out more light...
but hey, after you put the led in there did it look like it does light the interior??
luigi
09-06-2005, 07:33 PM
#35
Originally Posted by gec
CooL -- Post some pics and if you don't mind check my writeup for accuracy so we can add to it if necessary...thanx bro --- now enough chattin get to it
Done, I went with white LED's and it's bright. Lights up my whole center console/armrest. I tried amber but it just wasn't that bright.
2 things, the stock light isn't LED, just reg. And you forgot to mention the center screw that holds the whole thing up in there. But yes the clips do hold it pretty tight, I was afraid I was going to break somethng for sure!!!
Pics coming soon...


 09-06-2005, 07:55 PM
#38
Guest
Posts: n/a
The white looks good --- it matches well with the map lights --- Seems like it lights better too --- I might have to swap mine out.... The blue doesn't give off any light other than it looks better than orange....but that white....hmmmmm....I'm gonna try it out tomorrow and see....
thanx for the check and balances.... feel free to copy and paste it with your pics so we get a nice clean write-up for others....
btw --- did you use the same bulb for the security light???
thanx for the check and balances.... feel free to copy and paste it with your pics so we get a nice clean write-up for others....
btw --- did you use the same bulb for the security light???
09-06-2005, 07:57 PM
#39
Guest
Posts: n/a
Originally Posted by luigi'smax
that damm light does not light up anything !! (imo ) i've seen the ones in the bimers and thats is something else !! the new jettas and the other one...thats nice...it would be nice if it really lit the interior...
but hey, after you put the led in there did it look like it does light the interior??
luigi
but hey, after you put the led in there did it look like it does light the interior??
luigi
Think Jsmith just solved it for ya bro ---- go with superbright white if you want light