Budget intake option.
 05-08-2006, 07:39 PM
#1
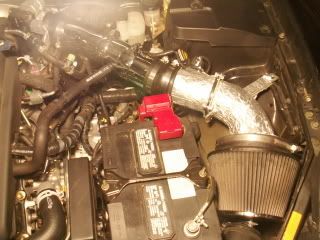
Budget intake option.
I spent some time at PepBoys today and here is the result:

I have to say during normal driving you can't hear the difference but once you open it up sounds really mean.
I have to say during normal driving you can't hear the difference but once you open it up sounds really mean.
 05-08-2006, 08:29 PM
#4
Nations 1st 6th Gen Turbo


iTrader: (15)
Join Date: May 2005
Location: Displaced New Yorker in Southern, MD
Posts: 10,202
Originally Posted by mroleg
Thanks Chris. The whole thing came out to around 90 bux.
Great freakin job...
05-08-2006, 11:09 PM
#7

did you say pep boyz.... holy crap I need to find one out here now..... that kicks ***.... I will draw up my design for you guys and see what you think maybe they can make it for me..... hey what parts did you have to purchase before going.... did they supply everything..... info man share.... 90 dollars for that is a steal let me tell ya....
05-09-2006, 05:32 AM
#8
Ok, here is the layout. It took me a while because I was taking one part at a time and test fit it but here is what you will need:
Edit: All parts are Spectre "PowerAdder"
1 of - 8708 - Air Intake Tube 4"

1 of - 8707 - Air Intake Vacuum/Sensor Adapter 3"

1 of - 8728 - Air Intake Tube 22 Deg. Elbow 3"

1 of - 8148 - Duct Mounting Plate

1 of - 8132 - Cone Air Filter Red

2 of - 8771 - Coupler/Reducer Combo
1 of - 8701 - Air Intake Mounting Bracket kit Universal
3 of - 8706 Air Intake Connection Collar 3"
1 of - piece of silicone tubing.
Here is how I did it. You may find other ways I am sure.
First - diassemble stock intake. Remove everything from the intake manifold all the way to the front including air box. Leave the bracket that holds airbox in place you will use it later to attach custom intake bracket to it.
Second - Attach 4" intake tube (8708) to intake manifold using Coupler/Reducer (8771)
Third - Air Intake Vacuum/Sensor Adapter (8707) to the 4" air intake tube (8708) using air intake connection collar (8706).
Fourth - Attach Air Intake Tube 22 Deg. Elbow (8728) to the Air Intake Vacuum/Sensor Adapter (8707) using air intake connection collar (8706)
Fifth - Attach attach Duct mounting plate (8148) to the MAF tube (flange side) using 2 screws diagonally. Then drill the other two holes and tighten it with the screws.
Sixth - Attach MAF tube (side without a flange) to the 22 degree elbow (8728) using Coupler/Reducer Combo (8771).
Seventh - attach Cone air filter red (8132) to the short rube on the end of duct mounting plate.
Eighth - unscrew one connection collar (8706) and put it on the maf tube right behind the flange part. Use Air Intake Mounting Bracket kit (8701) to attach it the the braket that used to hold airbox in place.
Nineth - connect vaccuum hose to the Air Intake Vacuum/Sensor Adapter (8707). Connect MAF sensor wire.
Start the car and enjoy.
Edit: All parts are Spectre "PowerAdder"
1 of - 8708 - Air Intake Tube 4"
1 of - 8707 - Air Intake Vacuum/Sensor Adapter 3"
1 of - 8728 - Air Intake Tube 22 Deg. Elbow 3"
1 of - 8148 - Duct Mounting Plate
1 of - 8132 - Cone Air Filter Red
2 of - 8771 - Coupler/Reducer Combo
1 of - 8701 - Air Intake Mounting Bracket kit Universal
3 of - 8706 Air Intake Connection Collar 3"
1 of - piece of silicone tubing.
Here is how I did it. You may find other ways I am sure.
First - diassemble stock intake. Remove everything from the intake manifold all the way to the front including air box. Leave the bracket that holds airbox in place you will use it later to attach custom intake bracket to it.
Second - Attach 4" intake tube (8708) to intake manifold using Coupler/Reducer (8771)
Third - Air Intake Vacuum/Sensor Adapter (8707) to the 4" air intake tube (8708) using air intake connection collar (8706).
Fourth - Attach Air Intake Tube 22 Deg. Elbow (8728) to the Air Intake Vacuum/Sensor Adapter (8707) using air intake connection collar (8706)
Fifth - Attach attach Duct mounting plate (8148) to the MAF tube (flange side) using 2 screws diagonally. Then drill the other two holes and tighten it with the screws.
Sixth - Attach MAF tube (side without a flange) to the 22 degree elbow (8728) using Coupler/Reducer Combo (8771).
Seventh - attach Cone air filter red (8132) to the short rube on the end of duct mounting plate.
Eighth - unscrew one connection collar (8706) and put it on the maf tube right behind the flange part. Use Air Intake Mounting Bracket kit (8701) to attach it the the braket that used to hold airbox in place.
Nineth - connect vaccuum hose to the Air Intake Vacuum/Sensor Adapter (8707). Connect MAF sensor wire.
Start the car and enjoy.

 writeup.

 05-10-2006, 05:05 AM
#15
Originally Posted by 04BlackMaxx
What was the total cost?
Check engine come on?
Check engine come on?
I hooked everything up correctly and reset ecu afterwards.
 05-14-2006, 07:07 AM
#19
I think replacing this piece provides better air flow. If you look through the stock piece that comes eight off the throttle nody, you see its VERY undulating. Now its nice and smooth, and smooth flowing air means more can be crammed in the engine.
I think insulating will quiet the intake down to some extent, another added benefit.
I think insulating will quiet the intake down to some extent, another added benefit.


 Proves how much I pay attention.

 05-19-2011, 02:23 PM
#27
I never reset my ECU. Don't need to, not necessary.


Thread
Thread Starter
Forum
Replies
Last Post
maxima297
4th Generation Maxima (1995-1999)
4
09-30-2015 03:32 PM