
Customize lights inside/Out of vehicle.


Thread Starter
Junior Member
Joined: Apr 2015
Posts: 24
Customize lights inside/Out of vehicle.
I'm thinking about a idea for a light set up for the inside ando outside. I have a 2014 pearl white Max.
1) An artic blue Halo head light set up.
2) Swap out stock lights that come on when you open the doors. Overheard and by feet for artic blue.
3) The stock orange lights that come on behind your radio,navigation and in the general dash board area.
My idea is to make an artic blue/icy light theme. Has anyone done this before and how hard would it be to do? I might have to take it to a professional because I'm not good with cars myself and I want it to look good.
Any feed back is appreciated. .

Ummmm I'd say there's a wealth of information regarding lighting on this forum. I'd suggest using the search box.
Many have halos around their headlights (myself included) which is a common and relatively easy mod but involves baking open the headlight assembly and wiring things up to work properly so I'd suggest having a shop do it. The interior door lights are super simple and can be done in a few minutes. The orange dash and radio backlighting is a different story. A few have done it but it requires removing each individual led then resoldering the new ones in place for the entire dash which seems like a pain to me.
Anyway, good luck!

Senior Member
Joined: May 2014
Posts: 302
From: Houston, TX
The amber lighting for your radio, navigation, and dashboard area is a very difficult, and costly job. If you do not have any experience soldering, consider giving it to a professional. Even then, they will charge you about $1,000 for it to be done. The LEDs (PLCC-4) are the size of Lincoln's forehead on the penny.

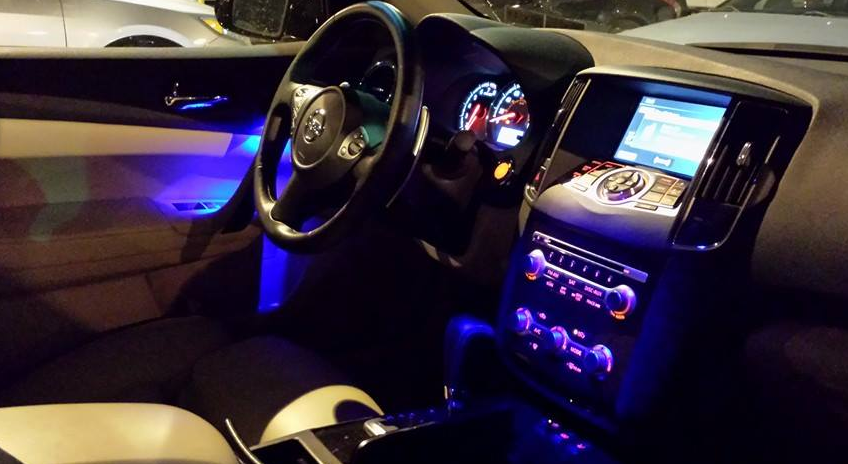
Here is what I have done. There is an overhead light next to your sunroof/moonroof controls that lights up the center console and cupholders, and you can change out with a different color LED. The factory color is orange, but I changed it to a 3mm blue LED to contrast the orange on the radio.
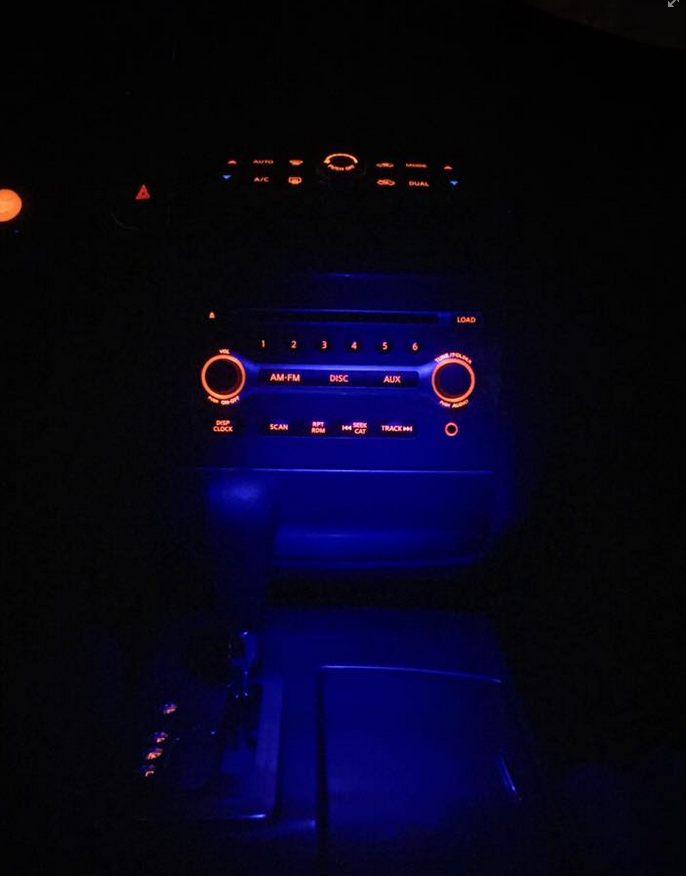
There are also little lights on the under the front driver and passenger door handles illuminating the door lock and window controls. Again, factory color is orange. You can change it to any color 3mm LED.
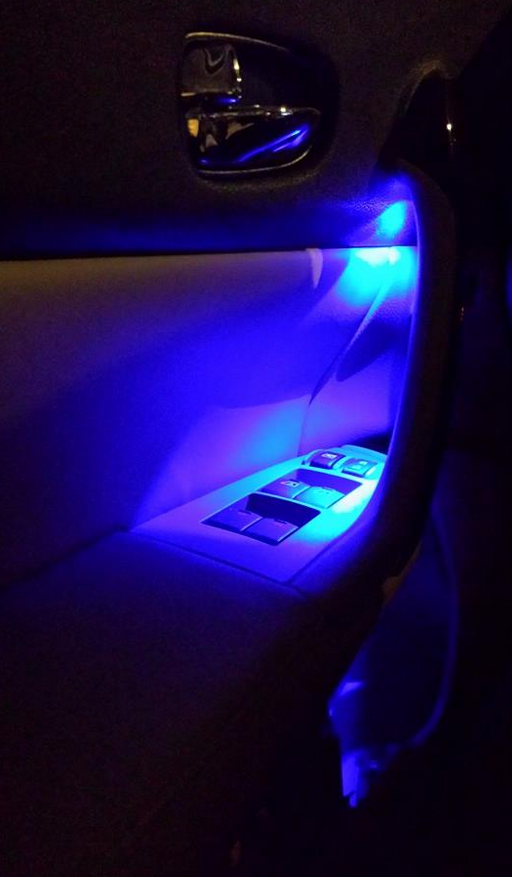
What it looks like when it is all said and done. Really helps contrast the orange on the radio, and looks much more modern and luxurious.
There are vendors out there that sell a plug-and-play projector light for the doors shining a Nissan logo already wired into where the factory 194 incandescent bulb would go. This way, you do not have to drill a hole into your door and do any wiring.
For your headlights, you can do it yourself or have a professional do it. There are ton of write-ups on how to bake your headlight open and reseal them, including the current Maxima we have. Many have halos on their Maximas. You will have better quality lights combined with a legitimate warranty through TheRetrofitSource.
Here is what I have done. There is an overhead light next to your sunroof/moonroof controls that lights up the center console and cupholders, and you can change out with a different color LED. The factory color is orange, but I changed it to a 3mm blue LED to contrast the orange on the radio.
There are also little lights on the under the front driver and passenger door handles illuminating the door lock and window controls. Again, factory color is orange. You can change it to any color 3mm LED.
What it looks like when it is all said and done. Really helps contrast the orange on the radio, and looks much more modern and luxurious.
There are vendors out there that sell a plug-and-play projector light for the doors shining a Nissan logo already wired into where the factory 194 incandescent bulb would go. This way, you do not have to drill a hole into your door and do any wiring.
For your headlights, you can do it yourself or have a professional do it. There are ton of write-ups on how to bake your headlight open and reseal them, including the current Maxima we have. Many have halos on their Maximas. You will have better quality lights combined with a legitimate warranty through TheRetrofitSource.
Thread Starter
Junior Member
Joined: Apr 2015
Posts: 24
The amber lighting for your radio, navigation, and dashboard area is a very difficult, and costly job. If you do not have any experience soldering, consider giving it to a professional. Even then, they will charge you about $1,000 for it to be done. The LEDs (PLCC-4) are the size of Lincoln's forehead on the penny.
Here is what I have done. There is an overhead light next to your sunroof/moonroof controls that lights up the center console and cupholders, and you can change out with a different color LED. The factory color is orange, but I changed it to a 3mm blue LED to contrast the orange on the radio.

There are also little lights on the under the front driver and passenger door handles illuminating the door lock and window controls. Again, factory color is orange. You can change it to any color 3mm LED.

What it looks like when it is all said and done. Really helps contrast the orange on the radio, and looks much more modern and luxurious.

There are vendors out there that sell a plug-and-play projector light for the doors shining a Nissan logo already wired into where the factory 194 incandescent bulb would go. This way, you do not have to drill a hole into your door and do any wiring.
For your headlights, you can do it yourself or have a professional do it. There are ton of write-ups on how to bake your headlight open and reseal them, including the current Maxima we have. Many have halos on their Maximas. You will have better quality lights combined with a legitimate warranty through TheRetrofitSource.
Here is what I have done. There is an overhead light next to your sunroof/moonroof controls that lights up the center console and cupholders, and you can change out with a different color LED. The factory color is orange, but I changed it to a 3mm blue LED to contrast the orange on the radio.
There are also little lights on the under the front driver and passenger door handles illuminating the door lock and window controls. Again, factory color is orange. You can change it to any color 3mm LED.
What it looks like when it is all said and done. Really helps contrast the orange on the radio, and looks much more modern and luxurious.
There are vendors out there that sell a plug-and-play projector light for the doors shining a Nissan logo already wired into where the factory 194 incandescent bulb would go. This way, you do not have to drill a hole into your door and do any wiring.
For your headlights, you can do it yourself or have a professional do it. There are ton of write-ups on how to bake your headlight open and reseal them, including the current Maxima we have. Many have halos on their Maximas. You will have better quality lights combined with a legitimate warranty through TheRetrofitSource.
I'll take another look at these things once I get done work.


Senior Member
Joined: May 2014
Posts: 302
From: Houston, TX
- You'll need 3mm LED, anything larger will not fit and anything smaller will not emit enough light through the opening.

- From the front of the panel, pull downward and it should pop off.

- The 3mm LED sits inside this black box.
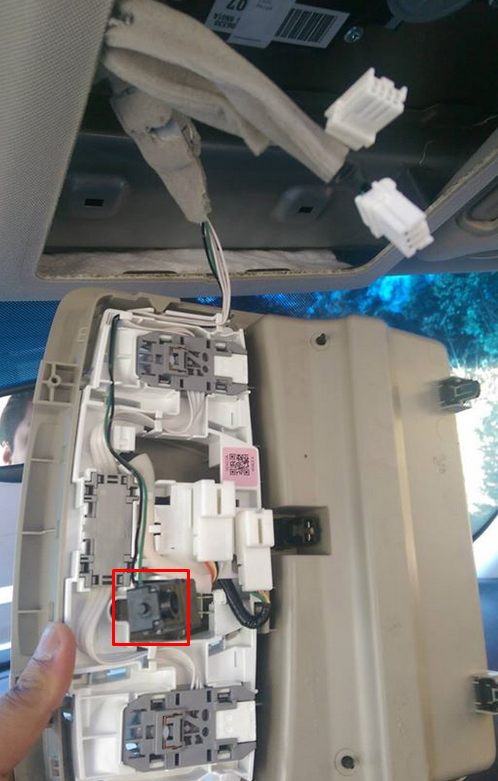
- I forget how to open the black box, but if I remember there are these little three black pins on the outside that you have to press down simultaneously and then it will separate revealing the light. Disconnect the harness that attaches to the box so you can remove it and put in the LED easier.

- Take your new 3mm LED and cut it to same size as the factory orange 3mm led. The reason to remove the box from the housing is because the new pins on the LED may be thicker than the factory OEM, so having the box separated will be easier for you to pry apart the old connectors to seat the new LED.

- Put the new LED in and close the box. It is important to close the box as the box puts pressure onto the wires to ensure the wires have a solid connection and act as a pressure crimp.

- Put everything back together, and enjoy your new blue light.

Last edited by Daaavid; May 13, 2015 at 08:26 AM.

Senior Member
Joined: May 2014
Posts: 302
From: Houston, TX
Dependent upon what year, model, and package you have, the door light is another story and much more complex. To see if you have a light back there, turn on your parking light or low beams and place your hand behind the handle. All Maximas will have a hole for the light, but few will have a physical light. This is important because if there is actually a light behind there, then your vehicle is wired from the factory. If not, then you will need to run it.
You can pry open the door handle by putting a flathead screw driver or using those plastic trim removal tools on the bottom of the door handle and prying outward. It's held in by clips.
To change the door handle light, you will actually need to cut the wire to remove the LED as the housing cannot be removed.
- Take a flathead screw driver or a plastic trim removal tool and pry from the bottom.

- Here you can see the LED, housing, and the two wires. The LED housing cannot be removed, so you must physically cut the wires and crimp new ones.

- Cut as close as you can to the existing housing and splice them.


- Grab your new LEDs. These LEDs came pre-wired so all you have to do is match up the negative and positive, and it should light up. Link attached below.

- Solder or crimp, your choice. The lights will not be moved, but because it is in the door, it is subject to vibrations and slamming. Determine what is best for you. You will also want to heatshrink.


- Seat the wires neatly and ensure the light comes on. You can cut the wires shorter if you want, but there is ample room to tuck the wires.

- Finished product.

http://www.ebay.com/itm/like/261615939634?lpid=82&chn=ps

Newbie - Just Registered
Joined: Apr 2015
Posts: 13
From: Southern Cali
need help...
trying to find some good led DTRL / turn signals ive tried a couple sets of bulbs with the resistors but cant seem to figure out why they don't blink, ive got them to turn on with the signal but they just stay on, then if I use the running lights they blow the fuse.... I tired looking for a thread on this but cant seem to find one... any help would do..
Thank you
Thank you
Senior Member
Joined: May 2014
Posts: 302
From: Houston, TX
I believe the lights are only wired if you have the mood lighting package from Nissan ($500). I will see if I can find a write up on how to wire it easily if you don't have the package.
You need 3157CK base bulbs. If it is just a regular 3157, you will blow fuses.
trying to find some good led DTRL / turn signals ive tried a couple sets of bulbs with the resistors but cant seem to figure out why they don't blink, ive got them to turn on with the signal but they just stay on, then if I use the running lights they blow the fuse.... I tired looking for a thread on this but cant seem to find one... any help would do..
Thank you
Thank you


Newbie - Just Registered
Joined: Mar 2023
Posts: 1
Wires?
Dependent upon what year, model, and package you have, the door light is another story and much more complex. To see if you have a light back there, turn on your parking light or low beams and place your hand behind the handle. All Maximas will have a hole for the light, but few will have a physical light. This is important because if there is actually a light behind there, then your vehicle is wired from the factory. If not, then you will need to run it.
You can pry open the door handle by putting a flathead screw driver or using those plastic trim removal tools on the bottom of the door handle and prying outward. It's held in by clips.
To change the door handle light, you will actually need to cut the wire to remove the LED as the housing cannot be removed.
You can pry open the door handle by putting a flathead screw driver or using those plastic trim removal tools on the bottom of the door handle and prying outward. It's held in by clips.
To change the door handle light, you will actually need to cut the wire to remove the LED as the housing cannot be removed.
- Take a flathead screw driver or a plastic trim removal tool and pry from the bottom.
- Here you can see the LED, housing, and the two wires. The LED housing cannot be removed, so you must physically cut the wires and crimp new ones.
- Cut as close as you can to the existing housing and splice them.
- Grab your new LEDs. These LEDs came pre-wired so all you have to do is match up the negative and positive, and it should light up. Link attached below.
- Solder or crimp, your choice. The lights will not be moved, but because it is in the door, it is subject to vibrations and slamming. Determine what is best for you. You will also want to heatshrink.
- Seat the wires neatly and ensure the light comes on. You can cut the wires shorter if you want, but there is ample room to tuck the wires.
- Finished product.
Qty 10 LED 3mm Pre Wired 12 Volt LEDs 12V Blue USA | eBay

Thread
Thread Starter
Forum
Replies
Last Post
Maxima30
5th Generation Maxima (2000-2003)
2
Sep 7, 2015 06:13 PM