

3rd gen VQ35DE Full ECU Swap Progress Thread

Thread Starter
NWP Engineering.com
iTrader: (128)
Joined: Jul 2001
Posts: 14,065
From: Walstonburg, NC
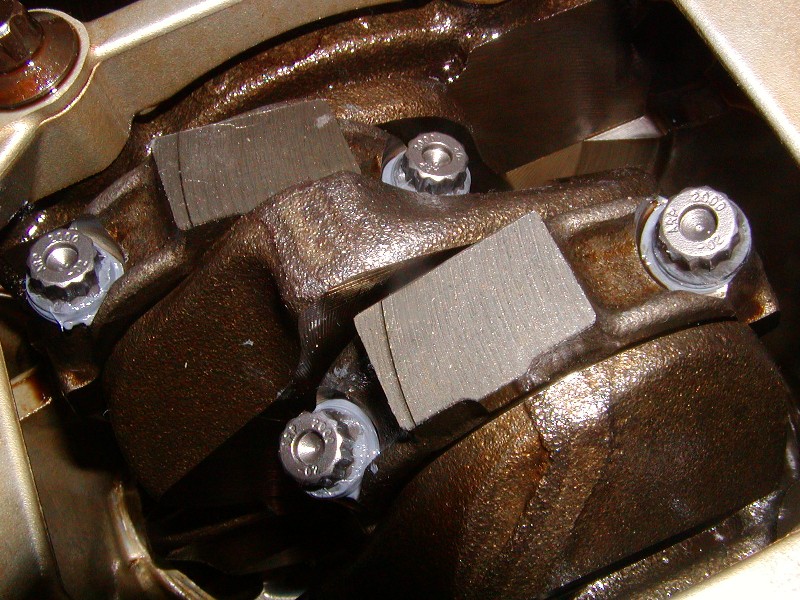
I honestly don't see a problem with tightening the ARP bolts 20 times to 28ft-lbs. Wouldn't you agree? Sure it's excessive, but would overdoing it cause any potential problems?


Thread Starter
NWP Engineering.com
iTrader: (128)
Joined: Jul 2001
Posts: 14,065
From: Walstonburg, NC
Also, I took apart my revup and non-revup oil pumps to compare. I figured I'd start a new thread with my findings:
http://forums.maxima.org/all-motor/5...oil-pumps.html
http://forums.maxima.org/all-motor/5...oil-pumps.html
Thread Starter
NWP Engineering.com
iTrader: (128)
Joined: Jul 2001
Posts: 14,065
From: Walstonburg, NC
After talking with nismology. He mentioned that he's seen the ARP bolts not stretch to spec (.0065" longer) even after 5 tightens at 28ft-lbs. So I went back and tightened it another 3 times to make for a total of 6 since I do not have a stretch gauge.


Thread Starter
NWP Engineering.com
iTrader: (128)
Joined: Jul 2001
Posts: 14,065
From: Walstonburg, NC
Got my stuff from DaveB!!
1) HR Head Gaskets (stronger and better coolant flow)
2) HR Valve Springs (stiffer)
3) HR Head Bolts (stronger and longer)
4) HR Valve Seats (double shimmed)
5) Valve Seals
6) 6th gen RH Valve Cover (must cheaper than 5.5 gen)
7) Valve Cover Gaskets
8) Exhaust Manifold Gaskets
9) Crank Seal, Orings, CVTC Gaskets, Oil Pan Seals, Axles Seals, etc
Thread Starter
NWP Engineering.com
iTrader: (128)
Joined: Jul 2001
Posts: 14,065
From: Walstonburg, NC
I used acetone, rags, soft wire brush, plastic gasket scrapers, and several hours of elbow grease.

Supporting Maxima.org Member

Joined: Dec 2003
Posts: 678
From: Memphis, TN
Beautiful job in true DIY spirit....BTW, I never thought of plastic scrapers for cleaning soft metal surfaces. Not to sound like a moron, but where did you buy them? Same as the plastic putty/drywall scrapers/blades you can get at Home Depot,etc?
Thanks
Jeremy
Thanks
Jeremy
Thread Starter
NWP Engineering.com
iTrader: (128)
Joined: Jul 2001
Posts: 14,065
From: Walstonburg, NC
I got my plastic scrapers from Harbor Freight. They worked great for cleaning the top of the cylinder walls where the carbon builds up and forms a ring. I didn't want to touch the walls with a wire brush.
Thread Starter
NWP Engineering.com
iTrader: (128)
Joined: Jul 2001
Posts: 14,065
From: Walstonburg, NC
Just uploaded this video. It shows how easy it is to remove the valve keepers and valve springs with this tool. Installation of the keepers is just as fast.
http://www.youtube.com/watch?v=lLfU0Cg47L4
http://www.youtube.com/watch?v=lLfU0Cg47L4
Just uploaded this video. It shows how easy it is to remove the valve keepers and valve springs with this tool. Installation of the keepers is just as fast.
http://www.youtube.com/watch?v=lLfU0Cg47L4
http://www.youtube.com/watch?v=lLfU0Cg47L4
what song was that in the background btw?
Thread Starter
NWP Engineering.com
iTrader: (128)
Joined: Jul 2001
Posts: 14,065
From: Walstonburg, NC
damn... makes me want to change my valve springs just for the hell of it. not that my motor will ever rev high enough to float the valves....... but still. so the installation... how do they not get sucked up in there? or is there an attachment thingy that goes in there for installation, and for removal you just use the outer part of the tool? i thought i saw it as a 2-piece tool in an earlier pic.....
what song was that in the background btw?
what song was that in the background btw?
When you want to install the keepers, you just load them into the retainer and use the black part of the tool which has a spring loaded rod that keeps the keepers towards the outside. Push down and they click right into place perfectly.


I'm wondering why you don't get it installed and on the road before spending so much time and money working on the engine. If you get it in and it's an oil burner or you want to eventually build it up, you can always spend a day pulling it back out and then do what you want with it. I'd personally want to get the custom part of the job over with first though. If it were another VE you're throwing in there I'd understand, but I think you would be pretty safe leaving a 50k miles VQ as is. Anyway best of luck with the swap, seems like you have a pretty solid plan.
Thread Starter
NWP Engineering.com
iTrader: (128)
Joined: Jul 2001
Posts: 14,065
From: Walstonburg, NC
I'm wondering why you don't get it installed and on the road before spending so much time and money working on the engine. If you get it in and it's an oil burner or you want to eventually build it up, you can always spend a day pulling it back out and then do what you want with it. I'd personally want to get the custom part of the job over with first though. If it were another VE you're throwing in there I'd understand, but I think you would be pretty safe leaving a 50k miles VQ as is. Anyway best of luck with the swap, seems like you have a pretty solid plan.
Plus, I am going to pay my neighbor to use his lift and help me install the engine. So it's better for me to just do this engine swap once.
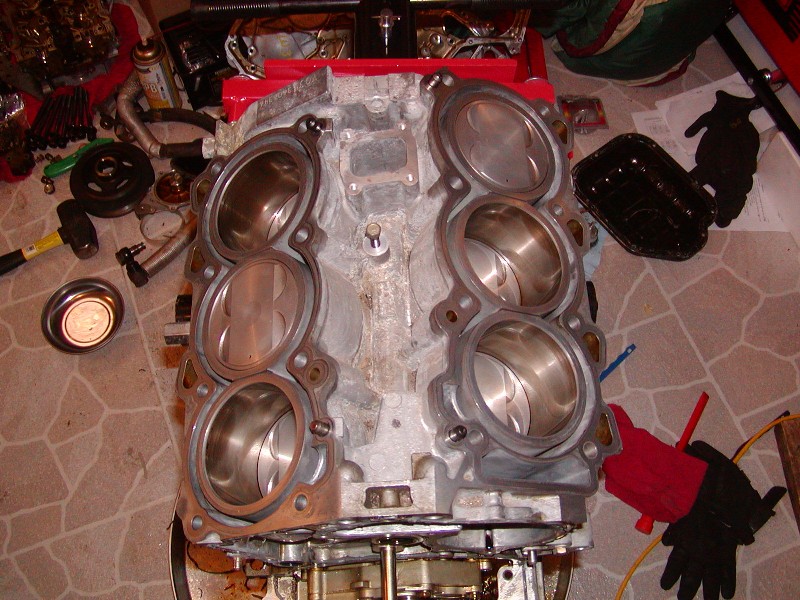
To me, it's a very solid plan. I am certain I can get this engine installed. So I might as well build it up while I have it out of the car and only do the engine install once. The compression and leak down tests were just fine. The cylinder walls and the rod bearings are in perfect shape.
Plus, I am going to pay my neighbor to use his lift and help me install the engine. So it's better for me to just do this engine swap once.
Plus, I am going to pay my neighbor to use his lift and help me install the engine. So it's better for me to just do this engine swap once.

Thread Starter
NWP Engineering.com
iTrader: (128)
Joined: Jul 2001
Posts: 14,065
From: Walstonburg, NC
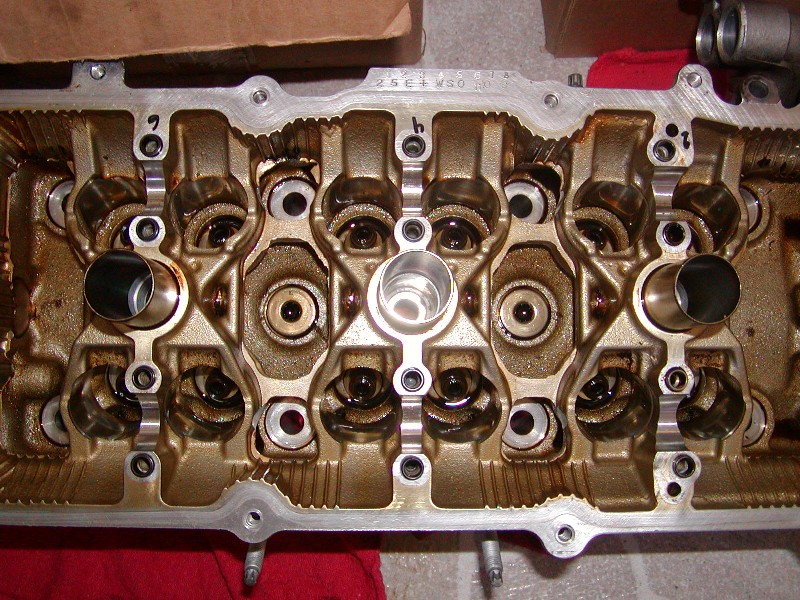
Nope. Nothing new yet. Got the heads disassembled. I'm in the headwork stage.
Very nice! That looks pretty good! 
Thread Starter
NWP Engineering.com
iTrader: (128)
Joined: Jul 2001
Posts: 14,065
From: Walstonburg, NC
Well after 6 weeks of hassling with a salvage yard in SC, I finally got my engine wire harness. Just one little problem though, he said all the connectors were in great condition.


Anybody have any tips? I can get my hands on a good ECU connector pretty easily. But, I will either need to splice and solder every wire or somehow remove each pin maybe.
Anybody have any tips? I can get my hands on a good ECU connector pretty easily. But, I will either need to splice and solder every wire or somehow remove each pin maybe.

It has a screw to hold it right? Should be fine to plug in the way it is, or at least it seems that way based on the photo.
Edit: also I believe you can pop out those colored connectors from the massive grey one, so you shouldnt need to splice/solder.
Edit: also I believe you can pop out those colored connectors from the massive grey one, so you shouldnt need to splice/solder.
Last edited by mikekantor; Dec 5, 2008 at 01:40 PM.
Aaron - I believe all of the connector pins actually come out quite easily. If you take a pic of the wire side of the connector, I can point out how to do it. Just make sure to keep them in order, heh.
mikekantor - No, they have a release latch that locks them into place, much like the Z33/V35.
mikekantor - No, they have a release latch that locks them into place, much like the Z33/V35.
Thread Starter
NWP Engineering.com
iTrader: (128)
Joined: Jul 2001
Posts: 14,065
From: Walstonburg, NC
Yeah, some of the pins are in the large grey connector. So those large pins are the ones I'll swap over. But those colored connectors do come out I noticed. I just don't know how hard it would be to get those colored connectors out of the new connector without damaging too much.
Aaron - I believe all of the connector pins actually come out quite easily. If you take a pic of the wire side of the connector, I can point out how to do it. Just make sure to keep them in order, heh.
mikekantor - No, they have a release latch that locks them into place, much like the Z33/V35.
mikekantor - No, they have a release latch that locks them into place, much like the Z33/V35.
kinda like that? just from the rear side?
I'm lazy splice and solder for me, I would be worried that one of the pins not getting a good connections
plus it would be a great time to make a sub harness for any pig back, monitors devices you may have
plus it would be a great time to make a sub harness for any pig back, monitors devices you may have
The A33 connector is more labor intensive than the Z33 and A32. I can see why companies like Autosport do not like working with it.
Here is a new one disassembled
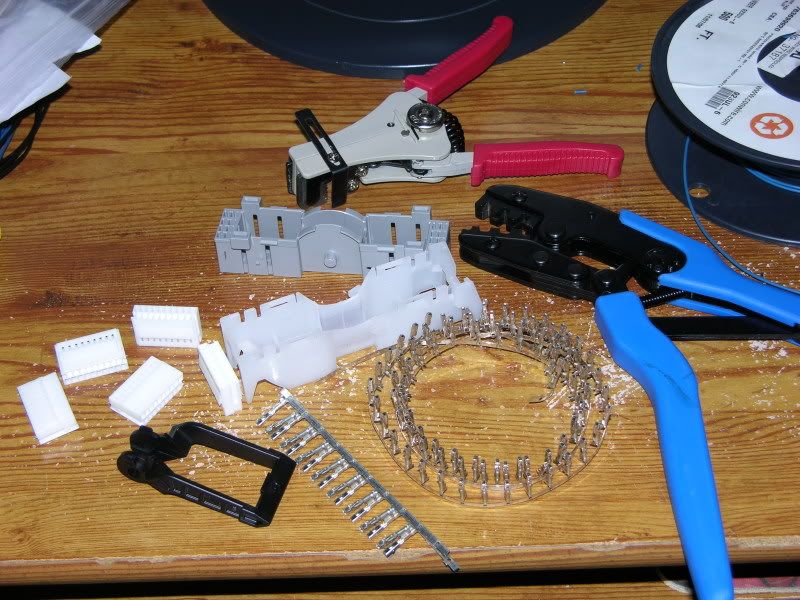
IIRC each of the white terminal blocks has a little plastic "latch" on either end. You release the latches by inserting a pin (or very small precision screwdriver blade) through access holes in the face of the grey connector housing.
Once you have popped the white blocks out, you have to release the pin locks. If you look closely at the picture above you will see that the sides of the blocks open slightly.
Even after opening the sides of the blocks, you still have to unlock each one by prying up lightly on the small white retaining tab to release the terminal.
Once you get the hang of it, it moves along quite quickly.
Here is a new one disassembled
IIRC each of the white terminal blocks has a little plastic "latch" on either end. You release the latches by inserting a pin (or very small precision screwdriver blade) through access holes in the face of the grey connector housing.
Once you have popped the white blocks out, you have to release the pin locks. If you look closely at the picture above you will see that the sides of the blocks open slightly.
Even after opening the sides of the blocks, you still have to unlock each one by prying up lightly on the small white retaining tab to release the terminal.
Once you get the hang of it, it moves along quite quickly.
Thread Starter
NWP Engineering.com
iTrader: (128)
Joined: Jul 2001
Posts: 14,065
From: Walstonburg, NC
The A33 connector is more labor intensive than the Z33 and A32. I can see why companies like Autosport do not like working with it.
Here is a new one disassembled
http://img.photobucket.com/albums/v2...2/DSCN0025.jpg
IIRC each of the white terminal blocks has a little plastic "latch" on either end. You release the latches by inserting a pin (or very small precision screwdriver blade) through access holes in the face of the grey connector housing.
Once you have popped the white blocks out, you have to release the pin locks. If you look closely at the picture above you will see that the sides of the blocks open slightly.
Even after opening the sides of the blocks, you still have to unlock each one by prying up lightly on the small white retaining tab to release the terminal.
Once you get the hang of it, it moves along quite quickly.
bump
still just doing headwork? or other NWP stuff been keeping you busy? just curious how it's coming along (and when i might be allowed to ride out and see it for myself )
)
still just doing headwork? or other NWP stuff been keeping you busy? just curious how it's coming along (and when i might be allowed to ride out and see it for myself
)
Thread Starter
NWP Engineering.com
iTrader: (128)
Joined: Jul 2001
Posts: 14,065
From: Walstonburg, NC
This headwork takes several labor hours to do. I'm expecting to spend over 15 straight labor hours using this die grinder. That's a lot of hours to be hunching over a head or manifold.
I knew it was going to take a while to do the headwork phase. But I really want to get this engine together as soon as possible. But yet, you know I can't rush headwork.
lol Not quite ready. Still doing headwork and NWP stuff keeping me busy. I haven't actually touched the heads in the past several days.
This headwork takes several labor hours to do. I'm expecting to spend over 15 straight labor hours using this die grinder. That's a lot of hours to be hunching over a head or manifold.
I knew it was going to take a while to do the headwork phase. But I really want to get this engine together as soon as possible. But yet, you know I can't rush headwork.
Thread Starter
NWP Engineering.com
iTrader: (128)
Joined: Jul 2001
Posts: 14,065
From: Walstonburg, NC
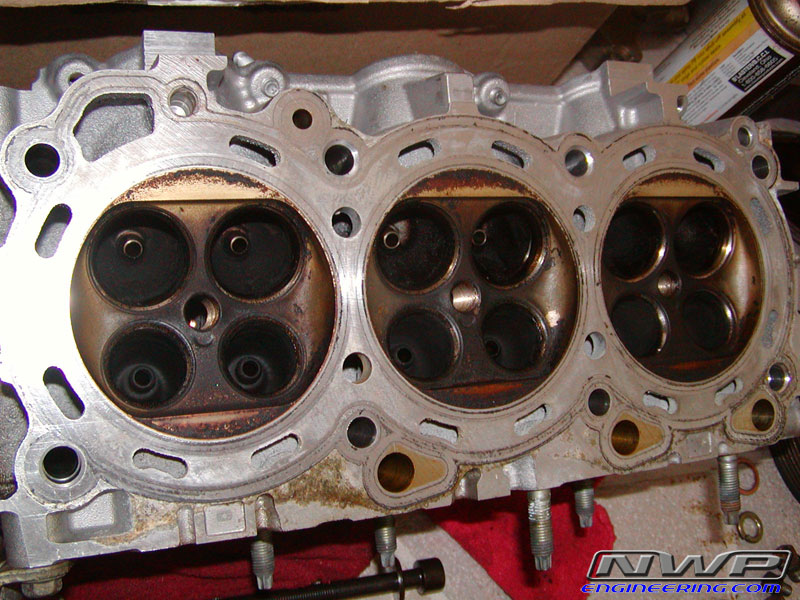
There are a few restrictions I've seen just under the valve seats that can be smoothed out. That is the most crucial spot. Cause if I bump the valve seat with the bit, I am in trouble!
The exhaust ports are just going to be polished to a mirror finish to prevent carbon buildup. I don't plan on port matching them to the headers since you want the headers to be slightly larger than the exhaust ports on the heads.
But as far as the intake, everything needs to be matched perfectly.
Yeah, it will be perfect when it's done. I am only doing a very mild stage of headwork. I'm really only concentrating on port matching the intake ports and not reconstructing the airflow.
There are a few restrictions I've seen just under the valve seats that can be smoothed out. That is the most crucial spot. Cause if I bump the valve seat with the bit, I am in trouble!
The exhaust ports are just going to be polished to a mirror finish to prevent carbon buildup. I don't plan on port matching them to the headers since you want the headers to be slightly larger than the exhaust ports on the heads.
But as far as the intake, everything needs to be matched perfectly.
Thread Starter
NWP Engineering.com
iTrader: (128)
Joined: Jul 2001
Posts: 14,065
From: Walstonburg, NC
Little update: I modified my stock Tstat by installing a little .0750" thick spacer. Now it opens about 15 degrees sooner than before. Thanks Jime!
I just cut a slot in the head of the screws with a dremel cutting disc.

Then I cut a chunk off a spare bolt that I had and filed it down to .0950".

That caused it open around 20 degrees sooner than before. So I took it apart again and filed the spacer down to .0750" and it's about where I think I want it right now (15 degrees sooner). Jime used a .0625" spacer and he says it opens 10 degrees sooner.
http://forums.maxima.org/general-max...hermostat+jime
Also, this headwork is taking a while. So not much of an update there. Here is one finished intake port on the LH head. It's not suppose to have a polished finish.

I just cut a slot in the head of the screws with a dremel cutting disc.
Then I cut a chunk off a spare bolt that I had and filed it down to .0950".
That caused it open around 20 degrees sooner than before. So I took it apart again and filed the spacer down to .0750" and it's about where I think I want it right now (15 degrees sooner). Jime used a .0625" spacer and he says it opens 10 degrees sooner.
http://forums.maxima.org/general-max...hermostat+jime
Also, this headwork is taking a while. So not much of an update there. Here is one finished intake port on the LH head. It's not suppose to have a polished finish.
Aaron that looks great!
Question, Im not a big expert on headwork so please, LEARN ME!
Why is it that you do not want to mirror-finish the intake port?
I understand that yes for the exh side it avoids carbon build up and this helps airflow overall. However, why does the same idea not apply to the intake side? Does keeping it SLIGHTLY rough create a tumbling effect for better mixing with the fuel vapor prior to entering the chamber (which of course, is a good thing! lol)?
From a VW forum:
not only that any, positive flow that may come of this will be negated by possible fuel puddling and reduction in fuel atomization caused by a mirror shine in the intake ports