Ordered front sway bar from Altima SE-R
 07-20-2006, 09:28 AM
#81
Supporting Maxima.org Member

Thread Starter
iTrader: (1)
Join Date: Nov 2004
Location: Upland CA
Posts: 7,353
Is there a way to let me know which bolts I undo on the subframe. Its a bit confusing. Perhaps a picture with some arrows on it would be great. Also, do i need to remove the rear engine mount, or remove something on the rear engine mount?
 07-20-2006, 09:43 AM
#82
ActiveTuning Partner

Join Date: Nov 2001
Posts: 157
There are four huge fasteners on the subframe. You can't miss them when you get under there. The rear two need to be removed and I believe they are nuts. The rear motor mount needs the long horizontal bolt removed from it so the subframe can drop away from the motor/trans.
 07-20-2006, 11:44 AM
#85
ActiveTuning Partner
Join Date: Nov 2001
Posts: 157
Originally Posted by DeusExMaxima
I noted the large fasteners - 17mm or 19mm I think - but I also saw some brackets that appear to be involved. Is that true?
 07-23-2006, 12:56 PM
#93
Supporting Maxima.org Member
Thread Starter
iTrader: (1)
Join Date: Nov 2004
Location: Upland CA
Posts: 7,353
All bolts off except motor mount bolt. I admit, removing subframe bolts is scary cuz it better line up when I put it together. I noticed the subframe dropped a bit, even though I am supporting engine/tranny with a floor jack. Once I figure out the motor mount removal, its time to pry the subframe. There is either one bolt in the middle of the mount, or two bolts at the bottom. Im going to research it and find out which needs to come off. I tried to remove the bar without having to drop subframe, and its impossible. Too many curves in the bar. So far, its been stright forward. I am using air tools and I bought $100 worth of 1/2" drive hardened sockets that are wonderful.
07-23-2006, 02:34 PM
#94
Originally Posted by DeusExMaxima
All bolts off except motor mount bolt. I admit, removing subframe bolts is scary cuz it better line up when I put it together. I noticed the subframe dropped a bit, even though I am supporting engine/tranny with a floor jack. Once I figure out the motor mount removal, its time to pry the subframe. There is either one bolt in the middle of the mount, or two bolts at the bottom. Im going to research it and find out which needs to come off. I tried to remove the bar without having to drop subframe, and its impossible. Too many curves in the bar. So far, its been stright forward. I am using air tools and I bought $100 worth of 1/2" drive hardened sockets that are wonderful.
Kamski
07-23-2006, 02:46 PM
#96
Originally Posted by MAXDOUT04
Hey Kam sorry for O/T but did you ever get that stillen front lip painted and installed yet? also dues hows it coming so far
 LOLLOLOLOL
No no, I'll get it on, still need new bumper and grille. Will do all at the same time.
Kamski
07-23-2006, 03:04 PM
#97

deus i hope everythings coming good...i hope you don't miss allign anything when putting everything back together. good luck we are all looking forward to seeing if this will be the next step in handling perfromance mods.
07-23-2006, 05:00 PM
#98
Supporting Maxima.org Member
Thread Starter
iTrader: (1)
Join Date: Nov 2004
Location: Upland CA
Posts: 7,353
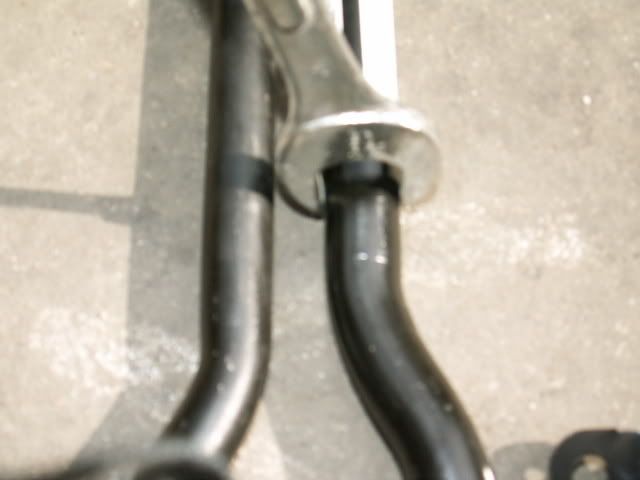
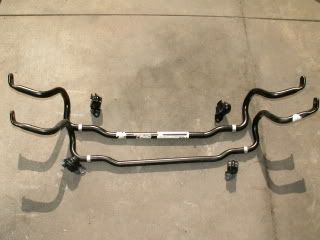
THE BAR IS OUT!!!! Prying that subframe was really a bzitch, but I got it!! Its hard to tell the difference between the OEM bar and the SE-R bar, but using a 15/16" open end wrench, the wrench easily slides over the OEM bar with 2mm gap, whereas the SE-R bar wont allow the wrench to fit over it.
Here is a pic of the bars side by side with wrench over OEM bar:
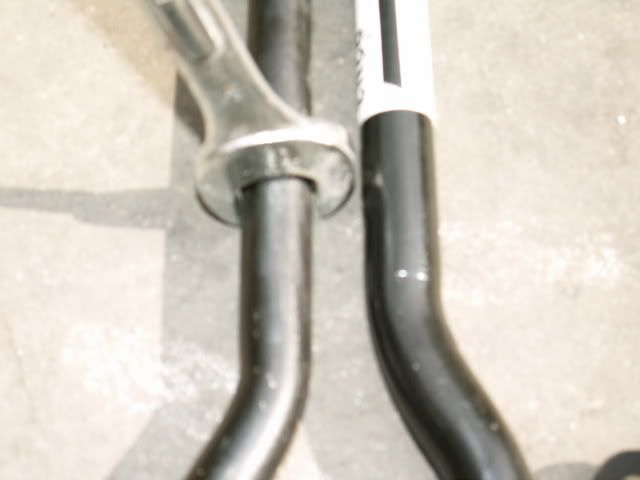
Here is pic with wrench over SE-R bar:
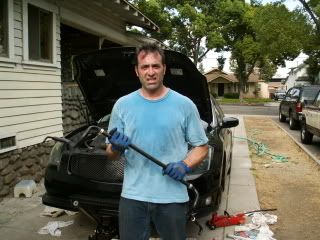
Here is what it looks like when you work in 102 degree temperatures, 100% humidity, and you have to remove a front sway bar:
Time for a dinner break, and Ill see how far I get on the install.
Here is a pic of the bars side by side with wrench over OEM bar:
Here is pic with wrench over SE-R bar:
Here is what it looks like when you work in 102 degree temperatures, 100% humidity, and you have to remove a front sway bar:
Time for a dinner break, and Ill see how far I get on the install.
07-23-2006, 08:48 PM
#99
Originally Posted by DeusExMaxima
THE BAR IS OUT!!!! Prying that subframe was really a bzitch, but I got it!! Its hard to tell the difference between the OEM bar and the SE-R bar, but using a 15/16" open end wrench, the wrench easily slides over the OEM bar with 2mm gap, whereas the SE-R bar wont allow the wrench to fit over it.
Here is a pic of the bars side by side with wrench over OEM bar:
Here is pic with wrench over SE-R bar:
Here is what it looks like when you work in 102 degree temperatures, 100% humidity, and you have to remove a front sway bar:
Time for a dinner break, and Ill see how far I get on the install.
Here is a pic of the bars side by side with wrench over OEM bar:
Here is pic with wrench over SE-R bar:
Here is what it looks like when you work in 102 degree temperatures, 100% humidity, and you have to remove a front sway bar:
Time for a dinner break, and Ill see how far I get on the install.
Do they look the same? It WILL FIT right?
Kamski
07-24-2006, 08:20 AM
#102
Originally Posted by DeusExMaxima
They look EXACTLY the same, except the SE-R bar is thicker. I am confident it will work.
..........................
Props to you for trying it out
I'm next
Kamski
07-24-2006, 10:46 AM
#103
Supporting Maxima.org Member
Thread Starter
iTrader: (1)
Join Date: Nov 2004
Location: Upland CA
Posts: 7,353
Lets see how the install goes . . .can't to try and get that subframe back up. The alignment should not be affected at all. I'll make some time for the install later this afternoon. And, of course Ill keep u posted and take plenty of pics.
07-24-2006, 01:12 PM
#105

Originally Posted by RHMax
Is the SE-R bar heavier, or just thicker?
07-24-2006, 03:45 PM
#106
Originally Posted by DeusExMaxima
Lets see how the install goes . . .can't to try and get that subframe back up. The alignment should not be affected at all. I'll make some time for the install later this afternoon. And, of course Ill keep u posted and take plenty of pics.
 07-24-2006, 09:47 PM
#107
Newbie just Registered

Join Date: May 2005
Location: LA/OC, CA
Posts: 2,795
Originally Posted by !PrjctMax!
I'd assume that it would be a little heavier, considering that the 2mm more of metal and that I believe that it's solid so that would make it heavier as well; but not more than a few pounds imo just like the rear OEM sway bar compared to the Progress/Cattman bar.

 07-25-2006, 07:33 PM
#113
Supporting Maxima.org Member
Thread Starter
iTrader: (1)
Join Date: Nov 2004
Location: Upland CA
Posts: 7,353
Im in the home stretch!! Sway bar fits perfectly!!! I just need to tighten down bushings and bolt in Y-pipe and put wheels on. I'll start another thread regarding how to install and results.
07-25-2006, 07:45 PM
#114
Originally Posted by DeusExMaxima
Im in the home stretch!! Sway bar fits perfectly!!! I just need to tighten down bushings and bolt in Y-pipe and put wheels on. I'll start another thread regarding how to install and results.
Kamski


 07-25-2006, 08:47 PM
#116
Supporting Maxima.org Member
Thread Starter
iTrader: (1)
Join Date: Nov 2004
Location: Upland CA
Posts: 7,353
DISASTER STRIKES!!!! I started the car and the steering somehow got disconnected!!!! When I turn the steering wheel, its doesn't turn the wheels. It feels like its disconnected!!I cant understand how that happened. Im gonna get underthere and find out. I hope I dont have to redo this!!
07-25-2006, 09:59 PM
#118
Supporting Maxima.org Member
Thread Starter
iTrader: (1)
Join Date: Nov 2004
Location: Upland CA
Posts: 7,353
I went under the car to check out the steering rack. It looks fine. I had someone turn the steering wheel, but I couldnt see anything moving leading me to believe that maybe the column broke inside the car when I dropped the subframe down. The steering rack is bolted to the subframe, of course. I need help!!!
07-25-2006, 10:18 PM
#119
Newbie just Registered
Join Date: May 2005
Location: LA/OC, CA
Posts: 2,795
Originally Posted by DeusExMaxima
I went under the car to check out the steering rack. It looks fine. I had someone turn the steering wheel, but I couldnt see anything moving leading me to believe that maybe the column broke inside the car when I dropped the subframe down. The steering rack is bolted to the subframe, of course. I need help!!!
07-25-2006, 11:02 PM
#120
Supporting Maxima.org Member

Join Date: Nov 2000
Location: Reno, NV
Posts: 2,909
Originally Posted by DeusExMaxima
I went under the car to check out the steering rack. It looks fine. I had someone turn the steering wheel, but I couldnt see anything moving leading me to believe that maybe the column broke inside the car when I dropped the subframe down. The steering rack is bolted to the subframe, of course. I need help!!!
Check the splines. The shaft runs into a spine and held with a clamp. It is possible the spline (male side) slipped out when you dropped the subframe. Hopefully you can loosen the clamp and slip the shaft back in the femal side and reclamp it (no pun intended!).