When you click on links to various merchants on this site and make a purchase, this can result in this site earning a commission. Affiliate programs and affiliations include, but are not limited to, the eBay Partner Network.
I am completing this write up to help people save some money.
You can probably buy all of the needed tools for what the dealership would charge. This was an over $400 quote for each side.
Generally, you will replace these in pairs, but it is not absolutely required.
I have 150k miles on my 09.
I purchased replacement assemblies from Rock Auto. The bearing assemblies were $154 shipped for the pair. TIMKEN HA590252
I would recommend new cotter pins as well, but you can make due with the old ones if necessary if you don't break them on removal.
This is a fairly easy replacement as far as complexity, but it is a critical component to your car. I would recommend having some mechanical knowledge and plenty of time if you have not completed something like this before. This took me 3 hours with taking pictures, and an hour of letting penetrating oil soak in. I would say it could be done in as little as 1 hour, or as long as 6 hours if you have never done anything like it before, or need to let the penetrating oil soak in.
I was a mechanic in a previous life and had all of the tools required.
You will need:
32mm socket for the axle nut
22mm sockets for suspension nut/bolt
18 and 19mm wrenches and sockets
You may need some additional sizes that I am forgetting.
10mm (I think, may be. 11 or 12) for the abs/speed ring sensor
Breaker bar
Impact gun
Penetrating oil
8" pry bar
Rubber mallet
Ball peen hammer
Needle nose pliers (to remove and replace cotter pins)
Wood
Bungee cord
Sandpaper or scotchbrite pad
First, you need to properly jack up your car and place it on stands. Then remove the wheel on the corner you will be working on.
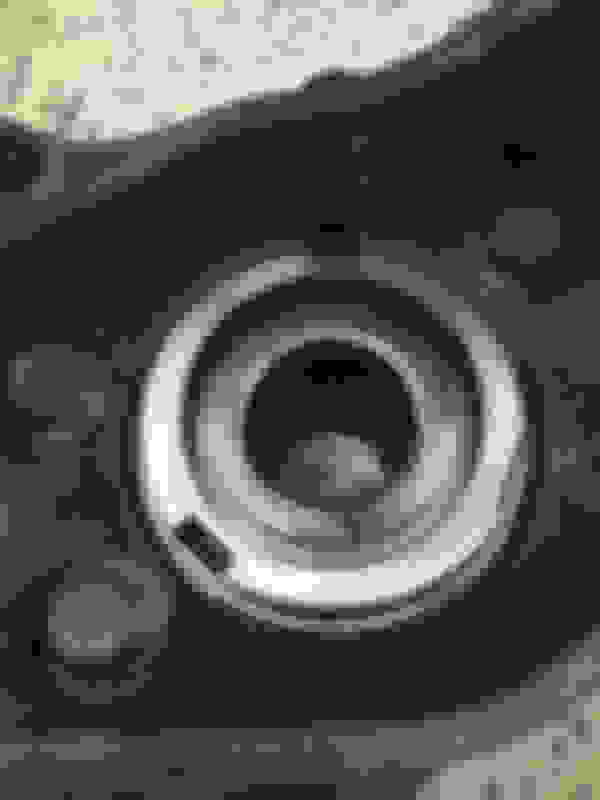
This is the 32mm nut and cotter pin
Remove the brakes. You need to remove the two bolts holding the caliper carrier to the knuckle. You do not need to separate the caliper and carrier.
Then you can take the rotor off and set it to the side. You can then use the short pry bar to remove the brake line clip off the strut to get more room. Set the caliper to the side, but do not hang it from the brake line. I set it on top of a small bucket.
Once the brakes are off, I sprayed the axle nut with penetrating oil. I put an oil catch can underneath to not stain the floor. I also sprayed a bit of oil on the bolts between the knuckle and strut. I also removed the cotter pin at this point.
You then need to remove the axle nut. You can try a breaker bar, but you most likely won't get far. An impact gun will be your friend. My electric gun wasn't quite enough and I had to break out the air impact gun.
The axle nut removed. You can also see the tie rod end in the lower right. This also has a cotter pin that will need to be removed. You will remove the pin, nut and washer, the carefully tap the bolt up to remove the tie rod from the knuckle. You should also remove the abs/speed sensor at this point. It is the small bolt on the side of the knuckle. Just tuck this out of the way.
You will also remove the bolt for the lower ball joint. This must be fully removed for the shaft of the ball joint to be removed from the knuckle in the next step.
You will also remove the two bolts holding the knuckle to the strut.
You then need to remove the axle from the hub. This should slide out fairly easily, just by wiggling and pulling the knuckle outward while pushing in on the axle. I then spun the knuckle 90 degrees, and hung the axle to the side with a bungee cord.
All that should be left holding the knuckle in place is the ball joint.
Use the pry bar to spread the joint around the ball joint rod. This can be achieved by placing the pry bar in the notch, and tapping it in with the mallet. Then you should be able to lift the knuckle off the ball joint.
You then need to remove the 4 bolts holding the hub and bearing to the knuckle. You will also remove the dust sheild on the back of the bearing. This will just pop off with a screw driver. Take note that one of the notches in the dust cover lines up with the hole for the abs sensor.
Last edited by MaximaDrvr; 05-09-2016 at 01:50 PM.
Now it is time to remove the hub assembly.
Place it on the wood blocks so that the hub can drop free of the knuckle.
Then use the hammer to knock the assembly free. Take care to not hit the knuckle around where the bearing slides in.
Now you need to clean up the bearing surface. Use you sand paper or scotchbrite to clean up the inside and any places with corrosion.
Now you can reassemble the knuckle and hub. Place the hub in the knuckle, lining up the bolt holes. You can use the 4 bolts to pull the hub into place. Tighten them by hand in a circular manner, not just one at a time. These should be torqued to 93ft.lbs, or really tight with a 3/4" bar.
Then place the dust cover with one of the notches aligned with the abs sensor hole.
Now we put the knuckle back.
Slide the axle back into the hub, then slide the knuckle back onto the ball joint. Then push the top of the knuckle back into the strut and put in the two bolts. Then put the tie rod end back into the knuckle.
Put the abs sensor back in place and tighten the bolt.
Place the bolt back into the knuckle for the ball joint and tighten.
Place the washer and nut in place on the tie rod and tighten. Then replace the cotter pin.
Put the nuts back onto the strut bolts and tighten.
Place the axle nut onto the axle and tighten. This should be 136ft.lbs. or, really tight with a breaker bar. Then replace the cotter pin.
Next we put the brakes back together.
Put the brake line in place on the strut and replace the clip.
Put the rotor back on the hub, then put the caliper assembly back in place. Tighten the two bolts that hold it in place.
Now you put the wheel back on and you are finished.
(I made a conscious decision to not replace the dust shield. Most of you will want to make sure that the shield is back in place when you reassemble the hub and knuckle)
Last edited by MaximaDrvr; 05-08-2016 at 05:53 PM.
I was going to do this myself, but found out that they are covered on the power train warranty so I dropped it off at the dealer. They did both sides. At the time, I only had 45K miles on it.
Would do it myself if needed again as warranty will probably be history by then.
Very good write up!! I have done this many times on other vehicles and you nailed it.
MaximaDrvr,
quick question, could you access the hub bearing bolts with axle still in place?
This would have simplified the task greatly.
Undo the brakes
Undo 4 holding bolts
Yank the the hub bearing out with sliding hammer
reassemble.
MaximaDrvr,
quick question, could you access the hub bearing bolts with axle still in place?
This would have simplified the task greatly.
Undo the brakes
Undo 4 holding bolts
Yank the the hub bearing out with sliding hammer
reassemble.
I am not answering for the op but I'd think it's pretty safe to say if that was possible he certainly would have don't that instead of completely dismantling his front end like that but you never know right??? LOL
I am not answering for the op but I'd think it's pretty safe to say if that was possible he certainly would have don't that instead of completely dismantling his front end like that but you never know right??? LOL
you know, just out of curiosity, I went out and peaked under the car to see the bolts. The bottom ones are a bit tight, but with the right extension and socket, they will come out like nobody's business. The top ones are clear.
Then I looked at service manual, FAX section page 8 for my 2009. There is nothing there about removing knuckle. Pretty much what I said above as far as removal goes. http://www.nicoclub.com/FSM/Maxima/2009/FAX.pdf
No disrespect to OP, just have some experience doing this type of jobs before. Did a 2010 Honda Pilot front hub bearing assembly last weekend, same deal.
MaximaDrvr,
quick question, could you access the hub bearing bolts with axle still in place?
This would have simplified the task greatly.
Undo the brakes
Undo 4 holding bolts
Yank the the hub bearing out with sliding hammer
reassemble.
Yes, you can do it that way.
I don't have a slide hammer, or the right swivels and extensions anymore.
This method can be done with almost basic tools.
There is only a 4 bolt difference, so maybe 5 - 10 minutes in the grand scheme of things. Also, my way you aren't putting the hub bolts back in blind, and can properly torque them. This is really the difference between doing the job on the ground vs doing it on a lift.
makes sense. The only thing is, when you undo knuckle bolts, you really suppose to do alignment after. I know you can get it close, but still.
Slide hammer can be rented from Advance auto or Autozone via tool loan program. You can buy decent sockets and extensions from Harbor freight for less than cost of alignment.
Anyway, thanks for detailed instructions, those who never done one before will definitely appreciate all thats involved.
No need for the lift whichever way you are doing it. I have been working off jack stands for the last 6 years.
How are the bearing assemblies holding up so far? I need something reliable because this will be the THIRD time I am replacing the front bearings.
Timken typically has top tier bearing NTN, SKF in their assemblies and is my preferred brand for bearings. You should be perfectly fine, and if not, they should have warranty.
Third time for wheel bearings? Are you offroading your Maxima?
No seriously, that should not happen.
Timken typically has top tier bearing NTN, SKF in their assemblies and is my preferred brand for bearings. You should be perfectly fine, and if not, they should have warranty.
Third time for wheel bearings? Are you offroading your Maxima?
No seriously, that should not happen.
Lol I wish the Maxima could be taken off road! The first time I replaced the OEM bearings with a set I purchased from Auto Zone. When those failed a little over a year later, I purchase a set from Advanced Auto. Both sets were some store brand so I guess that could account for the poor quality?
I am going to purchase these that you have installed and I will see how they hold up.
I know this is an older thread...but I am now in the market to replace my CV Axle. So the question arises....should I go ahead and proactively replace the bearing and/or other parts while it's apart?
I have a 2009 with 160k miles on it. I'm not planning to get rid of it anytime soon.
i just finished replacing the hub but didn�t have to remove the knuckle completely. You can get at the 4 bolts holding the hub on if you only remove the 2 bolts holding the knuckle to the strut.
After removing the driveshaft bolt and the abs sensor, remove only the 2 bolts holding the knuckle to the strut.
Pull the top of the knuckle towards you and slide the driveshaft out completely and pull it aside. It will retract all the way and allow you to pull it clear of the knuckle.
Now you can access the 4 bolts holding the hub to the knuckle. Use a breaker bar. I have a nice 3 in 1 bar that has the normal 1/2� at one end and a 1/2� and 3/8� ratchet at the other.
Remove the 4 bolts.
Slide the driveshaft back in the hub and just attach the knuckle back to the strut with one bolt. You don�t need the nut.
Use a hub puller to remove the hub. Don�t use the slide hammer, use the one with the bolt in the middle. The slide hammer one doesn�t have enough umph. You need the driveshaft back in so the puller has something to push on. You need your handy dandy breaker bar for this.
Once the hub comes off, remove the bolt holding the knuckle to the strut and pull the knuckle towards you and move the driveshaft aside again and clean the inside the knuckle with an emery cloth. Sand it out well.
Carefully remove the small white plastic plug and remember where it was on the hub. Install it in the new one.
Put it all back together.
Remember to face the dust shield the right way. I did mine backwards and couldn�t get my rotor back on. Had to take everything back off.
Remember to make sure that that little white piece of plastic isn�t where the abs sensor goes. Had to take everything back off, again. I�m getting real good at replacing the same hub. Got it down to a science now.
When you bolt on the hub, just do one thread on each until all 4 are on. Since the 4 bolts essentially press the hub into the knuckle, don�t fully tighten each one, just until they seat, then do a proper X pattern until they are all fully tightened. Your 3 in 1 breaker is your best friend.
Put your assembled knuckle back on the strut. Line up the knuckle to the strut as you install the driveshaft.
Install the 2 strut bolts, abs sensor and the driveshaft bolt and cottor pin.

 05-08-2016 | 04:48 PM