Carltonator: 18"long/ 6" round Magnaflow
#121
What do you guys think about this. Hvae this shop install the y-pipe as it is now where they quote "doesnt fit with the LTB Stage II" and then go to another shop and see what really gives?
Ugh.. never going here again, it was nice too i could walk to this place from home.
#122
i vote for going to the chop shop to see exactly how it doesn't fit before you pay them any more money to take out the LTB.
i was able to rip out the cats - y-pipe, post main cat without damaging anything. In my driveway too. and this was my 1st time doing it.
i have a similar experience from a shop a while back when i was working crazy OT. they replaced my spark plugs and i asked them to install nwp spacers. they installed 1 and tossed the rest. wasn't happy at all. it's why i rarely leave my car alone at any shop, especially when i'm having them do aftermarket work.
#123
i vote for going to the chop shop to see exactly how it doesn't fit before you pay them any more money to take out the LTB.
i was able to rip out the cats - y-pipe, post main cat without damaging anything. In my driveway too. and this was my 1st time doing it.
i have a similar experience from a shop a while back when i was working crazy OT. they replaced my spark plugs and i asked them to install nwp spacers. they installed 1 and tossed the rest. wasn't happy at all. it's why i rarely leave my car alone at any shop, especially when i'm having them do aftermarket work.
i was able to rip out the cats - y-pipe, post main cat without damaging anything. In my driveway too. and this was my 1st time doing it.
i have a similar experience from a shop a while back when i was working crazy OT. they replaced my spark plugs and i asked them to install nwp spacers. they installed 1 and tossed the rest. wasn't happy at all. it's why i rarely leave my car alone at any shop, especially when i'm having them do aftermarket work.
i think anyone would have to remove the LTB to install the exhaust, but i thought about it and how would they even know how to put it on with out instructions, there is so many factors, im going to go to the shop i got the LTB Stage II installed before and see what they can do.
how did they through out perfectly good product? thats horrible.
i wonder if a shop that excels with exhaust could maybe get a better fit too. I also thought about installing sub frame collers to gain 1/8" or 1/4"... i dont know. sorry for the tangent in this wonderful thread.
its kinda like Dj Freestyles suspension thread but for exhaust!
#124

#128
ok, so in case anyone was wondering, the shop "bent the warpspeed y-pipe" to make it work with the LTB Stage II and i got plenty of clearance. so I am content! end of the day y-pipes fit with a LTB Stage II as blehmco states!
#130
i dont think they bent it, (just said that) they put jack under it and messed with the engine torque.... about 1.5-2 inches clear to LTB.
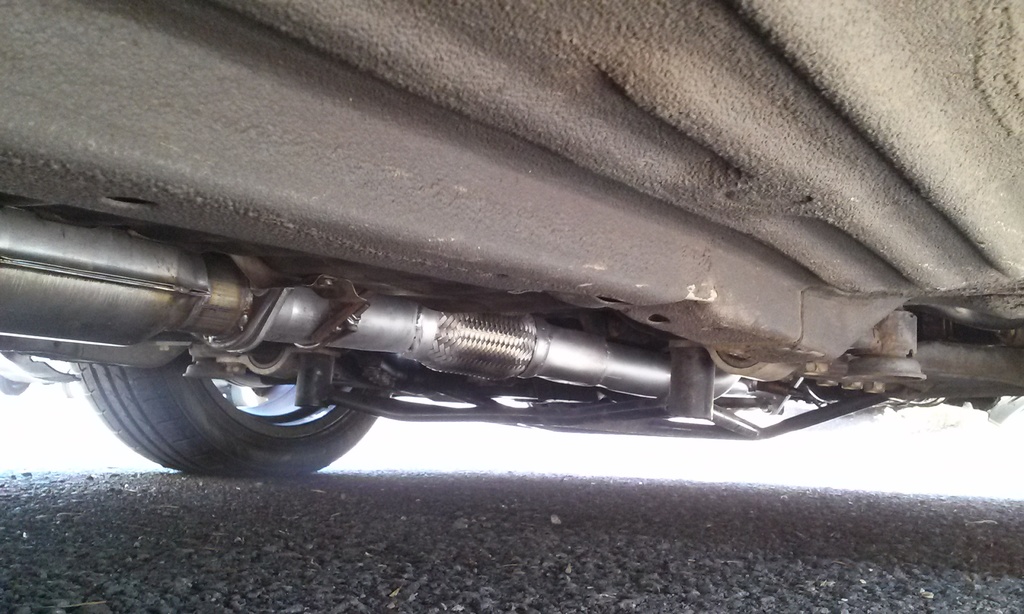
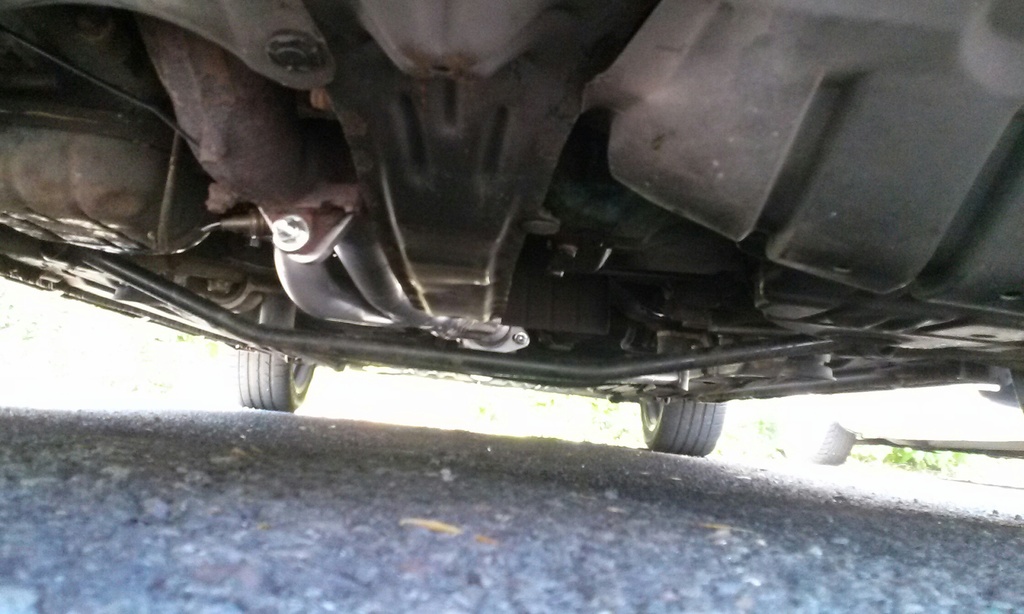
they didnt install the precats, because they didnt have enough time. still gotta put them on.
noise....everything stock but fastcat and ws y-pipe......... quiet as stock, i got on it and it was not loud at all, could hear a little deeper tone but nothing yet...so now we will see with the gutted cats.
#132
road kill is 2nd on the list from man hole covers being worst for LTB clearance. i have learned to hug the inside of the wheels or even go over w wheels instead of dead center.
just driving around more with just a ws-y-pipe and fast cat, the tone is def noticable and maybe at idle i can feel alot more of the exhaust, I can imagine it may get more toney with more miles. lets just say for a person with priorities to keep the exhuast as quiet as possible I am completely happy.
i want to put on the gutted precats within a month. then that will be the final verdict.
#133
Yup, sorry it took a bit longer than expected. Needed some help.
http://vibrantperformance.com/catalo...oducts_id=2391
http://vibrantperformance.com/catalo...oducts_id=2391
So you guys have mentioned that in order to get this installed, I'll have to cut the old one out and weld in the new one..... does this mean I will need to unbolt the Ypipe entirely from the two headers and fast cat?
Last edited by TSelanne; 08-03-2015 at 05:22 PM. Reason: removed pics
#134
Got the flex pipe replaced, thanks again you guys for the link to the correct part. It fit perfectly, didn't need to remove anything except cut out the old flex pipe. The one that came 'stock' with Cattman must have been crappy quality, because 1- it failed really fast, and 2- the car sounds different now than it ever has since the cattman install. Smoother. Lower tone. A bit quieter too, although that's probably more due to the sound coming from the back of the car instead of right under the driver.
Next up, operation 12641. Just came in the mail
Next up, operation 12641. Just came in the mail

Last edited by TSelanne; 08-10-2015 at 09:43 AM. Reason: removed pic
#135
Big Bertha is installed. Jury is still out as to how much quieter it is. We made space for it by cutting off a few inches from the front of the Bpipe. The fast cat was not cut or altered at all (although beforehand I was expecting we'd need to). Took little over an hour. Everything is still bolt-on.
Cross brace removed and Bpipe cut just before the hanger:
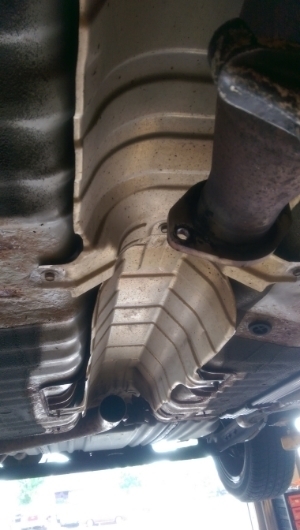
rough fitment prior to welding flanges:
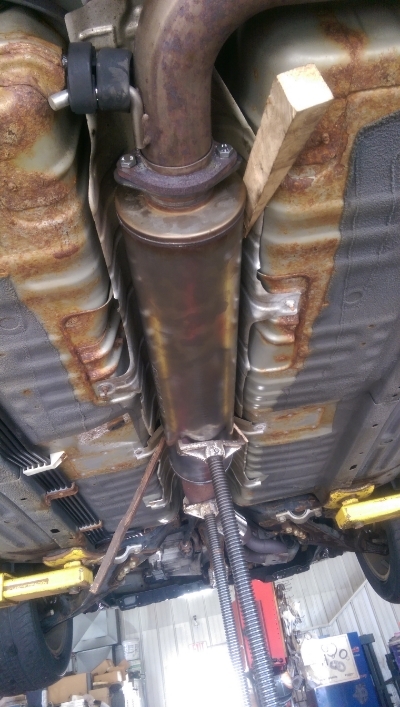
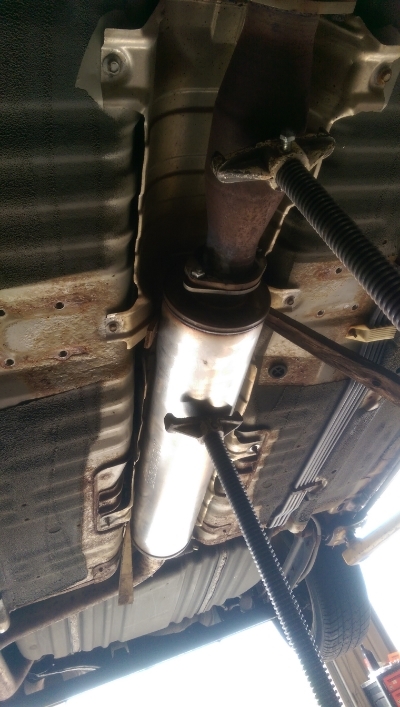
finished:

It was tough to get the Bpipe to not bang against the rear frame, so we altered the hanger (by the rear right tire) with two minor fixes. First was adding a few washers on the left side of the hanger on the top side (can't see in pic, but they're there), and the second was tack welding a washer to the hanger on the lower side. These keep the system from sliding to the left and banging on the frame:
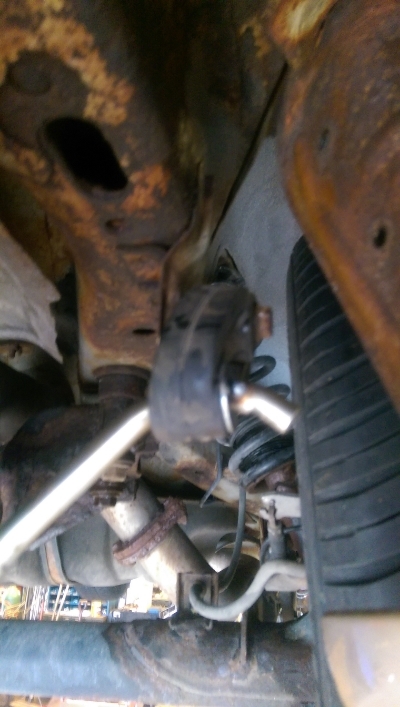
Cross brace removed and Bpipe cut just before the hanger:

rough fitment prior to welding flanges:


finished:

It was tough to get the Bpipe to not bang against the rear frame, so we altered the hanger (by the rear right tire) with two minor fixes. First was adding a few washers on the left side of the hanger on the top side (can't see in pic, but they're there), and the second was tack welding a washer to the hanger on the lower side. These keep the system from sliding to the left and banging on the frame:

#136
Wow! Great looking install! Tucked very nicely!!
Unclear how jury is out if you've driven it. There was a clear difference for me just going from original Cattman res to the Carltinator.
Unclear how jury is out if you've driven it. There was a clear difference for me just going from original Cattman res to the Carltinator.
#137
I said 'jury is still out' because while the car was on the lift I discovered my lower radiator support is completely rotted out
 , so I've been driving very cautiously ever since. But since you're twisting my arm
  ...... yeah the bigB seems a bit quieter. Less than I expected though. Sounds about exactly the same during a cold start and during acceleration, but seems quieter while idling and cruising. Honestly I've never experienced a big difference in volume decrease for any of the resonators. I realize it's a subjective thing and many of you have stated the sound difference is substantial. After changing my resonator three times I've learned that a 3" system will always be loud. Not much you can do about that if you want it wide open. However the 'smoothness' and tone has improved even more with the bigB, and it is a bit quieter I guess. IMHO
edit: got rad support fixed....so I've been driving less conservatively now. Observations are that there's pretty much zero drone and it's nice and quiet when cruising. Doesn't seem any quieter when accelerating.
Also attached vids. One of the 18" and one of the 30". They were recorded with the phone in the same spot (wedged in behind the steering wheel), and on the same exact stretch of road.
Last edited by TSelanne; 10-24-2015 at 12:45 PM. Reason: got off my soap box, added vids
#138
Hey all, I need some creative help.
Wife and I are going to take the max on a 8 hr drive. She doesn't like the 'loud'. Do any of you have ideas for how I can mate the stock muffler to the 3" system? Inlet on stock is 2.25 though.....so idk how to get it to work w the current 3" cattman system.? I'd like to make it easily removable then I can swap out the mufflers when I need it to be quiet.
Otherwise I guess I could just have a separate stock b-pipe setup that can mate to the end of the current big bertha resonator (with a reducer from 3" to 2.25"), but then I'm unbolting two areas every time (and cutting out four very rusty bolts) and switching out two gaskets every time, as opposed to just swapping a muffler.
Any ideas?
Also, anyone have the part number for the SE/AE OEM muffler with the variable flap on the inside? I've been searching all over, but most places either have knockoffs or have the OEM style listed as "does not have OEM valve". I don't want the Bosal or Walker knockoffs, I want the OEM kind with the valve. I see 20100-5Y800 and 20100-3Y370 listed here, but they don't specify the valve:
http://parts.nissanusa.com/nissanpar...partcode=20100
Last edited by TSelanne; 10-24-2015 at 02:09 PM.
#140
Thanks! Gotta think thru that.......so that idea would change the length of the piping though......so the last foot of piping before the muffler would need a 3" flange, and then both mufflers would need a 3" flange.....the stock would need a 3" to 2.25" reducer and a 3" flange, and the cattman would need 3" piping of the same length and a 3" flange. That way they both bolt up in the same location. Do I have that correct?
#142
Hey all, I need some creative help.
Wife and I are going to take the max on a 8 hr drive. She doesn't like the 'loud'. Do any of you have ideas for how I can mate the stock muffler to the 3" system? Inlet on stock is 2.25 though.....so idk how to get it to work w the current 3" cattman system.? I'd like to make it easily removable then I can swap out the mufflers when I need it to be quiet.
Otherwise I guess I could just have a separate stock b-pipe setup that can mate to the end of the current big bertha resonator (with a reducer from 3" to 2.25"), but then I'm unbolting two areas every time (and cutting out four very rusty bolts) and switching out two gaskets every time, as opposed to just swapping a muffler.
Any ideas?
Also, anyone have the part number for the SE/AE OEM muffler with the variable flap on the inside? I've been searching all over, but most places either have knockoffs or have the OEM style listed as "does not have OEM valve". I don't want the Bosal or Walker knockoffs, I want the OEM kind with the valve. I see 20100-5Y800 and 20100-3Y370 listed here, but they don't specify the valve:
http://parts.nissanusa.com/nissanpar...partcode=20100
Wife and I are going to take the max on a 8 hr drive. She doesn't like the 'loud'. Do any of you have ideas for how I can mate the stock muffler to the 3" system? Inlet on stock is 2.25 though.....so idk how to get it to work w the current 3" cattman system.? I'd like to make it easily removable then I can swap out the mufflers when I need it to be quiet.
Otherwise I guess I could just have a separate stock b-pipe setup that can mate to the end of the current big bertha resonator (with a reducer from 3" to 2.25"), but then I'm unbolting two areas every time (and cutting out four very rusty bolts) and switching out two gaskets every time, as opposed to just swapping a muffler.
Any ideas?
Also, anyone have the part number for the SE/AE OEM muffler with the variable flap on the inside? I've been searching all over, but most places either have knockoffs or have the OEM style listed as "does not have OEM valve". I don't want the Bosal or Walker knockoffs, I want the OEM kind with the valve. I see 20100-5Y800 and 20100-3Y370 listed here, but they don't specify the valve:
http://parts.nissanusa.com/nissanpar...partcode=20100
#143
I have a 6th Gen and have the same idea. I have Cattman headers and y-pipe with cat into a single 3" pipe and single 3" Vibrant muffler. Id like the option of bolting on a stock 5th gen muffler with the internal flap when I take long drives. A reducer could be welded on the end of the pipe before the muffler. Has anyone done this, or something similar.
Parts:
Three flanges;
http://www.mandrelbends.com/flanges-...stainless.html
One 3" to 2.25" reducer;
http://www.summitracing.com/parts/sum-652284/overview/
Install:
1- On the pipe that connects the muffler to the B-pipe (the one that runs over the rear beam), make a cut after the rear beam on any straight section (which may be tough because I think that last section of pipe is kindof a continuous bend). Weld one flange to the end of that pipe.
2- Weld the 2nd flange to the pipe that leads to your existing muffler. Bolt it up and you'll have the same as what we have now (3" to 3"), just with two connected flanges instead of one continuous pipe.
3- Weld the 3rd flange to the reducer, and weld the reducer to the stock muffler pipe. Or if there's no more room for pipe, weld the reducer right to the muffler itself.
I'm thinking this method would make it easy to access for swapage, and it's only two bolts to worry about. Boom goes the dynamite.
#144
2.5" flange adapter would work too since at one point I had the Cattman 2.5" system bolted to my stock rear. Not sure it make much difference but I don't like the way that bottle neck looks, 2.5" might be the way to go, even 2.75" since we know that also works with the 2.5" system and stock (Cattman FastCat is 2.75" and bolts to the stock set-up).
I'd also say that with the carltonator, you don't need the stock rear, it's really really quiet and with your 6MT, eve more so...and with the performance to boot, but that's a bit more work for Dues since he's got a lot more to look at under there.
But, let me know how the 3" to 2.5" journey goes, I actually tried bolting the stocker to the Cattman 3".

#145
http://www.xforceusa.com/xforce-prod...-300/cid-/vid-
Same idea as a manually controlled cutout, however it's already installed inside the muffler. It is fully controllable by the driver, so you can drive with an open or closed flap whenever you want. A bunch of examples are on youtube.
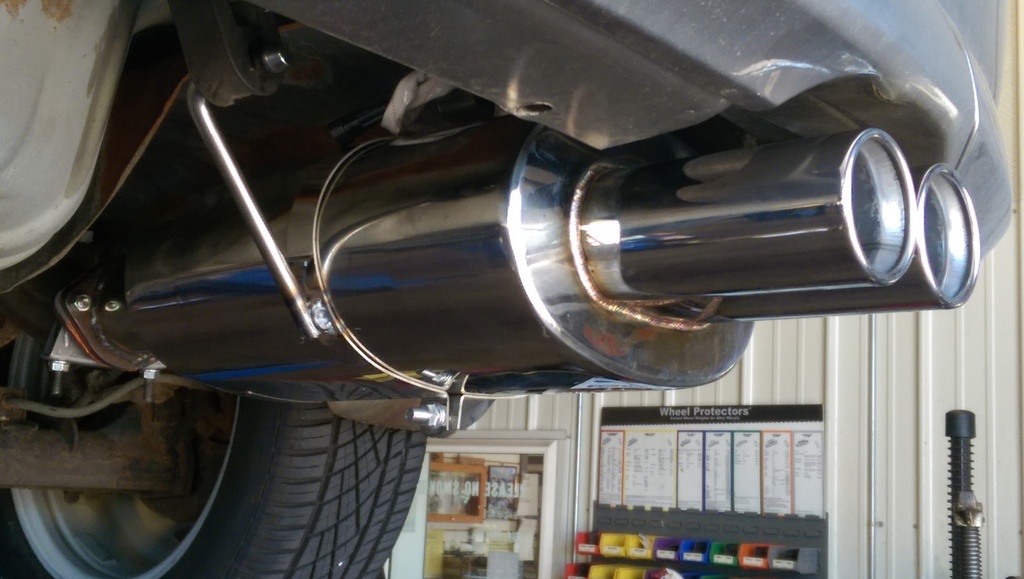
I'm normally pretty cheap, but time has been hard to come by lately so I went ahead and bought it and installed it last week. It's amazing. With the flap open it sounds exactly the same as the full 3" cattman system. When closed, all the noise comes from the front because of the headers, and the back is WAY quieter. When closed it's still a bit louder than a stock setup, yet it still sounds great. No rasp or annoying rattles or anything like that. The volume difference between open and closed is very large, yet the sound is very similar if that makes any sense.
Spot welding flanges & muffler for positioning:
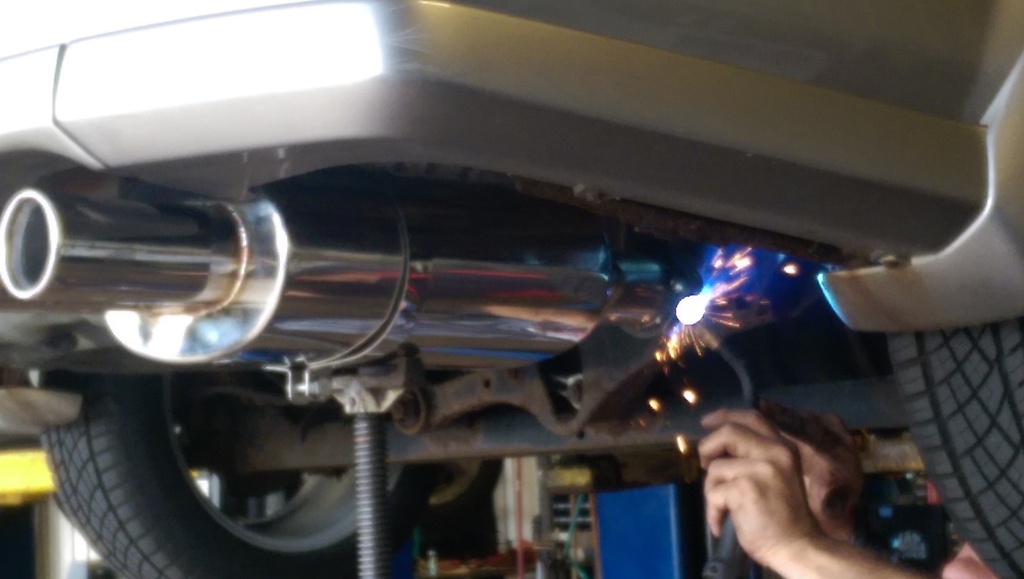
Instead of a hanger we used this contraption to keep the system from moving left and banging the rear beam:
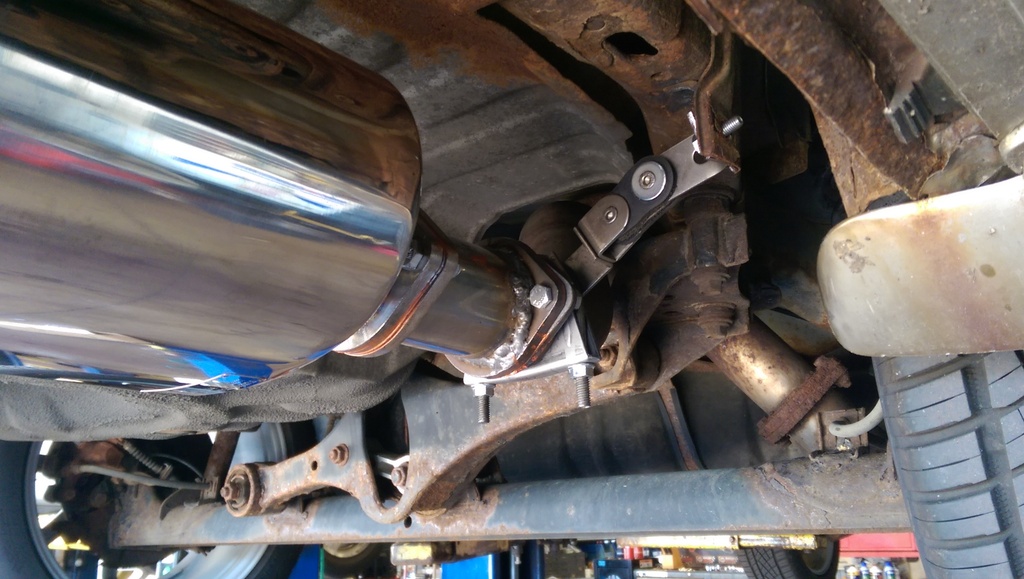
I am worried about the motor controls rusting away, so I added a double flange. This muffler is a bit shorter than the cattman muffler. This way if I ever need to take off the Varex to fix the motor I can swap in the cattman easy peasy:
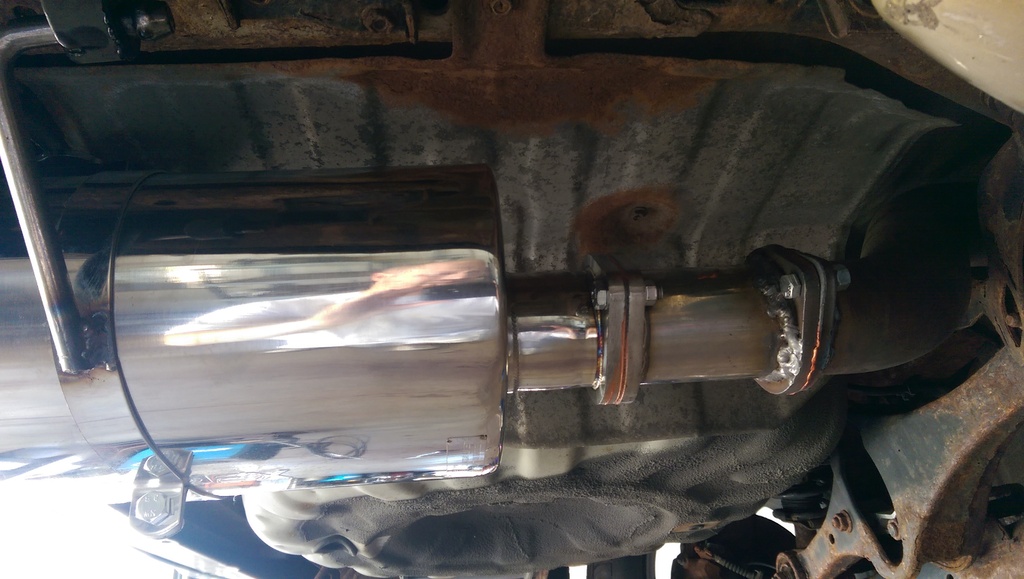
Nice & purty and shiny:
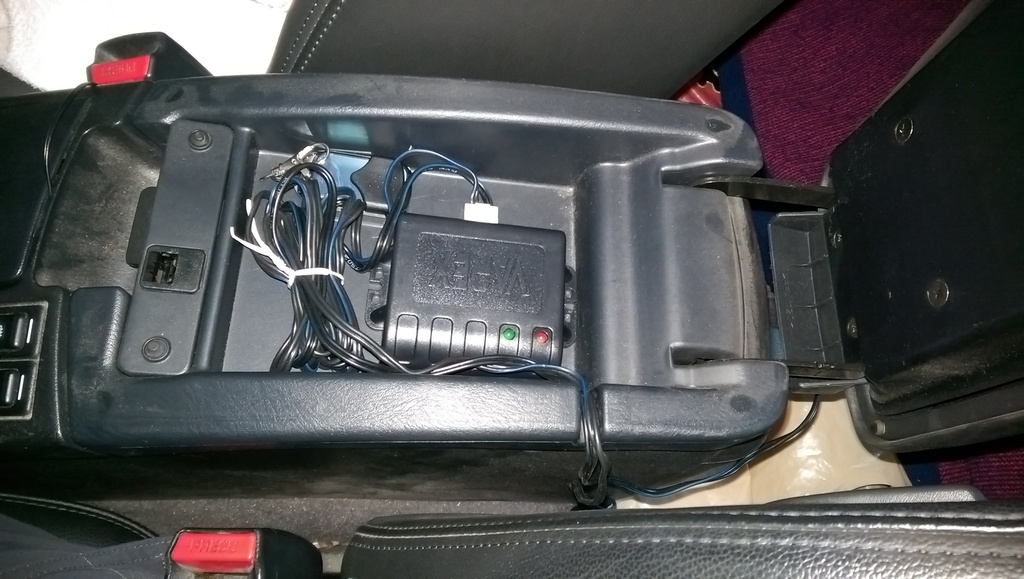
I ran the wiring through the rubber drain cap in the bottom of the spare tire cavity, under the back seat and under the floor mat; plugged it in at the rear lighter outlet, and put the receiver and extra wiring in the top armrest space. I never use that small space anyway so it is perfect.
The remote control thing is kinda annoying.....I don't want it on my key chain so I either hang it from the rear view or leave it in a cup holder. At some point when I get around to it I want to wire it like in the vid below, placing the switch in that dead-switch space next to the interior light dimmer.
Last edited by TSelanne; 08-26-2016 at 07:39 PM. Reason: Added pics
Thread
Thread Starter
Forum
Replies
Last Post
Justin Kroll
5th Generation Maxima (2000-2003)
7
09-02-2015 11:06 AM


