
What do you do to make your engine look pretty? :)
 04-25-2011, 05:46 PM
#961

 04-29-2011, 10:02 AM
#962
I wasn't totally satisfied with the high-temp conduit on the radiator fan wiring, because I had used 1/4" conduit for the long sections.
So I re-did everything based on what I learned the first time around. This time I started by wrapping the wires in electrical tape, and then tucked them inside 3/8" conduit. I think it looks much, much better this way. It sucks when you do something, but have a nagging feeling that it just wasn't good enough.

So I re-did everything based on what I learned the first time around. This time I started by wrapping the wires in electrical tape, and then tucked them inside 3/8" conduit. I think it looks much, much better this way. It sucks when you do something, but have a nagging feeling that it just wasn't good enough.
 04-29-2011, 10:29 AM
#964
I think my reasoning is that calling attention to a coolant hose seemed an odd thing to showcase. Clamps? Sure. But the hose itself? Nah.
Everything is subjective to the eye of the beholder, blah blah blah.

 04-29-2011, 04:05 PM
#967
[quote=Rochester;8023172]No, you can't do that, Spock. There's no room.quote]
Yea, you can. There isn't enough room to go a full 270* from where yours is now, but you'll get~ 250* and that's enough for the ears not to be visable from a front view.
Yea, you can. There isn't enough room to go a full 270* from where yours is now, but you'll get~ 250* and that's enough for the ears not to be visable from a front view.
04-29-2011, 05:45 PM
#968
Maybe I should start actually looking at my car, instead of looking at pictures of my car?

 04-29-2011, 07:35 PM
#970
Junior Member

Join Date: Mar 2010
Posts: 53
I wasn't totally satisfied with the high-temp conduit on the radiator fan wiring, because I had used 1/4" conduit for the long sections.
So I re-did everything based on what I learned the first time around. This time I started by wrapping the wires in electrical tape, and then tucked them inside 3/8" conduit. I think it looks much, much better this way. It sucks when you do something, but have a nagging feeling that it just wasn't good enough.
So I re-did everything based on what I learned the first time around. This time I started by wrapping the wires in electrical tape, and then tucked them inside 3/8" conduit. I think it looks much, much better this way. It sucks when you do something, but have a nagging feeling that it just wasn't good enough.
04-29-2011, 07:38 PM
#971
 05-14-2011, 12:44 PM
#972
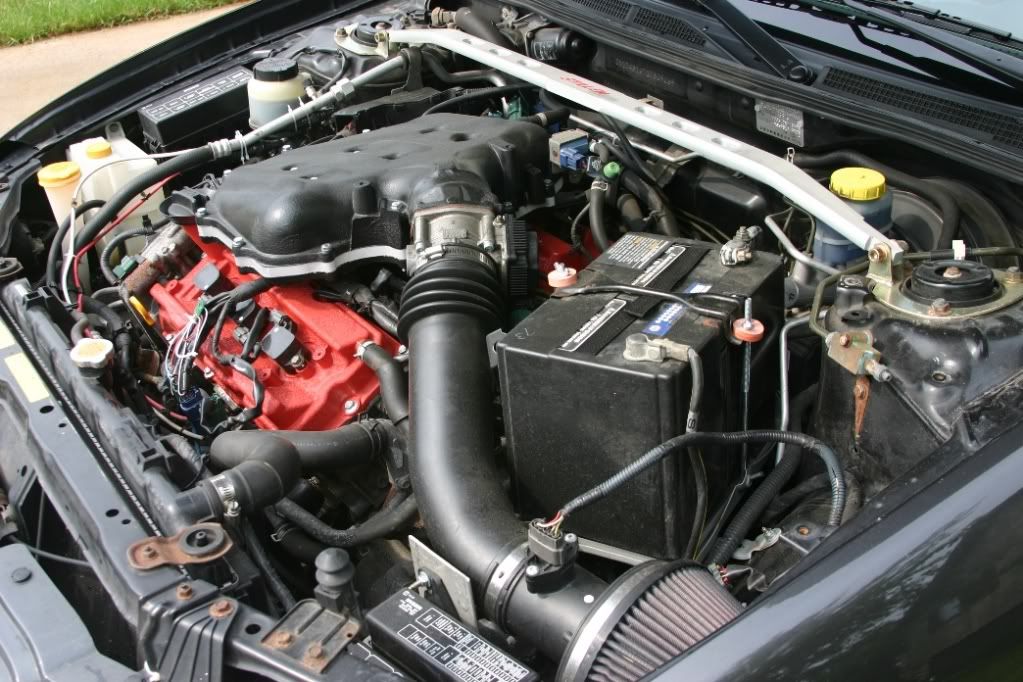
Anybody else using a SRI where you can see the filter gasket?
Well, the one that comes with the Apexi pop-charger is this marble-blue color. I never really liked it.

So I filled-in the visible area (and edge) with a black sharpie, then lightly smoothed it out with black primer.
And while the adapter plate was off, figured I should polish it a little.
Much better.

Well, the one that comes with the Apexi pop-charger is this marble-blue color. I never really liked it.
So I filled-in the visible area (and edge) with a black sharpie, then lightly smoothed it out with black primer.
And while the adapter plate was off, figured I should polish it a little.
Much better.
05-14-2011, 12:58 PM
#973

Anybody else using a SRI where you can see the filter gasket?
Well, the one that comes with the Apexi pop-charger is this marble-blue color. I never really liked it.
So I filled-in the visible area (and edge) with a black sharpie, then lightly smoothed it out with black primer.
And while the adapter plate was off, figured I should polish it a little.
Much better.
05-14-2011, 02:03 PM
#974
I don't really know photography lingo or equipment... the pictures are taken with a 7-year old Canon G3, (which is a 4 megapixel point-n-shoot). The lighting is from a Canon 420EX external bounce flash.
05-19-2011, 05:47 PM
#975
A few weeks ago, I was complaining about the pinch-style hose clamp on the radiator overflow hose. As spock pointed out, you can twist it under and out of the way. But it looks so bare... it doesn't have any presence.
And yes, I know how dumb that sounds. But I'm going with it anyway.

This is a Mr. Gasket 1/4" stainless-steel worm-clamp, with an aluminum cap in a polished titanium finish.

I'm liking it so much, I think I'm going to get a couple more for my evap lines.
And yes, I know how dumb that sounds.
But I'm going with it anyway.This is a Mr. Gasket 1/4" stainless-steel worm-clamp, with an aluminum cap in a polished titanium finish.
I'm liking it so much, I think I'm going to get a couple more for my evap lines.
05-19-2011, 06:04 PM
#976
I love the filter detail Rochester, that looks so much better.
Now on to this clamp, I have to point out my cynical view. You say the old clamp lacks presance, then you toss on a "hey look at me!" clamp
I'm just poking the bear maybe, but I really don't like it, can we get a shot from farther back (overlooking bay). I suspect it sticks out like a sore thumb in your overly clean bay. The other reason I think, is the colour/finish doesn't match the NISMO Rad cap.
Details baby, details.
OAN I still vote for total removal, I think that would look best on that particular hose.
05-19-2011, 08:28 PM
#977

Here's your shot, a little further back and straight on. I'm still liking it.


Last edited by Rochester; 05-19-2011 at 08:32 PM.
05-19-2011, 10:12 PM
#978
Junior Member
Join Date: Mar 2010
Posts: 53
I like the look of the worm clamp. For the valve cover bolts I used a combination of the bench wire wheel and OOO Steel Wool on the top of the nut. I also used 000 Steel Wool with Black Magic Tire Wet to clean up the upper intake manifold. I wonder if a new set of valve cover bolts properly powder coated would hold up to the abuse of a wrench during the install?
05-20-2011, 04:55 AM
#979
That's a great idea. I'm going to keep that one in my pocket as an option when addressing the front VC bolts. I need to buy a good inch/pound torque wrench first.
 05-20-2011, 12:11 PM
#981
And oddly enough, bike stores like this place here, which works out well for you Canadians.

 05-20-2011, 07:00 PM
#985
These weren't from ebay. I purchased them from SummitRacing.com. They come in a titanium finish, black, and polished aluminum. The prices and shipping costs are fair, they support paypal transactions, and the shipment is almost weirdly fast. Very professional.
http://www.summitracing.com/search/D...ress+up&RC=100
Last edited by Rochester; 05-20-2011 at 07:08 PM.
05-22-2011, 09:41 AM
#986
These 1/2" clamps are a really, really tight fit. You have to be patient with their fitment around the hose, particularly when jamming the pipe into it. What I figured out is that if you disconnect every point except for the UIM side of the pieces, you can swivel the entire 3-piece section up for each access. In that way, you can install the middle clamps with their worm-clamp screw to the backside, out of view.
It's a clean look that way, and an easier approach to doing each one at a time.
I also replaced that old yellowed firewall retainer with a couple small black zip ties. And I cut about a 1/2" off the brake-booster end of the hose, so it was a little more flush.
Anyway, I like it.

It's a clean look that way, and an easier approach to doing each one at a time.
I also replaced that old yellowed firewall retainer with a couple small black zip ties. And I cut about a 1/2" off the brake-booster end of the hose, so it was a little more flush.
Anyway, I like it.
05-22-2011, 11:58 AM
#987

These 1/2" clamps are a really, really tight fit. You have to be patient with their fitment around the hose, particularly when jamming the pipe into it. What I figured out is that if you disconnect every point except for the UIM side of the pieces, you can swivel the entire 3-piece section up for each access. In that way, you can install the middle clamps with their worm-clamp screw to the backside, out of view.
It's a clean look that way, and an easier approach to doing each one at a time.
I also replaced that old yellowed firewall retainer with a couple small black zip ties. And I cut about a 1/2" off the brake-booster end of the hose, so it was a little more flush.
Anyway, I like it.
It's a clean look that way, and an easier approach to doing each one at a time.
I also replaced that old yellowed firewall retainer with a couple small black zip ties. And I cut about a 1/2" off the brake-booster end of the hose, so it was a little more flush.
Anyway, I like it.
05-30-2011, 05:33 AM
#988
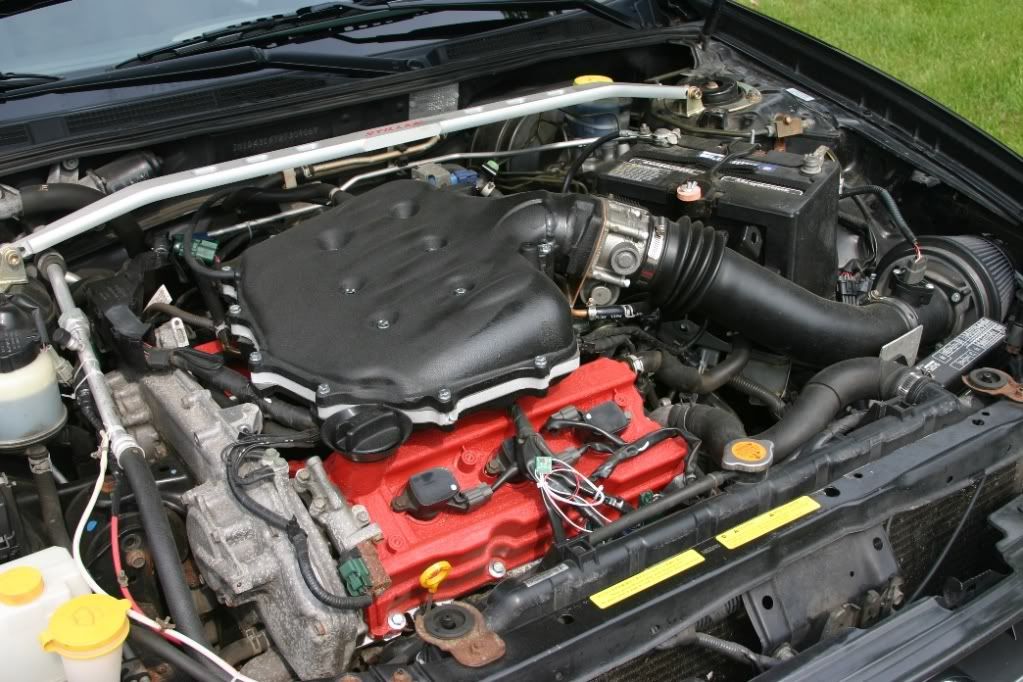
Since I had an extra MAF housing lying around, I painted it black and installed it with the MAF sensor turned around from the 10:00 position to the 2:00 position. Then I applied new high-temp wire conduit, and polished the bolts, brackets and clamps.

06-03-2011, 12:31 PM
#989
For those of you with a SRI, have you ever noticed the front VC breather that goes to that extension on the mid-pipe? That little 5/8" extension is welded directly to the mid-pipe. And the weld is... well, it's a weld. It always looked a little crude to me, but is what it is.
Anyway, I was looking for something in my junk-drawer, and noticed this little rubber washer thing left over from some long ago plumbing project. I was staring at this interesting little thing, thinking, "I can use that somewhere..." -- when it occurred to me exactly where.
It fits perfectly, and gives a nice, finished look. Here's the before:

And here's the after.

Anyway, I was looking for something in my junk-drawer, and noticed this little rubber washer thing left over from some long ago plumbing project. I was staring at this interesting little thing, thinking, "I can use that somewhere..." -- when it occurred to me exactly where.
It fits perfectly, and gives a nice, finished look. Here's the before:
And here's the after.
Last edited by Rochester; 06-03-2011 at 12:45 PM.
 06-03-2011, 06:51 PM
#991

That's OK, I welcome your opinions, Tuner. The finish doesn't match the Rad cap sticker, that's true. But it matches close enough plenty of other items in the bay. For example, the titanium counter-sunks in the JDM fender washers on the engine cover. But not that rusty valve cover bolt... that's still unresolved. Look away from the rusty valve cover bolt.
Here's your shot, a little further back and straight on. I'm still liking it.
Not a democracy, champ.
Here's your shot, a little further back and straight on. I'm still liking it.
Not a democracy, champ.
Looking good Rochester and i have that same rusty bolt lol
06-09-2011, 06:59 PM
#992
Everything is so clean and shiny. Except for your air filter. Time to wash or replace by the looks of it.
Just yankin' your chain, John. You have a lot of patience and pride of ownership.
Just yankin' your chain, John. You have a lot of patience and pride of ownership.
06-09-2011, 07:05 PM
#993
Thanks, spock. That Apexi pop-charger... I replace it every two years.
What I don't have at the moment is a functioning bounce flash. It seems my Canon Speedlite 420EX has died. Which sucks, because I just bought two M10 x 60mm, titanium, tapered allenheads. These are to replace the chrome-steel pins connecting the FSTB to the strut brackets. Unfortunately, I can't take a decent photo at the moment.
My bounce flash is dead.
06-09-2011, 07:18 PM
#994
 06-10-2011, 04:46 AM
#995
This is the EVAP return line from the solenoid to the UIM.
Last edited by Rochester; 06-10-2011 at 04:48 AM.


 06-22-2011, 04:54 AM
#999
Sorry, tcb_02_max, but the pride is in the mods, not the looks. What you've got there is a seriously ugly chick who's awesome in bed.